

Browse All Articles > Mouse Wheel Programming in JavaScript
In this article I'll describe cross-browser techniques for using the mouse wheel (or "scroll wheel") in your JavaScript programming for HTML pages. I'll show example Javascript for option selection and image zooming.
The mouse wheel is generally used for scrolling, but it can also be convenient for other U/I functionality. Image zooming is a common use; for instance in Google Maps, spinning the mouse wheel zooms you in or out. I've seen the mouse wheel used to raise or lower the "camera viewpoint" in first-person 3D games. Another use I've seen is to cycle though a series of objects. In HalfLife, et al., you can choose a weapon with the wheel -- though it's a bit awkward (it's better to use the direct choice keys [1,2,3...] if you want to avoid becoming fragmeat by the time you find the weapon you want.)
I was revising an old JavaScript program I'd written years ago (when mouse wheels were uncommon) and I realized that I could improve the UI by supporting mousewheel events.
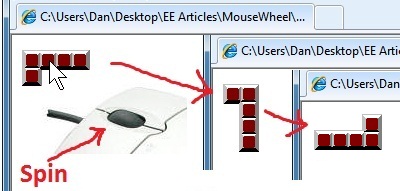
![Pentomino piece selection with the mouse wheel.]() The application is a fascinating puzzle/game called Pentominos. For some background, see the Wikipedia entry. You can see my revised (but unfinished) recreational programming project here.
The application is a fascinating puzzle/game called Pentominos. For some background, see the Wikipedia entry. You can see my revised (but unfinished) recreational programming project here.
The goal of Pentominos is to place all 12 pieces into the puzzle board. But each piece can be rotated and/or flipped in various ways, so there are a total of 62 unique shapes (piece orientations). In the earlier version, each time you click on a piece in the lower frame, it would cycle from one orientation to the next. This version still handles that, but it also lets you use the mouse wheel to spin through the options.
One challenge of supporting the mouse wheel is that there are differences in how each of the major webbrowsers implement the event handling. In the following code, I'll show the basic technique that works for (at least) IE, Firefox, and Chrome.
What do you need to know about a mousewheel event?
In the following code snippets, the HTML page is assumed to include...
Here's the core of this article... the actual cross-browser event handler:
[step="" title="Event Handler"]
[step="" title="Event Handler Setup"]
<img id="oImage" src="PL0.jpg" onmousewheel="SomeFn()">
but using a DoSetup() function like this is the most flexible since it lets you use some cross-browser compatibility logic, as shown.
[/step]
We have an object (oImage) and a way to set up a wheel handler, so now we just need to provide some program code that will do something with or to that object when the mousewheel spins on it. Each "wheel click" will trigger the event which will call your custom function named HandleMouseSpin().
Item/Option Selection
In this first example, we'll cycle through the eight possible orientations for a particular pentomino piece, as illustrated in fig1-1, above. I have eight JPG files named PL0.jpg, PL1.jpg,... PL7.jpg so all I need to do is is change the src attribute of that object to swap-in a different version of the puzzle piece. A "wheel forward" event (delta= +1) goes forward though the list and a "wheel backward" event (delta= -1) goes backward though the list. Upon reaching the end of the list, it wraps to the other end.
[step="" title="Example HandleMouseSpin function"]Item Selection
Image Magnification
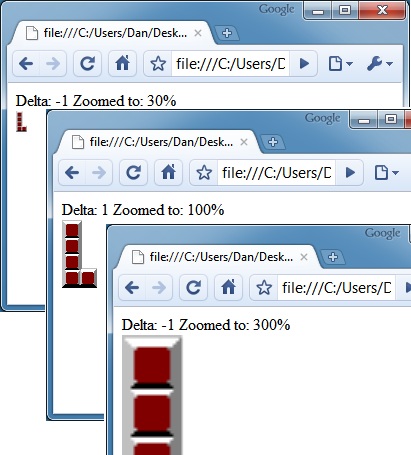
As a second example, we'll use the same HTML, but change the handler so that mousewheel action enlarges or shrinks the image.
![Image zooming with the mouse wheel]() [step="" title="Example HandleMouseSpin function"]Image Zoom
[step="" title="Example HandleMouseSpin function"]Image Zoom
Summary
This article shows how to add cross-browser mousewheel awareness to your HTML pages. Since virtually every mouse has a "scroll wheel" nowadays, it makes sense to use it to enrich the experience of your viewer.
However, you should take care to not override the normal functioning of the mousewheel unless there is good reason...
Users expect to be able to use the wheel for normal page (and textarea) scrolling. But when you have a non-scrolling page, or if you handle the event only on specific objects (not the document or the window as a whole) then it can be a useful shortcut for your users.
=-=-=-=-=-=-=-=-=-=-=-=-=-=-=-=-=-=-=-=-=-=-=-=-=-=-=-=-=-=-=-=-=-=-=-=-=-=-=-=-=-=
If you liked this article and want to see more from this author, please click the Yes button near the:
Was this article helpful?
label that is just below and to the right of this text. Thanks!
=-=-=-=-=-=-=-=-=-=-=-=-=-=-=-=-=-=-=-=-=-=-=-=-=-=-=-=-=-=-=-=-=-=-=-=-=-=-=-=-=-=
The mouse wheel is generally used for scrolling, but it can also be convenient for other U/I functionality. Image zooming is a common use; for instance in Google Maps, spinning the mouse wheel zooms you in or out. I've seen the mouse wheel used to raise or lower the "camera viewpoint" in first-person 3D games. Another use I've seen is to cycle though a series of objects. In HalfLife, et al., you can choose a weapon with the wheel -- though it's a bit awkward (it's better to use the direct choice keys [1,2,3...] if you want to avoid becoming fragmeat by the time you find the weapon you want.)
I was revising an old JavaScript program I'd written years ago (when mouse wheels were uncommon) and I realized that I could improve the UI by supporting mousewheel events.
 The application is a fascinating puzzle/game called Pentominos. For some background, see the Wikipedia entry. You can see my revised (but unfinished) recreational programming project here.
The goal of Pentominos is to place all 12 pieces into the puzzle board. But each piece can be rotated and/or flipped in various ways, so there are a total of 62 unique shapes (piece orientations). In the earlier version, each time you click on a piece in the lower frame, it would cycle from one orientation to the next. This version still handles that, but it also lets you use the mouse wheel to spin through the options.
One challenge of supporting the mouse wheel is that there are differences in how each of the major webbrowsers implement the event handling. In the following code, I'll show the basic technique that works for (at least) IE, Firefox, and Chrome.
What do you need to know about a mousewheel event?
The direction of the spin. We'll set up a delta value of +1 to mean "forward/larger" and -1 to mean "backward/smaller."
Mouse location. The X,Y coordinates in the event object are the same as for mouse clicks, and they can be used without any special handling.
The on-screen object that is in play. This can be determined by the mouse location OR you can assign a separate event listener for each object that can be affected by wheel spins (that's the technique I'll show here).
How much of a spin was given. The mouse wheel itself usually works in single-step increments. You roll the wheel one "notch" at a time, and each "wheel click" is an individual event. It is possible to keep track of these events and synthesize a "velocity" or "distance" even an "inertia" for use in your program, but we won't go into that here.
In the following code snippets, the HTML page is assumed to include...
<body onload="DoSetup();">
                      <div id="oInfo"></div>
<img id="oImage" src="PL0.jpg" alt="The 'L' Piece">Here's the core of this article... the actual cross-browser event handler:
[step="" title="Event Handler"]
function onMouseWheelSpin(e) {
                          var nDelta = 0;
                          if (!e) { // For IE, access the global (window) event object
                              e = window.event;
                          }
                          // cross-bowser handling of eventdata to boil-down delta (+1 or -1)
                          if ( e.wheelDelta ) { // IE and Opera
                              nDelta= e.wheelDelta;
                              if ( window.opera ) {  // Opera has the values reversed
                                  nDelta= -nDelta;
                              }
                          }
                          else if (e.detail) { // Mozilla FireFox
                              nDelta= -e.detail;
                          }
                          if (nDelta > 0) {
                              HandleMouseSpin( 1, e.clientX, e.clientY );
                          }
                          if (nDelta < 0) {
                              HandleMouseSpin( -1, e.clientX, e.clientY );
                          }
                          if ( e.preventDefault ) {  // Mozilla FireFox
                              e.preventDefault();
                          }
                          e.returnValue = false;  // cancel default action
}[step="" title="Event Handler Setup"]
//-------- set up to handle wheel events on object: oImage
                      function DoSetup() {
                          if (oImage.addEventListener) {
                              oImage.addEventListener('DOMMouseScroll', onMouseWheelSpin, false);
                              oImage.addEventListener('mousewheel', onMouseWheelSpin, false); // Chrome
                          }
                          else {
                              oImage.onmousewheel= onMouseWheelSpin;
                          }
}<img id="oImage" src="PL0.jpg" onmousewheel="SomeFn()">
but using a DoSetup() function like this is the most flexible since it lets you use some cross-browser compatibility logic, as shown.
[/step]
We have an object (oImage) and a way to set up a wheel handler, so now we just need to provide some program code that will do something with or to that object when the mousewheel spins on it. Each "wheel click" will trigger the event which will call your custom function named HandleMouseSpin().
Item/Option Selection
In this first example, we'll cycle through the eight possible orientations for a particular pentomino piece, as illustrated in fig1-1, above. I have eight JPG files named PL0.jpg, PL1.jpg,... PL7.jpg so all I need to do is is change the src attribute of that object to swap-in a different version of the puzzle piece. A "wheel forward" event (delta= +1) goes forward though the list and a "wheel backward" event (delta= -1) goes backward though the list. Upon reaching the end of the list, it wraps to the other end.
[step="" title="Example HandleMouseSpin function"]Item Selection
//----------- change the image from PL0.jpg to PL1, PL2,... PL7... PL0
                      var gnOrient = 0;
                      function HandleMouseSpin( nDelta, x,y ) {
                          gnOrient += nDelta;
                          if (gnOrient < 0) gnOrient = 7;
                          if (gnOrient > 7) gnOrient = 0;

                          oImage.src="PL"+gnOrient+".jpg";
                          oInfo.innerHTML = "Delta: " + nDelta + "<br>" + oImage.src;
}Image Magnification
As a second example, we'll use the same HTML, but change the handler so that mousewheel action enlarges or shrinks the image.
 [step="" title="Example HandleMouseSpin function"]Image Zoom
//----------- increase/decrease the size of the image
                      var gnOrigWide = -1;
                      var gnZoomLevel= 100;
                      function HandleMouseSpin(nDelta, x, y) {
                          if (gnOrigWide == -1) {
                              gnOrigWide = oImage.width;
                          }
                          gnZoomLevel += nDelta * 10;
                          if ( gnZoomLevel < 10) gnZoomLevel=10;
                          var nNewWide = (gnOrigWide * gnZoomLevel) / 100;
                          oImage.width = nNewWide;

                          oInfo.innerHTML = "Delta: " + nDelta + "<br>zoomed to: " + gnZoomLevel +"%";
}Summary
This article shows how to add cross-browser mousewheel awareness to your HTML pages. Since virtually every mouse has a "scroll wheel" nowadays, it makes sense to use it to enrich the experience of your viewer.
However, you should take care to not override the normal functioning of the mousewheel unless there is good reason...
Users expect to be able to use the wheel for normal page (and textarea) scrolling. But when you have a non-scrolling page, or if you handle the event only on specific objects (not the document or the window as a whole) then it can be a useful shortcut for your users.
=-=-=-=-=-=-=-=-=-=-=-=-=-
If you liked this article and want to see more from this author, please click the Yes button near the:
Was this article helpful?
label that is just below and to the right of this text. Thanks!
=-=-=-=-=-=-=-=-=-=-=-=-=-
Have a question about something in this article? You can receive help directly from the article author. Sign up for a free trial to get started.
Comments (3)
Commented:
Commented:
Open in new window
Commented:
https://www.experts-exchange.com/questions/25150778/Mousewheel-scroll-focus-and-or-className.html