

Browse All Articles > Understanding Static Routes using VMware Server
Introduction:
Networking is an area of computing where you must be thorough with what you implement. If not configured properly, it causes severe headaches in operations. This may lead to reconfiguring the network afresh.
Virtualization is a concept in which you trick your Operating System to see another computer (or device) connected to it. A subtle example would be the Optical Drives that your computer sees when you install Daemon Tools or Virtual Clone Drive software. Virtual Machines are just an extension of that technology relating to a Computer as a whole rather than a single device.
Basis of this article:
In this article, I will try to explain the implementation of Static Routes using a Virtual Machine and Windows XP.
Before we proceed, I would like you to have a thorough view of this article at Experts Exchange which explains “Static Routes” and “Default Gateways” by keith_alabaster in the best possible manner. My article will just illustrate how we could set it up in a practical environment.
Requirements on part of the reader:
Following will be needed to implement the contents of this article in a test environment-
1. Basic understanding of IP addresses and their behavior in a local area network
2. Installation of windows and applications in a windows operating system
3. Configuration of IP addresses in a windows operating system
4. Licenses for two Windows Operating Systems
5. A copy of VMware server with a valid user license
6. A computer with hardware capable of hosting a VMware server
7. A connection to the internet
8. A router or modem-cum-router capable of implementing static routes
9. A thorough read of the above mentioned article at Experts Exchange
VMware Server:
This is free software from http://www.vmware.com/ but you must register your details with the vmware website in order to download VMware server. After registration, you will be given a free license key to use your product. There are other software too for creation and management of Virtual Machines but VMware Server is more mature which gives ultimate control for a test environment.
To put it briefly, you can create a Virtual Machine (VM as an abbreviation) and Add / Edit / Remove Hardware components with VMware server in an easy way. Moreover you have a much granular control over the network connectivity of your VM. VMware server also supports USB, sound and swap memory which similar competent products may not support.
Virtual Machine installation and basic configuration:
Dealing with the creation and installation of VMs is outside the scope of what I am trying to put forward here and may put this article a bit off the track. For a broad idea, imagine your VM to be a real machine which needs a BIOS, motherboard, Hard Disk, RAM, CPU and other hardware to operate.
The operation of VMs like starting / stopping the VM and hardware addition / removal is done via the VMware interface. The Operating System we install on a VM is called the Guest and the Operating System on which we install VMware server is called the Host.
Treat the VM as a real computer for which you will require legal licenses for the Operating System and other applications. It needs a firewall, Operating System updates and anti-malware software just like a real machine.
All said here, I will be using Windows XP SP3 as the Host and Windows 98 Second Edition as a Guest.
Network Connection Types in VMware server:
It is implied that you have added a NIC (Network Interface Card or Ethernet adapter) to the VM configuration to connect to a network. Remember, it works like a real computer. Vmware Server provides many ways to connect your VM to a Network.
The Host may or may not be directly connected to VM’s network. However, I will be using Bridged Mode in this article. Once again, other modes are outside the scope of this article, so I will not be discussing them.
Bridged Mode:
This is the simplest mode of connection. Imagine the NIC of your VM to be overlapping the NIC of the Host. The physical NIC of the host becomes the communication point of your VM to the external world, much like a Hub that resonates whatever communication it receives.
Keep in mind that if the Host NIC is disconnected from the network (means if a network cable is unplugged), the state of the VM’s NIC will reflect the same.
Microsoft Loopback Adapter:
What if there is no NIC present on the Host? Will we be denied the privilege of using VMware server simply because of this shortcoming? No, you can install a Virtual NIC on your Host for the VM to connect. This is the Microsoft Loopback Adapter.
You can install it the traditional way on Windows XP. Control Panel >> Add Hardware >> Next >> Select, -- Yes I have already connected the hardware >> Next >> Select, -- Add a New hardware device (last option under the list of “Installed Hardware”) >> Next >> Select the second option, -- “Install the hardware that I manually select from a list (Advanced)” >> Next >> Under “common hardware types” select “Network Adapters” >> Under manufacturer, select Microsoft and then in the “Network Adapter” section, select “Microsoft Loopback Adapter” >> Next >> Again click Next, to confirm installing your new hardware >> Finish to exit the installation.
You will find your new hardware listed under the “Network Connections” section in Control Panel as “Local Area Connection x” where x is an integer. It will show as “Microsoft Loopback Adapter” under “Device Name” below “LAN or High-Speed Internet”.
Network Map:
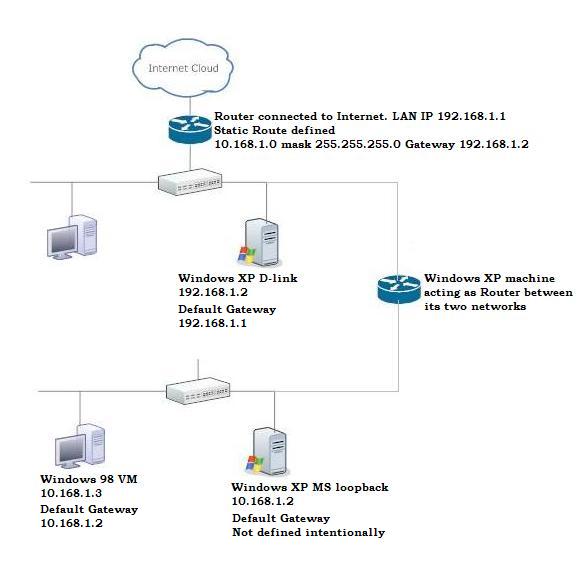
Following will be the map which will form the basis of our network.
![Network Map]()
Configuring the VM and Host network:
I have already installed Vmware Server and a Windows 98 Guest for the test environment. I have also installed a Microsoft Loopback Adapter in my Host XP machine.
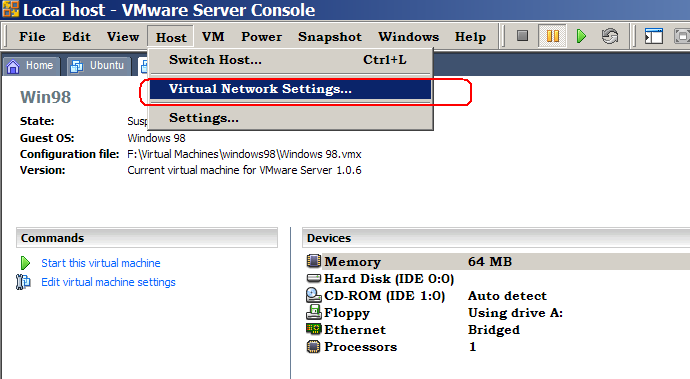
To begin, open the VMware server console and select “Connect to local host” when prompted. Select Host >> Virtual Network Settings to open the Virtual Network Editor Window.
![To Open Virtual Network Editor]()
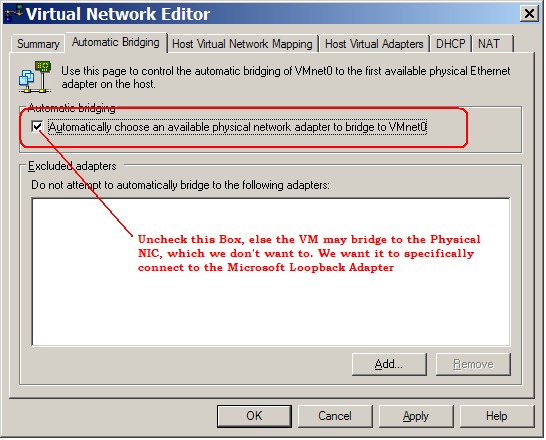
Deselect the automatic bridging option.
![Deselect Automatic Bridging]()
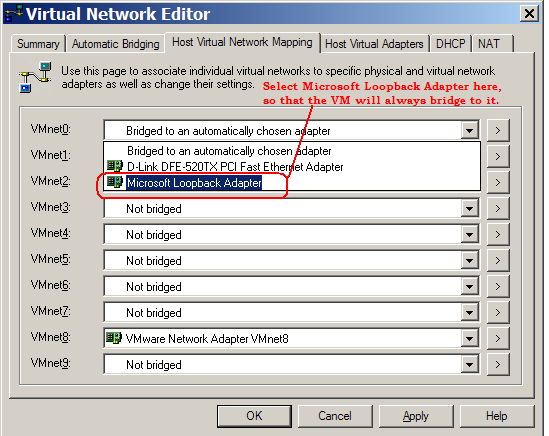
Select “Microsoft Loopback Adapter” under VMnet0 as per screenshot.
![Select Microsoft Loopback Adapter here]()
Hit Apply >> Ok to close the Virtual Network Editor.
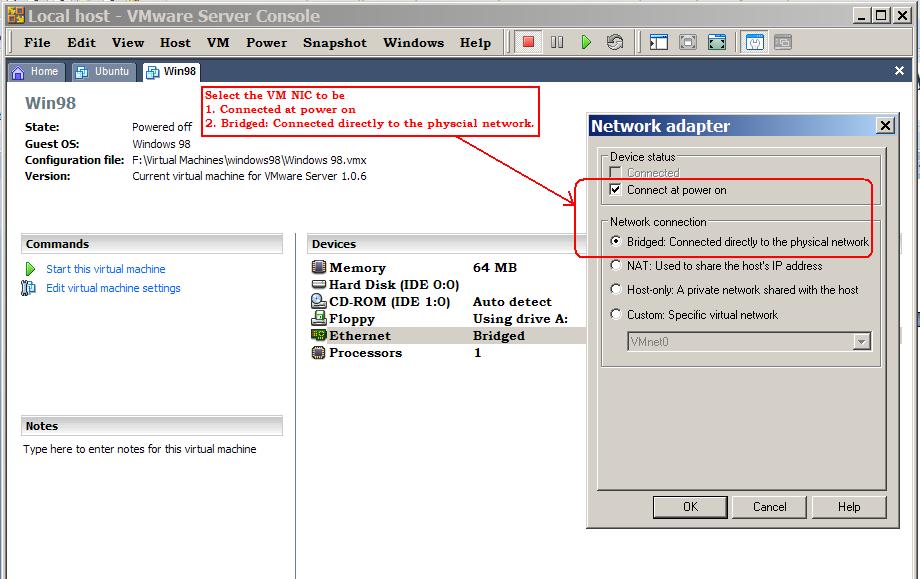
Now, edit the NIC properties of the VM to –
1. Connect at Power On
2. Connect in Bridge mode
![Set NIC properties of VM as per image]()
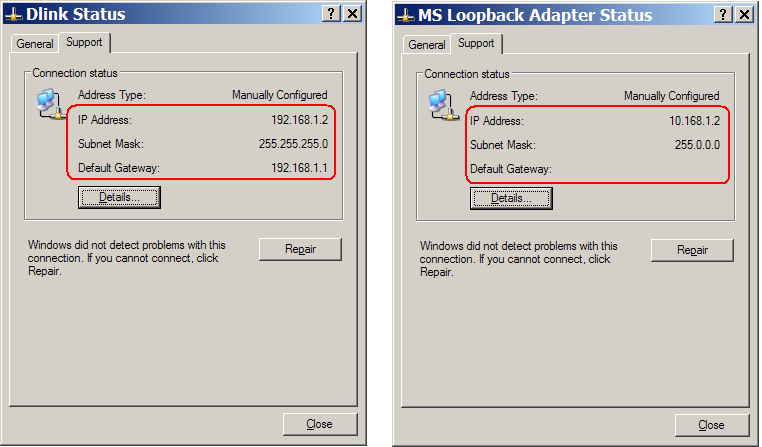
Configure the NICs on the Host as per image.
![Assign IP addresses as per image to Host NICs]()
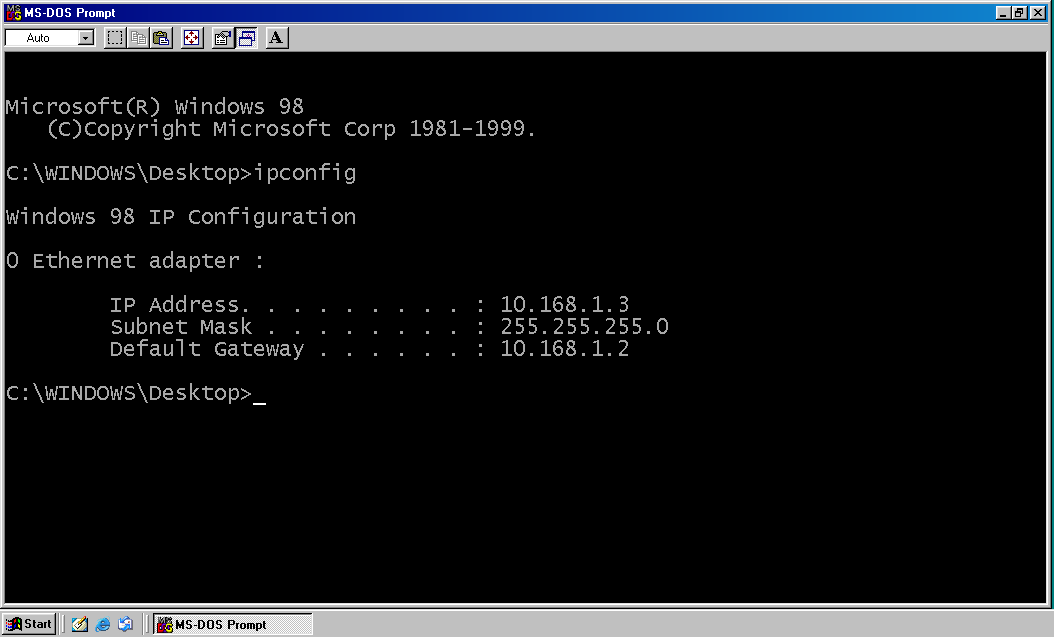
Further configure the NIC on the Guest Windows 98 as per the details in this image.
![Assign IP addresses as per image to Guest NIC]()
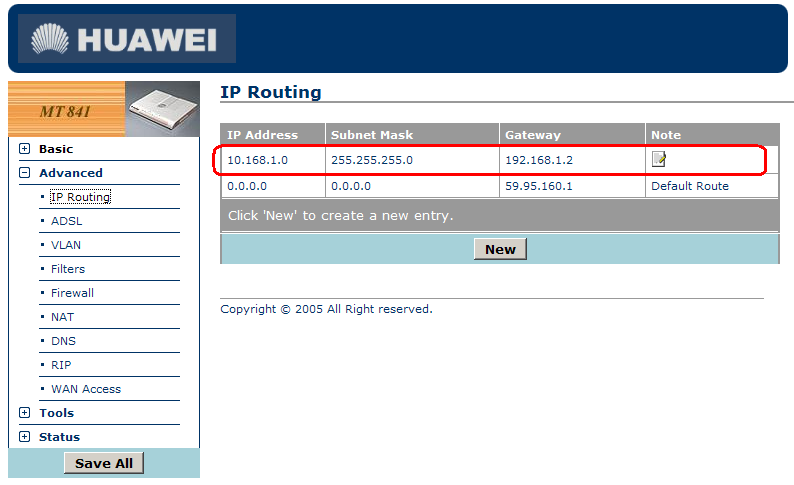
I have setup a static Route in my modem too.
![Setup a static route in your router facing the internet]()
Setting up Windows XP to behave like a Router:
Routing is configured on a W2K Server / Windows Server 2003 machine by use of the RRAS snap-in. However, this console is NOT available on a W2K Pro or XP Pro machine.
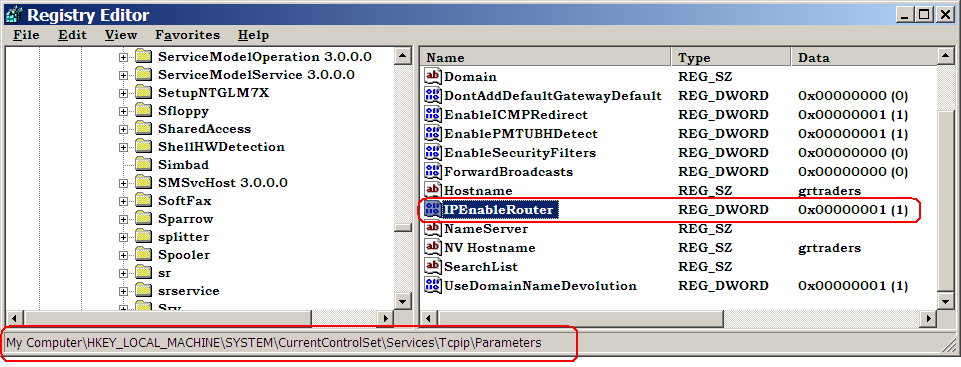
By changing the value of the Windows registry key “IPEnableRouter” to 1 we can enable Routing in a machine running the Windows XP Operating System.
1. In the Run command type Regedit.exe and press Enter.
2. In the registry navigate to HKEY_LOCAL_MACHINE\SYSTEM\CurrentControlSet\Services\Tcpip\Parameters
3. Select the "IPEnableRouter" entry (by default the value is 0) and change it's value to 1.
4. Close Regedit.
5. Reboot.
![Enable Routing in Windows XP host]()
My setup works well with everything in place and the web browser of my Virtual Machine is able to pull pages successfully from the Internet. Below is a screenshot showing the same.
![VM's browser can pull pages from the Internet]()
Key points:
Sources of Reference:
1. Briefly explain gateways, default gateways and static routes.
2. IP Forwarding - How to make Windows XP as a Router
3. Configuring Routing in W2K Pro/XP Pro
Closing comments:
May it interest you this is one of the few articles I have written on Experts Exchange. You may find links to the others at My Member Profile Page. Scroll to the “Skills / Accomplishments Section” to view them all.
Was the read worth it? May I request you, the reader to kindly click the small blue "Yes" button at the end of this article, where it states "Was this article helpful?", if you really did find it helpful. A "No" is also welcome, so that at least I will know that you got through the stuff I wrote.
Please post comments, so that I may improve on it further. Your input will help me to improve and benefit all future readers.
Ravi.
Networking is an area of computing where you must be thorough with what you implement. If not configured properly, it causes severe headaches in operations. This may lead to reconfiguring the network afresh.
Virtualization is a concept in which you trick your Operating System to see another computer (or device) connected to it. A subtle example would be the Optical Drives that your computer sees when you install Daemon Tools or Virtual Clone Drive software. Virtual Machines are just an extension of that technology relating to a Computer as a whole rather than a single device.
Basis of this article:
In this article, I will try to explain the implementation of Static Routes using a Virtual Machine and Windows XP.
Before we proceed, I would like you to have a thorough view of this article at Experts Exchange which explains “Static Routes” and “Default Gateways” by keith_alabaster in the best possible manner. My article will just illustrate how we could set it up in a practical environment.
Requirements on part of the reader:
Following will be needed to implement the contents of this article in a test environment-
1. Basic understanding of IP addresses and their behavior in a local area network
2. Installation of windows and applications in a windows operating system
3. Configuration of IP addresses in a windows operating system
4. Licenses for two Windows Operating Systems
5. A copy of VMware server with a valid user license
6. A computer with hardware capable of hosting a VMware server
7. A connection to the internet
8. A router or modem-cum-router capable of implementing static routes
9. A thorough read of the above mentioned article at Experts Exchange
VMware Server:
This is free software from http://www.vmware.com/ but you must register your details with the vmware website in order to download VMware server. After registration, you will be given a free license key to use your product. There are other software too for creation and management of Virtual Machines but VMware Server is more mature which gives ultimate control for a test environment.
To put it briefly, you can create a Virtual Machine (VM as an abbreviation) and Add / Edit / Remove Hardware components with VMware server in an easy way. Moreover you have a much granular control over the network connectivity of your VM. VMware server also supports USB, sound and swap memory which similar competent products may not support.
Virtual Machine installation and basic configuration:
Dealing with the creation and installation of VMs is outside the scope of what I am trying to put forward here and may put this article a bit off the track. For a broad idea, imagine your VM to be a real machine which needs a BIOS, motherboard, Hard Disk, RAM, CPU and other hardware to operate.
The operation of VMs like starting / stopping the VM and hardware addition / removal is done via the VMware interface. The Operating System we install on a VM is called the Guest and the Operating System on which we install VMware server is called the Host.
Treat the VM as a real computer for which you will require legal licenses for the Operating System and other applications. It needs a firewall, Operating System updates and anti-malware software just like a real machine.
All said here, I will be using Windows XP SP3 as the Host and Windows 98 Second Edition as a Guest.
Network Connection Types in VMware server:
It is implied that you have added a NIC (Network Interface Card or Ethernet adapter) to the VM configuration to connect to a network. Remember, it works like a real computer. Vmware Server provides many ways to connect your VM to a Network.
The Host may or may not be directly connected to VM’s network. However, I will be using Bridged Mode in this article. Once again, other modes are outside the scope of this article, so I will not be discussing them.
Bridged Mode:
This is the simplest mode of connection. Imagine the NIC of your VM to be overlapping the NIC of the Host. The physical NIC of the host becomes the communication point of your VM to the external world, much like a Hub that resonates whatever communication it receives.
Keep in mind that if the Host NIC is disconnected from the network (means if a network cable is unplugged), the state of the VM’s NIC will reflect the same.
Microsoft Loopback Adapter:
What if there is no NIC present on the Host? Will we be denied the privilege of using VMware server simply because of this shortcoming? No, you can install a Virtual NIC on your Host for the VM to connect. This is the Microsoft Loopback Adapter.
You can install it the traditional way on Windows XP. Control Panel >> Add Hardware >> Next >> Select, -- Yes I have already connected the hardware >> Next >> Select, -- Add a New hardware device (last option under the list of “Installed Hardware”) >> Next >> Select the second option, -- “Install the hardware that I manually select from a list (Advanced)” >> Next >> Under “common hardware types” select “Network Adapters” >> Under manufacturer, select Microsoft and then in the “Network Adapter” section, select “Microsoft Loopback Adapter” >> Next >> Again click Next, to confirm installing your new hardware >> Finish to exit the installation.
You will find your new hardware listed under the “Network Connections” section in Control Panel as “Local Area Connection x” where x is an integer. It will show as “Microsoft Loopback Adapter” under “Device Name” below “LAN or High-Speed Internet”.
Network Map:
Following will be the map which will form the basis of our network.
Configuring the VM and Host network:
I have already installed Vmware Server and a Windows 98 Guest for the test environment. I have also installed a Microsoft Loopback Adapter in my Host XP machine.
To begin, open the VMware server console and select “Connect to local host” when prompted. Select Host >> Virtual Network Settings to open the Virtual Network Editor Window.
Deselect the automatic bridging option.
Select “Microsoft Loopback Adapter” under VMnet0 as per screenshot.
Hit Apply >> Ok to close the Virtual Network Editor.
Now, edit the NIC properties of the VM to –
1. Connect at Power On
2. Connect in Bridge mode
Configure the NICs on the Host as per image.
Further configure the NIC on the Guest Windows 98 as per the details in this image.
I have setup a static Route in my modem too.
Setting up Windows XP to behave like a Router:
Routing is configured on a W2K Server / Windows Server 2003 machine by use of the RRAS snap-in. However, this console is NOT available on a W2K Pro or XP Pro machine.
By changing the value of the Windows registry key “IPEnableRouter” to 1 we can enable Routing in a machine running the Windows XP Operating System.
1. In the Run command type Regedit.exe and press Enter.
2. In the registry navigate to HKEY_LOCAL_MACHINE\SYSTEM\
3. Select the "IPEnableRouter" entry (by default the value is 0) and change it's value to 1.
4. Close Regedit.
5. Reboot.
My setup works well with everything in place and the web browser of my Virtual Machine is able to pull pages successfully from the Internet. Below is a screenshot showing the same.

Key points:
The windows 98 machine sees the Microsoft Loopback Adapter on the Windows XP machine as its default gateway and its NIC is configured in that manner.
Routing needs to be enabled in the Windows XP machine. Just having two NICs in place does not make it a Router.
If routing is not in place, the XP machine will forward the traffic in one direction only from Windows 98 VM to ISP Router (as it sees both networks) but will not transfer traffic it is receiving from the Router (facing the internet) to the VM network.
A static Route needs to be defined on the ISP Router that will forward requests received from the 10.168.1.0 network to the IP 192.168.1.2 (Nic on XP machine that is acting as Gateway to Windows 98 VM)
Since there are two routers in place doing their job, the setup works happily even though the Windows 98 machine is on a completely different network.
A static Route may have been required on the Windows XP machine too but Windows adds it automatically to its routing tables, so it was not defined here.
Sources of Reference:
1. Briefly explain gateways, default gateways and static routes.
2. IP Forwarding - How to make Windows XP as a Router
3. Configuring Routing in W2K Pro/XP Pro
Closing comments:
May it interest you this is one of the few articles I have written on Experts Exchange. You may find links to the others at My Member Profile Page. Scroll to the “Skills / Accomplishments Section” to view them all.
Was the read worth it? May I request you, the reader to kindly click the small blue "Yes" button at the end of this article, where it states "Was this article helpful?", if you really did find it helpful. A "No" is also welcome, so that at least I will know that you got through the stuff I wrote.
Please post comments, so that I may improve on it further. Your input will help me to improve and benefit all future readers.
Ravi.
Have a question about something in this article? You can receive help directly from the article author. Sign up for a free trial to get started.
Comments (0)