Configure Exchange 2007 or 2010 to relay email for an additional domain.


Published:
Browse All Articles > Configure Exchange 2007 or 2010 to relay email for an additional domain.
The most common request is how to configure Exchange Server to receive and deliver mail for an additional domain name. This could be because of a company merger, a change in name or you could simply be hosting multiple domains within a single Exchange Organisation. For this you would use an Authoritative Domain. There are however 2 other types of accepted domain that can be created using Exchange Server and these are detailed below.
Accepted Domain Types
There are 3 types of accepted domain in Exchange. These are:
Authoritative Domain
To configure an authoritative domain we can either use the Exchange Management Console or the Exchange Management Shell. This guide will use the Exchange Management Console.
Using the Exchange Management Console navigate to Organisation Configuration > Hub Transport > Accepted Domain. In the action pane on the right hand side select New Accepted Domain. This will start the wizard that will allow you to configure Exchange for a new domain.
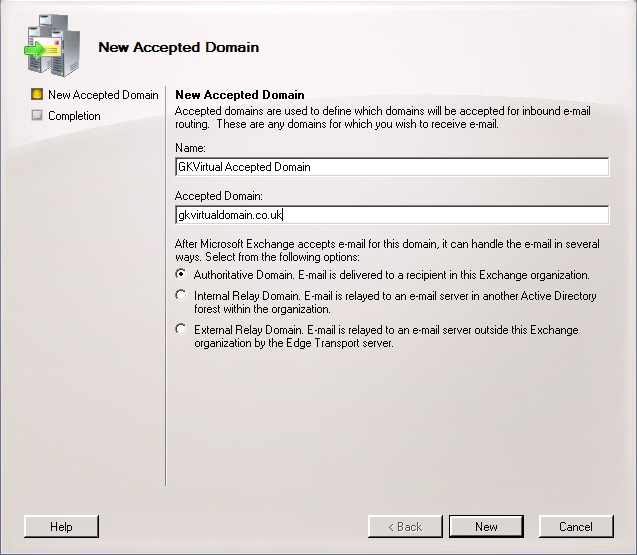
![accepted_Domain_01]() Enter a name for your accepted domain. It doesn’t make any difference what this is but make sure you use a name that will allow you to identify it easily later. If you have a large number it can be quite difficult to identify them. Then in the accepted domain field, enter the domain name for which you want Exchange Server to accept mail from. Click Next.
Enter a name for your accepted domain. It doesn’t make any difference what this is but make sure you use a name that will allow you to identify it easily later. If you have a large number it can be quite difficult to identify them. Then in the accepted domain field, enter the domain name for which you want Exchange Server to accept mail from. Click Next.
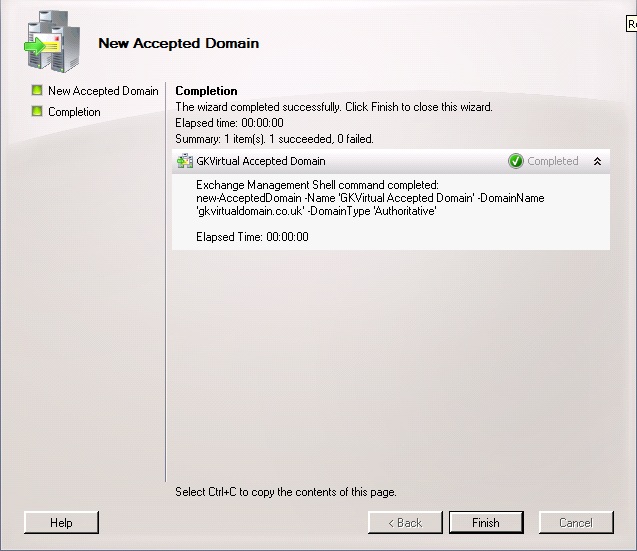
You will then be presented with a screen confirming your entries on the previous screen as below. Click Finish. The process for creating an Accepted Domain that will be used for Internal or External routing is exactly the same except that on the first screen you would select either Internal or External depending on how your needs meet the summary under Accepted Domain Types
![accepted_Domain_02]()
Internal or External Relay
Once you have created an Internal or External Relay domain you need to configure a Send Connector so that Exchange knows where to route the emails for this domain.
To do this, using the Exchange Management Console navigate to Organisation Configuration > Hub Transport and in the Action pane on the right hand side select New Send Connector. This will start the wizard that will allow you to configure your new connector.
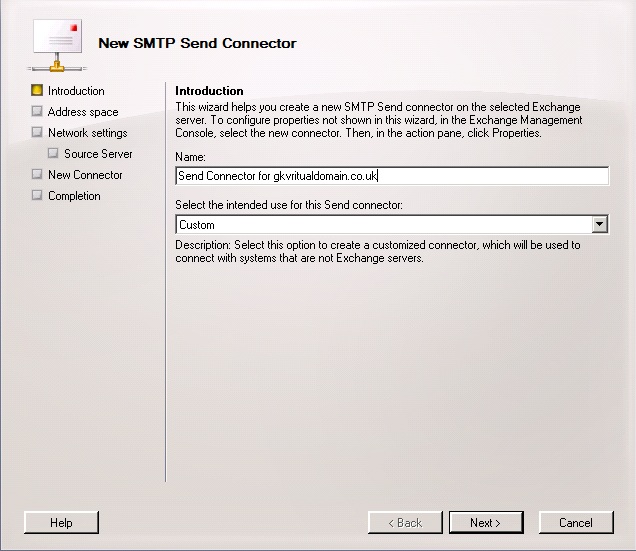
![send_connector_01]() Give the connector a name. Again it doesn’t make any difference what this is but make it something that will allow you to identify the connector later should you need to. From the drop down list of intended uses select Custom. Click Next
Give the connector a name. Again it doesn’t make any difference what this is but make it something that will allow you to identify the connector later should you need to. From the drop down list of intended uses select Custom. Click Next
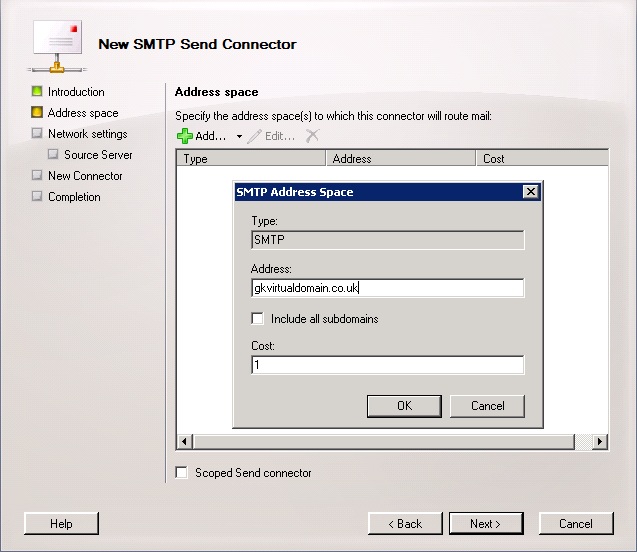
![send_connector_02]() On the screen above click the Add button and enter the domain name that you wish to be forwarded to another server, you can choose to click the box that includes all subdomains or not for example if you had a domain that was mail2.gkvirtualdomain.co.u
On the screen above click the Add button and enter the domain name that you wish to be forwarded to another server, you can choose to click the box that includes all subdomains or not for example if you had a domain that was mail2.gkvirtualdomain.co.uk and you wanted this to go to the same place then check the box. My personal preference would be to setup a separate send connector for this purpose rather than include it in this one. Click OK and then Next.
![send_connector_03]() On the next screen either enter the IP address of the system that you want to send the email to or the Fully Qualified Domain Name (FQDN). Click OK and then Next.
On the next screen either enter the IP address of the system that you want to send the email to or the Fully Qualified Domain Name (FQDN). Click OK and then Next.
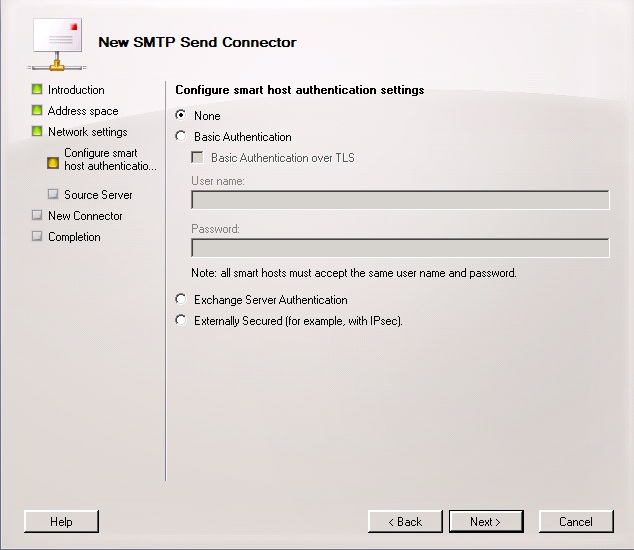
![send_connector_04]() The screen above is where you would enter any authentication that is required to connect to the other system. This is dependent on the system you will be sending mail to. Make your required choices and click Next.
The screen above is where you would enter any authentication that is required to connect to the other system. This is dependent on the system you will be sending mail to. Make your required choices and click Next.
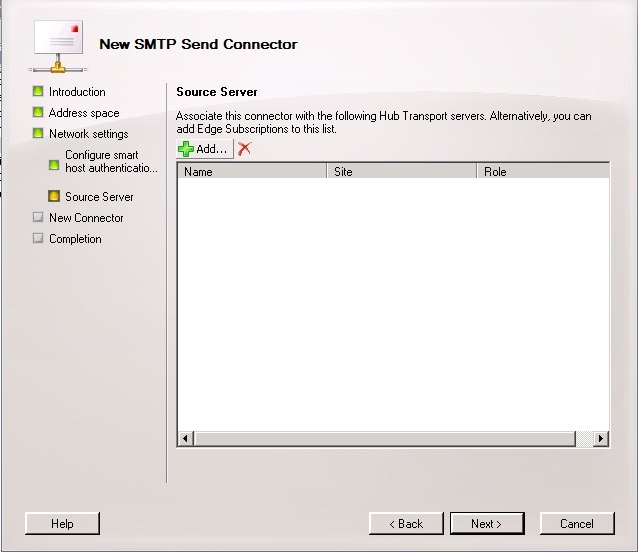
![send_connector_05]() On the Source Server screen you click the Add button and select from the list a server in your organisation that has the Hub Transport role or select an Edge Subscription. Click Next.
On the Source Server screen you click the Add button and select from the list a server in your organisation that has the Hub Transport role or select an Edge Subscription. Click Next.
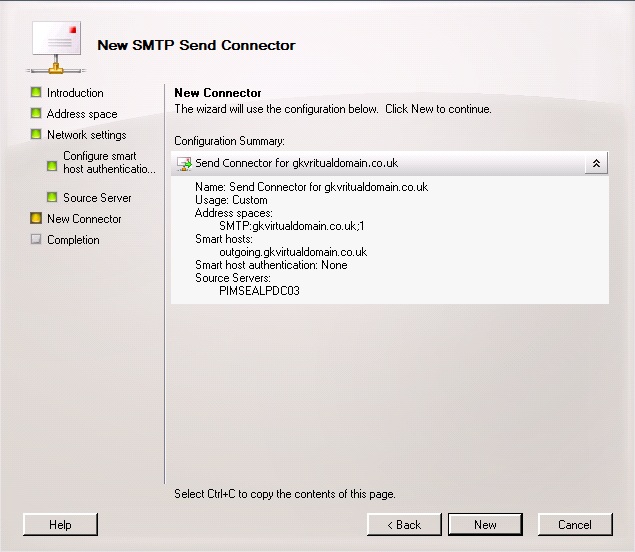
![send_connector_06]() The screen above just confirms the information you have entered in the previous screens, review this here and if necessary use the Back button to make any changes. Once you are happy with the details click the New button.
The screen above just confirms the information you have entered in the previous screens, review this here and if necessary use the Back button to make any changes. Once you are happy with the details click the New button.
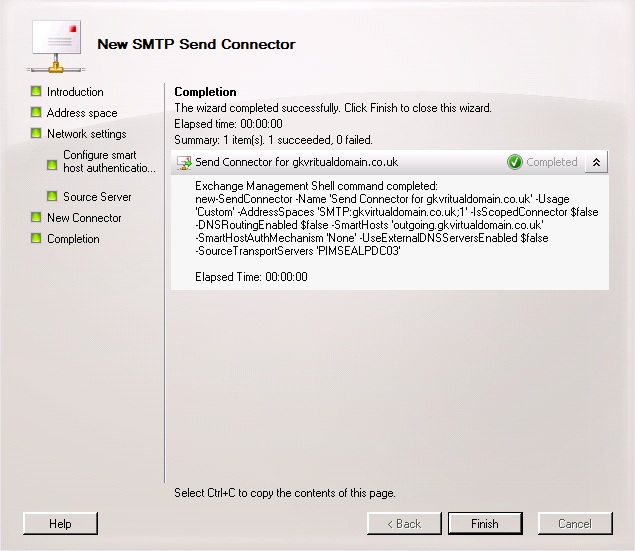
![send_connector_07]() On the final screen you receive confirmation of the Exchange Management Shell command that has been executed and if it’s been successful or not. As with all wizards in Exchange 2007 & Exchange 2010 these completion screens can assist you in getting to grips with the Management Shell commands as it displays the full command that is used. Click on the Finish button to close the Wizard.
On the final screen you receive confirmation of the Exchange Management Shell command that has been executed and if it’s been successful or not. As with all wizards in Exchange 2007 & Exchange 2010 these completion screens can assist you in getting to grips with the Management Shell commands as it displays the full command that is used. Click on the Finish button to close the Wizard.
E-mail address Policy
If you have configured an Authoritative Domain or an Internal Domain then you may want to automatically generate e-mail addresses for new and existing contacts. I tend to use the Company field under the Organisation tab and simply enter the domain name that I want that user to belong to as illustrated in the picture below. The one thing to note here is that if you are specifying a non-standard e-mail address and therefore need to modify the e-mail address policy before it is applied to your users do not enter any criteria here until you have done that as the policies do not remove e-mail addresses, it simply adds an additional ones.
![company_field]() You then need to configure an e-mail address policy to do this in Exchange Management Console navigate to Organisation Configuration > Hub transport and in the action pane on the right hand side select New e-mail address policy. This will start the wizard to create a new policy.
You then need to configure an e-mail address policy to do this in Exchange Management Console navigate to Organisation Configuration > Hub transport and in the action pane on the right hand side select New e-mail address policy. This will start the wizard to create a new policy.
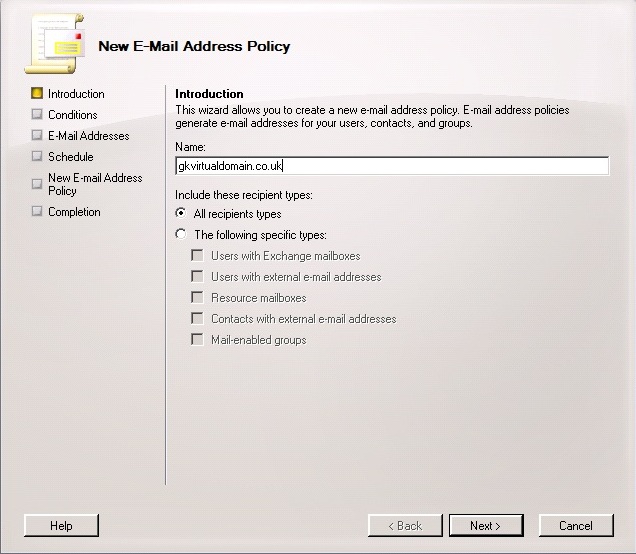
![email_policy_01]() Give the policy a name. As before it doesn’t matter what this name is but make sure it’s something that will allow you to easily identify the policy later if needed. Click Next.
Give the policy a name. As before it doesn’t matter what this name is but make sure it’s something that will allow you to easily identify the policy later if needed. Click Next.
![email_policy_02]() On the Conditions screen this is where you need to define the criteria for the recipients that will receive the new policy. If you want the policy to apply to all recipients then do not define anything here. If you are using the company field like I do then enter the criteria as displayed above. Click Next
On the Conditions screen this is where you need to define the criteria for the recipients that will receive the new policy. If you want the policy to apply to all recipients then do not define anything here. If you are using the company field like I do then enter the criteria as displayed above. Click Next
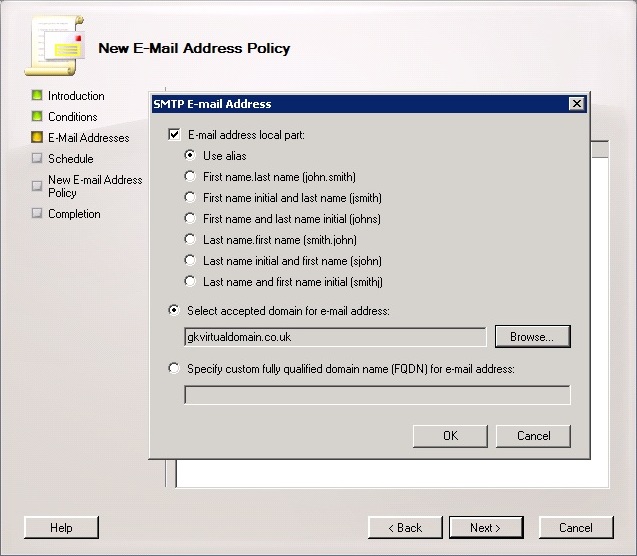
![email_policy_03]() On the E-Mail Addresses screen you need to define what e-mail address will be used by this domain. Select one of the default settings (if there is not one in the list that matches your requirements we can modify it later) then click the Browse button to select the domain you created earlier as an accepted domain. NOTE if the domain isn’t listed then Exchange does not see it as an accepted domain. Once you have selected the domain click OK. Once back at the main wizard right click on the e-mail address it will allow you to edit the format of the address allowing you to define your own local part of the address. The fields you require can be found here: http://support.microsoft.c
On the E-Mail Addresses screen you need to define what e-mail address will be used by this domain. Select one of the default settings (if there is not one in the list that matches your requirements we can modify it later) then click the Browse button to select the domain you created earlier as an accepted domain. NOTE if the domain isn’t listed then Exchange does not see it as an accepted domain. Once you have selected the domain click OK. Once back at the main wizard right click on the e-mail address it will allow you to edit the format of the address allowing you to define your own local part of the address. The fields you require can be found here: http://support.microsoft.com/kb/285136
![email_policy_04]() On the Schedule screen, select when you would like the schedule to run. This process does not stop any services but if you have a large amount of users it could take some time to apply and may cause a slight degradation of service. Click Next.
On the Schedule screen, select when you would like the schedule to run. This process does not stop any services but if you have a large amount of users it could take some time to apply and may cause a slight degradation of service. Click Next.
![email_policy_05]() Check the details in the confirmation screen and if you are happy with it click New. If there are any changes to be made click Back.
Check the details in the confirmation screen and if you are happy with it click New. If there are any changes to be made click Back.
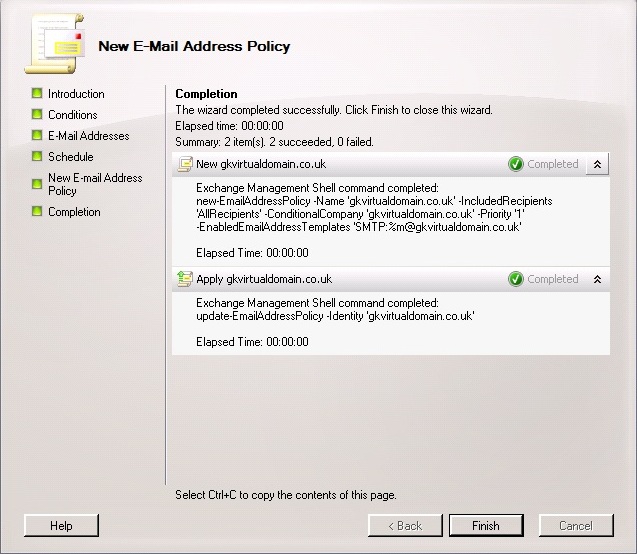
![email_policy_06]() The final page of the wizard will confirm the Exchange Management Shell commands that have run and will advise if the creation of the policy and application to the recipients was successful. Click Finish to complete the Wizard.
The final page of the wizard will confirm the Exchange Management Shell commands that have run and will advise if the creation of the policy and application to the recipients was successful. Click Finish to complete the Wizard.
DNS Configuration
The final part is the DNS Configuration. You need to configure the MX record for the new domain to use the A record that matches your rDNS (PTR) record. This is the only think that needs to be changed. As your Exchange server will connect to recipient SMTP services using the same IP address regardless of what domain you are sending from you only need 1 rDNS record. The DNS configuration for Exchange is explained in more detail in my article here: https://www.experts-exchange.com/articles/Software/Server_Software/Email_Servers/Exchange/Exchange-DNS-Configuration.html
Accepted Domain Types
There are 3 types of accepted domain in Exchange. These are:
Authoritative Domain - This is used when the recipients are configured within the Exchange organisation, for example configuring users within your organisation with an additional e-mail address
Internal Relay– This is used when you share contacts across different mail systems. When this type of accepted domain is configured Exchange Server will receive the mail if there is no mailbox for that address in the Exchange Organisation it will forward it to another server for delivery. This is often refered to as a Shared SMTP Namespace
External Relay – This is used when the Exchange Organisation is responsible for receiving the email but then simply forwards the mail on to another system. In this scenario there would be no mailboxes within the Exchange Organisation for this domain
Authoritative Domain
To configure an authoritative domain we can either use the Exchange Management Console or the Exchange Management Shell. This guide will use the Exchange Management Console.
Using the Exchange Management Console navigate to Organisation Configuration > Hub Transport > Accepted Domain. In the action pane on the right hand side select New Accepted Domain. This will start the wizard that will allow you to configure Exchange for a new domain.
 Enter a name for your accepted domain. It doesn’t make any difference what this is but make sure you use a name that will allow you to identify it easily later. If you have a large number it can be quite difficult to identify them. Then in the accepted domain field, enter the domain name for which you want Exchange Server to accept mail from. Click Next.
You will then be presented with a screen confirming your entries on the previous screen as below. Click Finish. The process for creating an Accepted Domain that will be used for Internal or External routing is exactly the same except that on the first screen you would select either Internal or External depending on how your needs meet the summary under Accepted Domain Types
Internal or External Relay
Once you have created an Internal or External Relay domain you need to configure a Send Connector so that Exchange knows where to route the emails for this domain.
To do this, using the Exchange Management Console navigate to Organisation Configuration > Hub Transport and in the Action pane on the right hand side select New Send Connector. This will start the wizard that will allow you to configure your new connector.
 Give the connector a name. Again it doesn’t make any difference what this is but make it something that will allow you to identify the connector later should you need to. From the drop down list of intended uses select Custom. Click Next
 On the screen above click the Add button and enter the domain name that you wish to be forwarded to another server, you can choose to click the box that includes all subdomains or not for example if you had a domain that was mail2.gkvirtualdomain.co.u
 On the next screen either enter the IP address of the system that you want to send the email to or the Fully Qualified Domain Name (FQDN). Click OK and then Next.
 The screen above is where you would enter any authentication that is required to connect to the other system. This is dependent on the system you will be sending mail to. Make your required choices and click Next.
 On the Source Server screen you click the Add button and select from the list a server in your organisation that has the Hub Transport role or select an Edge Subscription. Click Next.
 The screen above just confirms the information you have entered in the previous screens, review this here and if necessary use the Back button to make any changes. Once you are happy with the details click the New button.
 On the final screen you receive confirmation of the Exchange Management Shell command that has been executed and if it’s been successful or not. As with all wizards in Exchange 2007 & Exchange 2010 these completion screens can assist you in getting to grips with the Management Shell commands as it displays the full command that is used. Click on the Finish button to close the Wizard.
E-mail address Policy
If you have configured an Authoritative Domain or an Internal Domain then you may want to automatically generate e-mail addresses for new and existing contacts. I tend to use the Company field under the Organisation tab and simply enter the domain name that I want that user to belong to as illustrated in the picture below. The one thing to note here is that if you are specifying a non-standard e-mail address and therefore need to modify the e-mail address policy before it is applied to your users do not enter any criteria here until you have done that as the policies do not remove e-mail addresses, it simply adds an additional ones.
 You then need to configure an e-mail address policy to do this in Exchange Management Console navigate to Organisation Configuration > Hub transport and in the action pane on the right hand side select New e-mail address policy. This will start the wizard to create a new policy.
 Give the policy a name. As before it doesn’t matter what this name is but make sure it’s something that will allow you to easily identify the policy later if needed. Click Next.
 On the Conditions screen this is where you need to define the criteria for the recipients that will receive the new policy. If you want the policy to apply to all recipients then do not define anything here. If you are using the company field like I do then enter the criteria as displayed above. Click Next
 On the E-Mail Addresses screen you need to define what e-mail address will be used by this domain. Select one of the default settings (if there is not one in the list that matches your requirements we can modify it later) then click the Browse button to select the domain you created earlier as an accepted domain. NOTE if the domain isn’t listed then Exchange does not see it as an accepted domain. Once you have selected the domain click OK. Once back at the main wizard right click on the e-mail address it will allow you to edit the format of the address allowing you to define your own local part of the address. The fields you require can be found here: http://support.microsoft.c
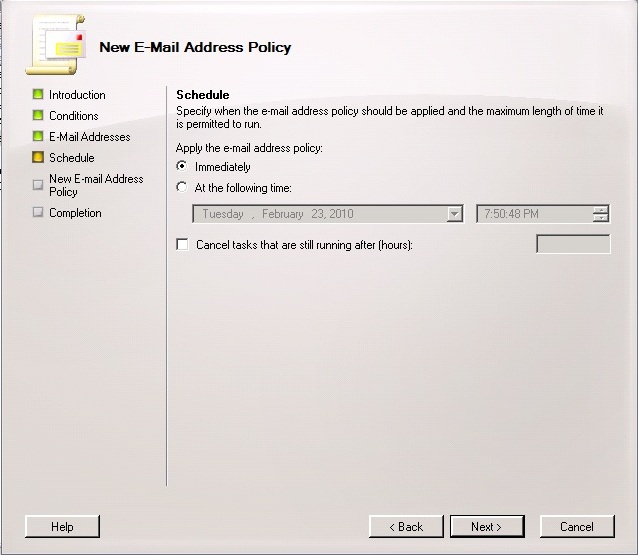 On the Schedule screen, select when you would like the schedule to run. This process does not stop any services but if you have a large amount of users it could take some time to apply and may cause a slight degradation of service. Click Next.
 Check the details in the confirmation screen and if you are happy with it click New. If there are any changes to be made click Back.
 The final page of the wizard will confirm the Exchange Management Shell commands that have run and will advise if the creation of the policy and application to the recipients was successful. Click Finish to complete the Wizard.
DNS Configuration
The final part is the DNS Configuration. You need to configure the MX record for the new domain to use the A record that matches your rDNS (PTR) record. This is the only think that needs to be changed. As your Exchange server will connect to recipient SMTP services using the same IP address regardless of what domain you are sending from you only need 1 rDNS record. The DNS configuration for Exchange is explained in more detail in my article here: https://www.experts-exchange.com/articles/Software/Server_Software/Email_Servers/Exchange/Exchange-DNS-Configuration.html
Have a question about something in this article? You can receive help directly from the article author. Sign up for a free trial to get started.
Comments (1)
Commented:
I will be configuring SMTP name space sharing between different Exchange Organizations.
lets say org1 is the server where MX is pointing and org 2,3 and 4 - all 4 servers are configured as Internal DomainRelay for newdomain.com.
so when email is sent from exchange org3 to the outside world would it be first sent to org1 and then sent to the outside or it will be sent outside straight away.
Im asking as i dont want to be marked as spam, i want all outgoing emails to be sent as @newdomain.com
will i have to make sure each sending server is listed on the SPF record for the newdomain.com
anything else i should be aware of ?
thanks