Automating Hardware Installation in Vista and Windows 7


Published:
Browse All Articles > Automating Hardware Installation in Vista and Windows 7
For all of you desktop administrators out there, automation is the key to success. Using Group Policy, we can automate the deployment of software, settings, printers, drive mappings and pretty much anything else for our users and computers. Hardware, especially roaming hardware, has always been a thorn in our sides! Anytime users get new printers or scanners, we have to install drivers and test drivers. Most of these drivers come with bloatware and applications that simply are not needed. With the release of Windows Vista and Windows 7, Microsoft made huge strides in giving us the tools to automate driver deployment, driver updates, and hardware management. We can use these tools to automate hardware which makes our users happier and our jobs easier!
Task 1: Setting up the Driver Store
Most of us have shares or drives where we keep our software, virtual machines, or downloaded drivers. Some of us probably even have network shares where software is kept for deployment. We have a central store for ADMX files but what about drivers? Well, it is time to create a Central Store for Drivers!
First, set up a network share. All computers and users will need to be able to read/execute drivers from this share so “Everyone” or “Authenticated Users” should have the Read permission on the share and Read/Execute on the folder. No other permissions should be required. For this article, the share name is CentralDrivers.
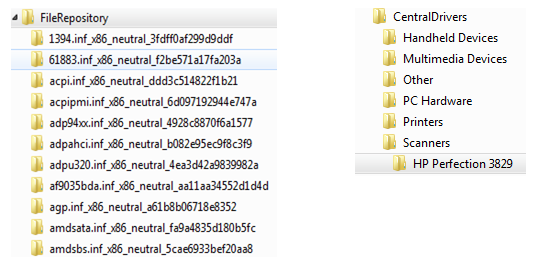
Underneath the CentralDrivers folder, exists sub-folders for common hardware types. The type of hardware dictates have specific I get. For example, under the folder PC Hardware, sub-folders have been created for Audio devices, system boards, and Video Cards. Set up your share in the way that makes the most logical sense for your organization.
![1]()
Task 2: Getting Our Drivers in the Central Driver Store
In Windows XP and below, extracting drivers was a nightmare to do by hand. Drivers could be stored in Program File, Application Data, Windows INF, System32, Temp folders … basically anywhere the driver manufacture wanted to put them.
Vista changed all of this! All drivers, when installed, are loaded into the local DriverStore. The entire packages of any drivers that are installed can be found at C:\Windows\System32\DriverStore\FileRepository\.
You want to automate a scanner install. To automate the scanner install, we must first put this scanner driver in the Central Driver Store. After installing the scanner driver on a test machine, open up the locate driver store (C:\Windows\System32\DriverStore\FileRepository). Drivers are not named in the friendliest fashion (as seen in the picture on the left) but sorting by data modified will show you the newest installed drivers. Simply drag the entire contents of the driver folder over to a folder in your network share. As seen in the picture on the right, I have created a sub folder under scanners and renamed the folder to a user friendly name. This folder contains all of the files needed to install the device.
![2]()
Task 3: Getting our clients to see the Central Driver Store
We have created a Central Driver Store. Our Central Driver Store now has at least one driver package in it. Now here comes the easy part – getting our clients to actually use the Central Driver Store. To do so, deploy this one registry key:
HKLM\Software\Microsoft\Windows\CurrentVersion\DevicePath
Value: %SystemRoot%\Inf;\\SERVERNAME\SHARE
EX: %SystemRoot%\Inf;\\DRIVERSERVER\Drivers
Task 4: Allowing Standard Users to Install Central Driver Store drivers
To completely automate driver installation, ordinary limited users (which should mean everyone but you/other IT people) should never be prompted for elevated credientials when installing managed hardware (such as when plugging in our scanner for the above task). To do this, the following three criterea must be met:
1. The driver must be in a central driver store.
2. The driver setup class must be allowed
3. The driver publisher must be trusted
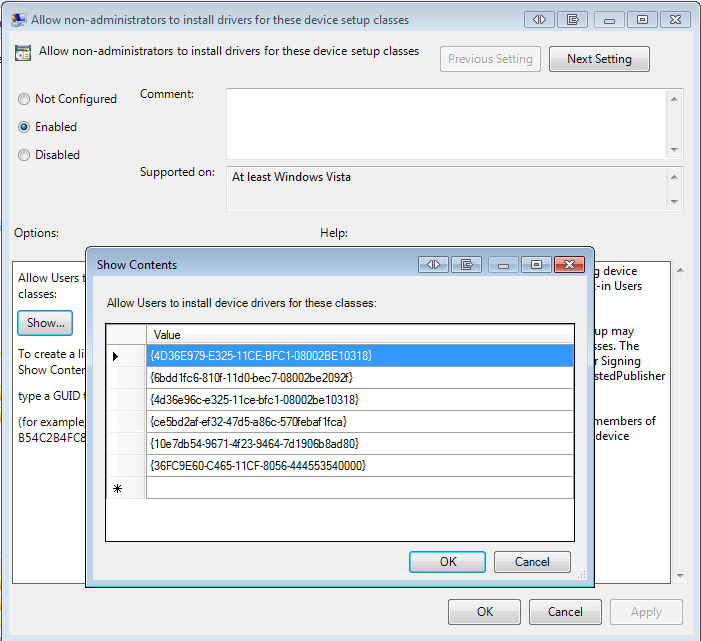
We have already tackled item 1 so that shouldn’t be a problem anymore. To meet item 2, we must first find out our driver setup class. Do to this, go to the location of the driver in the central driver store. Right click on any .INF files and click OPEN. At the top of the file, you will see a line named ClassGUID. It should look something like the GUID below. Copy everything to the right of the equals sign (including the brackets).
ClassGUID={4D36E979-E325-11CE-BFC1-08002BE10318}
In a GPO linked to your computers, navigate to Computer Config\Admin Templates\System\Driver Installation. Enable “Allow non-administrators to install drivers for these device setup classes” . Now paste the GUID that you copied from the .INF.
![3]()
The last thing that we have to do is to make sure that whoever signed the driver is a trusted publisher on our machines. You will only need to do this if you are presented with a Windows Security popup like the one below when installing the driver manually for extraction.
![4]()
If you are presented with this popup, select “Always trust software from …” and press install. After installation, run certmgr.msc. Navigate to “Trusted Published” and then select “Certificates”. Right click on the certificate and click export. This certificate will need to be distributed to all of your computers that will install this hardware. This can easily be done by opening a GPO, going to Computer Config\Windows Settings\Security Settings\Public Key Polices and importing the certificate under the Trusted Publishers Certificates. After importing, you should see the certificate listed (as seen below).
![5]()
There you have it! You now have the framework to completely automate all of your hardware installations across your entire organization! Gone are the days of having to individually install drivers, enter in Admin Credentials for your users (or worse: making users admins so that they can install hardware!).
You have:
1. Set up a central driver store
2. Organized your store for enterprise use
3. Started populating your store with drivers that do not automatically install
4. Configured your clients to search the store for drivers
5. Allowed non-admins to install the drivers you have in the store
6. Distributed certificates used in signed drivers to your clients
Good luck in your hardware automation!
This article also appeared on my blog, DeployHappiness
Task 1: Setting up the Driver Store
Most of us have shares or drives where we keep our software, virtual machines, or downloaded drivers. Some of us probably even have network shares where software is kept for deployment. We have a central store for ADMX files but what about drivers? Well, it is time to create a Central Store for Drivers!
First, set up a network share. All computers and users will need to be able to read/execute drivers from this share so “Everyone” or “Authenticated Users” should have the Read permission on the share and Read/Execute on the folder. No other permissions should be required. For this article, the share name is CentralDrivers.
Underneath the CentralDrivers folder, exists sub-folders for common hardware types. The type of hardware dictates have specific I get. For example, under the folder PC Hardware, sub-folders have been created for Audio devices, system boards, and Video Cards. Set up your share in the way that makes the most logical sense for your organization.

Task 2: Getting Our Drivers in the Central Driver Store
In Windows XP and below, extracting drivers was a nightmare to do by hand. Drivers could be stored in Program File, Application Data, Windows INF, System32, Temp folders … basically anywhere the driver manufacture wanted to put them.
Vista changed all of this! All drivers, when installed, are loaded into the local DriverStore. The entire packages of any drivers that are installed can be found at C:\Windows\System32\Driver
You want to automate a scanner install. To automate the scanner install, we must first put this scanner driver in the Central Driver Store. After installing the scanner driver on a test machine, open up the locate driver store (C:\Windows\System32\Drive
Task 3: Getting our clients to see the Central Driver Store
We have created a Central Driver Store. Our Central Driver Store now has at least one driver package in it. Now here comes the easy part – getting our clients to actually use the Central Driver Store. To do so, deploy this one registry key:
HKLM\Software\Microsoft\Wi
Value: %SystemRoot%\Inf;\\SERVERN
EX: %SystemRoot%\Inf;\\DRIVERS
Task 4: Allowing Standard Users to Install Central Driver Store drivers
To completely automate driver installation, ordinary limited users (which should mean everyone but you/other IT people) should never be prompted for elevated credientials when installing managed hardware (such as when plugging in our scanner for the above task). To do this, the following three criterea must be met:
1. The driver must be in a central driver store.
2. The driver setup class must be allowed
3. The driver publisher must be trusted
We have already tackled item 1 so that shouldn’t be a problem anymore. To meet item 2, we must first find out our driver setup class. Do to this, go to the location of the driver in the central driver store. Right click on any .INF files and click OPEN. At the top of the file, you will see a line named ClassGUID. It should look something like the GUID below. Copy everything to the right of the equals sign (including the brackets).
ClassGUID={4D36E979-E325-11CE-BFC1-0
In a GPO linked to your computers, navigate to Computer Config\Admin Templates\System\Driver Installation. Enable “Allow non-administrators to install drivers for these device setup classes” . Now paste the GUID that you copied from the .INF.
The last thing that we have to do is to make sure that whoever signed the driver is a trusted publisher on our machines. You will only need to do this if you are presented with a Windows Security popup like the one below when installing the driver manually for extraction.

If you are presented with this popup, select “Always trust software from …” and press install. After installation, run certmgr.msc. Navigate to “Trusted Published” and then select “Certificates”. Right click on the certificate and click export. This certificate will need to be distributed to all of your computers that will install this hardware. This can easily be done by opening a GPO, going to Computer Config\Windows Settings\Security Settings\Public Key Polices and importing the certificate under the Trusted Publishers Certificates. After importing, you should see the certificate listed (as seen below).

There you have it! You now have the framework to completely automate all of your hardware installations across your entire organization! Gone are the days of having to individually install drivers, enter in Admin Credentials for your users (or worse: making users admins so that they can install hardware!).
You have:
1. Set up a central driver store
2. Organized your store for enterprise use
3. Started populating your store with drivers that do not automatically install
4. Configured your clients to search the store for drivers
5. Allowed non-admins to install the drivers you have in the store
6. Distributed certificates used in signed drivers to your clients
Good luck in your hardware automation!
This article also appeared on my blog, DeployHappiness
Have a question about something in this article? You can receive help directly from the article author. Sign up for a free trial to get started.
Comments (11)
Author
Commented:is the driver digitally signed?
Commented:
Was finally able to sit down and have a good crack at this. I found that when the computer initially searched for drivers when the hardware was connected, it did search the DriverStore located on the network. Using Process Monitor I saw that my network location was being checked but could not be written to. This is because NT Authority\SYSTEM is the account that connects to the network share. SYSTEM needs to have write access to the share. As soon as I gave SYSTEM write access to the share my problem was resolved.
Thought this information may be useful for others.
Thanks!
IV
Author
Commented:Commented:
Commented:
View More