Adding Structure to Visio Diagrams: Using Containers


The ability to add structure to Visio diagrams using containers, lists, and callouts was introduced in Visio 2010 and has remained a key feature of every version of Visio since. In this article we’ll examine containers. We’ll explore lists and callouts in separate articles.
What is a Visio Container?
At the risk of stating the obvious, a container is an object that can contain other objects! To experienced Visio users that might sound like a group, however, there are significant differences.
Groups
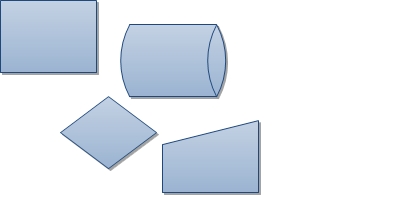
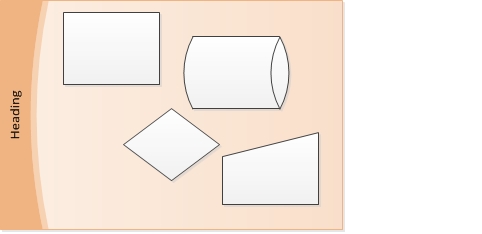
To understand the differences quickly, let’s create a group that includes multiple shapes. To create the group: drop four shapes on the page; select all of them; right-click and then select Group>Group. The image below illustrates a group comprising four flowchart shapes.
 Now try three things:
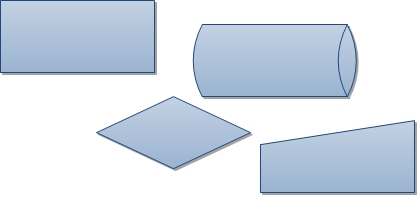
1) Resize the group by stretching it to the right… what happens to the contained shapes? Answer: They resize also, as shown below. This might be what you want – but often it is not.
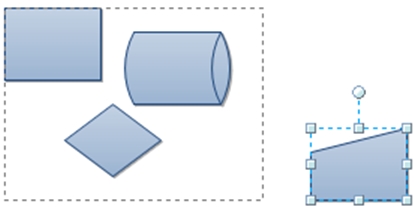
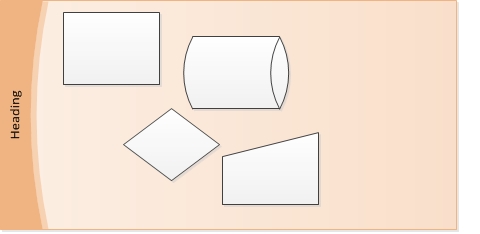
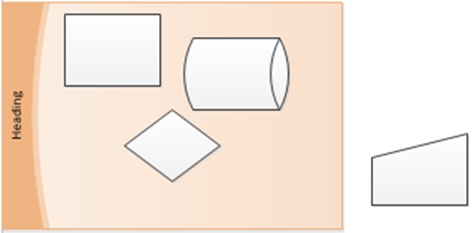
2) Remove one of the shapes from the group by dragging it out… is it outside the group? Answer: Visually, yes, but actually, no. It is still part of the group. For example, if you move the group, the external shape will move with it.
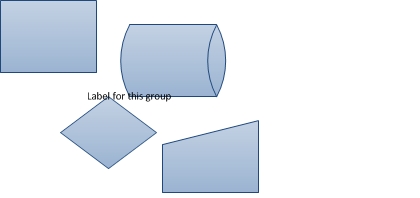
3) Add a label to the group. Is it easy to do? Is it in a useful place? Is it easy to relocate or format? Answer: the label text is placed in the center of the group by default and may obscure, or be obscured by, other items in the group as shown below. If you want it somewhere else or want it to be formatted differently, you’ll have to do that yourself.
Summary
The examples above illustrate just one way that groups are used in Visio. There are many other uses for groups that will remain critical to various Visio diagrams. However, using groups simply to organize a collection of objects does have its limitations. In addition to those pointed out above, another significant issue with groups is that the shapes in the group lose much of their individual identity. Not only is it more difficult to interact with specific shapes in the group, but altering the group often alters the members.
Containers
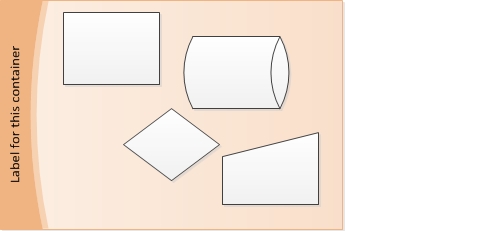
Now let’s try those same three steps with a container. To create a container: drop four shapes on the page; click Insert>Container; and then click on any of the 12 container types in the gallery. The figure below is a container that holds the same four flowchart shapes used in the group examples above.
 Repeat the same three tests:
1) Resize the container by stretching it to the right… what happens to the contained shapes? Answer: They are unchanged!
2) Remove one of the shapes from the container by dragging it out… is it outside the container? Answer: Yes! You can add and remove shapes at will, merely by dragging them into or out of the container.
3) Add a label to the container. Is it easy to do? Is it in a useful place? Is it easy to relocate or format? Answer: The answer to all three questions is yes because every container includes a bult-in header. To customize the text, just double-click the header, type the text, and you’re finished. To relocate or reformat the header, select the container shape, then use the Heading Style button on the Container Tools contextual tab.
Summary
A key advantage of a container is that, like a group, you can manipulate it as a unit (when you move, copy or delete a container, everything goes with it). However, unlike a group, the contained shapes all retain their individual integrity: a single click selects a shape in a container; you can right-click a member shape to see its context menu or view its shape data with no interference from the container.
When might you use containers? Any time you need to create a visual and logical relationship among a set of shapes in a drawing. Chances are very good that once you’ve worked with containers a few times, you will use groups much less frequently for this purpose.
Style Tip: Although there is both a container gallery and a container header gallery, you are not limited to those styles and colors. You can customize a container using the Line, Fill and Text formatting buttons that you use with any other Visio shape.
Containers in Visio Templates
If you’d like to see an example of containers in Visio, use the built-in template for Cross-Functional Flowcharts (commonly known as swimlane diagrams). This Visio template was completely redesigned to take advantage of containers. Each swimlane is now a container, which makes it much easier to deal with each of the contained shapes. In addition, the swimlane structure is a Visio list, which makes it easier to arrange and rearrange swimlanes.
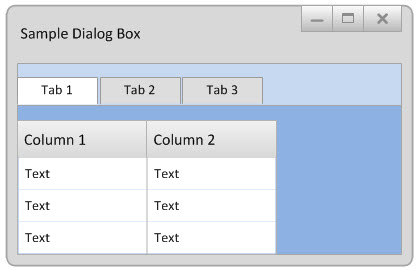
The Wireframe Diagram template, which is available in Visio Plan 2 and the Professional editions of Visio, was also redesigned to use both containers and lists. As a result, it is vastly easier to arrange, rearrange and manipulate the component parts of a user interface mockup created as a Visio wireframe. The graphic below shows a very simple example of a dialog box mockup. The dialog box shape and the darker blue tabbed section containing the columns are both containers; the tab header structure and the columns are all lists, allowing tabs or text boxes to be added or repositioned extremely easily.
Additional Information
For more information about containers, lists and callouts in Visio, refer to Chapter 11 in Visio 2010 Step by Step or Visio 2013 Step by Step, or Chapter 13 in Visio 2016 Step by Step. All three books are available from my website or wherever you buy books.
You will also find container details in several articles on the truly excellent Visio Insights blog written by the Visio development team:
If you’d like to experiment with containers, use the link below to download a Visio diagram that includes a group and container on the same page to facilitate comparison:
Containers, Lists and Callouts.vsdx
Other Articles in this Series
=-=-=-=-=-=-=-=-=-=-=-=-=-=-=-=-=-=-=-=-=-=-=-=-=-=-=-=-=-=-=-=-=-=-=-=-=-=-=-=-=
If you liked this article and want to see more from this author, please click here.
If you found this article helpful, please click the Yes button near “Was this article helpful?” below.
To learn more about Visio, please visit the Visio Step by Step web site.
=-=-=-=-=-=-=-=-=-=-=-=-=-=-=-=-=-=-=-=-=-=-=-=-=-=-=-=-=-=-=-=-=-=-=-=-=-=-=-=-=
Have a question about something in this article? You can receive help directly from the article author. Sign up for a free trial to get started.
Comments (0)