How to Configure Hard-Link Migration in User State Migration Tool 4.0


Published:
Browse All Articles > How to Configure Hard-Link Migration in User State Migration Tool 4.0
Case Summary
Description:
A new version if User State Migration Tool contains a nice feature which is called Hard-Link Migration, we can use this feature when we migrate from Microsoft Windows XP to Microsoft Windows 7.
We have Microsoft System Center Configuration Manager and we Configure Operating System Deployment Feature to deploy Microsoft Windows 7 to the end users.
In refresh “In-Place” scenario, we are using USMT to capture user data and store it in central location using State Migration Point (SMP), then restore user data after applying the image.
In our scenario we will Migrate user data from Windows XP to Windows 7 using Hard-Link feature not SMP, because migration will be faster than using traditional copy mechanisms.
Using Hard-link migration in USMT will scan the computer for user files and settings in Windows XP and then creates a directory of hard links to user data files, Then hard links are remapped into the appropriate locations in the new windows 7 operating system image.
Configuration :
Notes “Before Starting”:
1. This configuration can applied only on Configuration Manager with SP2.
2. We can use Hard-Link feature only for In-Place Scenario, we can’t use it for Re-Place scenario.
Steps:
1. Open Configuration Manager console, navigate to System Center Configuration Manager -> Site Database -> Computer Management -> Operating System Deployment ->Task Sequences.
2. Right-click the task sequence that you configure to capture and restore a user state, and then select Edit.
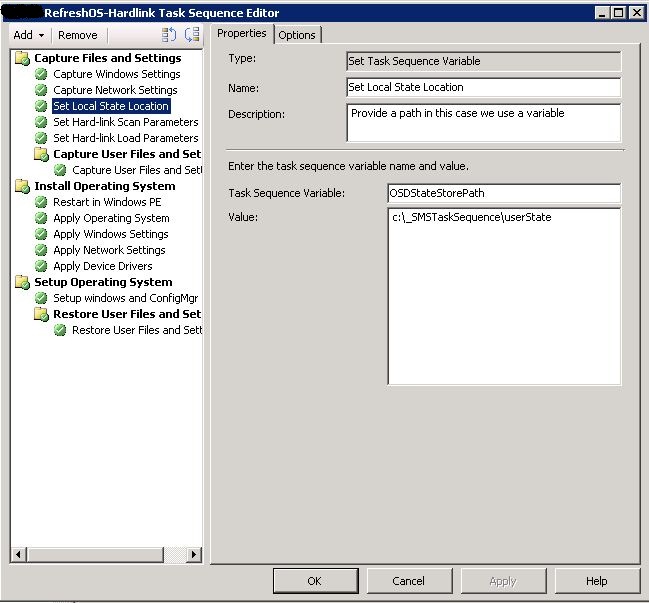
3. When you open task sequence, select a task sequence step before the User State Storage step, click Add, navigate to General, and then click Set Task Sequence Variable.
Name: Set Local State Location.
Task Sequence Variables: OSDStateStorePath.
Value: C:\_SMSTaskSequence\userstate.
![Hard-Link OSDStateStorePath.]()
4. Set on more Task Sequence Variable:
Name: Set Hard-Link Scan Parameters.
Task Sequence Variables: OSDMigrateAdditionalCaptureOptions.
Value: /hardlink /nocompress.
![Hard-Link OSDMigrateAdditionalCaptureOptions]()
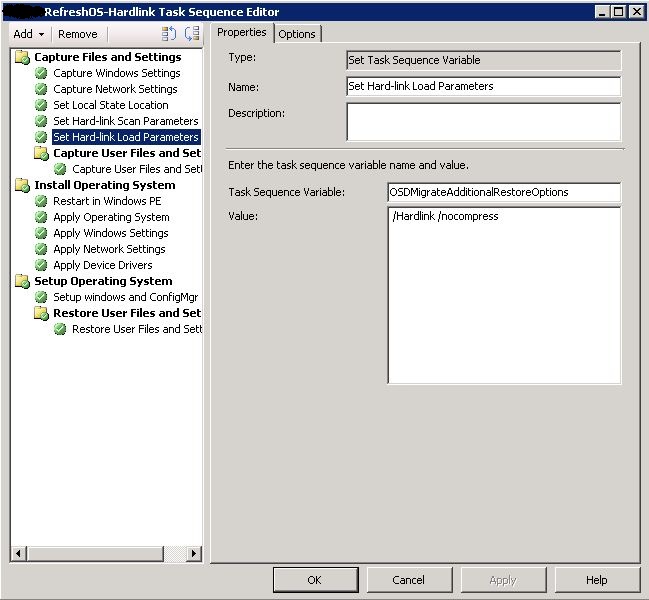
5. Set on more Task Sequence Variable:
Name: Set Hard-Link Load Parameters.
Task Sequence Variables: OSDMigrateAdditionalRestoreOptions.
Value: /hardlink /nocompress.
![Hard-Link OSDMigrateAdditionalRestoreOptions.]()
You can download the sample task sequence and import it into Configuration Manager, and replace missing packages such as “boot images, Windows 7 Master Image and USMT Package and don’t forget to edit Windows settings & Network settings.
Hardlink.xml
Regards
Description:
A new version if User State Migration Tool contains a nice feature which is called Hard-Link Migration, we can use this feature when we migrate from Microsoft Windows XP to Microsoft Windows 7.
We have Microsoft System Center Configuration Manager and we Configure Operating System Deployment Feature to deploy Microsoft Windows 7 to the end users.
In refresh “In-Place” scenario, we are using USMT to capture user data and store it in central location using State Migration Point (SMP), then restore user data after applying the image.
In our scenario we will Migrate user data from Windows XP to Windows 7 using Hard-Link feature not SMP, because migration will be faster than using traditional copy mechanisms.
Using Hard-link migration in USMT will scan the computer for user files and settings in Windows XP and then creates a directory of hard links to user data files, Then hard links are remapped into the appropriate locations in the new windows 7 operating system image.
Configuration :
Notes “Before Starting”:
1. This configuration can applied only on Configuration Manager with SP2.
2. We can use Hard-Link feature only for In-Place Scenario, we can’t use it for Re-Place scenario.
Steps:
1. Open Configuration Manager console, navigate to System Center Configuration Manager -> Site Database -> Computer Management -> Operating System Deployment ->Task Sequences.
2. Right-click the task sequence that you configure to capture and restore a user state, and then select Edit.
3. When you open task sequence, select a task sequence step before the User State Storage step, click Add, navigate to General, and then click Set Task Sequence Variable.
Name: Set Local State Location.
Task Sequence Variables: OSDStateStorePath.
Value: C:\_SMSTaskSequence\userst
4. Set on more Task Sequence Variable:
Name: Set Hard-Link Scan Parameters.
Task Sequence Variables: OSDMigrateAdditionalCaptur
Value: /hardlink /nocompress.

5. Set on more Task Sequence Variable:
Name: Set Hard-Link Load Parameters.
Task Sequence Variables: OSDMigrateAdditionalRestor
Value: /hardlink /nocompress.
You can download the sample task sequence and import it into Configuration Manager, and replace missing packages such as “boot images, Windows 7 Master Image and USMT Package and don’t forget to edit Windows settings & Network settings.
Hardlink.xml
Regards
Have a question about something in this article? You can receive help directly from the article author. Sign up for a free trial to get started.
Comments (5)
Commented:
Author
Commented:Commented:
but in the screenshot it says Value: C:\_SMSTaskSequence\userSt
Which one is it?
Thanks for the clarification.
Author
Commented:Commented: