How to Embed Screenshots in Posts


50+ years in computers
EE FELLOW 2017 — first ever recipient of Fellow award
MVE 2015,2016,2018
CERTIFIED GOLD EXPERT
DISTINGUISHED EXPERT
EE FELLOW 2017 — first ever recipient of Fellow award
MVE 2015,2016,2018
CERTIFIED GOLD EXPERT
DISTINGUISHED EXPERT
Published:
Browse All Articles > How to Embed Screenshots in Posts
This article explains how to embed/insert screenshots (screen captures/screen grabs) into EE posts. A search found a previous article on the subject and one follow-up to it. But large portions of those articles are devoted to explaining how to capture screenshots. My focus in this article is on members who already know how to capture screenshots but don't realize that it's possible to embed screenshots directly into posts, making it much easier to review the text and images in a question or answer. I've seen members post screenshots in Word and PowerPoint files that are attached, as well as in image files (typically, JPG and PNG), yet these images are also attached rather than embedded. I've even seen images posted outside of EE on image-sharing sites, such as Imgur.
The two previous articles were written before major enhancements to the EE website that include the new formatting toolbar. So both of those articles discuss the Attach File feature for posting screenshots. This article, instead, discusses the new formatting toolbar and its Insert Image feature. An even newer EE feature – the ability to embed screenshots (and other files) with My Personal Knowledgebase – is worthy of its own article.
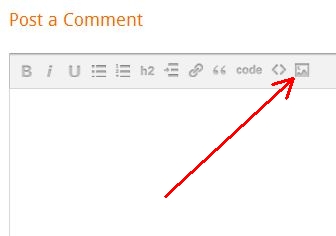
So, if you already know how to capture screenshots, here's how to embed them in posts. The toolbar above the Post a Comment text box looks like this:
![Post a Comment - Insert Image]()
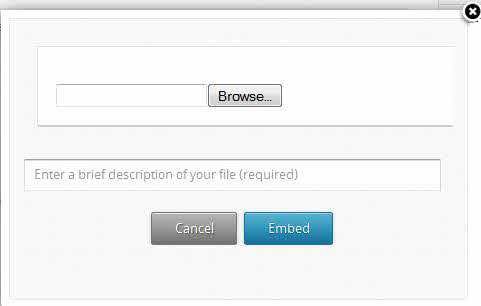
The icon pointed to by the red arrow is the Insert Image feature. Click on it to bring up this browse-for-file dialog:
![Insert Image Browse]()
Click on Browse, navigate to your screenshot (an image file), enter a description, click Embed. That's it!
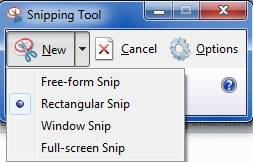
Although my primary intent in this article is to explain embedding/inserting, there are two issues on capturing worth mentioning. First, both of the previous articles were written before Vista was released, so neither mentioned the Snipping Tool, which was introduced in Vista and is also included in W7, W8, W8.1, and W10 (in Accessories). When you run the Snipping Tool, it displays this (the screenshot shows the drop-down menu with the type of Snip):
![Snipping Tool with drop-down menu]()
For a Free-form Snip or Rectangular Snip, drag the mouse around the area to be captured and release the mouse; for a Window Snip, click the window to be captured; for a Full-screen Snip, click that menu item and it immediately captures all of the monitors. In all Snip cases, it puts the captured area in its window, which you may then save to a GIF, JPG, MHT or PNG. For EE posts, I recommend JPG and PNG.
Second, one of the articles says you cannot capture a screen with a menu dropped down. This actually can be done in two ways – with the PrintScreen key (PrtScn or PrtSc on many keyboards) and with the Snipping Tool. For example, the screenshot above of the Snipping Tool shows its New menu while it is dropped down. This was done by simply hitting the PrintScreen key, which captured all monitors, and the resulting image was then cropped with imaging software. Note: on some systems in the past, I experienced PrintScreen not working; in those cases, Shift-PrintScreen worked.
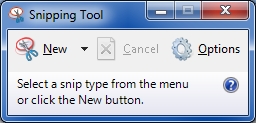
To capture a screen with a menu dropped down using the Snipping Tool, run the tool, but click Cancel (or hit Escape) right away. This will remove the screen freezing, but you'll still have its dialog on the screen:
![Snipping Tool after Cancel-Esc]()
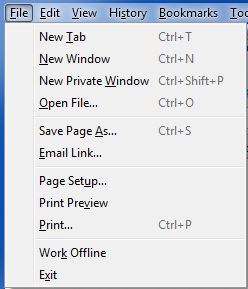
Now drop down a menu somewhere and then hit Ctrl-PrintScreen. This will activate the Snipping Tool with the screen frozen in place – including the dropped-down menu! Here's a screenshot of Firefox's File menu while it is dropped down, captured with this Snipping Tool technique:
![Firefox File menu dropped down captured with Snipping Tool]()
Note that it is not possible to capture a dropped-down menu with Alt-PrintScreen, because hitting Alt will remove the menu.
If you find this article to be helpful, please click the thumbs-up icon below. This lets me know what is valuable for EE members and provides direction for future articles. Thanks very much! Regards, Joe
The two previous articles were written before major enhancements to the EE website that include the new formatting toolbar. So both of those articles discuss the Attach File feature for posting screenshots. This article, instead, discusses the new formatting toolbar and its Insert Image feature. An even newer EE feature – the ability to embed screenshots (and other files) with My Personal Knowledgebase – is worthy of its own article.
So, if you already know how to capture screenshots, here's how to embed them in posts. The toolbar above the Post a Comment text box looks like this:
The icon pointed to by the red arrow is the Insert Image feature. Click on it to bring up this browse-for-file dialog:
Click on Browse, navigate to your screenshot (an image file), enter a description, click Embed. That's it!
Although my primary intent in this article is to explain embedding/inserting, there are two issues on capturing worth mentioning. First, both of the previous articles were written before Vista was released, so neither mentioned the Snipping Tool, which was introduced in Vista and is also included in W7, W8, W8.1, and W10 (in Accessories). When you run the Snipping Tool, it displays this (the screenshot shows the drop-down menu with the type of Snip):
For a Free-form Snip or Rectangular Snip, drag the mouse around the area to be captured and release the mouse; for a Window Snip, click the window to be captured; for a Full-screen Snip, click that menu item and it immediately captures all of the monitors. In all Snip cases, it puts the captured area in its window, which you may then save to a GIF, JPG, MHT or PNG. For EE posts, I recommend JPG and PNG.
Second, one of the articles says you cannot capture a screen with a menu dropped down. This actually can be done in two ways – with the PrintScreen key (PrtScn or PrtSc on many keyboards) and with the Snipping Tool. For example, the screenshot above of the Snipping Tool shows its New menu while it is dropped down. This was done by simply hitting the PrintScreen key, which captured all monitors, and the resulting image was then cropped with imaging software. Note: on some systems in the past, I experienced PrintScreen not working; in those cases, Shift-PrintScreen worked.
To capture a screen with a menu dropped down using the Snipping Tool, run the tool, but click Cancel (or hit Escape) right away. This will remove the screen freezing, but you'll still have its dialog on the screen:
Now drop down a menu somewhere and then hit Ctrl-PrintScreen. This will activate the Snipping Tool with the screen frozen in place – including the dropped-down menu! Here's a screenshot of Firefox's File menu while it is dropped down, captured with this Snipping Tool technique:
Note that it is not possible to capture a dropped-down menu with Alt-PrintScreen, because hitting Alt will remove the menu.
If you find this article to be helpful, please click the thumbs-up icon below. This lets me know what is valuable for EE members and provides direction for future articles. Thanks very much! Regards, Joe
50+ years in computers
EE FELLOW 2017 — first ever recipient of Fellow award
MVE 2015,2016,2018
CERTIFIED GOLD EXPERT
DISTINGUISHED EXPERT
EE FELLOW 2017 — first ever recipient of Fellow award
MVE 2015,2016,2018
CERTIFIED GOLD EXPERT
DISTINGUISHED EXPERT
Have a question about something in this article? You can receive help directly from the article author. Sign up for a free trial to get started.
Comments (10)
Commented:
Having previously jumped through the hoops and hassles a few times to make minor edits to other articles and then get them approved again (which is the main reason I don't bother making articles anymore), I decided not to update that article to incorporate 'embedded' images.
Author
Commented:Thanks for the comments. Regarding your first point, I hope you feel that my second paragraph addresses it: Regarding your second point, we've obviously had different experiences. I haven't had to jump through any hoops to make edits (minor or major) to my articles. The "Edit Article" link works well and EE's Page Editors have consistently been prompt in their reviews. Republishing of an article after my edits has been fast and hassle-free. Regards, Joe
Commented:
Commented:
Print Screen and Alt Print Screen work fine in Windows but have no effect under Linux. Instead there is a tool called import (part of the ImageMagick suite) which can make screen dumps in most any format you want. Having made, say, a png window dump, how would I embed it? Cheers ... Duncan.
Author
Commented:If you've made a PNG file, embedding it uses the same technique as with a JPG file, i.e., simply navigate to the PNG file. Here's an example of embedding a PNG (this is the same screenshot that was embedded as a JPG at the beginning of the article):
View More