How to setup a Filter to view Questions Awaiting Answers - (for Experts at EE)


Published:
Browse All Articles > How to setup a Filter to view Questions Awaiting Answers - (for Experts at EE)
Introduction:
As an expert on Experts Exchange, it has always been a good feeling trying to help out others. It has not been a long time since I joined Experts Exchange and since then I have always been impressed at the design of the website. The Help provided at the Help page is impressive and does fulfill a good job of using the website and its features. However, it does somewhat lack in defining the implementation and use of Filters.
Although there are many flavors of defining filters with a myriad of other options, my objective here will be to introduce you to the basic idea of creating and working with Filters. Once you are familiar with the creation of Filters, the rest will be quite easy to do and may not need further guidance.
Favorite Zones:
Nobody is an expert in all Zones and all of us tend be really good at only some subjects. For example, I am mainly interested in answering Questions relating to Windows XP and Internet Explorer. Of course, I do answer other Questions related to Printers, Laptops and a dozen other Zones. However, when I first navigate to the site, my idea is to gather the Questions that are seeking Answers in my Favorite Zones (i.e. Windows XP and Internet Explorer) and then look for remaining stuff, if I have time.
So, Experts Exchange has given us the option of creating a List of Favorite Zones, means viewing only those Zones which we wish to and not the others, so that they don’t get in the way. However, I would define “Favorite Zones” as those Zones which include any of the areas where I may want to answer a question, rather than the two zones (i.e. Windows XP and Internet Explorer) which you may otherwise think of.
Images used for simplicity:
I have taken screenshots of Experts Exchange Pages that I will be referring to in my below guide. In case you are doing it interactively while reading the guide, it should be quite easy to find all the stuff, I am referring to. Just in case it gets difficult, you can look up the exact location via the Images, I have used here.
Another technique would be to press Ctrl+F in your browser, that will open up the Find Dialog Box. You input the text to Search and your Browser will do all the hard work of finding what you want on the curent page, rather than you straining your eyes. Just in case, it hits something which you were not looking for, press F3 and it will find the next match.
The Presence of two skins on Experts Exchange:
Experts Exchange uses two skins for using the Website. Limited Members are presented with the option of using only the "Expert Skin" whereas Premium Members have the choice of using either. Premium members may change the Current View of the Skin by selecting the Third Option (Skin: Premium / Expert), found below "My Account" at the Top Right Section of the EE page. You can also change the option to permanently view your Desired Choice by Editing your Profile (Same Section, First Option).
This guide uses the Premium skin to explain the relevant material. If you happen to be only using the Expert Skin, the website view may somewhat differ but the applicability of this Article will not change.
Setting up Favorite Zones:
These are viewable in the side pane as “My Favorites” (See Image 1) when you are browsing the Site. They will appear as “Favorites” under “Expert Tools” if you have used the “Answer” Button on the Home Page (See Image 1) or used the https://www.experts-exchange.com/expertsZone.jsp link to directly reach the EE answer page.
![Image 1]()
Just in case you have not defined them yet, you will not see any zones listed under My Favorites. Whatever you do, first setting up the Favorites will be a proper way to define your filters. So when you click Edit under Favorites (See Image 1), you will be presented with a list of Zones (See Image 2) that can be expanded or collapsed, where you can select (or check-mark) the Zones which you always wish to view.
![Image 2]()
Defining Favorites:
Cick the Answer button on the Home Page of Experts Exchange (See Image 1) to get access to the Expert Tools section of your Profile.
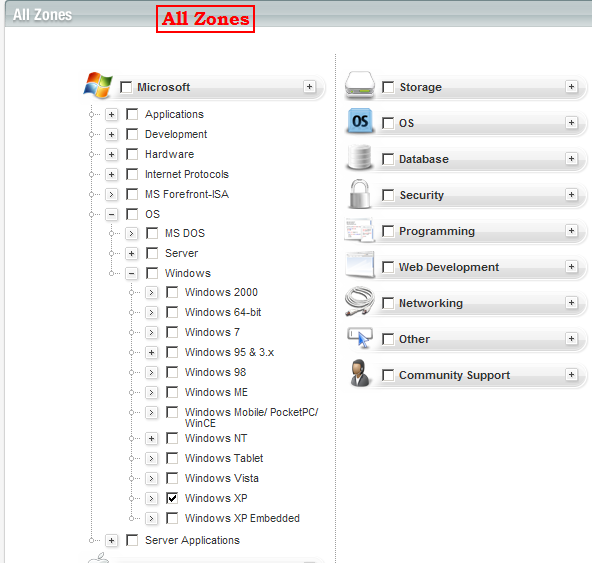
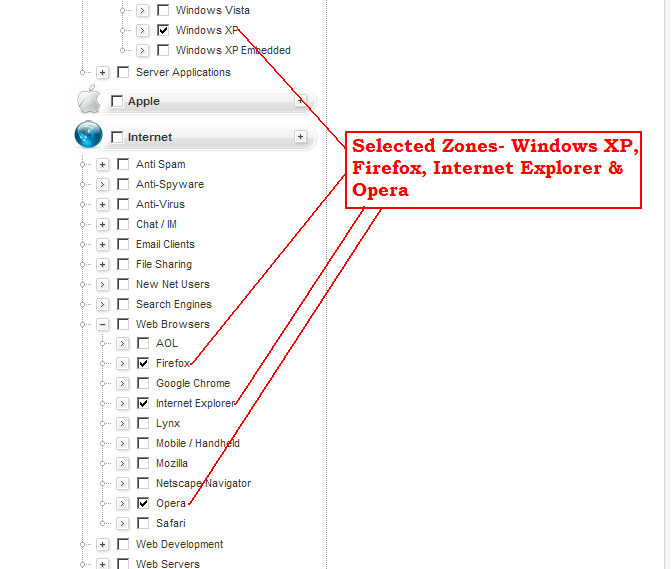
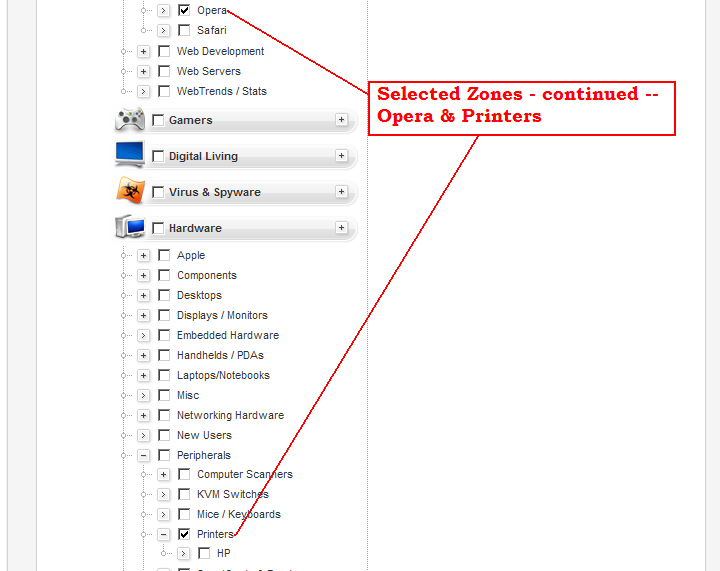
The Zones are broadly split into various categories which can be expanded and collapsed (See Image 2), much like a Windows Folder Tree where you click a “Plus” symbol (if options exist) to drill down further. For Example, I have selected my Zones of interest- Windows XP, Internet Explorer, Firefox, Opera (See Image 3) & Printers (See Image 4).
![Image 3]()
![Image 4]()
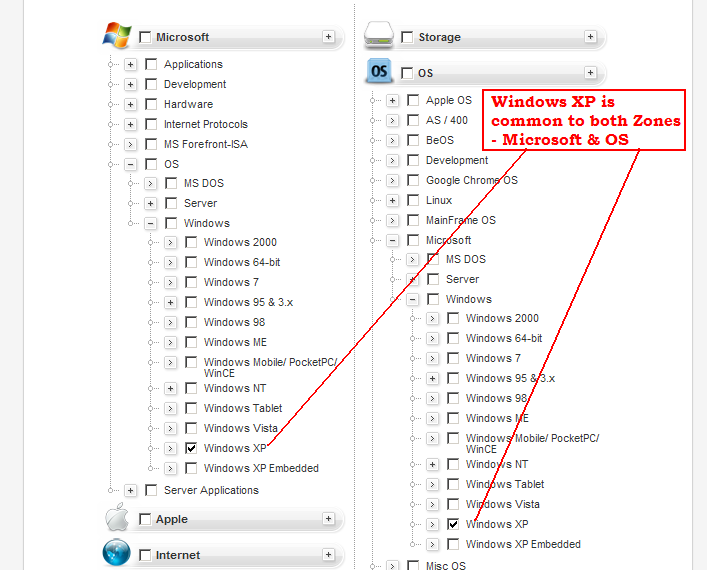
Please note that some areas may be common to two places (See Image 5). However once a Zone is selected, it is automatically selected in the common area.
![Image 5]()
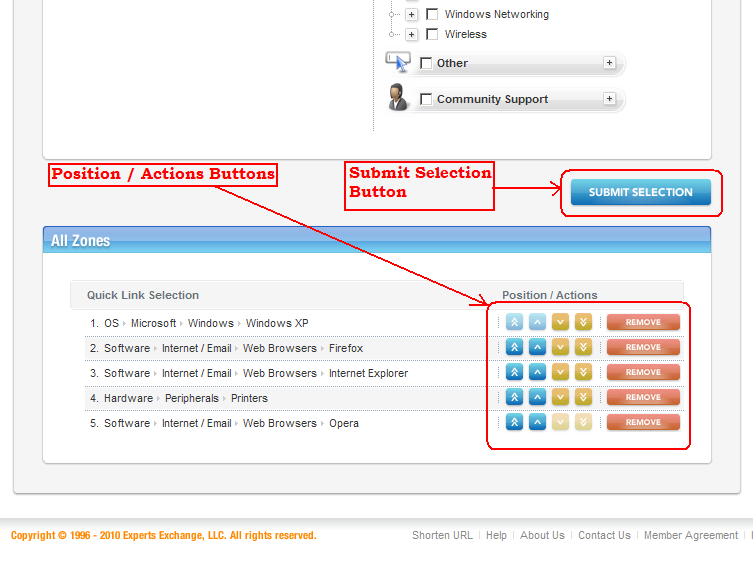
You can also alter the order in which the Zones are displayed in your List by scrolling below and using the Position / Actions buttons (See Image 6). Once done with the selection and ordering of your desired zones, click Submit Selection (See Image 6) to save what you have chosen to your Profile.
![Image 6]()
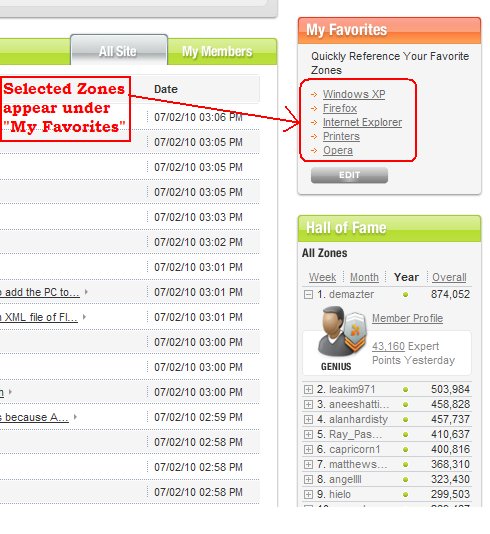
After doing that, you will see Links to your desired Favorite Zones located in the Right Pane under “My Favorites” (See Image 7).
![Image 7]()
Defining Filters:
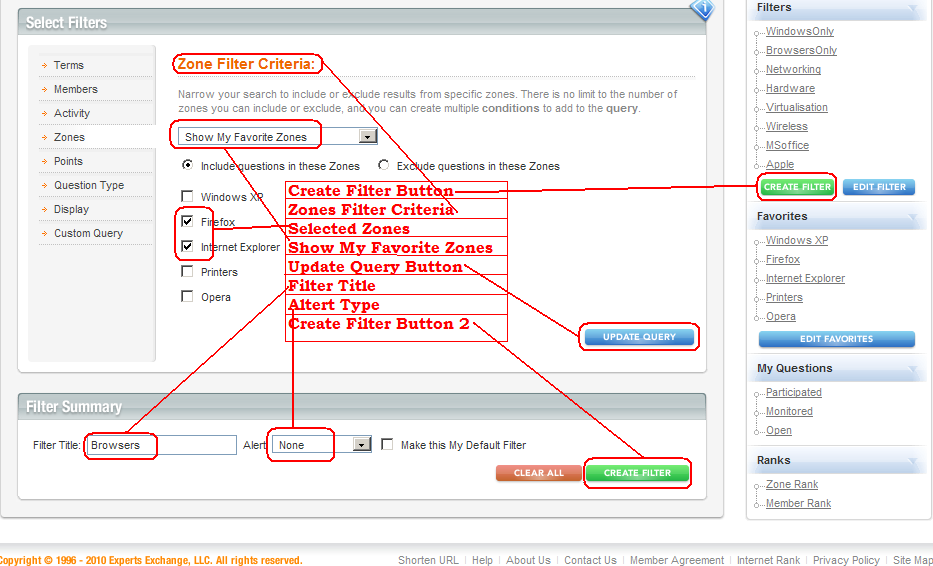
Once you have defined your “Favorite Zones”, it becomes much easier to “Group Zones” related to a particular Subject. In this example, I will be defining a Filter for all Browsers that include Internet Explorer, Firefox and Opera which are in “My Favorites”. First, click the Answer button (See Image 1) to get to your Expert Tools View. Then click the Create Filter button under Filters to define a New Filter (See Image 8).
I had already set up other Filters prior to creating this Article which also appear in the Screenshot. Please ignore them and do not confuse yourself. This will open up the same window which we used to define the Favorites. In order to keep it simple, select “Show my Favorite Zones” Filter (See Image 8) under “Zone Filter Criteria” which will list only those zones, you chose earlier. Select the “Desired Zones” (in our case Internet Explorer, Firefox and Opera) by placing a check mark next to their relevant boxes and don't forget to click the Update Query button (See Image 8), when done.
Choose a name for the Filter (I have chosen "Browsers" in this guide). You may also choose a frequency of time if you wish to be alerted by email with a list of “Questions Awaiting Answers”. When finished, click the Create Filter Button 2, which is down belo, next to the "Clear All" Button (See Image 8).
![Image 8]()
As soon as you do that, you will find your Filter created and listed under the “Filters” section of “Expert Tools”. In this example, the Filter named “Browsers” is immediately visible as explained (See Image 9).
![Image 9]()
Using Filters:
Once the initial configuration has been done, click the Answer button (See Image 1) on the Home Page of Experts Exchange to get access to “Expert Tools”.
Click on the Desired Filter under “Filters” (in our case, it happens to be “Browsers”) which will list a neat table displaying a list of questions awaiting answers with other granular details like Date Asked, Points Assigned, Title of the Question, Author of the Question, Number of Comments already made to it, Primary Zone of the Question and an Actions Button.
The Actions button will open the Question in a new Window. As most of you may already know, clicking a link by pressing the Mouse Wheel (also called the "middle button") is a shortcut to “Open the Current Link in a New Tab” for all Browsers using tabbed functionality. If you have a wheel mouse, you can press the wheel to view the question into a new tab of the same window (See image 9 for all the aforementioned details).
[step=""]Editor's Note:
You can also drag the small "open in new window" icon and drop it onto another open Browser window.[/step]
If you prefer to answer one Question at a time (or if you want a quick preview of a question before starting to work on it full screen), simply click the Question Title and it will be displayed just below the “Filter Results” table. Scroll below, view the Question and Post a Comment in the traditional way. Hit the Submit Button and you are done.
Please note that you can also use other links related to Individual Zones displayed under “Favorite Zones” to get a list of “Questions awaiting Answers” too.
Filters (define to your needs):
This guide has been written to increase the awareness of experts towards Filters which is a wonderful Tool. Defining and using Filters does enable a straightforward way for experts to do their business – i.e. answering questions without wasting time.
There are a couple of other options with filters that you may tune to your needs while defining them, such as minimum Points desired (means to view / not to view Questions that carry a weight-age of less than x points), Questions asked by a particular member and so on. However, once you have gone this far to defining Filters, the rest should not be really that difficult to implement.
Closing Comments:
May it interest you that this is my sixth article on Experts Exchange. The other five are --
Applications worthy of being in a Windows Techie Toolkit
Troubleshooting and repairing misbehaving Peripherals in Windows using the Device Manager
Putting Windows Explorer on Steroids
Dumping Windows Default Applications for Better Ones (Part One)
Bluetooth - Explained to a Finer Level
Was the read worth it? May I request you the reader to kindly click the Small Blue "Yes" button at the End of this Article, where it states "Was this article helpful?", if you really did find it helpful. A "No" is also welcome, so that at least I will know that you got through the stuff I wrote.
Please post comments, so that I may improve on it further. Your input will help me to improve and benefit all future readers.
Ravi.
As an expert on Experts Exchange, it has always been a good feeling trying to help out others. It has not been a long time since I joined Experts Exchange and since then I have always been impressed at the design of the website. The Help provided at the Help page is impressive and does fulfill a good job of using the website and its features. However, it does somewhat lack in defining the implementation and use of Filters.
Although there are many flavors of defining filters with a myriad of other options, my objective here will be to introduce you to the basic idea of creating and working with Filters. Once you are familiar with the creation of Filters, the rest will be quite easy to do and may not need further guidance.
Favorite Zones:
Nobody is an expert in all Zones and all of us tend be really good at only some subjects. For example, I am mainly interested in answering Questions relating to Windows XP and Internet Explorer. Of course, I do answer other Questions related to Printers, Laptops and a dozen other Zones. However, when I first navigate to the site, my idea is to gather the Questions that are seeking Answers in my Favorite Zones (i.e. Windows XP and Internet Explorer) and then look for remaining stuff, if I have time.
So, Experts Exchange has given us the option of creating a List of Favorite Zones, means viewing only those Zones which we wish to and not the others, so that they don’t get in the way. However, I would define “Favorite Zones” as those Zones which include any of the areas where I may want to answer a question, rather than the two zones (i.e. Windows XP and Internet Explorer) which you may otherwise think of.
Images used for simplicity:
I have taken screenshots of Experts Exchange Pages that I will be referring to in my below guide. In case you are doing it interactively while reading the guide, it should be quite easy to find all the stuff, I am referring to. Just in case it gets difficult, you can look up the exact location via the Images, I have used here.
Another technique would be to press Ctrl+F in your browser, that will open up the Find Dialog Box. You input the text to Search and your Browser will do all the hard work of finding what you want on the curent page, rather than you straining your eyes. Just in case, it hits something which you were not looking for, press F3 and it will find the next match.
The Presence of two skins on Experts Exchange:
Experts Exchange uses two skins for using the Website. Limited Members are presented with the option of using only the "Expert Skin" whereas Premium Members have the choice of using either. Premium members may change the Current View of the Skin by selecting the Third Option (Skin: Premium / Expert), found below "My Account" at the Top Right Section of the EE page. You can also change the option to permanently view your Desired Choice by Editing your Profile (Same Section, First Option).
This guide uses the Premium skin to explain the relevant material. If you happen to be only using the Expert Skin, the website view may somewhat differ but the applicability of this Article will not change.
Setting up Favorite Zones:
These are viewable in the side pane as “My Favorites” (See Image 1) when you are browsing the Site. They will appear as “Favorites” under “Expert Tools” if you have used the “Answer” Button on the Home Page (See Image 1) or used the https://www.experts-exchange.com/expertsZone.jsp link to directly reach the EE answer page.

Just in case you have not defined them yet, you will not see any zones listed under My Favorites. Whatever you do, first setting up the Favorites will be a proper way to define your filters. So when you click Edit under Favorites (See Image 1), you will be presented with a list of Zones (See Image 2) that can be expanded or collapsed, where you can select (or check-mark) the Zones which you always wish to view.
Defining Favorites:
Cick the Answer button on the Home Page of Experts Exchange (See Image 1) to get access to the Expert Tools section of your Profile.
The Zones are broadly split into various categories which can be expanded and collapsed (See Image 2), much like a Windows Folder Tree where you click a “Plus” symbol (if options exist) to drill down further. For Example, I have selected my Zones of interest- Windows XP, Internet Explorer, Firefox, Opera (See Image 3) & Printers (See Image 4).
Please note that some areas may be common to two places (See Image 5). However once a Zone is selected, it is automatically selected in the common area.
You can also alter the order in which the Zones are displayed in your List by scrolling below and using the Position / Actions buttons (See Image 6). Once done with the selection and ordering of your desired zones, click Submit Selection (See Image 6) to save what you have chosen to your Profile.
After doing that, you will see Links to your desired Favorite Zones located in the Right Pane under “My Favorites” (See Image 7).
Defining Filters:
Once you have defined your “Favorite Zones”, it becomes much easier to “Group Zones” related to a particular Subject. In this example, I will be defining a Filter for all Browsers that include Internet Explorer, Firefox and Opera which are in “My Favorites”. First, click the Answer button (See Image 1) to get to your Expert Tools View. Then click the Create Filter button under Filters to define a New Filter (See Image 8).
I had already set up other Filters prior to creating this Article which also appear in the Screenshot. Please ignore them and do not confuse yourself. This will open up the same window which we used to define the Favorites. In order to keep it simple, select “Show my Favorite Zones” Filter (See Image 8) under “Zone Filter Criteria” which will list only those zones, you chose earlier. Select the “Desired Zones” (in our case Internet Explorer, Firefox and Opera) by placing a check mark next to their relevant boxes and don't forget to click the Update Query button (See Image 8), when done.
Choose a name for the Filter (I have chosen "Browsers" in this guide). You may also choose a frequency of time if you wish to be alerted by email with a list of “Questions Awaiting Answers”. When finished, click the Create Filter Button 2, which is down belo, next to the "Clear All" Button (See Image 8).
As soon as you do that, you will find your Filter created and listed under the “Filters” section of “Expert Tools”. In this example, the Filter named “Browsers” is immediately visible as explained (See Image 9).

Using Filters:
Once the initial configuration has been done, click the Answer button (See Image 1) on the Home Page of Experts Exchange to get access to “Expert Tools”.
Click on the Desired Filter under “Filters” (in our case, it happens to be “Browsers”) which will list a neat table displaying a list of questions awaiting answers with other granular details like Date Asked, Points Assigned, Title of the Question, Author of the Question, Number of Comments already made to it, Primary Zone of the Question and an Actions Button.
The Actions button will open the Question in a new Window. As most of you may already know, clicking a link by pressing the Mouse Wheel (also called the "middle button") is a shortcut to “Open the Current Link in a New Tab” for all Browsers using tabbed functionality. If you have a wheel mouse, you can press the wheel to view the question into a new tab of the same window (See image 9 for all the aforementioned details).
[step=""]Editor's Note:
You can also drag the small "open in new window" icon and drop it onto another open Browser window.[/step]
If you prefer to answer one Question at a time (or if you want a quick preview of a question before starting to work on it full screen), simply click the Question Title and it will be displayed just below the “Filter Results” table. Scroll below, view the Question and Post a Comment in the traditional way. Hit the Submit Button and you are done.
Please note that you can also use other links related to Individual Zones displayed under “Favorite Zones” to get a list of “Questions awaiting Answers” too.
Filters (define to your needs):
This guide has been written to increase the awareness of experts towards Filters which is a wonderful Tool. Defining and using Filters does enable a straightforward way for experts to do their business – i.e. answering questions without wasting time.
There are a couple of other options with filters that you may tune to your needs while defining them, such as minimum Points desired (means to view / not to view Questions that carry a weight-age of less than x points), Questions asked by a particular member and so on. However, once you have gone this far to defining Filters, the rest should not be really that difficult to implement.
Closing Comments:
May it interest you that this is my sixth article on Experts Exchange. The other five are --
Applications worthy of being in a Windows Techie Toolkit
Troubleshooting and repairing misbehaving Peripherals in Windows using the Device Manager
Putting Windows Explorer on Steroids
Dumping Windows Default Applications for Better Ones (Part One)
Bluetooth - Explained to a Finer Level
Was the read worth it? May I request you the reader to kindly click the Small Blue "Yes" button at the End of this Article, where it states "Was this article helpful?", if you really did find it helpful. A "No" is also welcome, so that at least I will know that you got through the stuff I wrote.
Please post comments, so that I may improve on it further. Your input will help me to improve and benefit all future readers.
Ravi.
Have a question about something in this article? You can receive help directly from the article author. Sign up for a free trial to get started.
Comments (1)
Commented: