
Browse All Articles > Building Android app with NDK - integrated in Eclipse with CDT
Update (December 2011): Since this article was published, the things have changed for good for Android native developers. The Sequoyah Project automates most of the tasks discussed in this article. You can even find instructions for debugging your native code with Eclipse.
This was inspired by Robert Green's article, Get Your Eclipse-Integrated NDK On! Luckily, with the new R4 release of the Android Native Development Kit (NDK), the procedure has become much much easier.
Prerequisites
Download Cygwin from http://cygwin.org - ver. 1.7.5 is OK. I recommend using the default installation directory: Install it in
c:\cygwin
Make sure that c:\cygwin\bin is added to PATH. I set the environment variable CYGWIN=nodosfilewarning to make Windows integration easier.
Download Android SDK from http://developer.android.com/sdk/index.html. Unpack it to a directory without spaces in the folder name. Follow the instructions on the SDK page to install JDK, Eclipse, and ADT plugin.
Download Android NDK from http://developer.android.com/sdk/ndk/index.html. Unpack to a directory without spaces. Set NDK_ROOT environment variable to point there.
Download Eclipse CDT (C Development Tools) from http://www.eclipse.org/cdt/. Follow the instructions there to add CDT to your Eclipse.
Add project
Now it's time to import an existing Android project (C:\APPS\android-ndk-r4\samples\hello-jni is fine). It will show up as Java only, expecting you to run the build from the Cygwin command prompt.
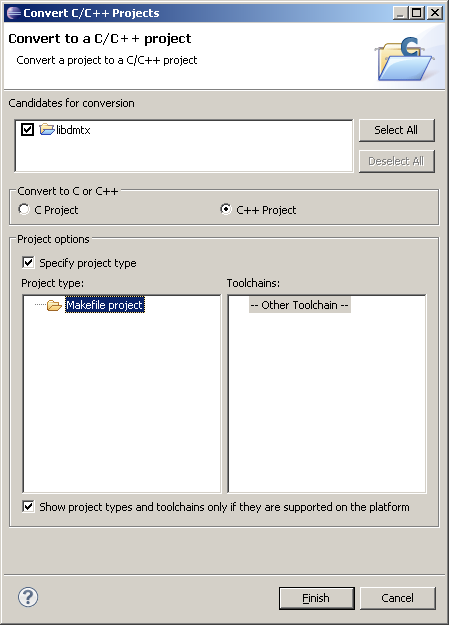
Right-click on a project, then select New -> Convert to C/C++ project. In the dialog, choose Makefile project with Other Toolchain.
![convert]()
Click Finish.
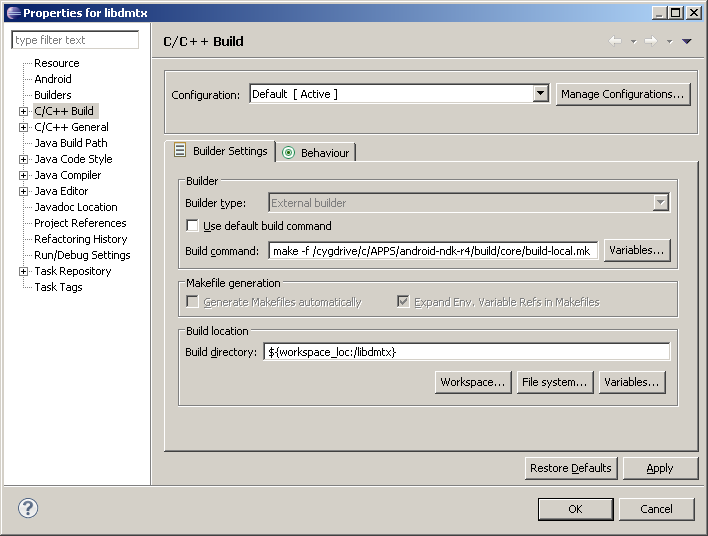
Once again, right-click on the project, go to the Properties -> C/C++ Build -> Builder settings tab. Uncheck "Use default build command", and type make -f ${NDK_ROOT}/build/core/build-local.mk
![builder settings]()
Please don't forget to click Apply.
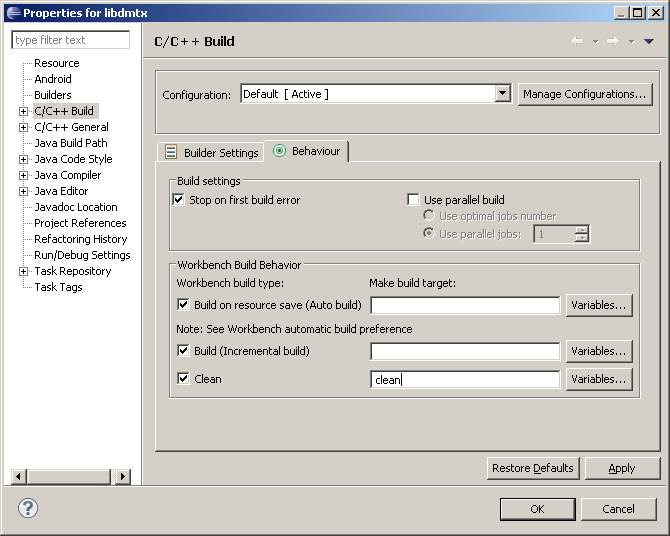
Choose the Behavior tab (Properties -> C/C++ Build again). Remove target names from both "Build" boxes. Leave clean target for the third build type (Clean).
![builder behaviour]()
Please don't forget to click Apply again.
Inspector integration
To help the Inspector find the include files, choose C/C++ General -> Paths and Symbols. For both C and for C++ remove all built-in include paths. You will need the following three:
![builder paths]()
You may include other paths, e.g. project-specific.
Done! Your projects will build now including Android.mk that is in jni directory.
Unfortunately, CDT cannot help you with debuggong. Use GDB that is provided with NDK. But you can use ELF binary parsers of the CDT to examine the libraries that are built.
This was inspired by Robert Green's article, Get Your Eclipse-Integrated NDK On! Luckily, with the new R4 release of the Android Native Development Kit (NDK), the procedure has become much much easier.
Prerequisites
Download Cygwin from http://cygwin.org - ver. 1.7.5 is OK. I recommend using the default installation directory: Install it in
c:\cygwin
Make sure that c:\cygwin\bin is added to PATH. I set the environment variable CYGWIN=nodosfilewarning to make Windows integration easier.
Download Android SDK from http://developer.android.com/sdk/index.html. Unpack it to a directory without spaces in the folder name. Follow the instructions on the SDK page to install JDK, Eclipse, and ADT plugin.
Download Android NDK from http://developer.android.com/sdk/ndk/index.html. Unpack to a directory without spaces. Set NDK_ROOT environment variable to point there.
Download Eclipse CDT (C Development Tools) from http://www.eclipse.org/cdt/. Follow the instructions there to add CDT to your Eclipse.
Add project
Now it's time to import an existing Android project (C:\APPS\android-ndk-r4\saRight-click on a project, then select New -> Convert to C/C++ project. In the dialog, choose Makefile project with Other Toolchain.
Click Finish.
Once again, right-click on the project, go to the Properties -> C/C++ Build -> Builder settings tab. Uncheck "Use default build command", and type make -f ${NDK_ROOT}/build/core/bui
Please don't forget to click Apply.
Choose the Behavior tab (Properties -> C/C++ Build again). Remove target names from both "Build" boxes. Leave clean target for the third build type (Clean).
Please don't forget to click Apply again.
Inspector integration
To help the Inspector find the include files, choose C/C++ General -> Paths and Symbols. For both C and for C++ remove all built-in include paths. You will need the following three:
${NDK_ROOT}/build/prebuilt/windows/arm-eabi-4.4.0/lib/gcc/arm-eabi/4.4.0/include-fixed
                      ${NDK_ROOT}/build/prebuilt/windows/arm-eabi-4.4.0/lib/gcc/arm-eabi/4.4.0/include
                      ${NDK_ROOT}/build/platforms/android-8/arch-arm/usr/include
You may include other paths, e.g. project-specific.
Done! Your projects will build now including Android.mk that is in jni directory.
Unfortunately, CDT cannot help you with debuggong. Use GDB that is provided with NDK. But you can use ELF binary parsers of the CDT to examine the libraries that are built.
Have a question about something in this article? You can receive help directly from the article author. Sign up for a free trial to get started.
Comments (0)