Specifying a Toolbox Icon for a Custom Control using Visual Studio 2010


Published:
Browse All Articles > Specifying a Toolbox Icon for a Custom Control using Visual Studio 2010
When a custom control is placed on the toolbox, if it is a professionally made control, it usually has a really nice icon associated with it instead of the default custom control icon that Visual Studio inserts when no icon is available. When you build your own custom control, you can add an icon for the control and embed it in your component's DLL assembly so that it is shown on the toolbox whenever someone adds your control.
you need to follow below steps to add icon in your custom control.
Step 1:
Create your icon and save it as a bmp file (16x16), named as shown below.
ProjectNameSpace.ControlName.bmp
e.g. Project Name : CustomGrid
Control Name : MyGridControl
Bmp File Name : CustomGrid.MyGridControl.bmp
Step 2: Add in Project and Change Build Action Properties to "Embedded Resources".
Stpe 3: Add ToolboxBitmap line in your class file as per screenshot.
![Toolbox Sample Code]()
Step 4 : Compile your Project as "Class Library".
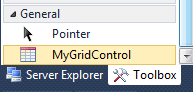
Step 5: Add this control in Different Solution Project Toolbox using choose items and icon will display like below ( In Same Project icon can not display).
![Toolbox]()
Download Sample Project : CustomGrid.zip
you need to follow below steps to add icon in your custom control.
Step 1:
Create your icon and save it as a bmp file (16x16), named as shown below.
ProjectNameSpace.ControlNa
e.g. Project Name : CustomGrid
Control Name : MyGridControl
Bmp File Name : CustomGrid.MyGridControl.b
Step 2: Add in Project and Change Build Action Properties to "Embedded Resources".
Stpe 3: Add ToolboxBitmap line in your class file as per screenshot.

Step 4 : Compile your Project as "Class Library".
Step 5: Add this control in Different Solution Project Toolbox using choose items and icon will display like below ( In Same Project icon can not display).
Download Sample Project : CustomGrid.zip
Have a question about something in this article? You can receive help directly from the article author. Sign up for a free trial to get started.
Comments (0)