Installing printer using GPO preferences


Published:
Browse All Articles > Installing printer using GPO preferences
Installing a printer using group policy preferences is not that hard let’s take a look at it.
First lets open up your group policy console and edit the policy you want to add it to. I recommend creating a new policy for each printer makes it a little easier to manage and then you can like the policy to multiple OUs without having every printer installed.
Once you have opened group policy console and selected the policy you want to edit you will need to decide if you want the printer to be on the computer side or user side. Little fact if you need it to be set at default printer it needs to be on the user side. For this example I am going to do it on the user side.
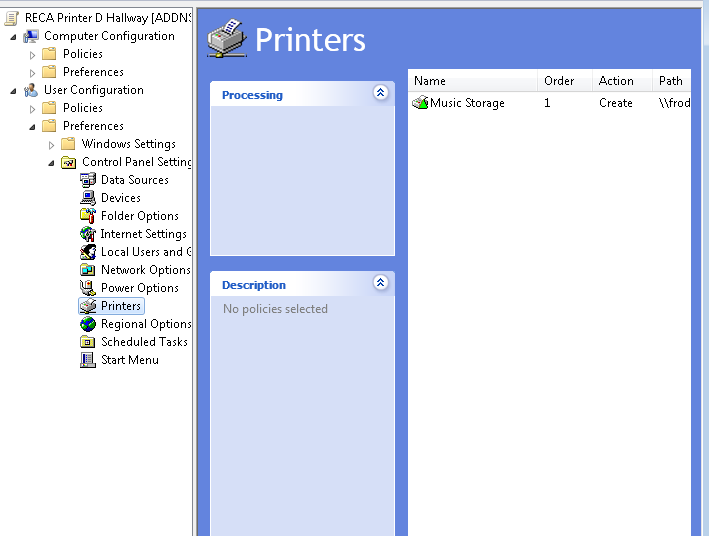
Ok now that your policy is open navigate to User Configuration \ Preferences \ Control Panel Setting \ Printers
![printer 1]()
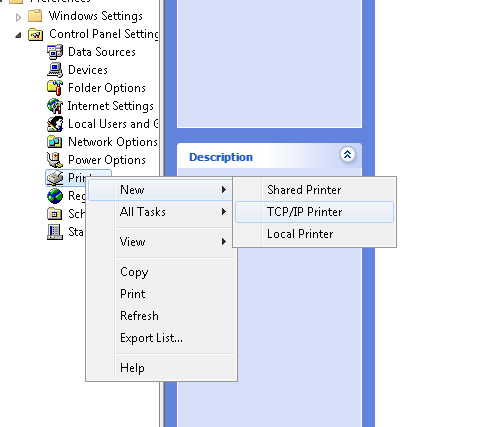
Now we need to add a printer in this example I am going to add a TCP/IP printer
![printer 2]()
A new screen is going to come up for you to put in the IP address the Local Name and printer Path
![printer 3]()
The first thing is you action on what do you want to do you have four option:
Create- which will create the printer
Replace- which will replace the printer on every login this is nice if every user does not need the printer or you do not want some people to print.
Update- which updates any changes you may have made
Delete – deletes the printer.
After that you have to enter in the IP adderss of the printer. Or use the DNS name of the printer which ever you would like.
Then enter the name of the printer that you want the users to see. This is what will show up on there computer.
Printer Path is where you need to put the server path of the printer or direct path of the printer.
You then have two options you can set “Set this printer as the default printer” and “…only if a local printer is not present”
Location and comments are not required but recommend.
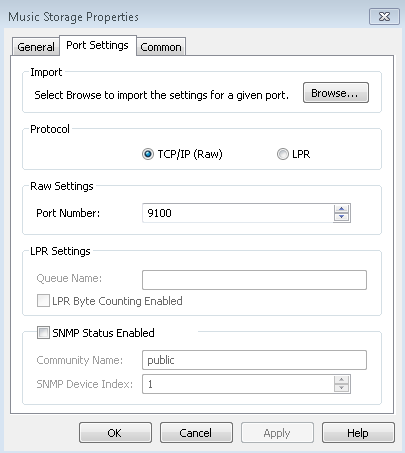
On your next tab you have the Port Settings. You may want to make a few changes here.
![Printer 4]()
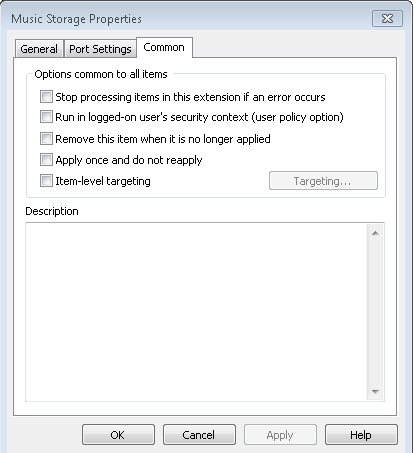
The Next tab Common has a few more options.
![Printer 5]()
Two on here that may be useful is Remove this item if no longer applied. It is very useful if you move computers around or you have some on that goes to different offices. If this box is checked it will change you action to replace and you will not be able to change that unless you uncheck the box.
The other is Item-level targeting. That is nice when you want only certain computers or users or OUs or IP address
![printer 6]()
Well after that you are all set. Don’t forget you may want to check your scope options to make sure that it’s going to the set of users or computers.
First lets open up your group policy console and edit the policy you want to add it to. I recommend creating a new policy for each printer makes it a little easier to manage and then you can like the policy to multiple OUs without having every printer installed.
Once you have opened group policy console and selected the policy you want to edit you will need to decide if you want the printer to be on the computer side or user side. Little fact if you need it to be set at default printer it needs to be on the user side. For this example I am going to do it on the user side.
Ok now that your policy is open navigate to User Configuration \ Preferences \ Control Panel Setting \ Printers
Now we need to add a printer in this example I am going to add a TCP/IP printer
A new screen is going to come up for you to put in the IP address the Local Name and printer Path
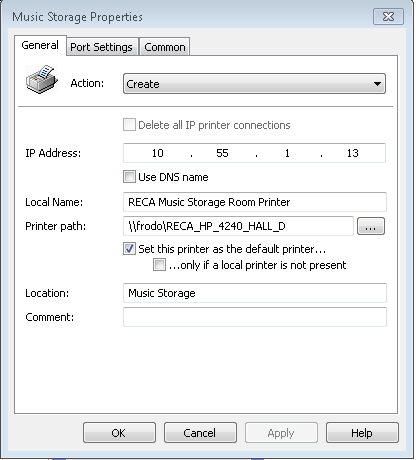
The first thing is you action on what do you want to do you have four option:
Create- which will create the printer
Replace- which will replace the printer on every login this is nice if every user does not need the printer or you do not want some people to print.
Update- which updates any changes you may have made
Delete – deletes the printer.
After that you have to enter in the IP adderss of the printer. Or use the DNS name of the printer which ever you would like.
Then enter the name of the printer that you want the users to see. This is what will show up on there computer.
Printer Path is where you need to put the server path of the printer or direct path of the printer.
You then have two options you can set “Set this printer as the default printer” and “…only if a local printer is not present”
Location and comments are not required but recommend.
On your next tab you have the Port Settings. You may want to make a few changes here.
The Next tab Common has a few more options.
Two on here that may be useful is Remove this item if no longer applied. It is very useful if you move computers around or you have some on that goes to different offices. If this box is checked it will change you action to replace and you will not be able to change that unless you uncheck the box.
The other is Item-level targeting. That is nice when you want only certain computers or users or OUs or IP address

Well after that you are all set. Don’t forget you may want to check your scope options to make sure that it’s going to the set of users or computers.
Have a question about something in this article? You can receive help directly from the article author. Sign up for a free trial to get started.
Comments (0)