Export mailboxes using Exmerge and Exchange 2003


Published:
Browse All Articles > Export mailboxes using Exmerge and Exchange 2003
There could be many reasons why you would want to export mail directly from the Exchange Mailbox Store. You may be migrating to a hosted solution, you could be moving to a different Exchange organisation or you may simply be using Exmerge as a way of doing a brick level backup of your mail store. This question has come up a lot recently with askers not wanting to migrate to Exchange 2010 but to start fresh and take their mailbox data with them.
Exmerge is a free utility available from Microsoft as a download using this link: http://www.microsoft.com/downloads/details.aspx?familyid=429163ec-dcdf-47dc-96da-1c12d67327d5&displaylang=en
Exmerge can be used against any version of Exchange from version 5.5 up to and including Exchange 2003, as long as the Exchange 2003 Management tools are installed on the system where you plan to use Exmerge.
NOTE: Outlook is not required for this process and should never be installed on an Exchange Server older than Exchange 2007.
Before we can run exmerge there are a few things we need to do.
Once you have downloaded Exmerge you will need to extract it into the C:\Program Files\ExchSrvr\Bin folder to allow it to run. This is because it relies on DLL’s in this folder. The other option would be to add this path in to the Environment Variables but this would require a reboot to take effect. For this article I will assume you are extracting to the folder I have recommended above.
You will need a user account that has access to all the mailboxes that you will be exporting. This type of account is commonly referred to as a service account. If you don’t already have a service account I would recommend configuring a new user and then follow the instructions in this link: http://support.microsoft.com/kb/292509
Once you have made permission changes on the Information Store there may be a delay in them being applied of up to 2 hours. This can be expedited by restarting the Microsoft Exchange Information Store service.
Please note that the Administrator user does not have these privileges by default and under a normal Exchange Server installation is specifically denied the required permissions. This is why I always configure a new account specifically for this purpose.
Extraction Process
To extract the mailboxes from Exchange, login using the service account you have created and then run exmerge.exe from the c:\program files\exchsrvr\bin folder.
Click Next on the welcome screen and you will see the screen below.
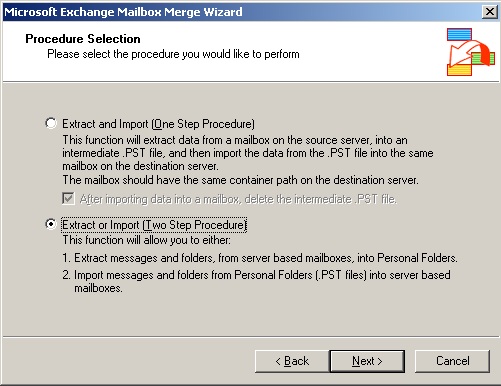
![exmerge_01]() The Extract and Import function will extract the mailboxes you choose to PST’s and then import them in to a source server of your choice in one process. The option we need is the Extract or Import (Two Step Procedure). This will allow us to extract the mailboxes to PST files ready for later use. Select Extract or Import and then click Next.
The Extract and Import function will extract the mailboxes you choose to PST’s and then import them in to a source server of your choice in one process. The option we need is the Extract or Import (Two Step Procedure). This will allow us to extract the mailboxes to PST files ready for later use. Select Extract or Import and then click Next.
![exmerge_02]() You will then have 2 options. Step 1 for extracting the data from the Exchange Server and Step 2 for importing. We are going to be using Step 1 which will extract the mailboxes we choose into PST files and store them. Select Step 1 and click Next.
You will then have 2 options. Step 1 for extracting the data from the Exchange Server and Step 2 for importing. We are going to be using Step 1 which will extract the mailboxes we choose into PST files and store them. Select Step 1 and click Next.
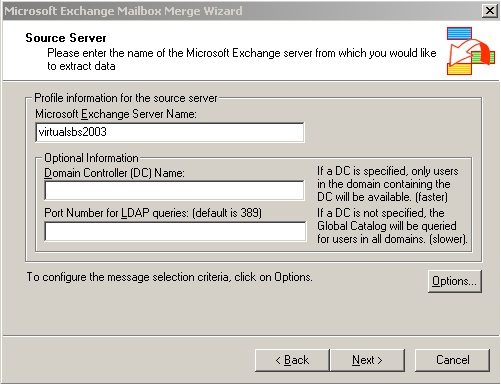
![exmerge_03]() The source server screen shown above is where the details of the Exchange Server, Domain Controller and Port Number for LDAP queries (optional). For most scenarios you will only need to enter the name of the Exchange server. The domain controller and port number is only used if you have a multiple domain configuration and need to specify a different domain controller.
The source server screen shown above is where the details of the Exchange Server, Domain Controller and Port Number for LDAP queries (optional). For most scenarios you will only need to enter the name of the Exchange server. The domain controller and port number is only used if you have a multiple domain configuration and need to specify a different domain controller.
NOTE: Exmerge will not extract mailboxes that are over 2GB in size in a single pass. This is due to the size limitation of the PST format that exmerge uses. To get around this we can use the options button on the source server screen as demonstrated below.
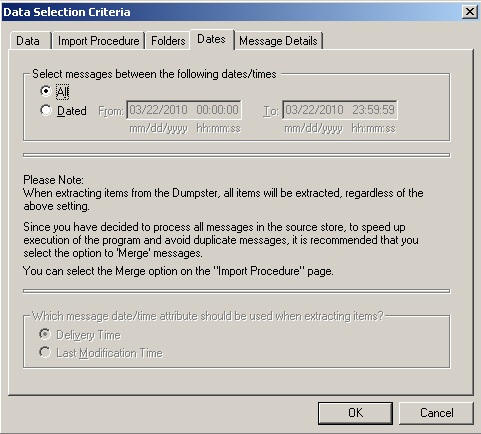
![exmerge_05]() On the options screen select the Dates tab, this will allow you to specify a date range to export first, this is useful for the larger mailboxes over 2GB in size. Splitting the export into 12 or 6 month exports should reduce the possibility of hitting the size limit but you will need to adjust these for your own individual requirements.
On the options screen select the Dates tab, this will allow you to specify a date range to export first, this is useful for the larger mailboxes over 2GB in size. Splitting the export into 12 or 6 month exports should reduce the possibility of hitting the size limit but you will need to adjust these for your own individual requirements.
NOTE: When you run exmerge and specify a date range for export make sure that once the export has finished it’s important to rename the PST. If you don’t do this then the next time you run exmerge to do the next date range it will overwrite the last PST
Once you have finished click OK and then Next on the source server screen to show the mailbox selection screen.
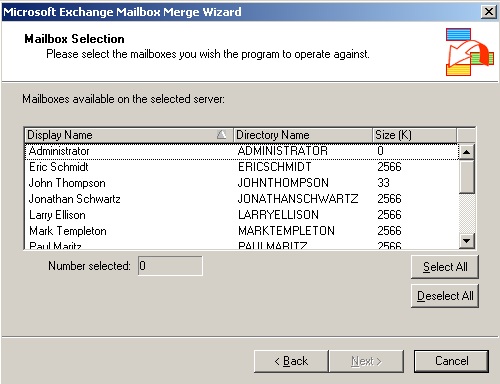
![exmerge_07]() On this screen you can select the mailboxes you want to select either individually, using the CTRL button to select random mailboxes or click the Select All button to just select all mailboxes. Remember that whatever selection you made in the options screen will be applied to ALL of these mailboxes for this export. Click Next.
On this screen you can select the mailboxes you want to select either individually, using the CTRL button to select random mailboxes or click the Select All button to just select all mailboxes. Remember that whatever selection you made in the options screen will be applied to ALL of these mailboxes for this export. Click Next.
Select the Locale that your Exchange Server is currently using, exmerge should detect this by default but it’s always worth just double checking. Click Next.
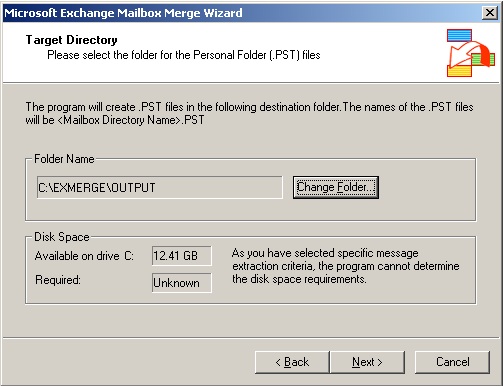
![exmerge_08]() On the target directory screen select the folder you would like the PST files saved to. It’s worth noting that you can only select an existing folder so you will need to create a folder prior to clicking the Change Folder button. Once selected click Next.
On the target directory screen select the folder you would like the PST files saved to. It’s worth noting that you can only select an existing folder so you will need to create a folder prior to clicking the Change Folder button. Once selected click Next.
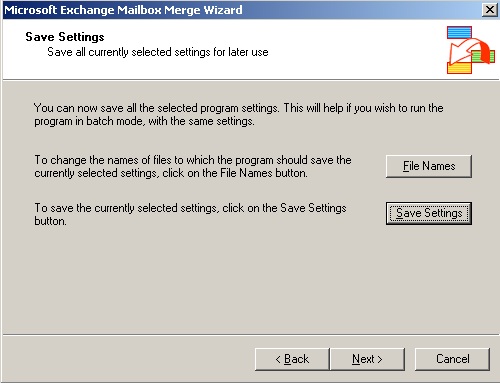
![exmerge_09]() The Save Settings screen allows you to save the settings that have just been specified in the wizards in to the exmerge.ini file. This is useful if you want to set the export up and then schedule it for another time or if you want to run regular backups using exmerge for brick level backup. Once you have all these settings saved in exmerge.ini file you can then use exmerge in command line mode without the need to run through the wizard.
The Save Settings screen allows you to save the settings that have just been specified in the wizards in to the exmerge.ini file. This is useful if you want to set the export up and then schedule it for another time or if you want to run regular backups using exmerge for brick level backup. Once you have all these settings saved in exmerge.ini file you can then use exmerge in command line mode without the need to run through the wizard.
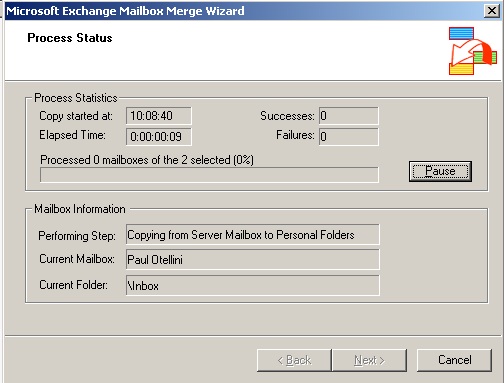
Once you click Next on this screen the extraction process will start so make sure you are happy with the settings you have made and click Next.
You will then see this screen.
![exmerge_10]() Once the extraction process has finished click Finish. If there are errors listed on the screen then you will need to review the exmerge.log file in c:\program files\exchsrvr\bin folder.
Once the extraction process has finished click Finish. If there are errors listed on the screen then you will need to review the exmerge.log file in c:\program files\exchsrvr\bin folder.
Issues that will cause problems with exporting data using Exmerge are:
Exmerge is a free utility available from Microsoft as a download using this link: http://www.microsoft.com/d
Exmerge can be used against any version of Exchange from version 5.5 up to and including Exchange 2003, as long as the Exchange 2003 Management tools are installed on the system where you plan to use Exmerge.
NOTE: Outlook is not required for this process and should never be installed on an Exchange Server older than Exchange 2007.
Before we can run exmerge there are a few things we need to do.
Once you have downloaded Exmerge you will need to extract it into the C:\Program Files\ExchSrvr\Bin folder to allow it to run. This is because it relies on DLL’s in this folder. The other option would be to add this path in to the Environment Variables but this would require a reboot to take effect. For this article I will assume you are extracting to the folder I have recommended above.
You will need a user account that has access to all the mailboxes that you will be exporting. This type of account is commonly referred to as a service account. If you don’t already have a service account I would recommend configuring a new user and then follow the instructions in this link: http://support.microsoft.c
Once you have made permission changes on the Information Store there may be a delay in them being applied of up to 2 hours. This can be expedited by restarting the Microsoft Exchange Information Store service.
Please note that the Administrator user does not have these privileges by default and under a normal Exchange Server installation is specifically denied the required permissions. This is why I always configure a new account specifically for this purpose.
Extraction Process
To extract the mailboxes from Exchange, login using the service account you have created and then run exmerge.exe from the c:\program files\exchsrvr\bin folder.
Click Next on the welcome screen and you will see the screen below.
 The Extract and Import function will extract the mailboxes you choose to PST’s and then import them in to a source server of your choice in one process. The option we need is the Extract or Import (Two Step Procedure). This will allow us to extract the mailboxes to PST files ready for later use. Select Extract or Import and then click Next.
 You will then have 2 options. Step 1 for extracting the data from the Exchange Server and Step 2 for importing. We are going to be using Step 1 which will extract the mailboxes we choose into PST files and store them. Select Step 1 and click Next.
 The source server screen shown above is where the details of the Exchange Server, Domain Controller and Port Number for LDAP queries (optional). For most scenarios you will only need to enter the name of the Exchange server. The domain controller and port number is only used if you have a multiple domain configuration and need to specify a different domain controller.
NOTE: Exmerge will not extract mailboxes that are over 2GB in size in a single pass. This is due to the size limitation of the PST format that exmerge uses. To get around this we can use the options button on the source server screen as demonstrated below.
 On the options screen select the Dates tab, this will allow you to specify a date range to export first, this is useful for the larger mailboxes over 2GB in size. Splitting the export into 12 or 6 month exports should reduce the possibility of hitting the size limit but you will need to adjust these for your own individual requirements.
NOTE: When you run exmerge and specify a date range for export make sure that once the export has finished it’s important to rename the PST. If you don’t do this then the next time you run exmerge to do the next date range it will overwrite the last PST
Once you have finished click OK and then Next on the source server screen to show the mailbox selection screen.
 On this screen you can select the mailboxes you want to select either individually, using the CTRL button to select random mailboxes or click the Select All button to just select all mailboxes. Remember that whatever selection you made in the options screen will be applied to ALL of these mailboxes for this export. Click Next.
Select the Locale that your Exchange Server is currently using, exmerge should detect this by default but it’s always worth just double checking. Click Next.
 On the target directory screen select the folder you would like the PST files saved to. It’s worth noting that you can only select an existing folder so you will need to create a folder prior to clicking the Change Folder button. Once selected click Next.
 The Save Settings screen allows you to save the settings that have just been specified in the wizards in to the exmerge.ini file. This is useful if you want to set the export up and then schedule it for another time or if you want to run regular backups using exmerge for brick level backup. Once you have all these settings saved in exmerge.ini file you can then use exmerge in command line mode without the need to run through the wizard.
Once you click Next on this screen the extraction process will start so make sure you are happy with the settings you have made and click Next.
You will then see this screen.
 Once the extraction process has finished click Finish. If there are errors listed on the screen then you will need to review the exmerge.log file in c:\program files\exchsrvr\bin folder.
Issues that will cause problems with exporting data using Exmerge are:
Incorrect permissions (covered by creating a new service account)
Information Store being Dismounted
User account associated with the mailbox being disabled
Not enough disk space in the location where you are storing the PST files
Mailbox over 2GB in size
Corrupt items in mailbox (if this happens then the only option you have is to export using Outlook as exmerge will not export corrupt items)
Have a question about something in this article? You can receive help directly from the article author. Sign up for a free trial to get started.
Comments (8)
Author
Commented:You also need to ensure you are logged in with the user that you have created.
Commented:
Author
Commented:Commented:
Commented:
View More