Configure a shared mailbox in Exchange 2010


Published:
Browse All Articles > Configure a shared mailbox in Exchange 2010
We see 3 or 4 requests every day for how to configure a shared mailbox. Now that Exchange 2010 is growing in uptake, more of those requests are for this facility in Exchange 2010. With Exchange 2010 the process has slightly changed, for the better.
![new mailbox]() You will notice in Exchange 2010 we have 4 different types of mailbox and these are:
You will notice in Exchange 2010 we have 4 different types of mailbox and these are:
![mailboxdetail]() Complete the details for your user; I like to use something that describes the mailbox in question. Once done click next and you will see the screen below.
Complete the details for your user; I like to use something that describes the mailbox in question. Once done click next and you will see the screen below.
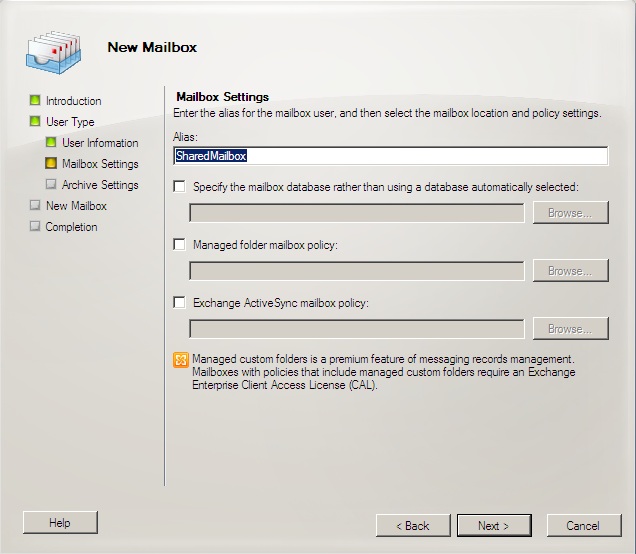
![mailboxdetail2]() Enter the Exchange Alias, I normally set this the same as the username, but as long as it’s unique it can be anything you like. If you want to specify a database (if you have more than one) and any mailbox/activesync policies do so here. As this is a shared mailbox you may want to not set any policies you have in place for other users or you may wish to define a completely separate policy specifically for shared mailboxes. Once done click next.
Enter the Exchange Alias, I normally set this the same as the username, but as long as it’s unique it can be anything you like. If you want to specify a database (if you have more than one) and any mailbox/activesync policies do so here. As this is a shared mailbox you may want to not set any policies you have in place for other users or you may wish to define a completely separate policy specifically for shared mailboxes. Once done click next.
Choose whether to include an archive mailbox or not. Click next then new and finish to complete the wizard.
![rightclick]() Select Manage Full Access Permissions this will display the first screen of the permissions wizard as below.
Select Manage Full Access Permissions this will display the first screen of the permissions wizard as below.
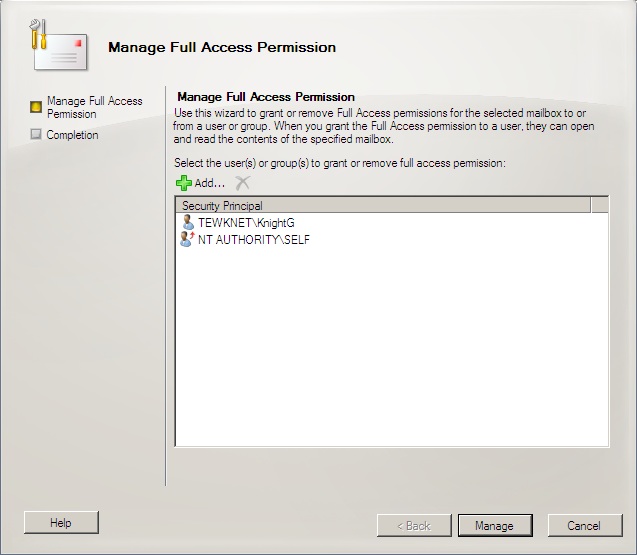
![permissions]() Click the Add button and locate the groups/users you want to give permissions to. I would always recommend using Security Groups because you can then simply add the user to the required group rather than run through the Exchange wizard each time.
Click the Add button and locate the groups/users you want to give permissions to. I would always recommend using Security Groups because you can then simply add the user to the required group rather than run through the Exchange wizard each time.
Once you have selected the users/groups click Manage and then Finish to apply the selected permissions.
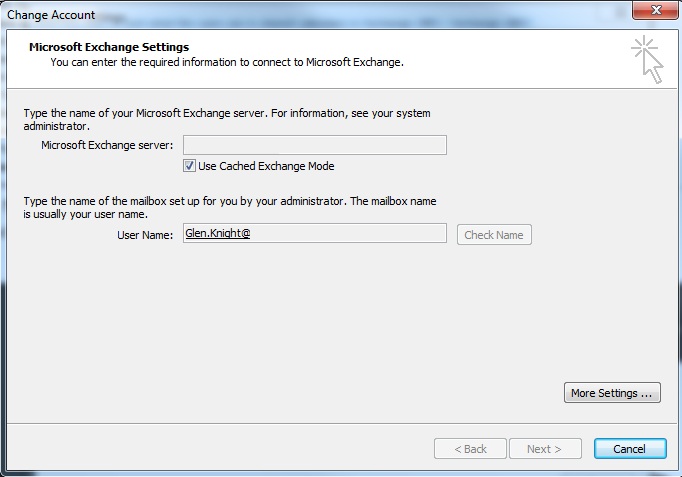
To do this is slightly different depending on the version of outlook you are using. Go to Tools > Account Settings (If using Outlook 2010 you will need to go to File and then Account settings) and then highlight the Exchange account and select either properties or change (depending on version). You will then see the screen below.
![outlook-01]() Click the more settings button and then select the advanced tab. As seen below.
Click the more settings button and then select the advanced tab. As seen below.
![outlook-02]() Once you have this screen open click on the Add and type the name of the mailbox, in this case shared mailbox. Click OK, then apply then finish.
Once you have this screen open click on the Add and type the name of the mailbox, in this case shared mailbox. Click OK, then apply then finish.
You will now be able to see the mailbox listed in Outlook.
Create the Mailbox
Using the Exchange Management Console locate the Recipient Configuration section. From the action pane on the right hand side select New Mailbox. You will then see the screen below.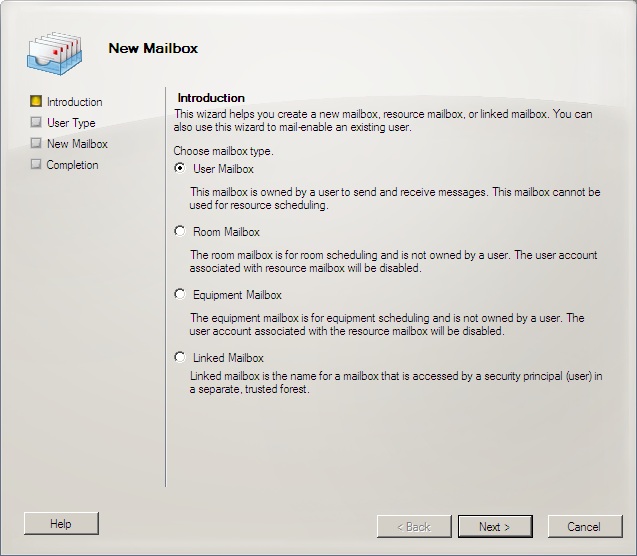 You will notice in Exchange 2010 we have 4 different types of mailbox and these are:
User Mailbox - This is the type of mailbox we would assign to a single user for sending/receiving email, calendaring & contacts.
Room Mailbox – Used for scheduling rooms for meetings etc. These can be added when sending out a meeting request as a resource. There are also a number of different management options
Equipment Mailbox – Used for scheduling a resource, like digital camera or projector for example. These can also be added when sending out a meeting request as a resource
Linked Mailbox – This is to assign a user to a mailbox that is in a different forest.
The one we are going to select is User Mailbox. Once selected click next. And you will receive the screen below.
 Complete the details for your user; I like to use something that describes the mailbox in question. Once done click next and you will see the screen below.
 Enter the Exchange Alias, I normally set this the same as the username, but as long as it’s unique it can be anything you like. If you want to specify a database (if you have more than one) and any mailbox/activesync policies do so here. As this is a shared mailbox you may want to not set any policies you have in place for other users or you may wish to define a completely separate policy specifically for shared mailboxes. Once done click next.
Choose whether to include an archive mailbox or not. Click next then new and finish to complete the wizard.
Assign permissions
Once you have completed the wizard and setup your mailbox, locate the mailbox in the Exchange Management Console and right click. You will see the following menu.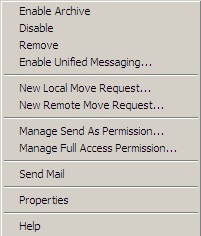 Select Manage Full Access Permissions this will display the first screen of the permissions wizard as below.
 Click the Add button and locate the groups/users you want to give permissions to. I would always recommend using Security Groups because you can then simply add the user to the required group rather than run through the Exchange wizard each time.
Once you have selected the users/groups click Manage and then Finish to apply the selected permissions.
Open the mailbox
Now that we have created the mailbox and assigned permissions we need to add the mailbox to our selected users we need to open it in Outlook.To do this is slightly different depending on the version of outlook you are using. Go to Tools > Account Settings (If using Outlook 2010 you will need to go to File and then Account settings) and then highlight the Exchange account and select either properties or change (depending on version). You will then see the screen below.
 Click the more settings button and then select the advanced tab. As seen below.
 Once you have this screen open click on the Add and type the name of the mailbox, in this case shared mailbox. Click OK, then apply then finish.
You will now be able to see the mailbox listed in Outlook.
Further Reading
Recipient types in Exchange 2010: http://technet.microsoft.com/en-us/library/bb201680.aspxHave a question about something in this article? You can receive help directly from the article author. Sign up for a free trial to get started.
Comments (8)
Commented:
Commented:
"You can't send a message on behalf of this user unless you have permission to do so. Please make sure you're sending on behalf of the correct sender, or request the necessary permission. If the problem continues, please contact your helpdesk."
Commented:
Commented:
Author
Commented:Articles are not for asking questions in.
View More