

Browse All Articles > Replacing Your Login Scripts with Group Policy Preferences
I'm sure that every Windows systems administrator has written, or at least used, a batch or VBS login script at some point in their career, whether it is to map network drives, install printers, or set some user preferences. No more!
With Windows Server 2008 – or, more specifically, the Group Policy Management Console for Vista / Server 2008 – Microsoft introduced Group Policy Preferences. The server-side configuration can be done in the GPMC in Windows Vista / Server 2008 and above, meaning you don't need Server 2008 to use GP Preferences. On the client side, the extensions are included natively in Vista and above, and can be installed as an add-on to Windows XP (available here: http://www.microsoft.com/downloads/en/details.aspx?FamilyID=e60b5c8f-d7dc-4b27-a261-247ce3f6c4f8&displaylang=en).
There's one big difference between standard Group Policy and Group Policy Preferences. With standard Group Policy, an administrator defines a set of policies that apply to a user or workstation, and they cannot be modified on the client. An example would be turning on the Windows Firewall. If this is set by Policy, the ability to turn this off is disabled for users. On the other hand, Preferences can be modified by the user. An example of this would be setting the default IE home page. We can set it to http://www.company.com for all our users, but if they want to change it, they are not prevented from doing so.
To get started, install the Group Policy Management Console, if you haven't already done so. On a domain controller, it should be installed by default. On a Vista / 7 machine, install the Remote Server Administration Tools (Windows Vista: http://www.microsoft.com/downloads/en/details.aspx?FamilyId=9FF6E897-23CE-4A36-B7FC-D52065DE9960&displaylang=en, Windows 7: http://www.microsoft.com/downloads/en/details.aspx?FamilyID=7d2f6ad7-656b-4313-a005-4e344e43997d&displaylang=en). It can then be enabled through Control Panel -> Programs and Features -> Turn Windows features on or off -> Remote Server Administration Tools -> Feature Administration Tools.
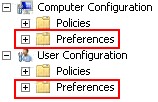
Once you've got the GPMC installed and opened, either create a new Group Policy Object to work with, or open an existing GPO. For this article, I'll just be working with the Default Domain Policy (in the real world, this probably isn't the policy object you'll want to use). Once the GPO is loaded, you'll notice that you now have a new top-level folder – Preferences.
In this new Preferences tree is where you'll find all the new Group Policy Preferences settings, and in the Policies tree you'll find all the "old" Group Policy settings. As before, Group Policy Preferences has been split into Computer Preferences, and User Preferences.
![new top-level tree items]()
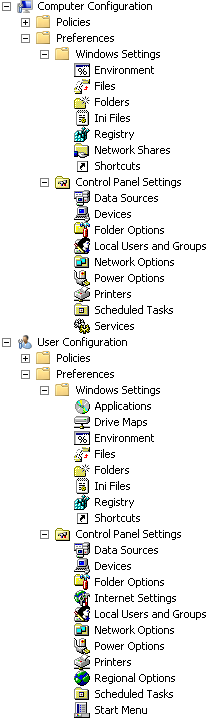
As you can see, it's a pretty extensive list of preferences that you can set. In this article I'm just going to look at two of the preferences that I've found quite useful in managing my Active Directory domain: Drive Maps and Local Users and Groups.
![all group policy preferences]()
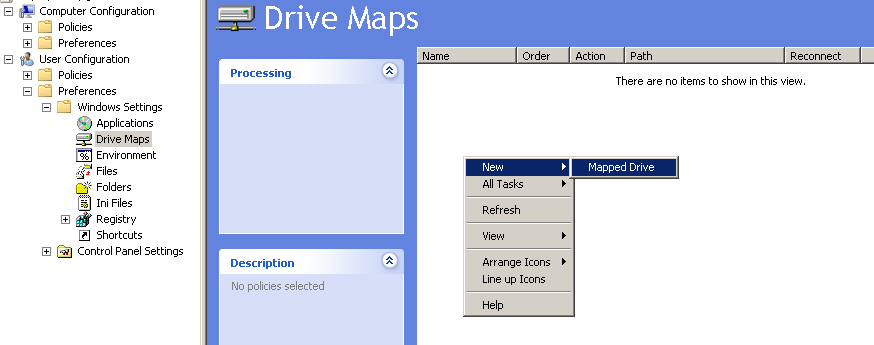
To create a Drive Map Preference, expand User Configuration -> Preferences -> Windows Settings, and select Drive Maps. Then, right-click in the white space, and select New -> Mapped Drive.
![creating a new drive map]()
You'll be presented with the New Drive Properties dialog, where you set all the properties for the new drive map.
![drive map properties]()
For the Action, I generally select Replace, although you can also choose from Create, Update, or Delete. I choose Replace because it will ensure that, in this case, the S drive is always mapped to \\server\share, even if the user has created an S drive mapping themself.
The "Location" is pretty self-explanatory. "Reconnect" is the same as checking "Reconnect at logon" when mapping a drive manually. It means that the drive mapping will be saved in the user's profile, so that each time they reboot it will attempt to connect the drive. "Label as" is a cool addition that, to the best of my knowledge (and if anyone knows otherwise, please feel free to correct me), can't be done with typical batch or VBS login scripts. It lets you change the display name of the drive from, for example, "share on \\server" to "Shared Folder". "Drive Letter" is also pretty self-explanatory, and "Connect as" will let you specify credentials to use to connect to the share (otherwise it will connect using the currently logged in user's credentials). "Hide/Show this drive" can be useful if you, say, need to map a drive for use by an application, but don't need users to see and manipulate the drive. It would still be accessible by typing S:\ in Explorer, but won't show up in My Computer, etc.
If we were to hit "OK" now, we'd have a new drive map applied to all computers and all users in our AD domain, which for some people may be exactly what they want. In many cases, however, you probably want to only map it for a specific group of users. If we select the "Common" tab, there are a whole bunch of other options available to us. Since this tab is the same for all Group Policy Preferences, I'll go into detail later on.
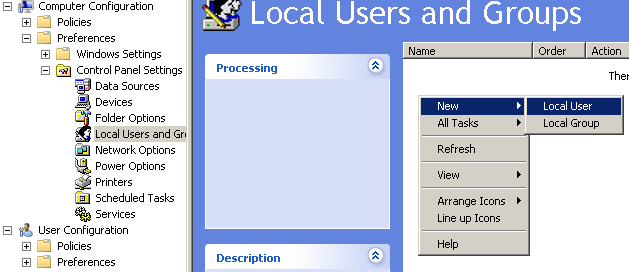
Let's say you want to set the local administrator password for a whole group of computers. This is easily accomplished by adding a new Local User preference. Simply click in the white space, and select New -> Local User.
![new local user]()
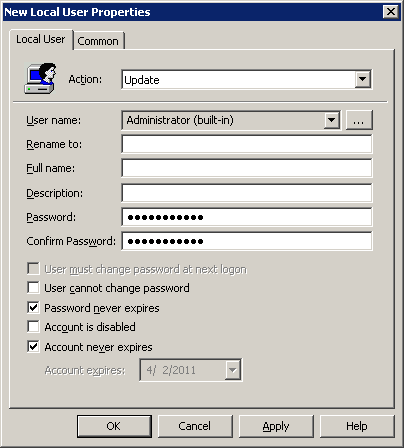
You will be presented with the New Local User Properties. In this example, select Administrator (built-in) from the User name drop down list. You could also just as easily specify a custom username here to create or update a new local user. We'll put the new password into the Password and Confirm Password fields, and it's probably also a good idea to select "Password never expires" and "Account never expires". As with Drive Maps, a whole slew of targeting and other options are available on the Common tab.
![local user properties]()
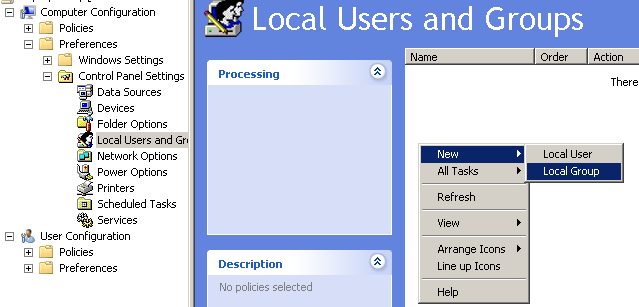
Another common task I find myself need to do is adding the Domain Users group to the local Administrators group on workstations. This can easily be accomplished by right clicking in the white space, and selecting New -> Local Group.
![new local group]()
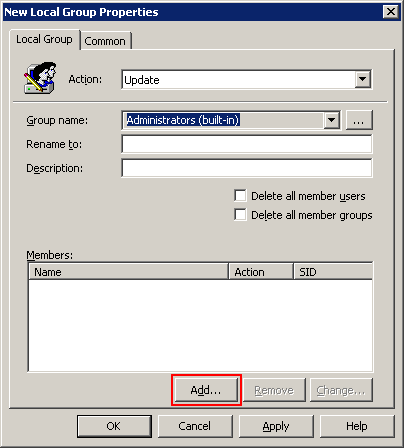
When the New Local Group Properties dialog appears, make sure that the Action is set to Update (which it should be by default), and select Administrators (built-in) in the "Group name" drop down. Then, click the "Add" button.
![local group properties]()
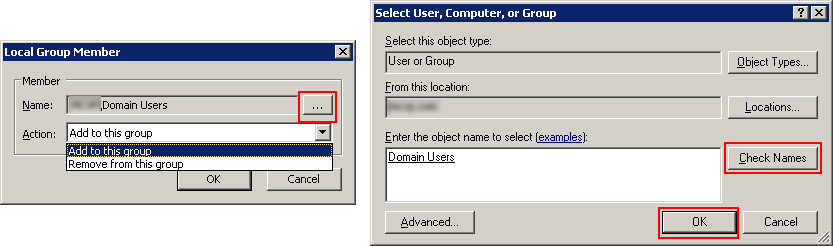
In the Local Group Member dialog, click the ellipsis button to open the AD object selector. In here, enter Domain Users, click "Check Names", and then OK.
In this case we want to be sure that "Add to this group" is select for the Action, but we could just as well remove the user from the group as well.
![add member to local group]()
And again, all the same options are available on the Common tab.
Just like that you've saved yourself potentially hours of work to set the local administrator password and give users local administrator rights.
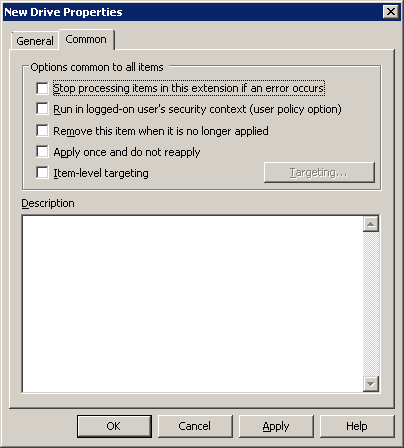
![common tab]() There are five options here on the Common tab, the first four I'll cover quickly. The option we're really interested in, though, is the last one – "Item-level targeting".
There are five options here on the Common tab, the first four I'll cover quickly. The option we're really interested in, though, is the last one – "Item-level targeting".
Stop processing items in this extension if an error occurs
If an error occurs with one of the Preference items, i.e. a shared folder that we're trying to map doesn't exist, do we want to stop processing any other drive maps? Generally, I say no.
Run in logged-on user's security context
If this is left unchecked, the preference processing will be run under the SYSTEM security context, limiting it to environmental variables and resources available only to the computer account. If, on the other hand, this selected, then variables and resources that are available to the currently logged-in user are available to the preference. This is particularly important with drive mappings, where the computer account may not have access to the share.
Remove this item when it is no longer applied
Unlike with standard Policies, when a Group Policy Object is no longer applied to a particular user, group, OU, computer, etc., preferences are not removed (i.e. undone). If you select this, when the preference falls out of scope, the settings are removed. Note: This changes how the "Replace" action works. Normally, Replace deletes and then recreates the setting on the client machine. If you select this option, the preference will be deleted but not recreated when the it falls out of scope.
Apply once and do not reapply
If you leave this unchecked, then the preference will be applied each time Group Policy is applied. In the IE home page example, it means that each time Group Policy is applied, the homepage will be reset to http://www.company.com. If you select this, it will be applied the first time Group Policy is applied, and not subsequently (i.e. the user can change their home page without fear of it being overwritten).
Item-level targeting
As far as I'm concerned, this is the most important option in Group Policy Preferences. This is where you can determine which user, group, computer, OU, whatever this preference applies to. It's basically providing you a GUI interface for some pretty complex WMI filters (or, for those of you who dare, you can write your own WMI filter). Check the box, and then click the "Targeting" button. You'll be presented with the Targeting Editor.
Start by selecting "New Item", and you'll be presented with a list of all the items you can filter on. There are obviously way to many options here to go into each one in detail, but the most common ones I usually end up using are Organizational Unit and Security Group, and occasionally User.
A simple example, for say a drive map, is to only apply to users of the Accounting security group. If you wanted, you could get far more complex by messing with the Item Options drop down (and / or, is / is not). So, if we wanted, we could say is a member of Account and is not user John Doe.
This is only the tip of the iceberg as to what Group Policy Preferences is capable of, but hopefully it's enough for most of you to finally do away with having to write and maintain old school login scripts!
With Windows Server 2008 – or, more specifically, the Group Policy Management Console for Vista / Server 2008 – Microsoft introduced Group Policy Preferences. The server-side configuration can be done in the GPMC in Windows Vista / Server 2008 and above, meaning you don't need Server 2008 to use GP Preferences. On the client side, the extensions are included natively in Vista and above, and can be installed as an add-on to Windows XP (available here: http://www.microsoft.com/downloads/en/details.aspx?FamilyID=e60b5c8f-d7dc-4b27-a261-247ce3f6c4f8&displaylang=en).
There's one big difference between standard Group Policy and Group Policy Preferences. With standard Group Policy, an administrator defines a set of policies that apply to a user or workstation, and they cannot be modified on the client. An example would be turning on the Windows Firewall. If this is set by Policy, the ability to turn this off is disabled for users. On the other hand, Preferences can be modified by the user. An example of this would be setting the default IE home page. We can set it to http://www.company.com for all our users, but if they want to change it, they are not prevented from doing so.
To get started, install the Group Policy Management Console, if you haven't already done so. On a domain controller, it should be installed by default. On a Vista / 7 machine, install the Remote Server Administration Tools (Windows Vista: http://www.microsoft.com/downloads/en/details.aspx?FamilyId=9FF6E897-23CE-4A36-B7FC-D52065DE9960&displaylang=en, Windows 7: http://www.microsoft.com/downloads/en/details.aspx?FamilyID=7d2f6ad7-656b-4313-a005-4e344e43997d&displaylang=en). It can then be enabled through Control Panel -> Programs and Features -> Turn Windows features on or off -> Remote Server Administration Tools -> Feature Administration Tools.
Once you've got the GPMC installed and opened, either create a new Group Policy Object to work with, or open an existing GPO. For this article, I'll just be working with the Default Domain Policy (in the real world, this probably isn't the policy object you'll want to use). Once the GPO is loaded, you'll notice that you now have a new top-level folder – Preferences.
In this new Preferences tree is where you'll find all the new Group Policy Preferences settings, and in the Policies tree you'll find all the "old" Group Policy settings. As before, Group Policy Preferences has been split into Computer Preferences, and User Preferences.
As you can see, it's a pretty extensive list of preferences that you can set. In this article I'm just going to look at two of the preferences that I've found quite useful in managing my Active Directory domain: Drive Maps and Local Users and Groups.
Drive Maps
I think it would be hard to argue that the most popular use for login scripts is to map network shares for end users. Sometimes it a one or two line script, other times it's much more complicated, mapping different sets of drives for different groups of users or computers. Fortunately, it's pretty simple to replace even the most complicated login script with Group Policy Preferences.To create a Drive Map Preference, expand User Configuration -> Preferences -> Windows Settings, and select Drive Maps. Then, right-click in the white space, and select New -> Mapped Drive.
You'll be presented with the New Drive Properties dialog, where you set all the properties for the new drive map.
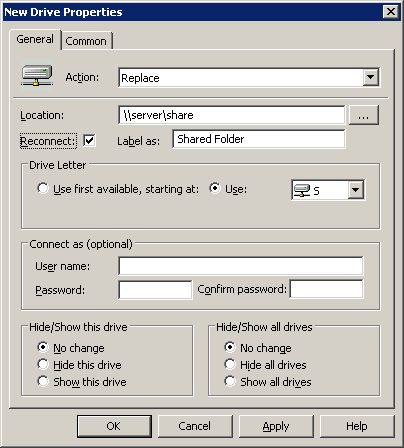
For the Action, I generally select Replace, although you can also choose from Create, Update, or Delete. I choose Replace because it will ensure that, in this case, the S drive is always mapped to \\server\share, even if the user has created an S drive mapping themself.
The "Location" is pretty self-explanatory. "Reconnect" is the same as checking "Reconnect at logon" when mapping a drive manually. It means that the drive mapping will be saved in the user's profile, so that each time they reboot it will attempt to connect the drive. "Label as" is a cool addition that, to the best of my knowledge (and if anyone knows otherwise, please feel free to correct me), can't be done with typical batch or VBS login scripts. It lets you change the display name of the drive from, for example, "share on \\server" to "Shared Folder". "Drive Letter" is also pretty self-explanatory, and "Connect as" will let you specify credentials to use to connect to the share (otherwise it will connect using the currently logged in user's credentials). "Hide/Show this drive" can be useful if you, say, need to map a drive for use by an application, but don't need users to see and manipulate the drive. It would still be accessible by typing S:\ in Explorer, but won't show up in My Computer, etc.
If we were to hit "OK" now, we'd have a new drive map applied to all computers and all users in our AD domain, which for some people may be exactly what they want. In many cases, however, you probably want to only map it for a specific group of users. If we select the "Common" tab, there are a whole bunch of other options available to us. Since this tab is the same for all Group Policy Preferences, I'll go into detail later on.
Local Users and Group
Ever been tasked with changing the local administrator password on a couple hundred user machines? Or ever had a need for users to have local administrator privileges, only to forget to set it for one machine and have users complain? Enter the Local Users and Groups preference. Under Computer Configuration, expand Preferences -> Control Panel Settings, and select Local Users and Groups.Let's say you want to set the local administrator password for a whole group of computers. This is easily accomplished by adding a new Local User preference. Simply click in the white space, and select New -> Local User.
You will be presented with the New Local User Properties. In this example, select Administrator (built-in) from the User name drop down list. You could also just as easily specify a custom username here to create or update a new local user. We'll put the new password into the Password and Confirm Password fields, and it's probably also a good idea to select "Password never expires" and "Account never expires". As with Drive Maps, a whole slew of targeting and other options are available on the Common tab.
Another common task I find myself need to do is adding the Domain Users group to the local Administrators group on workstations. This can easily be accomplished by right clicking in the white space, and selecting New -> Local Group.
When the New Local Group Properties dialog appears, make sure that the Action is set to Update (which it should be by default), and select Administrators (built-in) in the "Group name" drop down. Then, click the "Add" button.
In the Local Group Member dialog, click the ellipsis button to open the AD object selector. In here, enter Domain Users, click "Check Names", and then OK.
In this case we want to be sure that "Add to this group" is select for the Action, but we could just as well remove the user from the group as well.
And again, all the same options are available on the Common tab.
Just like that you've saved yourself potentially hours of work to set the local administrator password and give users local administrator rights.
The "Common" Tab
 There are five options here on the Common tab, the first four I'll cover quickly. The option we're really interested in, though, is the last one – "Item-level targeting".
Stop processing items in this extension if an error occurs
If an error occurs with one of the Preference items, i.e. a shared folder that we're trying to map doesn't exist, do we want to stop processing any other drive maps? Generally, I say no.
Run in logged-on user's security context
If this is left unchecked, the preference processing will be run under the SYSTEM security context, limiting it to environmental variables and resources available only to the computer account. If, on the other hand, this selected, then variables and resources that are available to the currently logged-in user are available to the preference. This is particularly important with drive mappings, where the computer account may not have access to the share.
Remove this item when it is no longer applied
Unlike with standard Policies, when a Group Policy Object is no longer applied to a particular user, group, OU, computer, etc., preferences are not removed (i.e. undone). If you select this, when the preference falls out of scope, the settings are removed. Note: This changes how the "Replace" action works. Normally, Replace deletes and then recreates the setting on the client machine. If you select this option, the preference will be deleted but not recreated when the it falls out of scope.
Apply once and do not reapply
If you leave this unchecked, then the preference will be applied each time Group Policy is applied. In the IE home page example, it means that each time Group Policy is applied, the homepage will be reset to http://www.company.com. If you select this, it will be applied the first time Group Policy is applied, and not subsequently (i.e. the user can change their home page without fear of it being overwritten).
Item-level targeting
As far as I'm concerned, this is the most important option in Group Policy Preferences. This is where you can determine which user, group, computer, OU, whatever this preference applies to. It's basically providing you a GUI interface for some pretty complex WMI filters (or, for those of you who dare, you can write your own WMI filter). Check the box, and then click the "Targeting" button. You'll be presented with the Targeting Editor.
Start by selecting "New Item", and you'll be presented with a list of all the items you can filter on. There are obviously way to many options here to go into each one in detail, but the most common ones I usually end up using are Organizational Unit and Security Group, and occasionally User.
A simple example, for say a drive map, is to only apply to users of the Accounting security group. If you wanted, you could get far more complex by messing with the Item Options drop down (and / or, is / is not). So, if we wanted, we could say is a member of Account and is not user John Doe.
This is only the tip of the iceberg as to what Group Policy Preferences is capable of, but hopefully it's enough for most of you to finally do away with having to write and maintain old school login scripts!
Have a question about something in this article? You can receive help directly from the article author. Sign up for a free trial to get started.
Comments (4)
Commented:
Commented:
I have 1 issue. Maped Drives work great on Windows 7 Clients, but my Windows XP clients do no get maped drives :(
Commented:
http://www.microsoft.com/download/en/details.aspx?displaylang=en&id=3628
run gpupdate and reboot.
Commented: