HOW TO: Create your first Linux Virtual Machine on a VMware vSphere Hypervisor 5.1 (ESXi 5.1) Host Server
EE Fellow, MVE, Expert of the Year 2021,2017-11, Scribe 2016-2012, Author of the Year 2018-6,2013-2012 VMware vExpert Pro, vExpert 2022-2011
Published:
Browse All Articles > HOW TO: Create your first Linux Virtual Machine on a VMware vSphere Hypervisor 5.1 (ESXi 5.1) Host Server
In my previous 24 VMware Articles, most featured Intermediate VMware Topics. My next series of articles will concentrate on topics for the VMware Novice; this is the sixth article in this series.
If you would like to read the other articles in this series, they are listed here for your convenience.
Part 1: HOW TO: Install and Configure VMware vSphere Hypervisor 5.1 (ESXi 5.1)
Part 2: HOW TO: Connect to the VMware vSphere Hypervisor 5.1 (ESXi 5.1) using the vSphere Client
Part 3: HOW TO: Create an ISO CD-ROM/DVD-ROM image (*.iso), and MD5 checksum signature, for use with VMware vSphere Hypervisor 5.1 (ESXi 5.1)
Part 4: HOW TO: Upload an ISO CD-ROM/DVD-ROM image to a VMware datastore for use with VMware vSphere Hypervisor 5.1 (ESXi 5.1) using the vSphere Client, and checking its MD5 checksum signature is correct.
Part 5: HOW TO: Enable SSH Remote Access on a VMware vSphere Hypervisor 5.1 (ESXi 5.1)
In this series of basic VMware articles for the Novice, I'll be showing you the basic VMware skills required to install, configure and deploy virtual machines using VMware's FREE VMware vSphere Hypervisor (ESXi).
In this article we will show you HOW TO: Create your first Linux Virtual Machine on a VMware vSphere Hypervisor 5.1 (ESXi 5.1) Host Server. This procedure can be followed to install ANY Linux Virtual Machines on earlier versions of VMware vSphere provided they are supported by the version of VMware vSphere. You may want to consult the the VMware Hardware Comparability Lists or HCL, see here
![vSphere Client Connected to VMware vSphere Hypervisor (ESXi) Host Server]() Click the Inventory icon.
Click the Inventory icon.
If you have already downloaded a Linux distribution as an ISO image file from the internet, there is no need to create new iso image file, if you have physical CD-ROM or DVD-ROM Linux distribution media, Please refer to my EE article on HOW TO: Create an ISO CD-ROM/DVD-ROM image (*.iso), and MD5 checksum signature, for use with VMware vSphere Hypervisor 5.1 (ESXi 5.1)
In this example, we will continue to use the Linux Distribution Ubuntu 12.10, which has been previously been uploaded to the datastore, datastore1, in the previous EE Article - HOW TO: Upload an ISO CD-ROM/DVD-ROM image to a VMware datastore for use with VMware vSphere Hypervisor 5.1 (ESXi 5.1) using the vSphere Client, and checking its MD5 checksum signature is correct. Please note and check the VMware Hardware Comparability Lists (HCL) here, to check your Operating System is compatible with VMware vSphere. Many operating systems fail to install because the operating system is not supported by the version of VMware vSphere being used. In the following screenshot from the HCL, we can clearly see this is supported for the version of VMware vSphere 5.1 we are using in this tutorial.
![Ubuntu 12.10 on HCL]()
![Create Virtual Machine]()
![Create Virtual Machine]() After selecting Create New Virtual Machine, the Create New Virtual Machine dialogue box and wizard will be displayed. This allows you to specify your requirements for the virtual machine, the number of processors, the amount of memory, storage required, and network card, these are the basic requirements, which are needed to create a virtual machine. Take a few minutes to think about your virtual machine requirements, Ask yourself the question - What would you specify when purchasing a physical machine or server? These values can be changed and amended later, e.g. add additional processors, increase memory or storage space. It's much easier to grow storage than reduce it later, so my advice would be to start small, and later grow your resources, by looking at the performance of the virtual machine. In a previous EE Article, we discuss performance, see here HOW TO: Performance Monitor vSphere 4.x or 5.0 This is one of the many advantages of virtual machines, we have greater flexibility to add and remove resources, compared to a physical computer or server.We also have very fine controls, or granular controls over machine specifications, e.g. memory, most memory components in physical servers today are in 1GB DIMM increments, using virtualisation, we can increase memory in 256MB or 512MB increments! This is not easy to complete with physical computers, we cannot cut a memory DIMM in half!
After selecting Create New Virtual Machine, the Create New Virtual Machine dialogue box and wizard will be displayed. This allows you to specify your requirements for the virtual machine, the number of processors, the amount of memory, storage required, and network card, these are the basic requirements, which are needed to create a virtual machine. Take a few minutes to think about your virtual machine requirements, Ask yourself the question - What would you specify when purchasing a physical machine or server? These values can be changed and amended later, e.g. add additional processors, increase memory or storage space. It's much easier to grow storage than reduce it later, so my advice would be to start small, and later grow your resources, by looking at the performance of the virtual machine. In a previous EE Article, we discuss performance, see here HOW TO: Performance Monitor vSphere 4.x or 5.0 This is one of the many advantages of virtual machines, we have greater flexibility to add and remove resources, compared to a physical computer or server.We also have very fine controls, or granular controls over machine specifications, e.g. memory, most memory components in physical servers today are in 1GB DIMM increments, using virtualisation, we can increase memory in 256MB or 512MB increments! This is not easy to complete with physical computers, we cannot cut a memory DIMM in half! ![Create New Virtual Machine Wizard]()
The Create Virtual Machine Wizard, creates the configuration or template for us to install our operating system later. It includes some specification templates, based on the vendors minimum requirements for the Operating System selected.
Select Typical followed by Next. This will create a new virtual machine with the most common devices and configuration options.![Create New Virtual Machine - Name]()
Enter a Name for the virtual machine and Click Next. This is the name which will appear in the inventory, this is not to be confused with the operating systems hostname, which will be set, when we install the operating system. In the example I have entered the name "My First Linux VM"![Create New Virtual Machine - Name]() Click Next to continue, select the datastore to store the virtual machine configuration files and virtual disks and click Next to continue through the wizard
Click Next to continue, select the datastore to store the virtual machine configuration files and virtual disks and click Next to continue through the wizard
In my previous EE articles, we discussed datastore creation see here
HOW TO: Install and Configure VMware vSphere Hypervisor 5.1 (ESXi 5.1)
HOW TO: Connect to the VMware vSphere Hypervisor 5.1 (ESXi 5.1) using the vSphere Client![Create New Virtual Machine - Datastore]() At the Guest Operating System selection dialogue wizard, select Linux, followed by the correct distribution version, if you cannot find the exact version, select a similar operating system.
At the Guest Operating System selection dialogue wizard, select Linux, followed by the correct distribution version, if you cannot find the exact version, select a similar operating system.![Create New Virtual Machine - OS Selection]() Select Linux, and use the scroll down box to select Ubuntu Linux (64-bit).
Select Linux, and use the scroll down box to select Ubuntu Linux (64-bit).![Create New Virtual Machine - OS Selection - Linux Ubuntu (64-bit)]() Click Next to continue the wizard.
Click Next to continue the wizard.
![Create New Virtual Machine - Network]() Select the Network defaults, and Click Next to continue the wizard.
Select the Network defaults, and Click Next to continue the wizard.![Create New Virtual Machine - virtual disk size]() Select the required virtual disk size, this is the size of the disk for the operating system installation. A default size is provided based on vendors minimum recommendations. Please note, it's very easy to increase the disk size of a virtual machine after installation, please see my previous EE Article HOW TO: Resize a VMware (VMDK) Virtual Disk, However it's more difficult to shrink a virtual disk. So we would always recommend, starting small and growing later. The only VMware supported procedure to shrink a virtual disk, is to use VMware vCenter Converter Standalone, and create a V2V, which is also covered in my previous EE Articles listed here
Select the required virtual disk size, this is the size of the disk for the operating system installation. A default size is provided based on vendors minimum recommendations. Please note, it's very easy to increase the disk size of a virtual machine after installation, please see my previous EE Article HOW TO: Resize a VMware (VMDK) Virtual Disk, However it's more difficult to shrink a virtual disk. So we would always recommend, starting small and growing later. The only VMware supported procedure to shrink a virtual disk, is to use VMware vCenter Converter Standalone, and create a V2V, which is also covered in my previous EE Articles listed here
HOW TO: Synchronize changes when completing a P2V or V2V with VMware vCenter Converter Standalone 5.1
HOW TO: P2V, V2V for FREE - VMware vCenter Converter Standalone 5.1
In this virtual machine deployment, we will use a Thick Provision Lazy Zeroed virtual disk, we will explain these different terms in a different article in the future.
Click Next to Continue the virtual machine wizard
![Create New Virtual Machine - Ready to Complete]() Check the Settings for the new virtual machine, if they are correct, click Finish to create the virtual machine, otherwise click Back. The virtual machine will be created.
Check the Settings for the new virtual machine, if they are correct, click Finish to create the virtual machine, otherwise click Back. The virtual machine will be created.![My First Linux VM]() If you check the Host Inventory, you will see your Virtual Machine - "My First Linux VM" listed in the inventory.
If you check the Host Inventory, you will see your Virtual Machine - "My First Linux VM" listed in the inventory.
Right Click the virtual server "My First Linux VM" , and Click Edit Settings
![VM - Edit Settings]() This step is often missed, many EE Questions are submitted, Why does my virtual machine not boot from the CD-ROM?
This step is often missed, many EE Questions are submitted, Why does my virtual machine not boot from the CD-ROM?
![BOOTABLE CDROM/DVDROM]() - this CD-ROM/DVD-ROM ISO image file will BOOT a computer, server, workstation or virtual machine.
- this CD-ROM/DVD-ROM ISO image file will BOOT a computer, server, workstation or virtual machine.![NON-BOOTABLE]() This CD-ROM/DVD-ROM ISO image file states NON-BOOTABLE, this CD-ROM/DVD-ROM ISO image file will NOT BOOT a computer, server, workstation or virtual machine. Please check your ISOs image files you use are BOOTABLE. It is beyond the scope of this article, to show you HOW TO: Create a Bootable ISO image file CD-ROM/DVD-ROM for use with a computer, server, workstation or virtual machine.
This CD-ROM/DVD-ROM ISO image file states NON-BOOTABLE, this CD-ROM/DVD-ROM ISO image file will NOT BOOT a computer, server, workstation or virtual machine. Please check your ISOs image files you use are BOOTABLE. It is beyond the scope of this article, to show you HOW TO: Create a Bootable ISO image file CD-ROM/DVD-ROM for use with a computer, server, workstation or virtual machine.
The following Virtual Machine settings will be displayed![CDROM Selected and Connected at Power On]() Select the CD/DVD drive1, and select Datastore ISO image file, browse to the location on the datastore, datastore1 in our example in the folder isos, and select the Ubuntu 12.10 amd.iso ISO image file. Also ensure that there is a Tick in the Connect at power on. Click OK for the changes to be saved.
Select the CD/DVD drive1, and select Datastore ISO image file, browse to the location on the datastore, datastore1 in our example in the folder isos, and select the Ubuntu 12.10 amd.iso ISO image file. Also ensure that there is a Tick in the Connect at power on. Click OK for the changes to be saved.
The very first time a virtual machines boots, its' BOOT order in the CMOS BIOS is set to CD-ROM. After the installation has been successful, this is reset to Hard Disk.
![Power On Virtual Machine]() Either Right-Click the virtual machine "My First Linux VM" and Select Power On, or select the virtual machine "My First Linux VM" , and type CTRL-B to power on the virtual machine, the virtual machine should automatically boot from the CD-ROM ISO image file. Then select the Open Console function so you can interact with the virtual machine. You may find it easier if you Right-Click the virtual machine "My First Linux VM" and Select Open Console.
Either Right-Click the virtual machine "My First Linux VM" and Select Power On, or select the virtual machine "My First Linux VM" , and type CTRL-B to power on the virtual machine, the virtual machine should automatically boot from the CD-ROM ISO image file. Then select the Open Console function so you can interact with the virtual machine. You may find it easier if you Right-Click the virtual machine "My First Linux VM" and Select Open Console.![Open Console]() and then selecting the Power On button on the ribbon bar
and then selecting the Power On button on the ribbon bar ![Power On Virtual Machine Button]() the virtual machine should automatically boot from the CD-ROM/DVD-ROM ISO image file. The Open Console function is similar to the Keyboard/Video Machine (KVM) function in a datacentre, which allows you to toggle between console screens of computers, it allows you to interact with the virtual machine, with keyboard and mouse movements, and displays the screen. The Ubuntu installation start up process
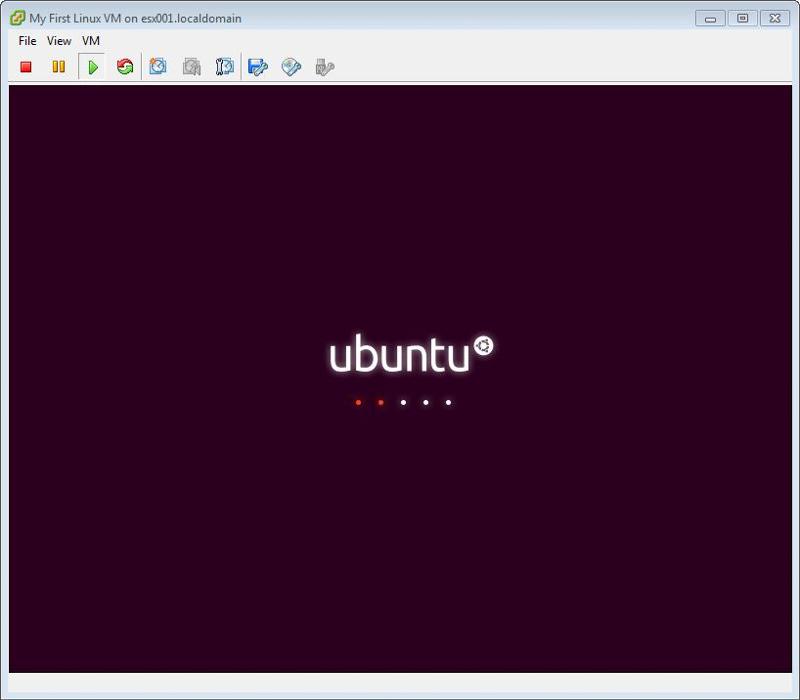
the virtual machine should automatically boot from the CD-ROM/DVD-ROM ISO image file. The Open Console function is similar to the Keyboard/Video Machine (KVM) function in a datacentre, which allows you to toggle between console screens of computers, it allows you to interact with the virtual machine, with keyboard and mouse movements, and displays the screen. The Ubuntu installation start up process ![Ubuntu Installation Startup 1]()
![Ubuntu Installation Startup 2]() Click Install Ubuntu
Click Install Ubuntu![Ubuntu Installation Click Install Ubuntu]() followed by Continue
followed by Continue![Ubuntu Installation Continue]() followed by Continue
followed by Continue![Ubuntu Installation Continue 1]()
![Ubuntu Installation Continue 2]() Select your time zone
Select your time zone![Ubuntu Installation Time Zone]() The screen will change many times whilst files are copied and the virtual machine is configured
The screen will change many times whilst files are copied and the virtual machine is configured![Ubuntu Installation Time Zone - London]() followed by Continue
followed by Continue![Ubuntu Installation Select Keyboard Layout]() and click Continue
and click Continue![Ubuntu Installation Enter username, computer name, password]() Enter Your Name, Computer Name, username and password when prompted and click Continue. The installation will Continue
Enter Your Name, Computer Name, username and password when prompted and click Continue. The installation will Continue![Ubuntu Installation Enter username]() Click Continue to complete the Installation.The screen will change many times whilst files are copied and the virtual machine is configured
Click Continue to complete the Installation.The screen will change many times whilst files are copied and the virtual machine is configured![Ubuntu Installation]() The screen will change many times whilst files are copied and the virtual machine is configured
The screen will change many times whilst files are copied and the virtual machine is configured![Ubuntu Installation 2]() The screen will change many times whilst files are copied and the virtual machine is configured
The screen will change many times whilst files are copied and the virtual machine is configured![Ubuntu Installation 3]() The screen will change many times whilst files are copied and the virtual machine is configured
The screen will change many times whilst files are copied and the virtual machine is configured![Ubuntu Installation 4]() The screen will change many times whilst files are copied and the virtual machine is configured
The screen will change many times whilst files are copied and the virtual machine is configured![Ubuntu Installation 5]()
![Ubuntu Installation 6]() The screen will change many times whilst files are copied and the virtual machine is configured
The screen will change many times whilst files are copied and the virtual machine is configured![Ubuntu Installation 7]() The screen will change many times whilst files are copied and the virtual machine is configured
The screen will change many times whilst files are copied and the virtual machine is configured![Ubuntu Installation 8]() The screen will change many times whilst files are copied and the virtual machine is configured
The screen will change many times whilst files are copied and the virtual machine is configured![Click Restart to Complete the Installation]() Click Restart to Complete the Installation. When the virtual machine has been restarted, the installation has been successful when it displays the Ubuntu desktop.
Click Restart to Complete the Installation. When the virtual machine has been restarted, the installation has been successful when it displays the Ubuntu desktop.![Ubuntu Installation Successfully Completed]()
Congratulations, you have successfully Created your first Linux Virtual Machine on a VMware vSphere Hypervisor 5.1 (ESXi 5.1) Host Server
It is recommended to install VMware Tools in the virtual machine. Please see my EE Article HOW TO: Tutorial Video - Install VMware Tools for Linux on a VMware Linux virtual machine
Please see my next article in this series, HOW TO: Create your first Windows Virtual Machine on a VMware vSphere Hypervisor 5.1 (ESXi 5.1) Host Server.
***************************************************************************
Thank you for reading my article, please leave valuable feedback. If you liked my VMware article and would like to see more Articles from me, please click the Yes button near the: Was this article helpful? at the bottom of this article just below and to the right of this information. Thank You. Do not forget if you have a question about this article or another VMware, Virtualisation, Windows Server 2012 question, why not post a Question for me and the other Experts Exchange Experts in the VMware, Virtualisation, Windows 2008, Windows 2012 Zones. I look forward to hearing from you. - Andy :- twitter @einsteinagogo
****************************************************************************
If you would like to read the other articles in this series, they are listed here for your convenience.
Part 1: HOW TO: Install and Configure VMware vSphere Hypervisor 5.1 (ESXi 5.1)
Part 2: HOW TO: Connect to the VMware vSphere Hypervisor 5.1 (ESXi 5.1) using the vSphere Client
Part 3: HOW TO: Create an ISO CD-ROM/DVD-ROM image (*.iso), and MD5 checksum signature, for use with VMware vSphere Hypervisor 5.1 (ESXi 5.1)
Part 4: HOW TO: Upload an ISO CD-ROM/DVD-ROM image to a VMware datastore for use with VMware vSphere Hypervisor 5.1 (ESXi 5.1) using the vSphere Client, and checking its MD5 checksum signature is correct.
Part 5: HOW TO: Enable SSH Remote Access on a VMware vSphere Hypervisor 5.1 (ESXi 5.1)
In this series of basic VMware articles for the Novice, I'll be showing you the basic VMware skills required to install, configure and deploy virtual machines using VMware's FREE VMware vSphere Hypervisor (ESXi).
In this article we will show you HOW TO: Create your first Linux Virtual Machine on a VMware vSphere Hypervisor 5.1 (ESXi 5.1) Host Server. This procedure can be followed to install ANY Linux Virtual Machines on earlier versions of VMware vSphere provided they are supported by the version of VMware vSphere. You may want to consult the the VMware Hardware Comparability Lists or HCL, see here
1. Connect to the VMware vSphere Hypervisor 5.1 (ESXi 5.1) or vSphere vCenter Server using the vSphere Client
Please refer to my EE article on HOW TO: Connect to the VMware vSphere Hypervisor 5.1 (ESXi 5.1) using the vSphere Client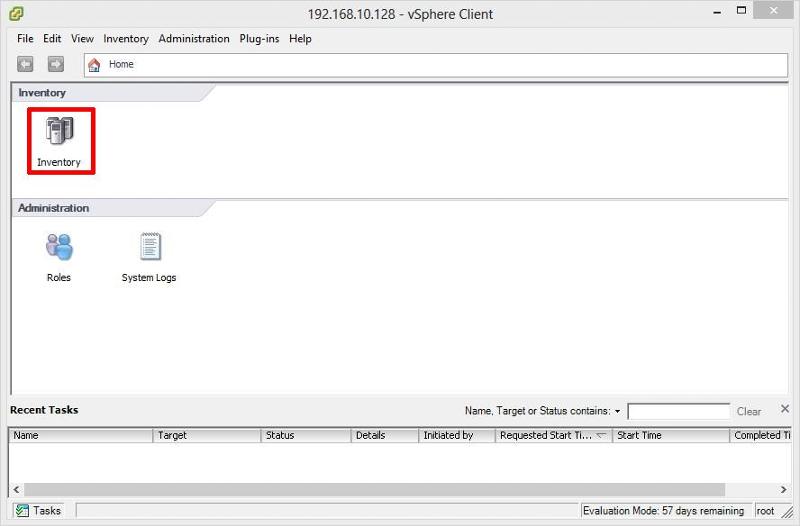 Click the Inventory icon.
2. Upload the Linux distribution ISO image file to the VMFS datastore
Please refer to my EE article on HOW TO: Upload an ISO CD-ROM/DVD-ROM image to a VMware datastore for use with VMware vSphere Hypervisor 5.1 (ESXi 5.1) using the vSphere Client, and checking its MD5 checksum signature is correct.If you have already downloaded a Linux distribution as an ISO image file from the internet, there is no need to create new iso image file, if you have physical CD-ROM or DVD-ROM Linux distribution media, Please refer to my EE article on HOW TO: Create an ISO CD-ROM/DVD-ROM image (*.iso), and MD5 checksum signature, for use with VMware vSphere Hypervisor 5.1 (ESXi 5.1)
In this example, we will continue to use the Linux Distribution Ubuntu 12.10, which has been previously been uploaded to the datastore, datastore1, in the previous EE Article - HOW TO: Upload an ISO CD-ROM/DVD-ROM image to a VMware datastore for use with VMware vSphere Hypervisor 5.1 (ESXi 5.1) using the vSphere Client, and checking its MD5 checksum signature is correct. Please note and check the VMware Hardware Comparability Lists (HCL) here, to check your Operating System is compatible with VMware vSphere. Many operating systems fail to install because the operating system is not supported by the version of VMware vSphere being used. In the following screenshot from the HCL, we can clearly see this is supported for the version of VMware vSphere 5.1 we are using in this tutorial.

3. Creating the Linux Virtual Machine
At the Summary tab, there are three different methods you can use to create the virtual machine.
Method 1: Use shortcut keys CTRL+N together
Method 2: Select File > New > Virtual Machine
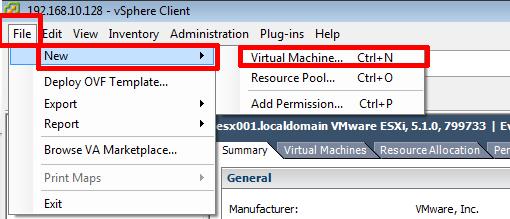
Method 3: Right Click the Host [192.168.10.128] select New Virtual Machine
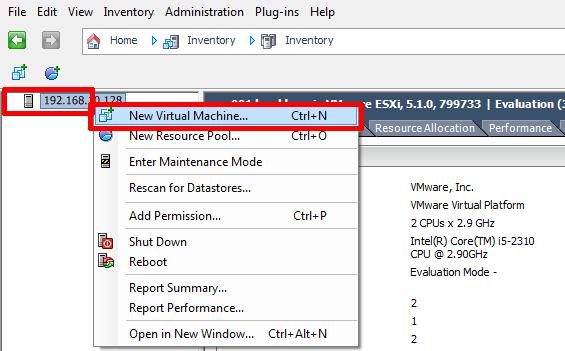 After selecting Create New Virtual Machine, the Create New Virtual Machine dialogue box and wizard will be displayed. This allows you to specify your requirements for the virtual machine, the number of processors, the amount of memory, storage required, and network card, these are the basic requirements, which are needed to create a virtual machine. Take a few minutes to think about your virtual machine requirements, Ask yourself the question - What would you specify when purchasing a physical machine or server? These values can be changed and amended later, e.g. add additional processors, increase memory or storage space. It's much easier to grow storage than reduce it later, so my advice would be to start small, and later grow your resources, by looking at the performance of the virtual machine. In a previous EE Article, we discuss performance, see here HOW TO: Performance Monitor vSphere 4.x or 5.0 This is one of the many advantages of virtual machines, we have greater flexibility to add and remove resources, compared to a physical computer or server.We also have very fine controls, or granular controls over machine specifications, e.g. memory, most memory components in physical servers today are in 1GB DIMM increments, using virtualisation, we can increase memory in 256MB or 512MB increments! This is not easy to complete with physical computers, we cannot cut a memory DIMM in half!
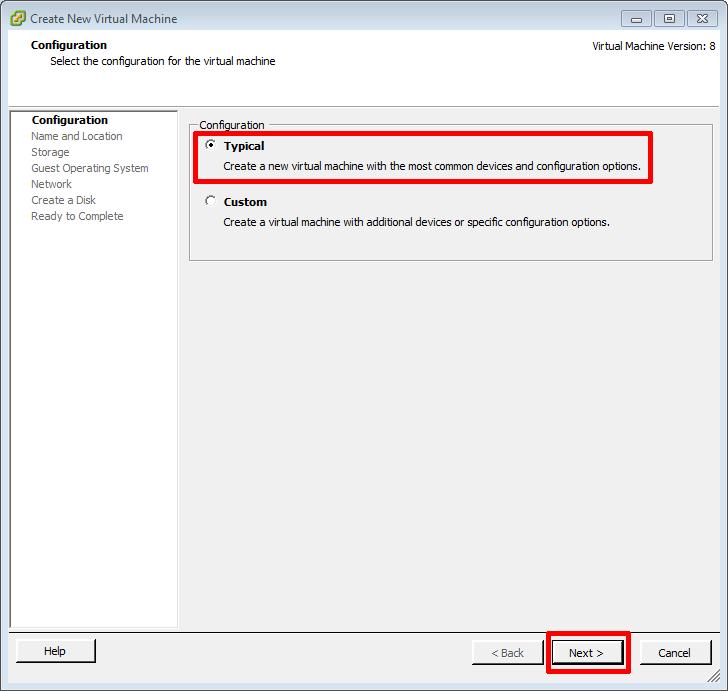
The Create Virtual Machine Wizard, creates the configuration or template for us to install our operating system later. It includes some specification templates, based on the vendors minimum requirements for the Operating System selected.
Select Typical followed by Next. This will create a new virtual machine with the most common devices and configuration options.
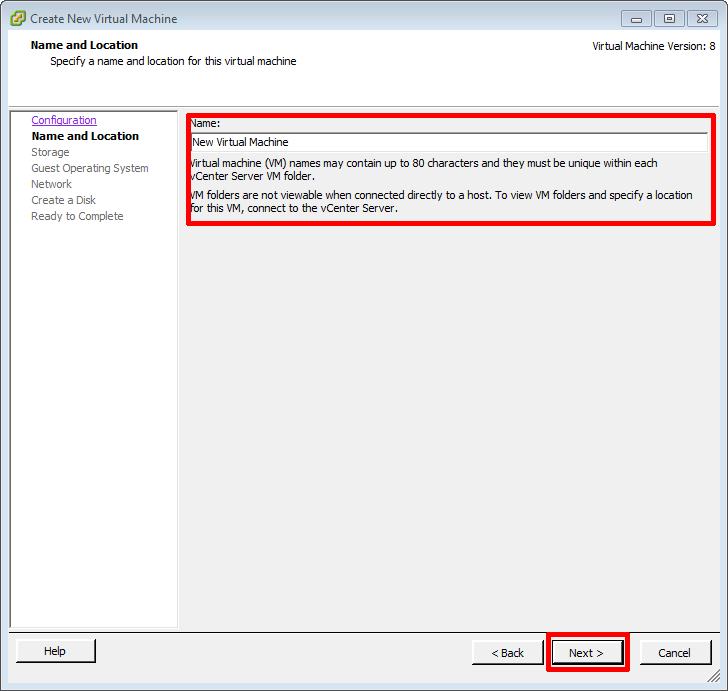
Enter a Name for the virtual machine and Click Next. This is the name which will appear in the inventory, this is not to be confused with the operating systems hostname, which will be set, when we install the operating system. In the example I have entered the name "My First Linux VM"
 Click Next to continue, select the datastore to store the virtual machine configuration files and virtual disks and click Next to continue through the wizard
In my previous EE articles, we discussed datastore creation see here
HOW TO: Install and Configure VMware vSphere Hypervisor 5.1 (ESXi 5.1)
HOW TO: Connect to the VMware vSphere Hypervisor 5.1 (ESXi 5.1) using the vSphere Client
 At the Guest Operating System selection dialogue wizard, select Linux, followed by the correct distribution version, if you cannot find the exact version, select a similar operating system.
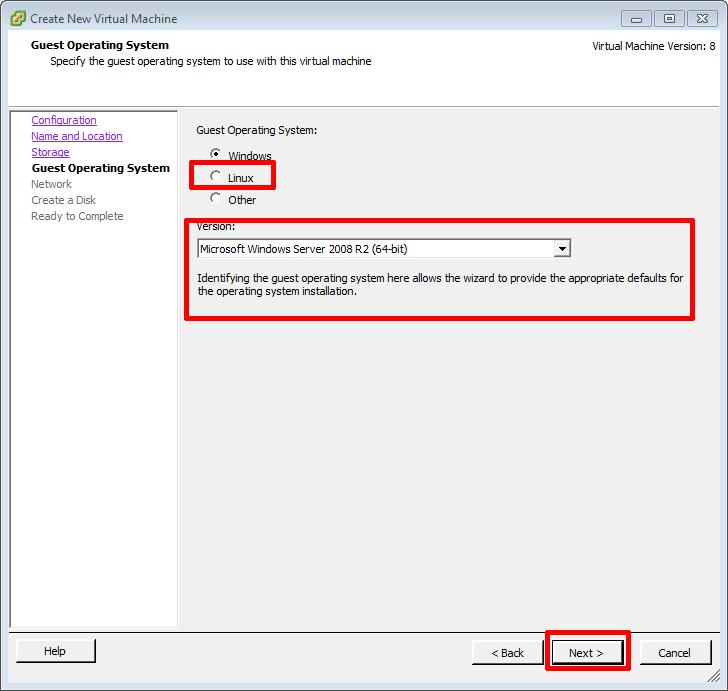 Select Linux, and use the scroll down box to select Ubuntu Linux (64-bit).
 Click Next to continue the wizard.
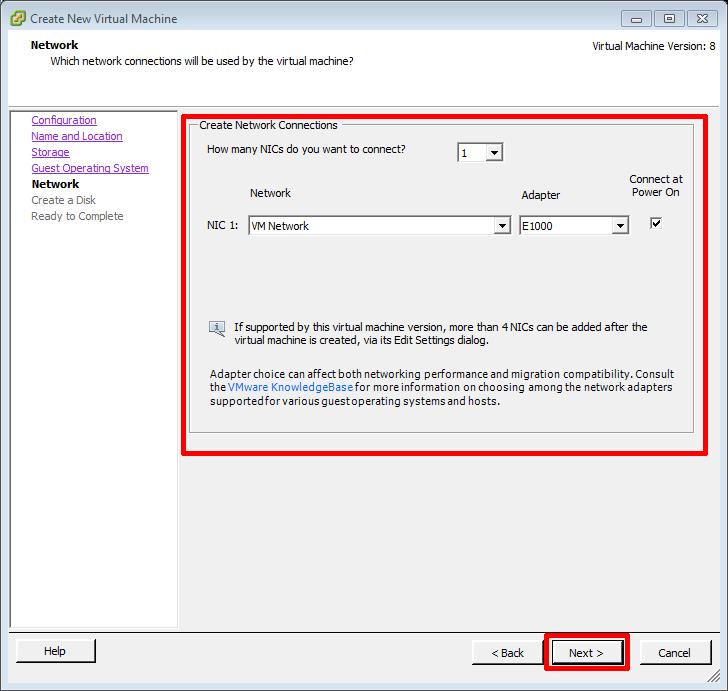 Select the Network defaults, and Click Next to continue the wizard.
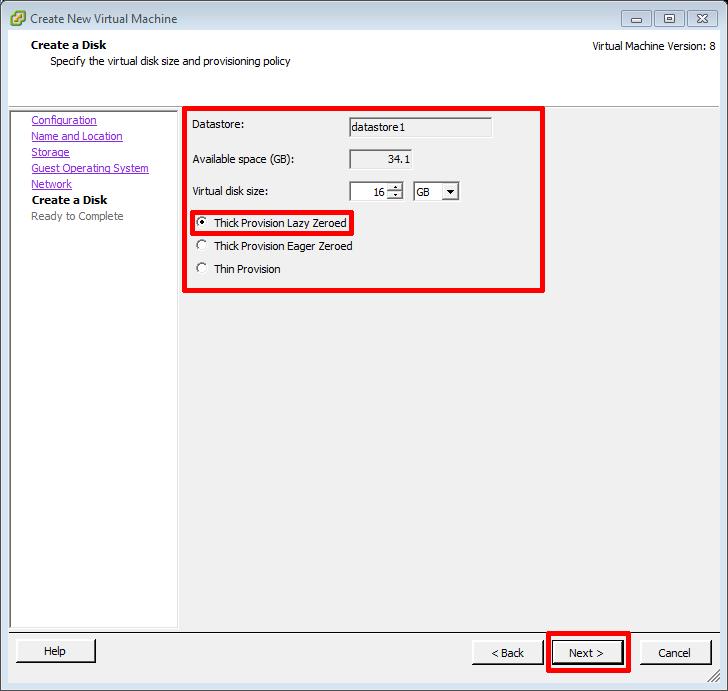 Select the required virtual disk size, this is the size of the disk for the operating system installation. A default size is provided based on vendors minimum recommendations. Please note, it's very easy to increase the disk size of a virtual machine after installation, please see my previous EE Article HOW TO: Resize a VMware (VMDK) Virtual Disk, However it's more difficult to shrink a virtual disk. So we would always recommend, starting small and growing later. The only VMware supported procedure to shrink a virtual disk, is to use VMware vCenter Converter Standalone, and create a V2V, which is also covered in my previous EE Articles listed here
HOW TO: Synchronize changes when completing a P2V or V2V with VMware vCenter Converter Standalone 5.1
HOW TO: P2V, V2V for FREE - VMware vCenter Converter Standalone 5.1
In this virtual machine deployment, we will use a Thick Provision Lazy Zeroed virtual disk, we will explain these different terms in a different article in the future.
Click Next to Continue the virtual machine wizard
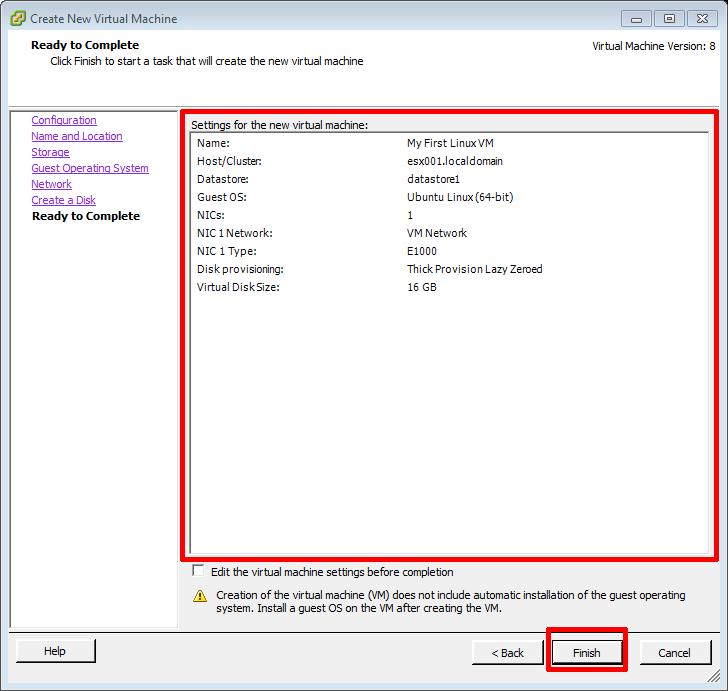 Check the Settings for the new virtual machine, if they are correct, click Finish to create the virtual machine, otherwise click Back. The virtual machine will be created.
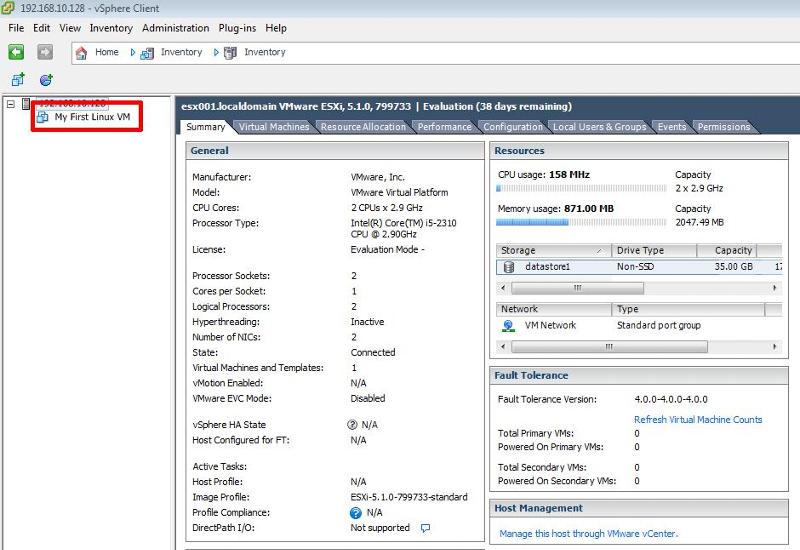 If you check the Host Inventory, you will see your Virtual Machine - "My First Linux VM" listed in the inventory.
4. Installing the Linux Ubuntu 12.10 Operating System in the Virtual Machine
Installing the Linux Ubuntu 12.10 Operating System in the virtual machine hosted on the VMware vSphere Hypervisor 5.1 (ESXi 5.1) Host Server is very similar, to installing the Linux Ubuntu 12.10 Operating System on a physical computer or server, with a few differences, which we will list below
the installation media is a virtual iso image file which must be connected to the VM
to complete the installation correctly, VMware Tools must be installed in the virtual machine.
other than the two differences highlighted above, the actual installation is exactly the same as installing on a physical computer or server.
Right Click the virtual server "My First Linux VM" , and Click Edit Settings
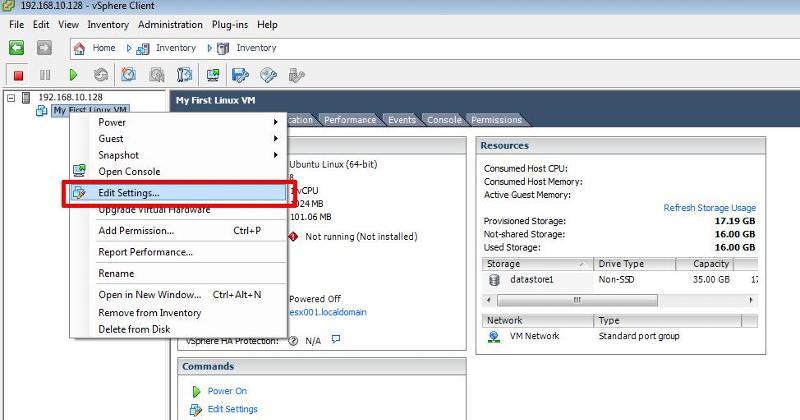 This step is often missed, many EE Questions are submitted, Why does my virtual machine not boot from the CD-ROM?
The *.ISO image file needs to be a Bootable ISO image file
- this can be checked using MagicISO If you open the ISO image file with MagicISO, it states BOOTABLE  - this CD-ROM/DVD-ROM ISO image file will BOOT a computer, server, workstation or virtual machine.
 This CD-ROM/DVD-ROM ISO image file states NON-BOOTABLE, this CD-ROM/DVD-ROM ISO image file will NOT BOOT a computer, server, workstation or virtual machine. Please check your ISOs image files you use are BOOTABLE. It is beyond the scope of this article, to show you HOW TO: Create a Bootable ISO image file CD-ROM/DVD-ROM for use with a computer, server, workstation or virtual machine.
the ISO image file must be connected to the virtual machine
connected to the virtual machine at power on
the BOOT order parameters in the CMOS BIOS are set to hard disk, network first and not CD-ROM.
the above procedures are exactly the same for a physical computer. e.g. - the same process as ensuring the CD-ROM/DVD-ROM in the drive at POST on a physical computer, - the same process as inserting the CD-ROM/DVD-ROM in the drive on a physical computer. Both physical and virtual BIOS are the same.
The following Virtual Machine settings will be displayed
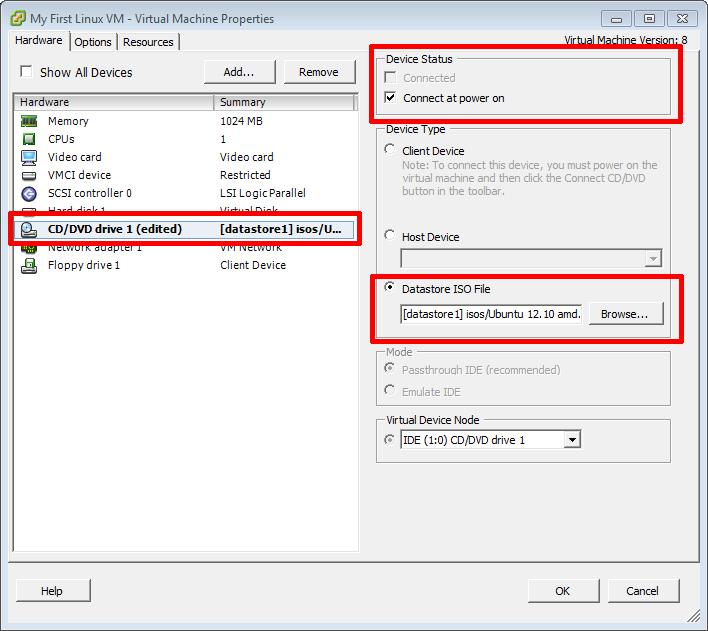 Select the CD/DVD drive1, and select Datastore ISO image file, browse to the location on the datastore, datastore1 in our example in the folder isos, and select the Ubuntu 12.10 amd.iso ISO image file. Also ensure that there is a Tick in the Connect at power on. Click OK for the changes to be saved.
The very first time a virtual machines boots, its' BOOT order in the CMOS BIOS is set to CD-ROM. After the installation has been successful, this is reset to Hard Disk.
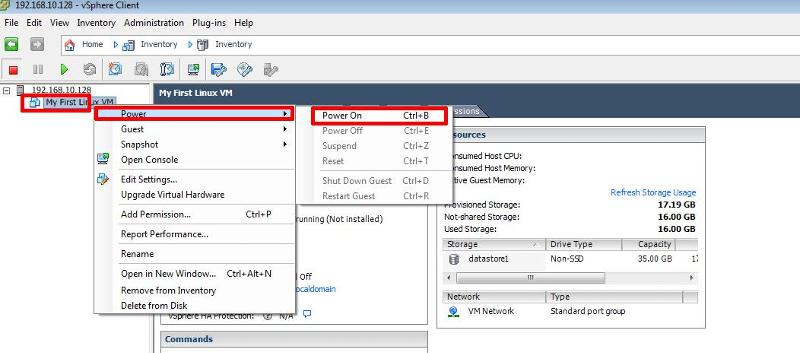 Either Right-Click the virtual machine "My First Linux VM" and Select Power On, or select the virtual machine "My First Linux VM" , and type CTRL-B to power on the virtual machine, the virtual machine should automatically boot from the CD-ROM ISO image file. Then select the Open Console function so you can interact with the virtual machine. You may find it easier if you Right-Click the virtual machine "My First Linux VM" and Select Open Console.
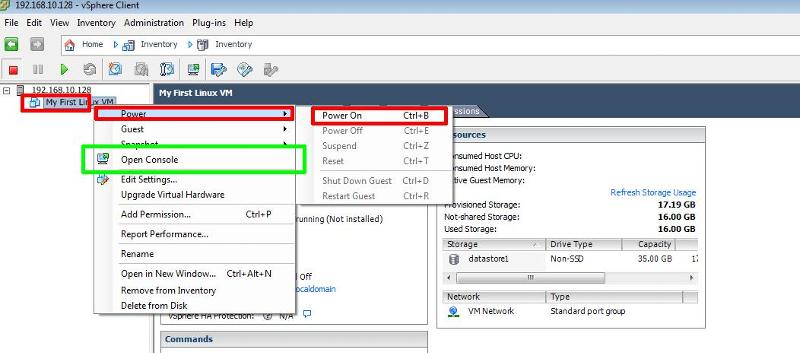 and then selecting the Power On button on the ribbon bar
 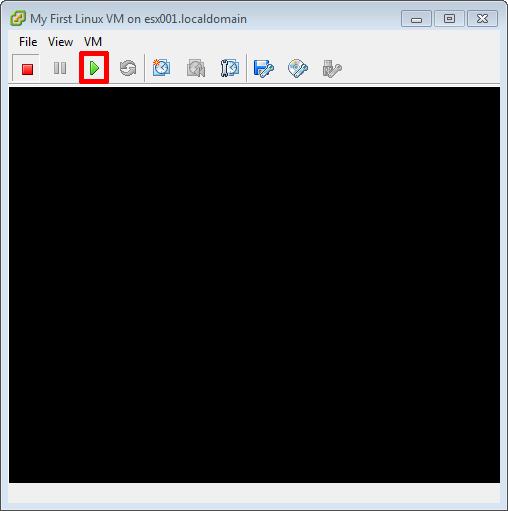 the virtual machine should automatically boot from the CD-ROM/DVD-ROM ISO image file. The Open Console function is similar to the Keyboard/Video Machine (KVM) function in a datacentre, which allows you to toggle between console screens of computers, it allows you to interact with the virtual machine, with keyboard and mouse movements, and displays the screen. The Ubuntu installation start up process
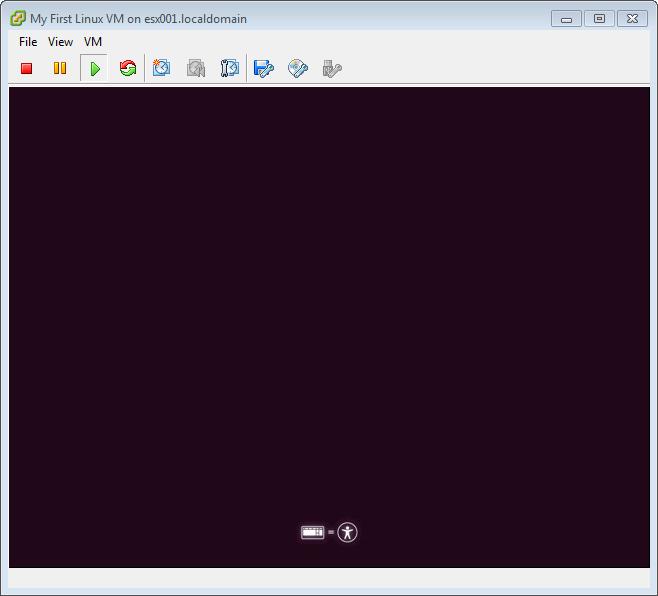
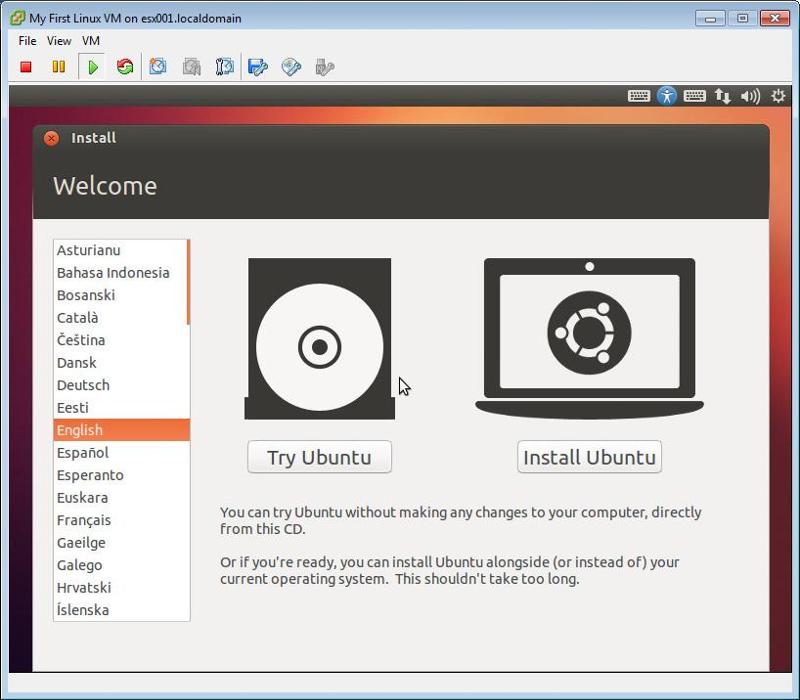
 Click Install Ubuntu
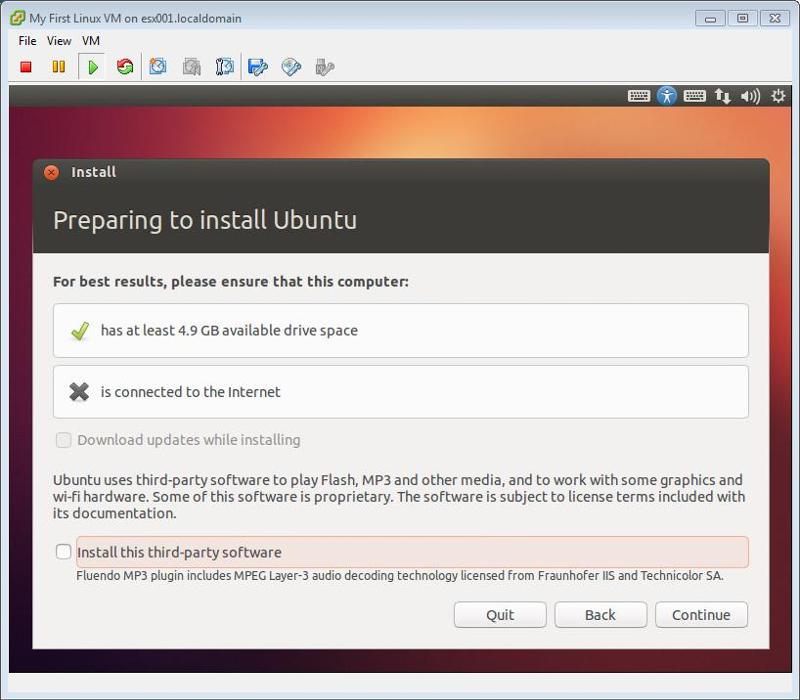
 followed by Continue
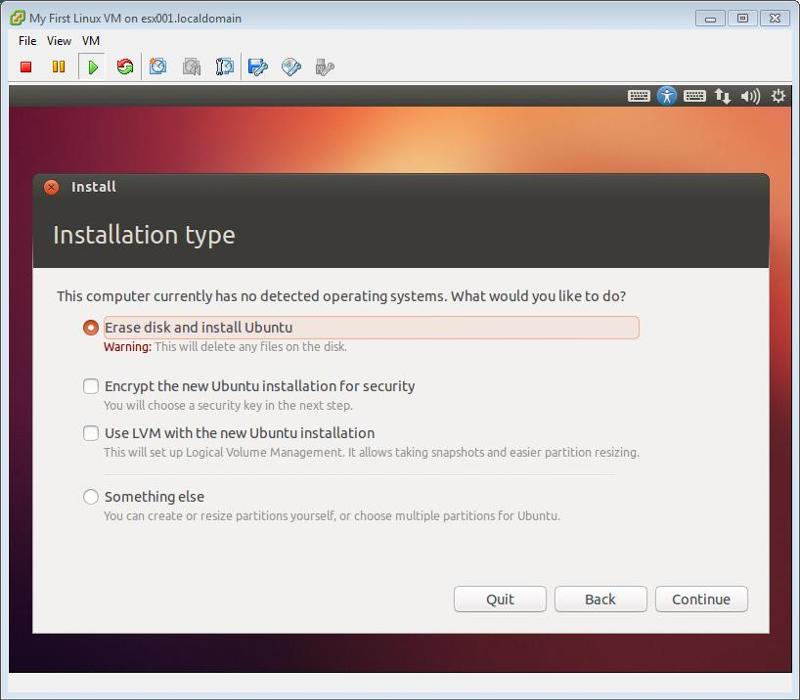
 followed by Continue
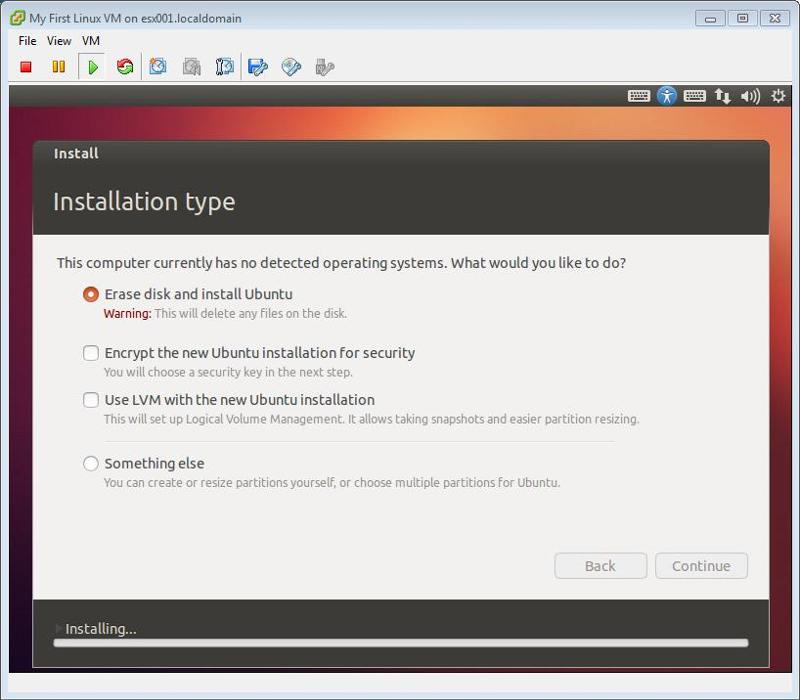 Select your time zone
 The screen will change many times whilst files are copied and the virtual machine is configured
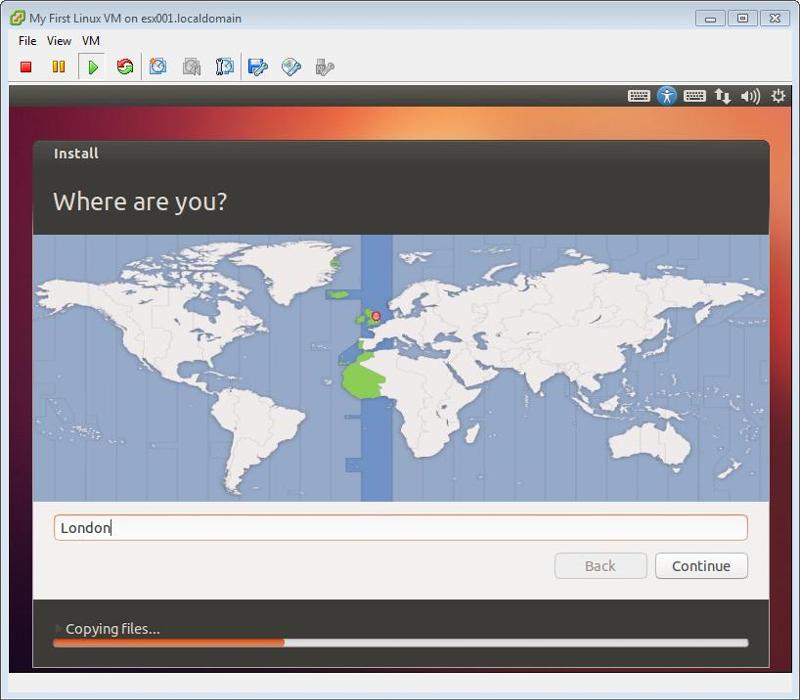 followed by Continue
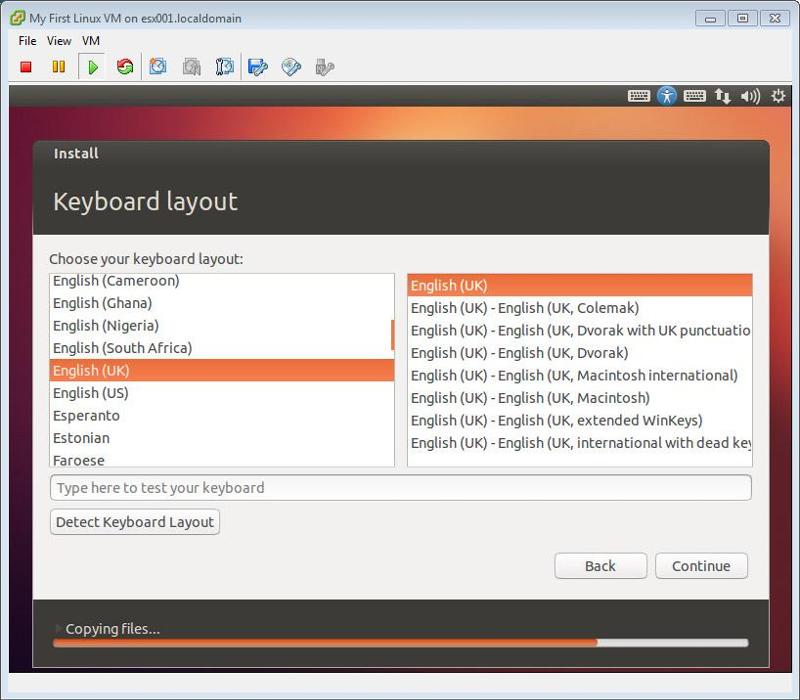 and click Continue
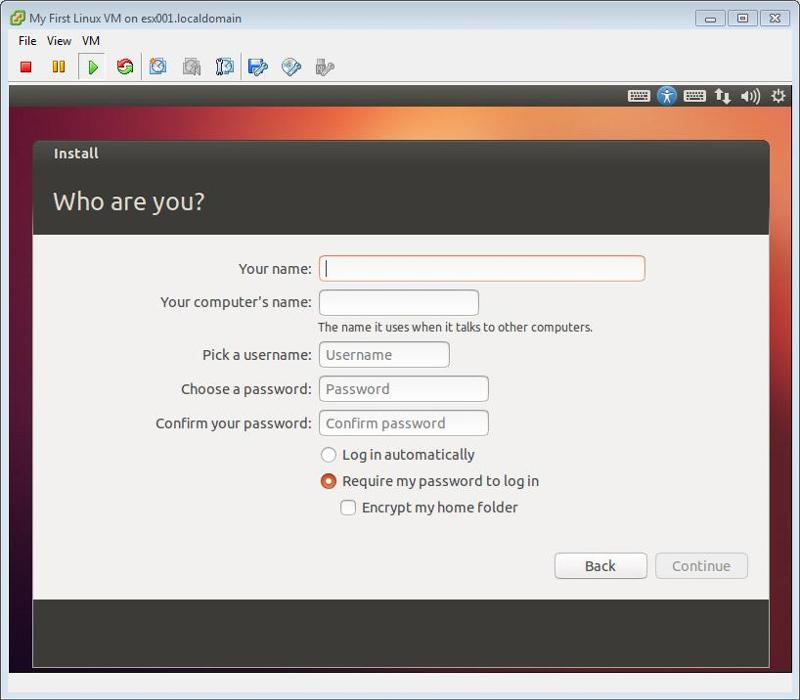 Enter Your Name, Computer Name, username and password when prompted and click Continue. The installation will Continue
 Click Continue to complete the Installation.The screen will change many times whilst files are copied and the virtual machine is configured
 The screen will change many times whilst files are copied and the virtual machine is configured
 The screen will change many times whilst files are copied and the virtual machine is configured
 The screen will change many times whilst files are copied and the virtual machine is configured
 The screen will change many times whilst files are copied and the virtual machine is configured
 The screen will change many times whilst files are copied and the virtual machine is configured
 The screen will change many times whilst files are copied and the virtual machine is configured
 The screen will change many times whilst files are copied and the virtual machine is configured
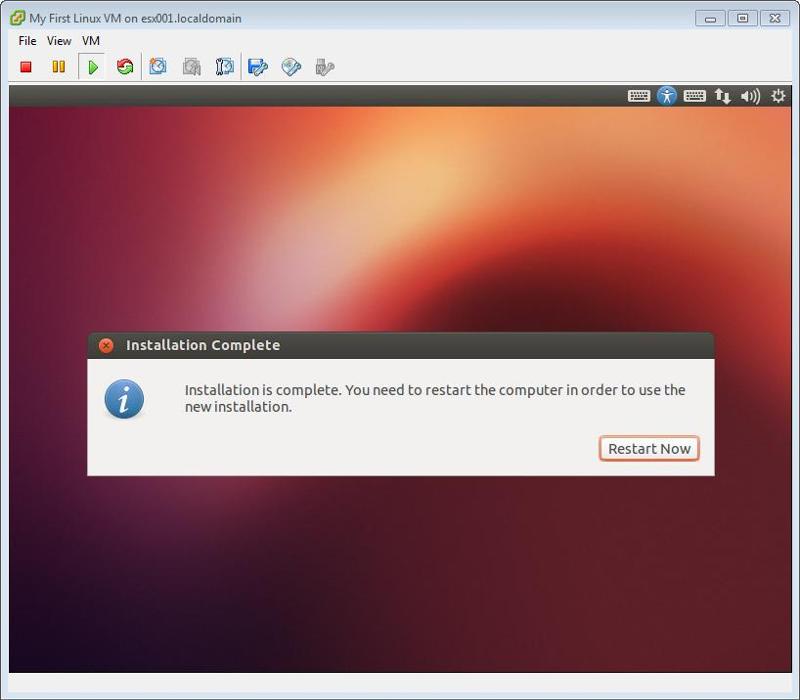 Click Restart to Complete the Installation. When the virtual machine has been restarted, the installation has been successful when it displays the Ubuntu desktop.
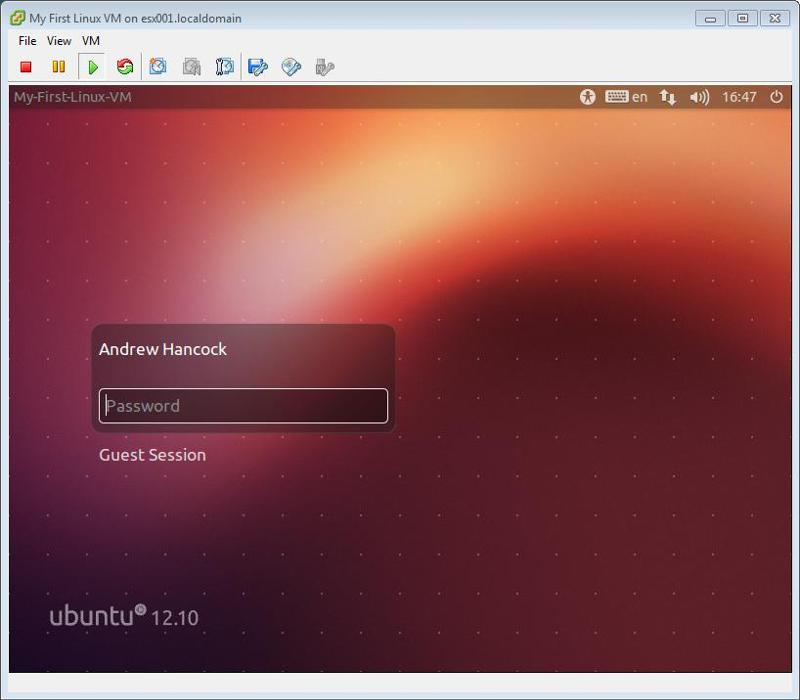
Congratulations, you have successfully Created your first Linux Virtual Machine on a VMware vSphere Hypervisor 5.1 (ESXi 5.1) Host Server
It is recommended to install VMware Tools in the virtual machine. Please see my EE Article HOW TO: Tutorial Video - Install VMware Tools for Linux on a VMware Linux virtual machine
Please see my next article in this series, HOW TO: Create your first Windows Virtual Machine on a VMware vSphere Hypervisor 5.1 (ESXi 5.1) Host Server.
**************************
Thank you for reading my article, please leave valuable feedback. If you liked my VMware article and would like to see more Articles from me, please click the Yes button near the: Was this article helpful? at the bottom of this article just below and to the right of this information. Thank You. Do not forget if you have a question about this article or another VMware, Virtualisation, Windows Server 2012 question, why not post a Question for me and the other Experts Exchange Experts in the VMware, Virtualisation, Windows 2008, Windows 2012 Zones. I look forward to hearing from you. - Andy :- twitter @einsteinagogo
**************************
Have a question about something in this article? You can receive help directly from the article author. Sign up for a free trial to get started.


Comments (4)
Commented:
Author
Commented:Commented:
Author
Commented: