HOW TO: Backup (Export) and Restore (Import) virtual machines to VMware vSphere Hypervisor 5.1 for FREE

Andrew Hancock (VMware vExpert PRO / EE Fellow/British Beekeeper)![]() VMware and Virtualization Consultant
VMware and Virtualization Consultant
 VMware and Virtualization Consultant
CERTIFIED EXPERT
EE Fellow, MVE, Expert of the Year 2021,2017-11, Scribe 2016-2012, Author of the Year 2018-6,2013-2012 VMware vExpert Pro, vExpert 2022-2011
Published:
Browse All Articles > HOW TO: Backup (Export) and Restore (Import) virtual machines to VMware vSphere Hypervisor 5.1 for FREE
In my previous 26 VMware Articles, most featured Intermediate VMware Topics. My next series of articles will concentrate on topics for the VMware Novice; this is the tenth article in this series.
If you would like to read the other articles in this series, they are listed here for your convenience.
During this series of articles VMware released VMware vSphere 5.5 and VMware vSphere Hypervisor ESXi 5.5. These articles are also applicable to VMware vSphere Hypervisor ESXi 5.x and 5.5. For consistency, I have used VMware vSphere Hypervisor ESXi 5.1 through this series.
Part 1: HOW TO: Install and Configure VMware vSphere Hypervisor 5.1 (ESXi 5.1)
Part 2: HOW TO: Connect to the VMware vSphere Hypervisor 5.1 (ESXi 5.1) using the vSphere Client
Part 3: HOW TO: Create an ISO CD-ROM/DVD-ROM image (*.iso), and MD5 checksum signature, for use with VMware vSphere Hypervisor 5.1 (ESXi 5.1)
Part 4: HOW TO: Upload an ISO CD-ROM/DVD-ROM image to a VMware datastore for use with VMware vSphere Hypervisor 5.1 (ESXi 5.1) using the vSphere Client, and checking its MD5 checksum signature is correct.
Part 5: HOW TO: Enable SSH Remote Access on a VMware vSphere Hypervisor 5.1 (ESXi 5.1)
Part 6: HOW TO: Create your first Linux Virtual Machine on a VMware vSphere Hypervisor 5.1 (ESXi 5.1) Host Server
Part 7: HOW TO: Create your first Windows Virtual Machine on a VMware vSphere Hypervisor 5.1 (ESXi 5.1) Host Server
Part 8: HOW TO: Install VMware Tools for Windows on a VMware Windows virtual machine on a VMware vSphere Hypervisor 5.1 (ESXi 5.1) Host Server
Part 9: HOW TO: Install VMware Tools for Linux on a VMware Linux virtual machine on a VMware vSphere Hypervisor 5.1 (ESXi 5.1) Host Server
In this series of basic VMware articles for the Novice, I'll be showing you the basic VMware skills required to install, configure and deploy virtual machines using VMware's FREE VMware vSphere Hypervisor (ESXi).
If you have been following this series, in Part 6: HOW TO: Create your first Linux Virtual Machine on a VMware vSphere Hypervisor 5.1 (ESXi 5.1) Host Server, we created our first Linux virtual machine called "My First Linux VM" , in Part 7: HOW TO: Create your first Windows Virtual Machine on a VMware vSphere Hypervisor 5.1 (ESXi 5.1) Host Server we created our first Microsoft Windows virtual machine called "My First Windows VM". Later in this tutorial we will using these virtual machines to backup and restore. This procedure can be used to backup and restore any virtual machine hosted on VMware vSphere Hypervisor 5.1 (ESXi 5.1) Host Server.
In this article we will show you HOW TO: Backup (Export) and Restore (Import) virtual machines to VMware vSphere Hypervisor 5.1 for FREE. This procedure can be followed to backup (export) and restore (import) any virtual machine hosted on the VMware vSphere Hypervisor 5.1 host server.
![VMware vSphere Hypervisor ESXi 5.1 Inventory]() Click the Inventory icon.
Click the Inventory icon.
![Inventory - both virtual machines are powered off]() This procedure can only backup (export) the virtual machines, when the virtual machine is powered off. So ensure that the virtual machines are powered off, before you backup (export) the virtual machines.
This procedure can only backup (export) the virtual machines, when the virtual machine is powered off. So ensure that the virtual machines are powered off, before you backup (export) the virtual machines.
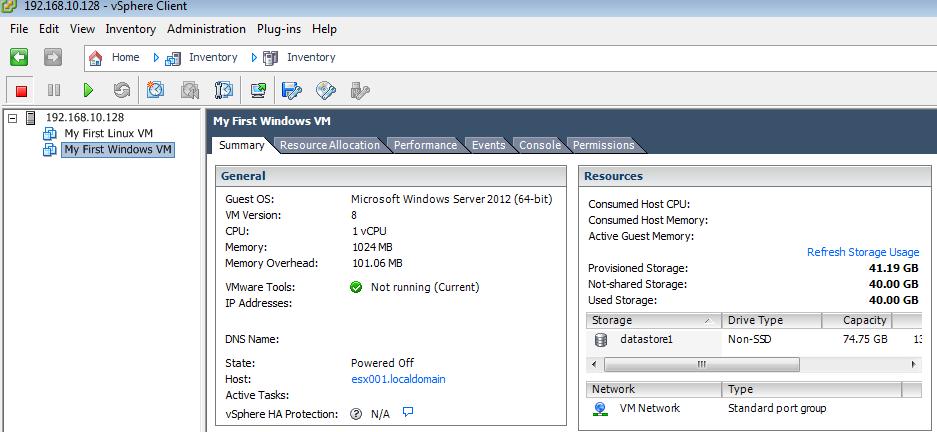
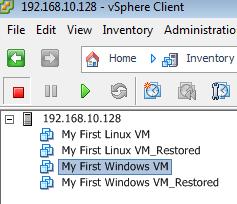
![My First Windows VM selected]() Select the virtual machine to backup (export) in the virtual machine inventory. In this step we will select "My First Windows VM". We will be using the Export function to backup the virtual machine. The Export function will backup the entire virtual machine to an OVF or OVA file. An OVF/OVA file is an Open Virtualization Format, OVF/OVA is an open standard for packaging and distributing virtual machines, sometimes referred to as virtual appliances. These files can also be restored to other Hypervisors e.g. Microsoft Hyper-V, Oracle Virtualbox.
Select the virtual machine to backup (export) in the virtual machine inventory. In this step we will select "My First Windows VM". We will be using the Export function to backup the virtual machine. The Export function will backup the entire virtual machine to an OVF or OVA file. An OVF/OVA file is an Open Virtualization Format, OVF/OVA is an open standard for packaging and distributing virtual machines, sometimes referred to as virtual appliances. These files can also be restored to other Hypervisors e.g. Microsoft Hyper-V, Oracle Virtualbox.
![Export My First Windows VM]() On the ribbon bar, select File > Export > Export OVF Template. If this option is not available or grayed out, check the virtual machine is not powered on.
On the ribbon bar, select File > Export > Export OVF Template. If this option is not available or grayed out, check the virtual machine is not powered on.
HANCOCK's TOP TIP Ensure that the virtual machine is disconnected from floppy drives, floppy drives images, disconnected from CD-ROMs and CD-ROM isos images before completing the backup (export). If left connected the backup (export) will also try and export the floppy drive, or CD-ROM iso image the virtual machine is attached to. Sometimes the backup (export) can fail. We have also seen that if you leave the virtual machine connected to an iso, but DO NOT tick the button to export the iso, the OVF will not Import (Restore) causing an OVF Import was cancelled by user error message, it is not obvious what the error is, because it cannot find the iso file to import!
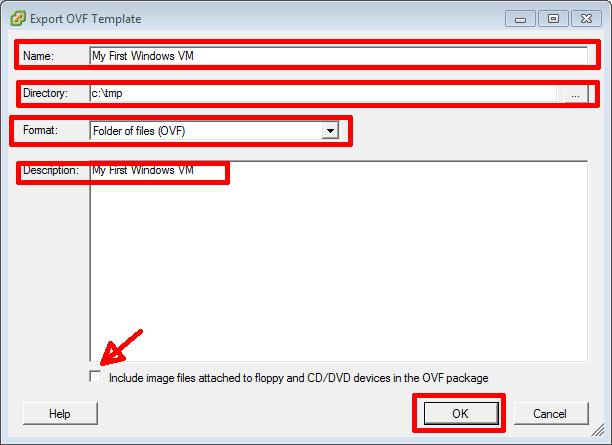
![Export OVF Template]() At the Export OVF Template diaglogue wizard, the default name entered is the name of the virtual machine, I would recommend leaving this as default. Enter a folder/directory on your local machine to store the backup, select OVF, and enter a Description of the Backup. Un-tick include image files attached to floppy and CD/DVD devices in the OVF package. Click OK to proceed with the export (backup).
At the Export OVF Template diaglogue wizard, the default name entered is the name of the virtual machine, I would recommend leaving this as default. Enter a folder/directory on your local machine to store the backup, select OVF, and enter a Description of the Backup. Un-tick include image files attached to floppy and CD/DVD devices in the OVF package. Click OK to proceed with the export (backup).
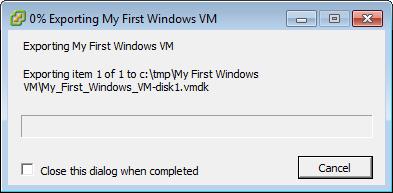
![Exporting My First Windows VM]() The Exporting dialogue box will be displayed. Depending upon the size of your virtual machine disk, (vmdk), this can take several minutes to a few hours. It will report how long it will take to export. In this tutorial "My First Windows VM" is 40GB in size, the operating system currently installed is only taking 8GB of space on the disk and it's reporting 35 minutes to export.
The Exporting dialogue box will be displayed. Depending upon the size of your virtual machine disk, (vmdk), this can take several minutes to a few hours. It will report how long it will take to export. In this tutorial "My First Windows VM" is 40GB in size, the operating system currently installed is only taking 8GB of space on the disk and it's reporting 35 minutes to export.
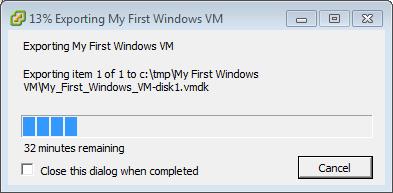
![Exporting My First Windows VM 13 percent complete]()
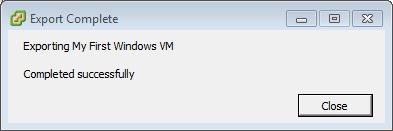
The following dialogue will be displayed when the export (backup) has been completed.
![Exporting My First Windows VM completed]()
![Exporting My First Linux VM]()
![Exporting My First Windows VM 1 percent completed]()
![Backup folder contents]()
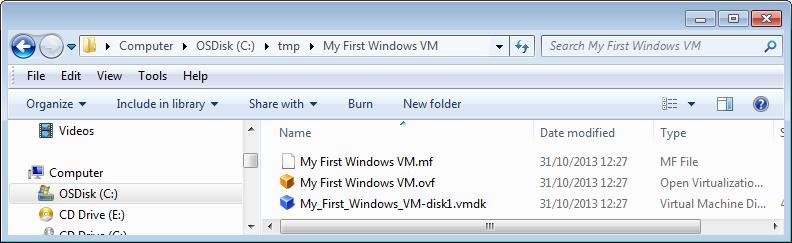
![Contents of My First Windows VM folder]() You will notice that the OVF backup or export has created a folder called "My First Windows VM", This contains three files,
You will notice that the OVF backup or export has created a folder called "My First Windows VM", This contains three files,
all these files are required for a successful restore.
You will also notice that the OVA backup or export has created a single file called "My First Linux VM.ova", This is a compressed archive file, which contains similar files to the above, but compressed and stored as a single backup file.
These OVF and OVA files can be successfully copied to a USB flash drive or external hard drive for transport, and imported (restored) to a different Host server.
HANCOCK's TOP TIP Please ensure you have tested and restored your virtual machine from an OVF or OVA file before deleting your virtual machine from the host server. Many VMware Administrators, delete their virtual machines before checking they have a backup that can be successfully restored. See step 5 below.
![Deploy OVF Template]() Select File > Deploy OVF Template
Select File > Deploy OVF Template
![Deploy OVF Template]() Browse to the location of the stored OVF file on your local workstations disk, in this tutorial this is C:\tmp\My First Windows VM\My First Windows VM.ovf followed by the Next to continue
Browse to the location of the stored OVF file on your local workstations disk, in this tutorial this is C:\tmp\My First Windows VM\My First Windows VM.ovf followed by the Next to continue
![Review Summary Page]() Review the summary page and click Next to continue
Review the summary page and click Next to continue
![Enter name]() Enter a new, different name for the virtual machine inventory name, all virtual machines in the VMware Hypervisor inventory must be unique. This is not the operating system hostname, it could be the same name as the operating system hostname, this is just a cosmetic name for the inventory. In this tutorial I have entered the name My First Windows VM_Restored Click Next to continue.
Enter a new, different name for the virtual machine inventory name, all virtual machines in the VMware Hypervisor inventory must be unique. This is not the operating system hostname, it could be the same name as the operating system hostname, this is just a cosmetic name for the inventory. In this tutorial I have entered the name My First Windows VM_Restored Click Next to continue.
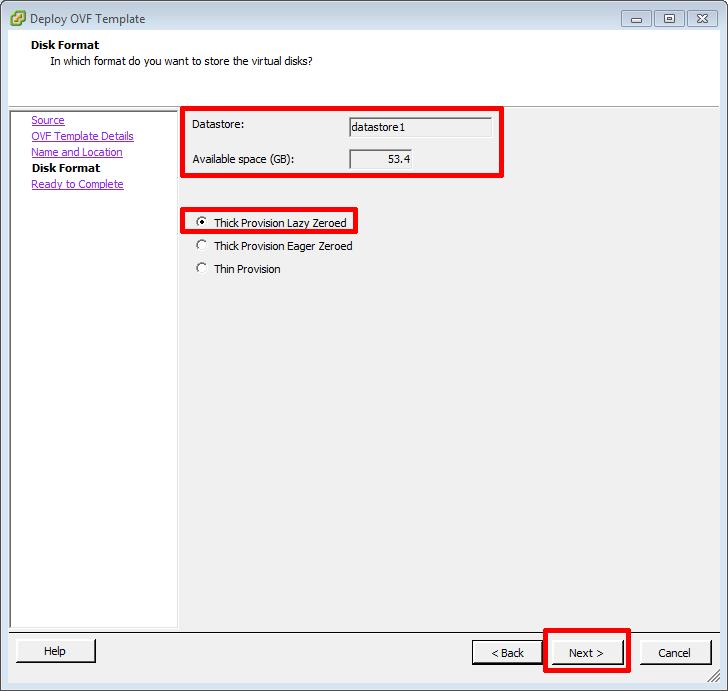
![Select datastore and disk provisioning type.]() Select a valid datastore, we only have a single datastore, datastore1, and select Thick Provision Lazy Zeroed, we will discuss these provisioning formats in a later article. Click Next to continue.
Select a valid datastore, we only have a single datastore, datastore1, and select Thick Provision Lazy Zeroed, we will discuss these provisioning formats in a later article. Click Next to continue.
![Select Finish to Deploy]() At the Ready to Complete Summary Page, review the Summary information, and click Finish.
At the Ready to Complete Summary Page, review the Summary information, and click Finish.
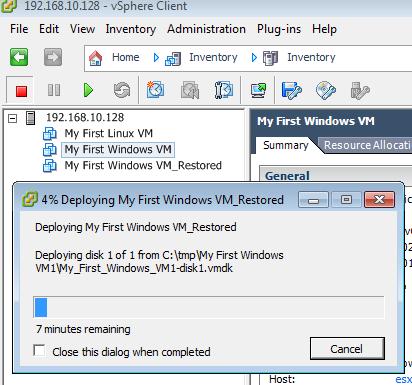
![Deploy Virtual ,machine...]() The virtual machine will start to be imported, this can take a few minutes to many hours depending upon the size of the virtual machine.
The virtual machine will start to be imported, this can take a few minutes to many hours depending upon the size of the virtual machine.
![7 minutes remaining]() 7 minutes remaining until restore (import complete)
7 minutes remaining until restore (import complete)
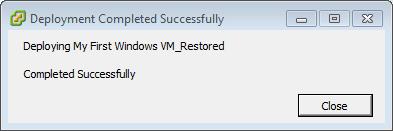
![Deploy OVF Template Complete Click Close]() Click Close when the Deployment Completed Successfully is displayed. The virtual machine My First Windows VM_Restored has been successfully restored, and will be listed in the inventory.
Click Close when the Deployment Completed Successfully is displayed. The virtual machine My First Windows VM_Restored has been successfully restored, and will be listed in the inventory.
![3 minutes to restore]() 3 minutes to restore
3 minutes to restore
![Restores Complete]() Restores (Imports) completed successfully, all the virtual machines are shown in the inventory.
Restores (Imports) completed successfully, all the virtual machines are shown in the inventory.
Congratulations, you have successfully completed a Backup (Export) and Restore (Import) of Windows and Linux virtual machines to VMware vSphere Hypervisor 5.1
If you require scheduled backup and restore, or the ability to backup virtual machines which are powered on, we would recommend you trial the following commercial backup products.
These are listed in alphabetical order. Please note you will need a Licensed version of VMware vSphere Hypervisor 5.1 to be able to use any of the following products. By Licensed, - you have to have purchased a License from VMware, the most basic License is called VMware vSphere Essentials Kit. Registering for FREE and obtaining a license, does not activate the storage APIs, which are required by commercial backup software.
Please see my Experts Exchange article for further details VMware ESX/ESXi Backup Guide.
Acronis Backup & Recovery® 11 Virtual Edition - Virtual Machine Backup & Recovery Solutions
Dell AppAssure - Data Protection | Backup and Recovery Solutions
NAKIVO Backup & Replication for VMware
StorageCraft ShadowProtect Server
Symantec Business Backup - Data Protection, Data Restore
Trilead VM explorer
Unitrends - Unitrends: All-in-One Data Backup Solutions and Disaster Recovery
Veeam Backup & Replication v7
VMware vSphere Data Protection
****************************************************************************
Thank you for reading my article, please leave valuable feedback. If you liked my VMware article and would like to see more Articles from me, please click the Yes button near the: Was this article helpful? at the bottom of this article just below and to the right of this information. Thank You. Do not forget if you have a question about this article or another VMware, Virtualisation, Windows Server 2012 question, why not post a Question for me and the other Experts Exchange Experts in the VMware, Virtualisation, Windows 2008, Windows 2012 Zones. I look forward to hearing from you. - Andy :- twitter @einsteinagogo
****************************************************************************
If you would like to read the other articles in this series, they are listed here for your convenience.
During this series of articles VMware released VMware vSphere 5.5 and VMware vSphere Hypervisor ESXi 5.5. These articles are also applicable to VMware vSphere Hypervisor ESXi 5.x and 5.5. For consistency, I have used VMware vSphere Hypervisor ESXi 5.1 through this series.
Part 1: HOW TO: Install and Configure VMware vSphere Hypervisor 5.1 (ESXi 5.1)
Part 2: HOW TO: Connect to the VMware vSphere Hypervisor 5.1 (ESXi 5.1) using the vSphere Client
Part 3: HOW TO: Create an ISO CD-ROM/DVD-ROM image (*.iso), and MD5 checksum signature, for use with VMware vSphere Hypervisor 5.1 (ESXi 5.1)
Part 4: HOW TO: Upload an ISO CD-ROM/DVD-ROM image to a VMware datastore for use with VMware vSphere Hypervisor 5.1 (ESXi 5.1) using the vSphere Client, and checking its MD5 checksum signature is correct.
Part 5: HOW TO: Enable SSH Remote Access on a VMware vSphere Hypervisor 5.1 (ESXi 5.1)
Part 6: HOW TO: Create your first Linux Virtual Machine on a VMware vSphere Hypervisor 5.1 (ESXi 5.1) Host Server
Part 7: HOW TO: Create your first Windows Virtual Machine on a VMware vSphere Hypervisor 5.1 (ESXi 5.1) Host Server
Part 8: HOW TO: Install VMware Tools for Windows on a VMware Windows virtual machine on a VMware vSphere Hypervisor 5.1 (ESXi 5.1) Host Server
Part 9: HOW TO: Install VMware Tools for Linux on a VMware Linux virtual machine on a VMware vSphere Hypervisor 5.1 (ESXi 5.1) Host Server
In this series of basic VMware articles for the Novice, I'll be showing you the basic VMware skills required to install, configure and deploy virtual machines using VMware's FREE VMware vSphere Hypervisor (ESXi).
If you have been following this series, in Part 6: HOW TO: Create your first Linux Virtual Machine on a VMware vSphere Hypervisor 5.1 (ESXi 5.1) Host Server, we created our first Linux virtual machine called "My First Linux VM" , in Part 7: HOW TO: Create your first Windows Virtual Machine on a VMware vSphere Hypervisor 5.1 (ESXi 5.1) Host Server we created our first Microsoft Windows virtual machine called "My First Windows VM". Later in this tutorial we will using these virtual machines to backup and restore. This procedure can be used to backup and restore any virtual machine hosted on VMware vSphere Hypervisor 5.1 (ESXi 5.1) Host Server.
In this article we will show you HOW TO: Backup (Export) and Restore (Import) virtual machines to VMware vSphere Hypervisor 5.1 for FREE. This procedure can be followed to backup (export) and restore (import) any virtual machine hosted on the VMware vSphere Hypervisor 5.1 host server.
1. Connect to the VMware vSphere Hypervisor 5.1 (ESXi 5.1) or vSphere vCenter Server using the vSphere Client
Please refer to my EE article on HOW TO: Connect to the VMware vSphere Hypervisor 5.1 (ESXi 5.1) using the vSphere Client Click the Inventory icon.
 This procedure can only backup (export) the virtual machines, when the virtual machine is powered off. So ensure that the virtual machines are powered off, before you backup (export) the virtual machines.
2. Virtual Machine Backup (Export) of My First Windows VM to OVF
 Select the virtual machine to backup (export) in the virtual machine inventory. In this step we will select "My First Windows VM". We will be using the Export function to backup the virtual machine. The Export function will backup the entire virtual machine to an OVF or OVA file. An OVF/OVA file is an Open Virtualization Format, OVF/OVA is an open standard for packaging and distributing virtual machines, sometimes referred to as virtual appliances. These files can also be restored to other Hypervisors e.g. Microsoft Hyper-V, Oracle Virtualbox.
 On the ribbon bar, select File > Export > Export OVF Template. If this option is not available or grayed out, check the virtual machine is not powered on.
HANCOCK's TOP TIP Ensure that the virtual machine is disconnected from floppy drives, floppy drives images, disconnected from CD-ROMs and CD-ROM isos images before completing the backup (export). If left connected the backup (export) will also try and export the floppy drive, or CD-ROM iso image the virtual machine is attached to. Sometimes the backup (export) can fail. We have also seen that if you leave the virtual machine connected to an iso, but DO NOT tick the button to export the iso, the OVF will not Import (Restore) causing an OVF Import was cancelled by user error message, it is not obvious what the error is, because it cannot find the iso file to import!
 At the Export OVF Template diaglogue wizard, the default name entered is the name of the virtual machine, I would recommend leaving this as default. Enter a folder/directory on your local machine to store the backup, select OVF, and enter a Description of the Backup. Un-tick include image files attached to floppy and CD/DVD devices in the OVF package. Click OK to proceed with the export (backup).
 The Exporting dialogue box will be displayed. Depending upon the size of your virtual machine disk, (vmdk), this can take several minutes to a few hours. It will report how long it will take to export. In this tutorial "My First Windows VM" is 40GB in size, the operating system currently installed is only taking 8GB of space on the disk and it's reporting 35 minutes to export.
The following dialogue will be displayed when the export (backup) has been completed.
3. Virtual Machine Backup (Export) of My First Linux VM to OVA
Repeat Step 2 above, but select and Export (backup) "My First Linux VM", but this time select OVA as the Export format.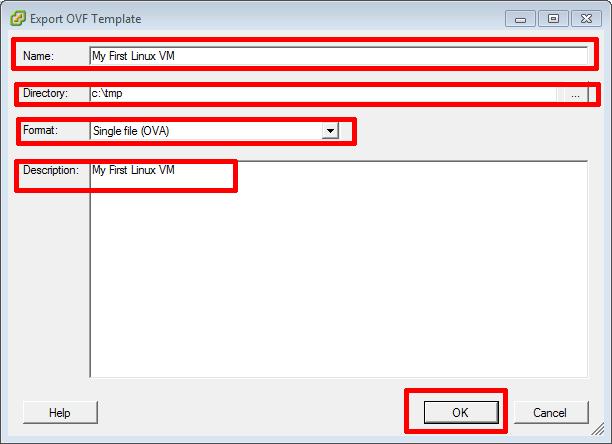

4. Examination of the exported (backup) files in the backup folder
select the backup folder on the local workstation, in this tutorial it was c:\tmp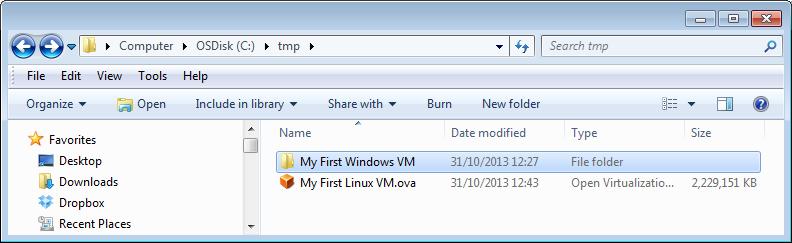
 You will notice that the OVF backup or export has created a folder called "My First Windows VM", This contains three files,
My First Windows VM.mf
My First Windows VM.ovf
My First Windows VM.vmdk
all these files are required for a successful restore.
You will also notice that the OVA backup or export has created a single file called "My First Linux VM.ova", This is a compressed archive file, which contains similar files to the above, but compressed and stored as a single backup file.
These OVF and OVA files can be successfully copied to a USB flash drive or external hard drive for transport, and imported (restored) to a different Host server.
HANCOCK's TOP TIP Please ensure you have tested and restored your virtual machine from an OVF or OVA file before deleting your virtual machine from the host server. Many VMware Administrators, delete their virtual machines before checking they have a backup that can be successfully restored. See step 5 below.
5. Virtual Machine Restore (Import) of My First Windows VM from an OVF
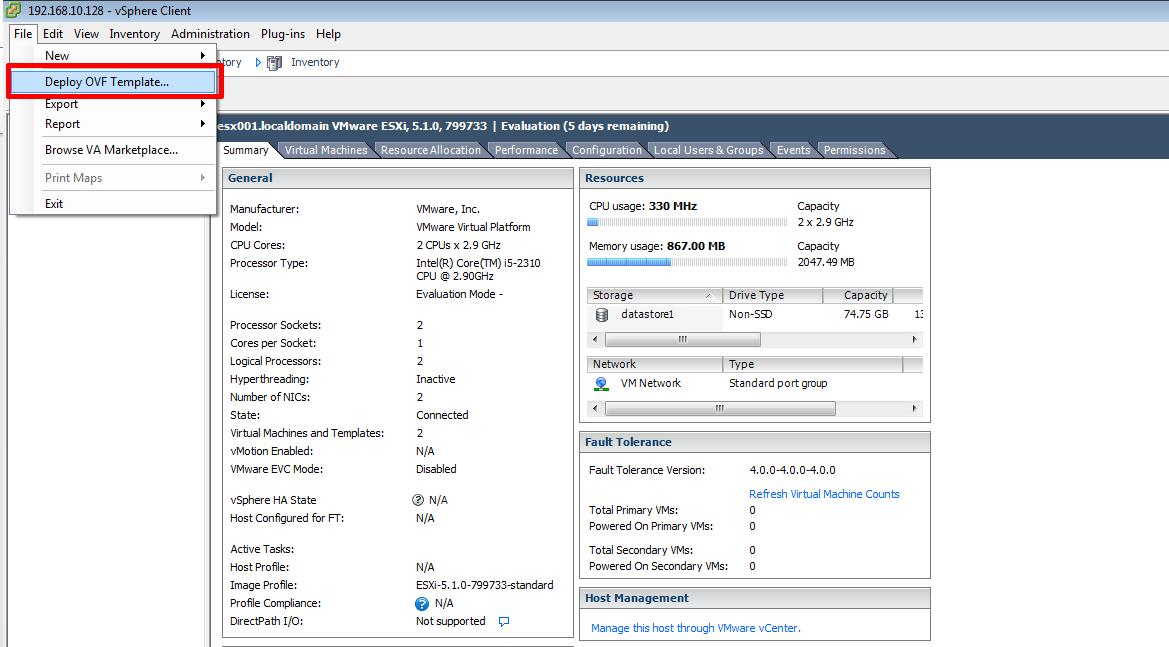 Select File > Deploy OVF Template
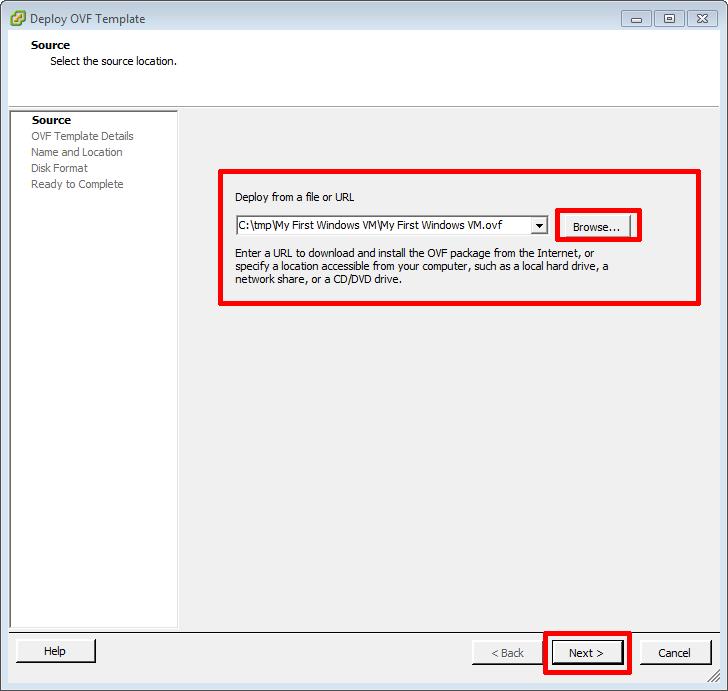 Browse to the location of the stored OVF file on your local workstations disk, in this tutorial this is C:\tmp\My First Windows VM\My First Windows VM.ovf followed by the Next to continue
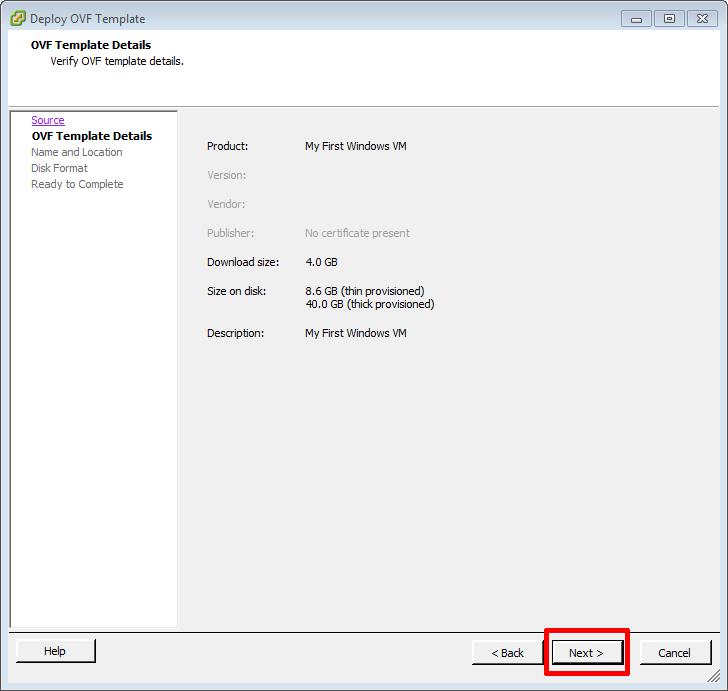 Review the summary page and click Next to continue
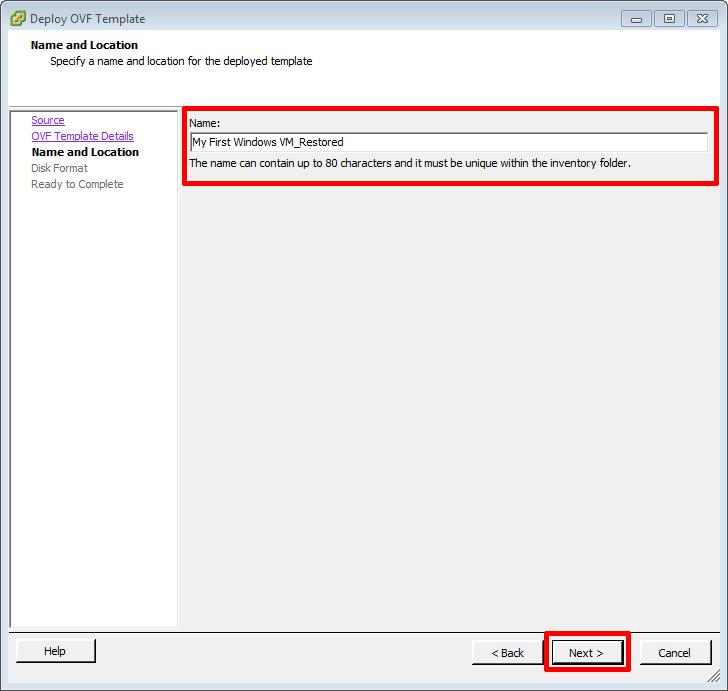 Enter a new, different name for the virtual machine inventory name, all virtual machines in the VMware Hypervisor inventory must be unique. This is not the operating system hostname, it could be the same name as the operating system hostname, this is just a cosmetic name for the inventory. In this tutorial I have entered the name My First Windows VM_Restored Click Next to continue.
 Select a valid datastore, we only have a single datastore, datastore1, and select Thick Provision Lazy Zeroed, we will discuss these provisioning formats in a later article. Click Next to continue.
 At the Ready to Complete Summary Page, review the Summary information, and click Finish.
 The virtual machine will start to be imported, this can take a few minutes to many hours depending upon the size of the virtual machine.
 7 minutes remaining until restore (import complete)
 Click Close when the Deployment Completed Successfully is displayed. The virtual machine My First Windows VM_Restored has been successfully restored, and will be listed in the inventory.
6. Virtual Machine Restore (Import) of My First Linux VM from an OVA
Repeat Step 5 above, but select and Import (restore) "My First Linux VM", but this time select the "My First Linux VM.ova" file when browsing and selecting the OVF template to import (restore).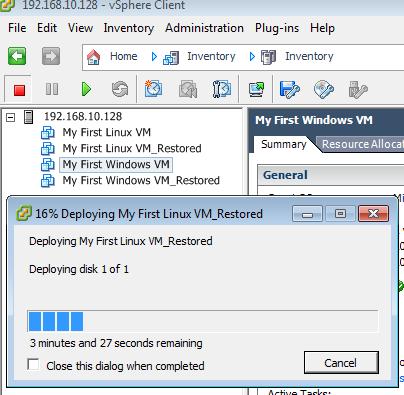 3 minutes to restore
 Restores (Imports) completed successfully, all the virtual machines are shown in the inventory.
Congratulations, you have successfully completed a Backup (Export) and Restore (Import) of Windows and Linux virtual machines to VMware vSphere Hypervisor 5.1
If you require scheduled backup and restore, or the ability to backup virtual machines which are powered on, we would recommend you trial the following commercial backup products.
These are listed in alphabetical order. Please note you will need a Licensed version of VMware vSphere Hypervisor 5.1 to be able to use any of the following products. By Licensed, - you have to have purchased a License from VMware, the most basic License is called VMware vSphere Essentials Kit. Registering for FREE and obtaining a license, does not activate the storage APIs, which are required by commercial backup software.
Please see my Experts Exchange article for further details VMware ESX/ESXi Backup Guide.
Acronis Backup & Recovery® 11 Virtual Edition - Virtual Machine Backup & Recovery Solutions
Dell AppAssure - Data Protection | Backup and Recovery Solutions
NAKIVO Backup & Replication for VMware
StorageCraft ShadowProtect Server
Symantec Business Backup - Data Protection, Data Restore
Trilead VM explorer
Unitrends - Unitrends: All-in-One Data Backup Solutions and Disaster Recovery
Veeam Backup & Replication v7
VMware vSphere Data Protection
**************************
Thank you for reading my article, please leave valuable feedback. If you liked my VMware article and would like to see more Articles from me, please click the Yes button near the: Was this article helpful? at the bottom of this article just below and to the right of this information. Thank You. Do not forget if you have a question about this article or another VMware, Virtualisation, Windows Server 2012 question, why not post a Question for me and the other Experts Exchange Experts in the VMware, Virtualisation, Windows 2008, Windows 2012 Zones. I look forward to hearing from you. - Andy :- twitter @einsteinagogo
**************************
Have a question about something in this article? You can receive help directly from the article author. Sign up for a free trial to get started.
Comments (8)
Commented:
Author
Commented:That might cause a disruption to users working on the VM
Commented:
Commented:
Commented:
May be you have to recalculate the cylinders setting of the virtual hard disk according to the size of the vmdk file.
Open in new window
View More