HOW TO: Set up a lab environment for vSAN using VMware Workstation

Andrew Hancock (VMware vExpert PRO / EE Fellow/British Beekeeper)![]() VMware and Virtualization Consultant
VMware and Virtualization Consultant
 VMware and Virtualization Consultant
CERTIFIED EXPERT
EE Fellow, MVE, Expert of the Year 2021,2017-11, Scribe 2016-2012, Author of the Year 2018-6,2013-2012 VMware vExpert Pro, vExpert 2022-2011
Published:
Browse All Articles > HOW TO: Set up a lab environment for vSAN using VMware Workstation
In my previous Experts Exchange Articles, most have featured Basic and Intermediate VMware and Virtualisation Topics. This tutorial does assume some basic VMware knowledge.
This tutorial shows how to create a test lab environment to test and demonstrate VMware vSAN, and to take it for a test drive. It's not recommended that this lab be used in production environment.
If you would like to read my Basic VMware articles, they are listed at the end of this article for your convenience.
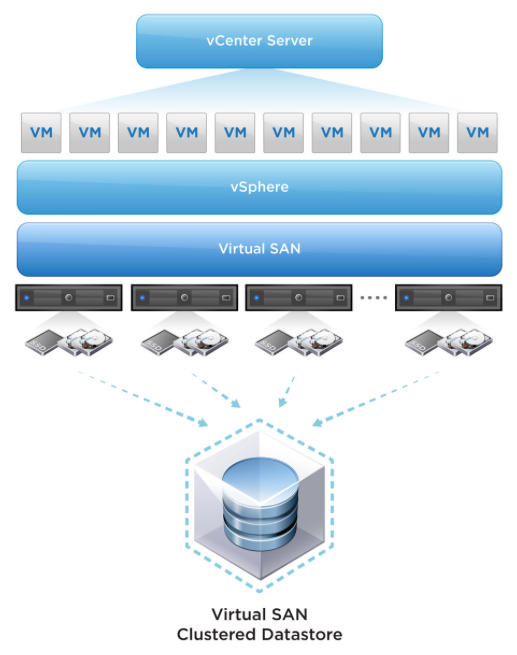
What is VMware vSAN ?
![VSAN1.png]()
This is not to be confused with the previous VMware vSphere product VMware vSphere Storage Appliance (VSA), which is based on a Virtual Appliance hosted on VMware vSphere (ESXi).
VMware Virtual SAN (vSAN) is built into the VMware vSphere (ESXi) 5.5 vSphere kernel. Both VSA and vSAN are similar in concept; they are both virtual but their similarities end there. vSAN provides better scalability, resilience and availability than VSA, (vSA does not scale beyond 3 hosts), and vSAN scales out better for virtualized/cloud environments, it's aimed at the Enterprise or Commercial vSphere customer. vSAN requires a minimum of three hosts for deployment, and supports SSD read and write buffering (caching). At least one SSD and one conventional magnetic hard disk drive are required per host for deployment (1 SSD, 1 HDD per host x 3 minimum). SSD caching is not supported in VSA. You cannot at present use all SSDs for a vSAN.
vSAN functionaility
What is VMware Workstation ?
![ws-gsx-arch.gif]()
VMware Workstation was VMware's first product, launched in May 1999, a Hypervisor application for Intel or AMD 64 bit processors. The current version is 11 at the time of writing this article (December 2014). It allows users to setup one or more guest machines on a single host computer. A guest machine is often referred to as a virtual machine.
VMware Workstation is a type 2 hypervisor. It's an application that installs under a Windows or Linux OS and requires a Windows or Linux OS to be present to function. Other current type 2 Hypervisors include VMware Player 7.0, Oracle Virtualbox 4.0, VMware Fusion 7.0 and Parallels Desktop 10 for Apple Mac OS X.
Type 2 hypervisors can be considered slower than a type 1 hypervisor. However, with the advent of faster desktop processors e.g. Intel i3, i5 and i7 processors, there are far more idle host CPU clock cycles available to allow virtual machines to function. On today's modern laptops and workstations we can run many virtual machines in VMware Workstation with little performance degradation, compared to running the computers on bare metal.
This makes VMware Workstation the ideal application and hypervisor to use for creating sophisticated test suites and labs if you do not own the physical hardware. Even if you do have the physical hardware, it's a great tool to have installed on a laptop to carry your lab around or test break and fix scenarios. All our laptops and desktop workstations have copies of VMware Workstation installed for this use.
In this Experts Exchange tutorial, I’m going to take time out from writing a Basic VMware Article, and show you HOW TO: Set up a lab environment for vSAN using VMware Workstation.
I'm using VMware Workstation, because we need a minimum of six virtual machines for this lab. I'm also going to use vSphere 5.0 AutoLab 2.0 by fellow VMware vExpert - Alastair Cooke. This allows the quick deployment of a VMware vSphere 5.0 Clustered environment.
What is the AutoLab?
The AutoLab is a quick easy way to build a vSphere environment for testing and learning using a single desktop or laptop PC and VMware Workstation, Fusion or ESXi. The whole lab runs in VMs on that one PC; Even ESXi runs in a VM and can then run its own VMs. With the release of AutoLab 2.0, VMware vSphere (ESXi 5.5) 5.5 is supported, and we can enable vSAN.
Source
http://professionalvmware.com/2012/05/vsphere-5-autolab/
Hardware Pre-requisites
Software Pre-requisites
the following software products are available as free downloads and/or 30/60 day trials.
(URLs above tested and correct at 13 December 2014)
I'm going to split this Experts Exchange tutorial into two parts
Download the vSphere 5.0 AutoLab 2.0 Deployment Guide. Alastair has provided an excellent guide to work through to setup AutoLab 2.0, so I'm not going to repeat all the steps required to setup AutoLab 2.0, but I will provide some examples, and pitfalls to avoid.
The first-time AutoLab deployment takes approximately three hours to complete, but re-deployment is much quicker.
Login as a local administrator on your computer, and download and install VMware Workstation 11.0. Download the vSphere 5 AutoLab 2.0 Software, and un-archive the software archive into the C:\Lab_Local folder.
![Lab-Local.jpg]()
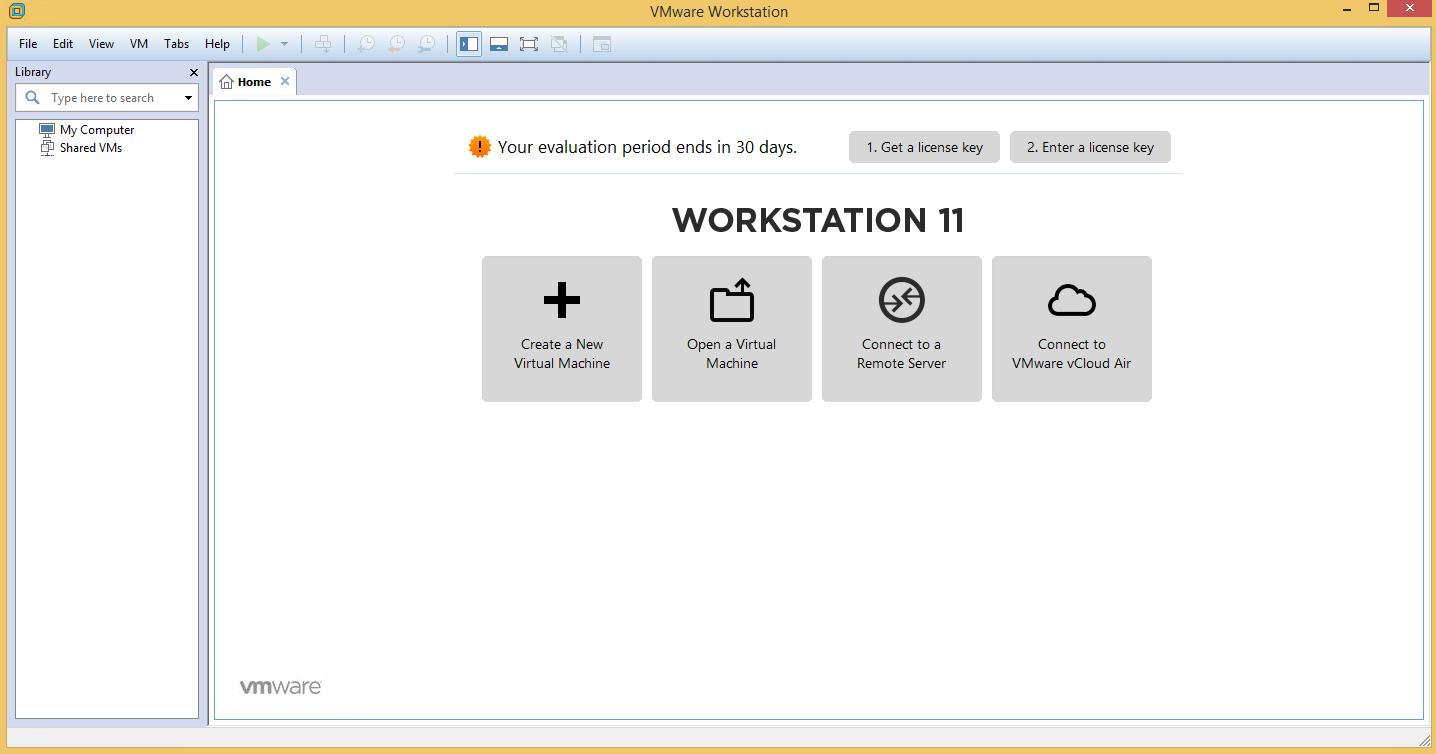
Click the VMware Workstation icon to start VMware Workstation
![VMware-Workstation11.jpg]()
The VMware Workstation workspace
![VMware-Workstation11-Console.jpg]()
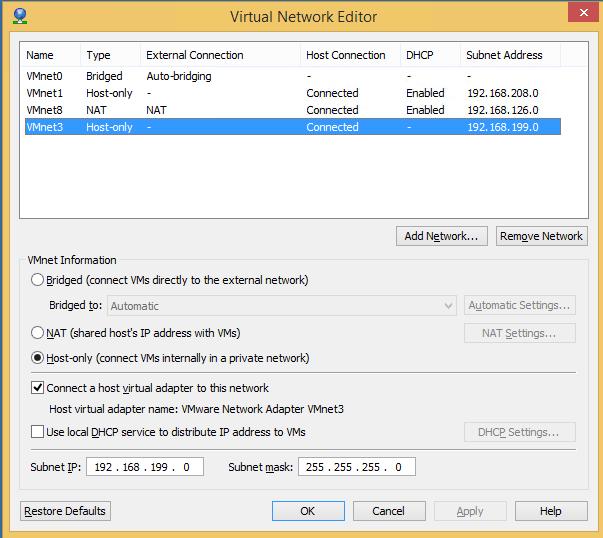
Create the Lab network as shown in the Deployment Guide. You will need to run the Virtual Network Editor as an Administrator (Run As Administrator).
![VMware-Workstation11-Net3.jpg]()
Task 1 – Prepare the prebuilt VMs Page 23 of the vSphere 5.0 AutoLab 2.0 Deployment Guide.
The minimum requirements for vSAN are three VMware vSphere ESXi 5.5 host servers, so open the following virtual machines in VMware Workstation and populate the build share, taking care to ensure that the Software Pre-requisites have been followed, especially the build versions of ESXi 5.5 and vCenter Server 5.5 required listed in this article. (There have been some compatibility issues highlighted with the latest version of ESXi 5.5 U2 and vCenter Server 5.5 U2 and later.)
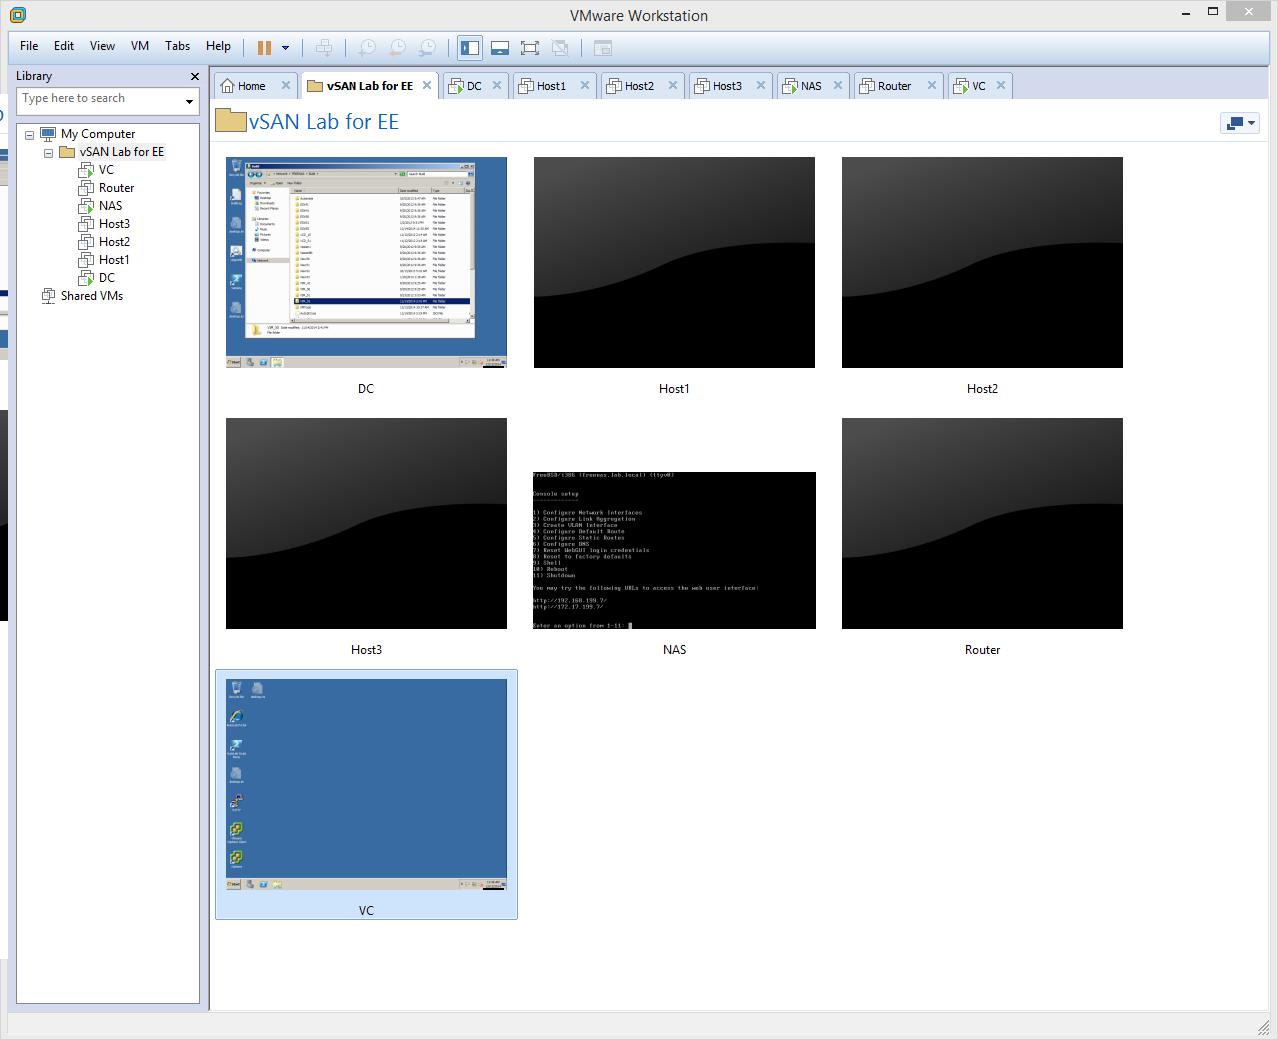
![vSAN-Lab.jpg]()
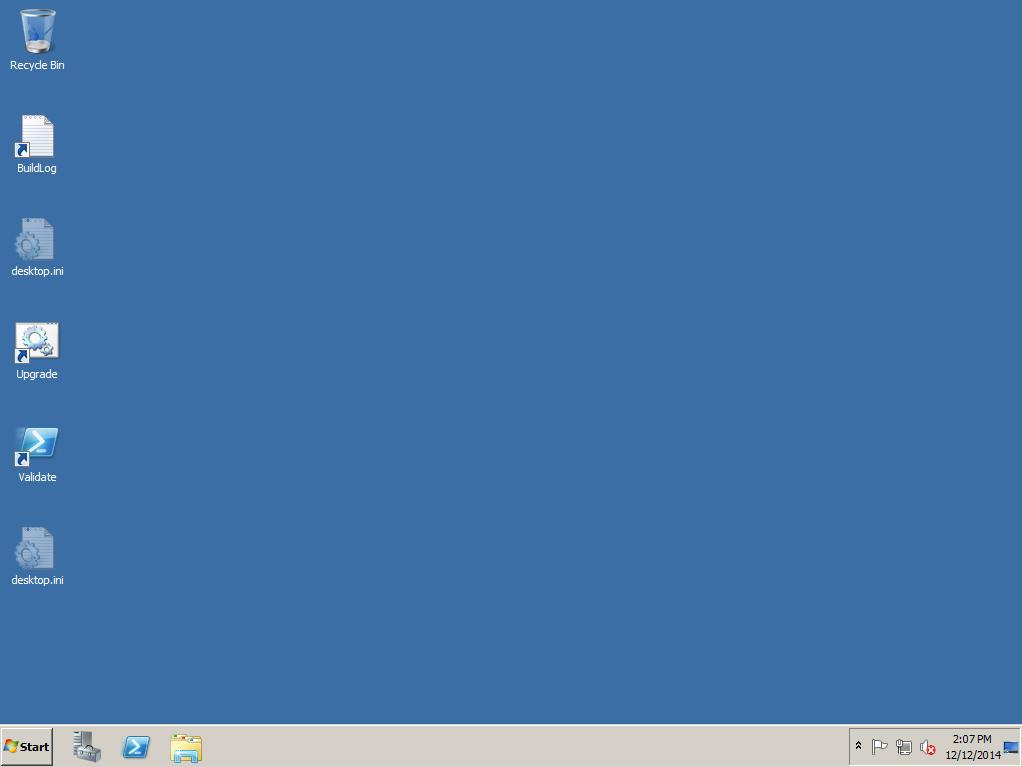
Task 2 – Build DC, Windows Infrastructure - Page 27 of the vSphere 5.0 AutoLab 2.0 Deployment Guide.
Use the Validate script icon to check the Lab Build has been completed successfully.
Lab - Domain Controller virtual machine - DC
![vSAN-Lab---DC.jpg]()
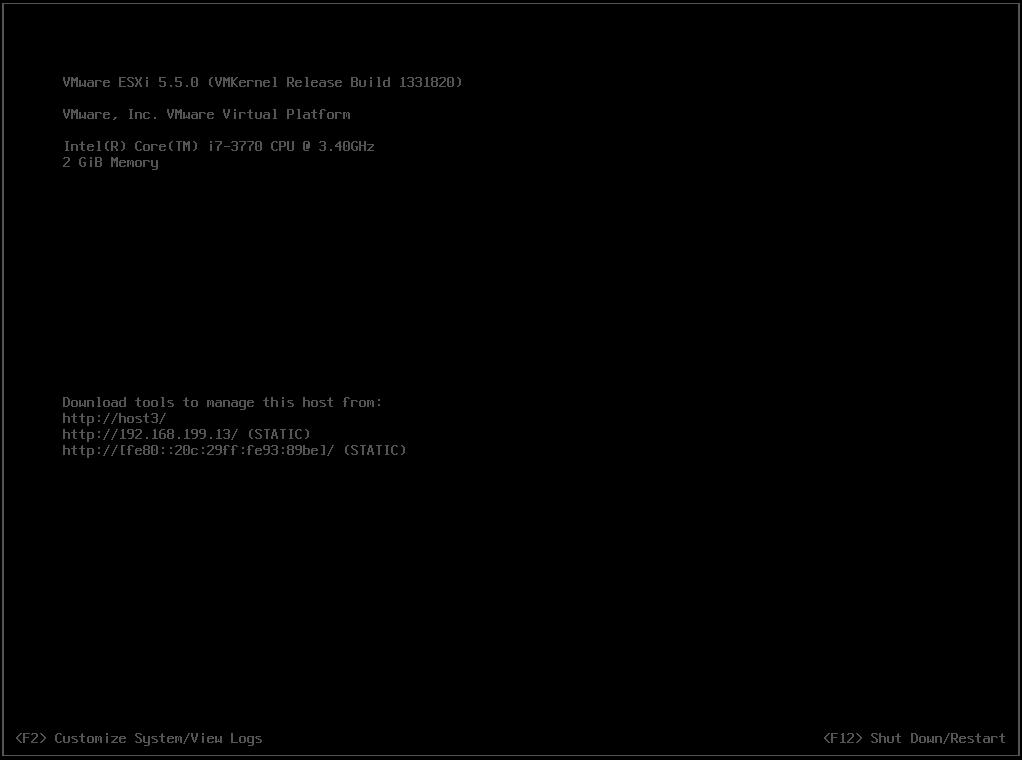
Task 3 – Build ESXi servers - Page 30 of the vSphere 5.0 AutoLab 2.0 Deployment Guide.
Deploy three ESXi 5,5 (u0) Hosts, Host1, Host2 and Host3.
Lab - ESXi Host1 virtual machine
![vSAN-Lab---Host1.jpg]()
Lab - ESXi Host2 virtual machine
![vSAN-Lab---Host2.jpg]()
Lab - ESXi Host3 virtual machine
![vSAN-Lab---Host3.jpg]()
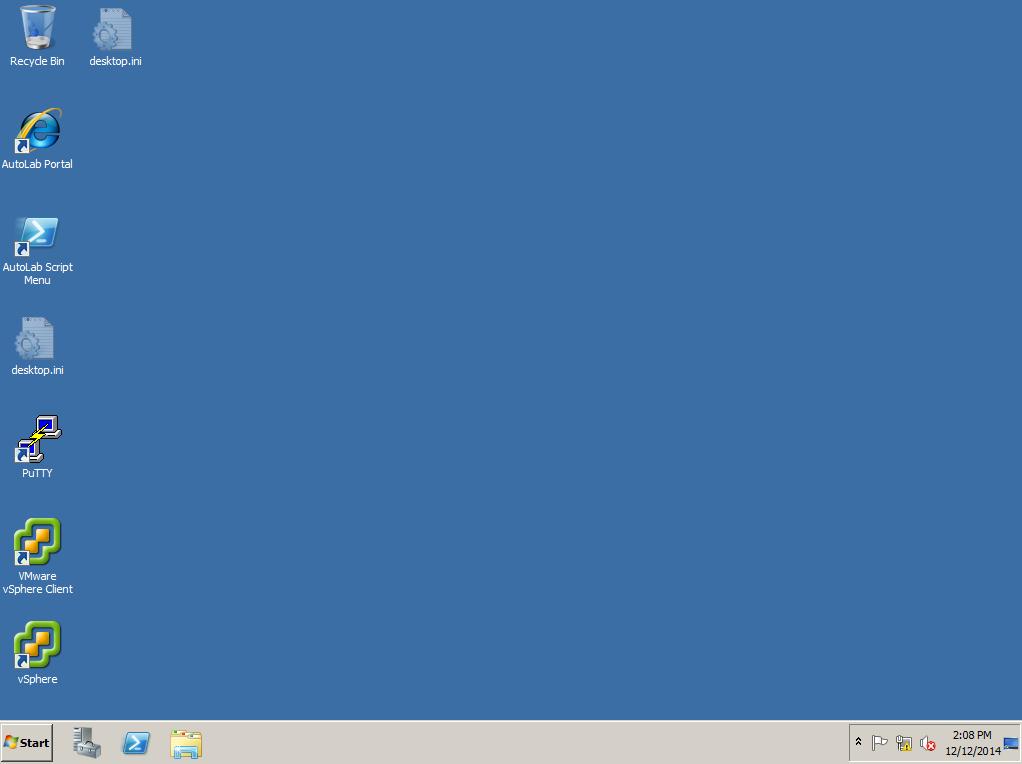
Task 4 – Build VC, vCenter server - Page 31 of the vSphere 5.0 AutoLab 2.0 Deployment Guide.
Lab - vCenter Server virtual machine - VC
![vSAN-Lab---VC.jpg]()
Task 5 – Populate vCenter - Page 33 of the vSphere 5.0 AutoLab 2.0 Deployment Guide.
Use the Add ESXi hosts option from the menu in the AutoLab Script Menu.
Open the URL - https://192.168.199.5:9443/vsphere-client/ on the host PC web browser or using the AutoLab Portal icon on the desktop on the vCenter Server. Login with the account details provided in the deployment guide.
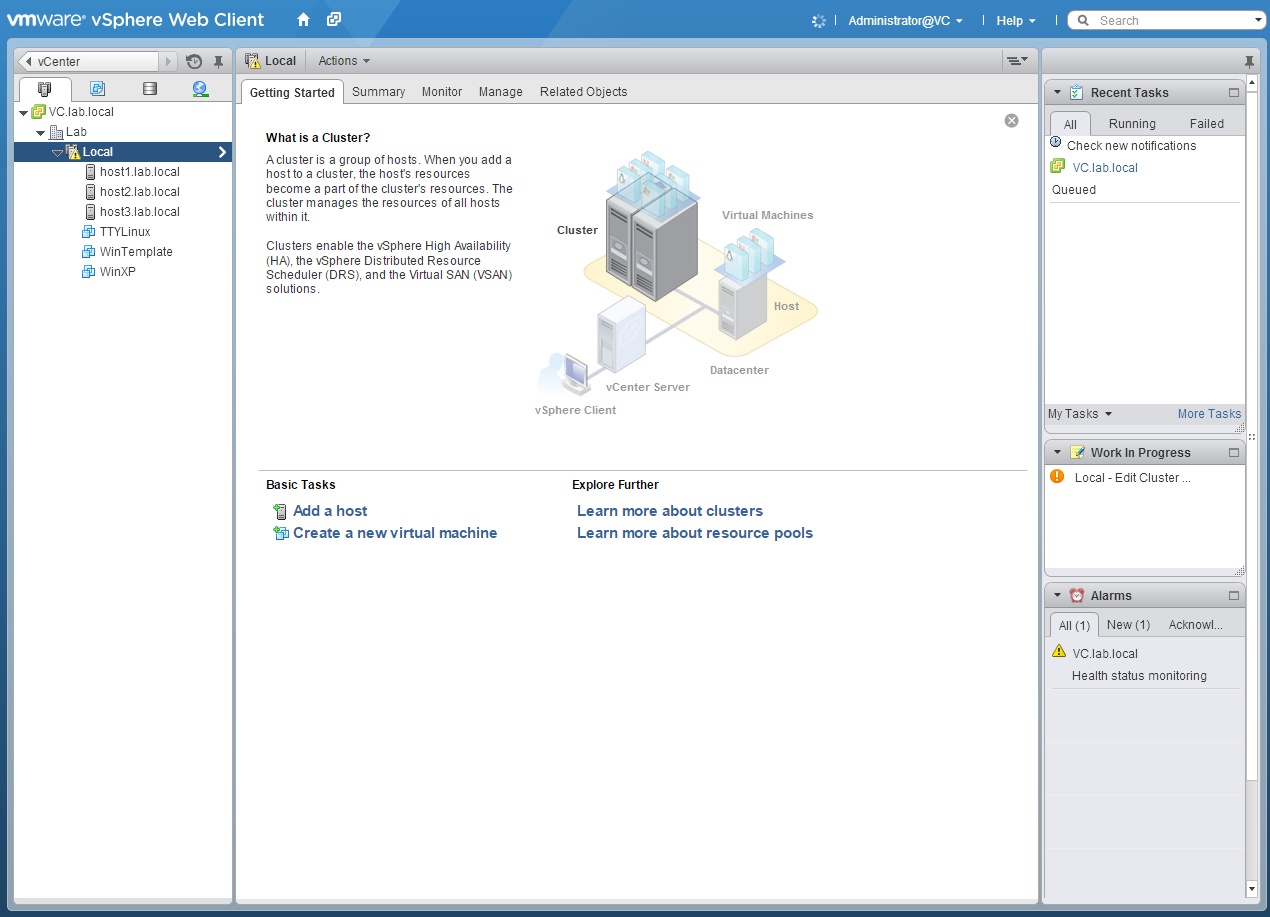
You should see the following "Welcome to the VMware vSphere Web Client" screen. Click the vCenter icon, to confirm the Lab has been completed successfully, and check vCenter, Cluster and Hosts are present.
![Welcome-to-the-VMware-vSphere-Web-Client]()
Click Host and Clusters and check that you have a Cluster called Local, and three hosts present: Host1, Host2 and Host3.
![Cluster.jpg]()
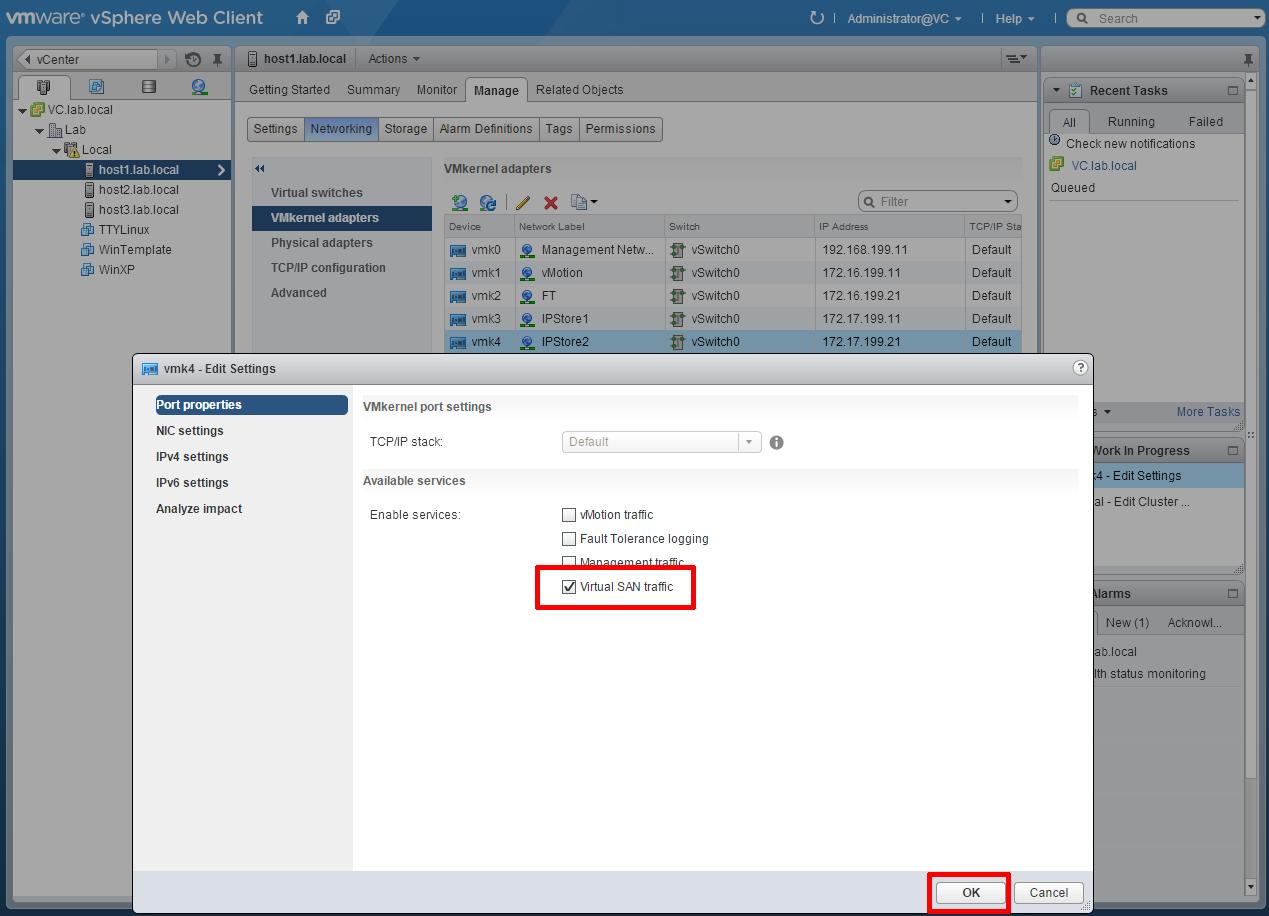
We need to perform some customizations to our lab cluster Local and hosts before we can enable VMware vSAN. We need to enable a VMkernel interface on each host for vSAN Traffic.
Select host1.lab.local > Manage > Networking > VMkernel Adapters
Each host has 4 VMkernel Interfaces, select and edit vmk4 - IPStore2, and enable for Virtual SAN traffic. Repeat for host2.lab.local and host3.lab.local.
![Enable-vSAN-traffic.jpg]()
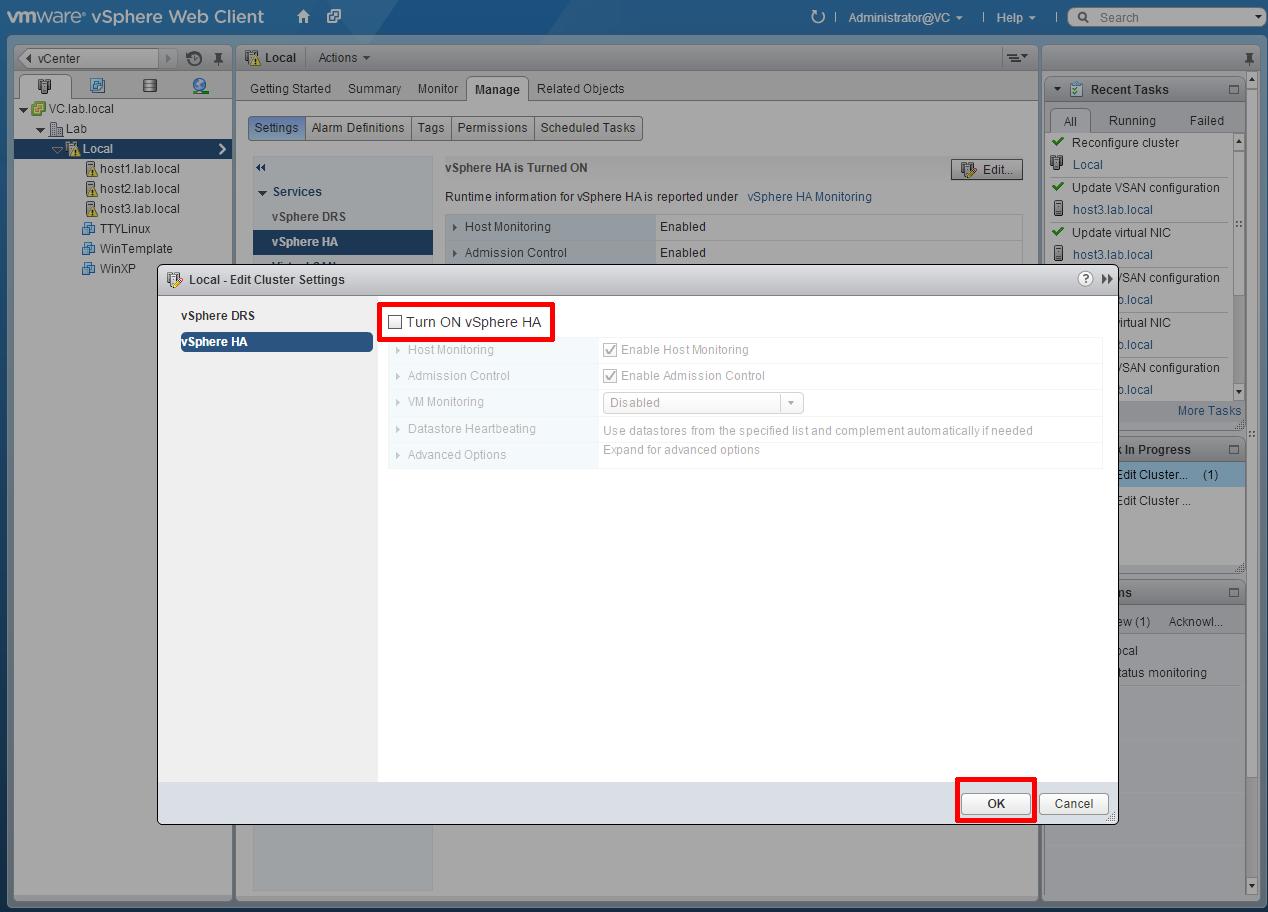
Select the cluster Local, and select the Manage tab, then vSphere HA, select Edit, and remove the Tick from Turn ON vSphere HA, to disable vSphere HA on the Cluster.
![Turn-off-Cluster.jpg]()
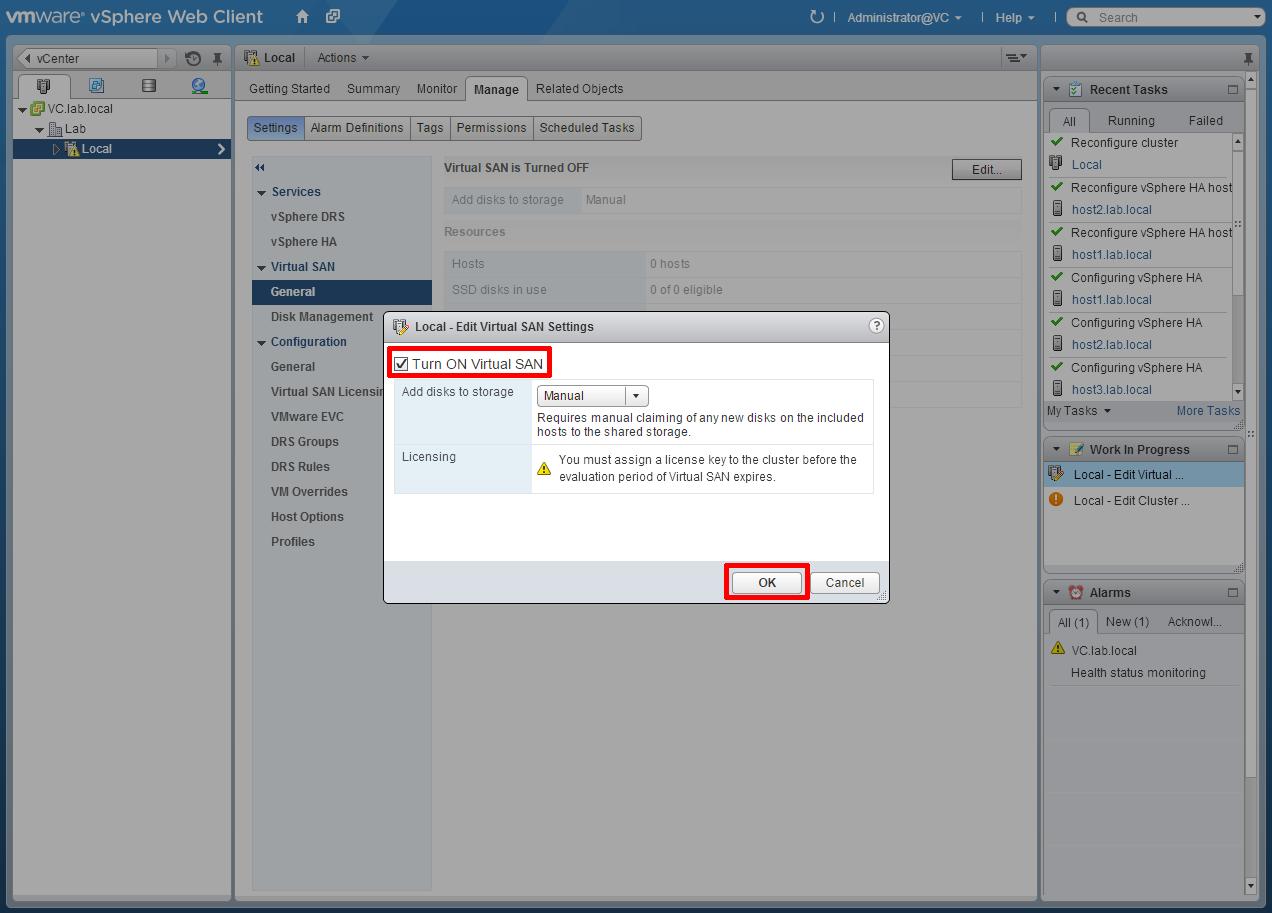
Click Virtual SAN (underneath vSphere HA) > General, select Edit and Tick the box to Turn ON Virtual SAN. Leave Add disks to Storage set to Manual. We will add the disks manually. If you select Automatoc - vSAN will select all eligible disks for you and add them.
![Turn-ON-vSAN.jpg]()
We now need to add disks to Disk Groups. A Disk Group contains at least one SSD, and one HDD (non-SDD) drives. Each host in the lab has already been provisioned with three local SSD disks (emulated/fake SSDs), two of which are not used or claimed by the host (meaning they are not used as a VMFS datastore, flash cache or host cache storage). If you continue without the next modification to your hosts, there will be no disks to claim for vSAN, because vSAN cannot be populated solely with SSDs! SSDs are used as read and write buffers (cache) for slower magnetic HDDs (non-SSD). vSAN is similar to hybrid storage.
You will need to tag a virtual disk as non-SSD, by adding the following line to the hostx.vmx file. This needs to be done when the host is powered off. At this point it's also worth increasing the RAM in the hosts to a minimum of 6GB, the minimum for vSAN.
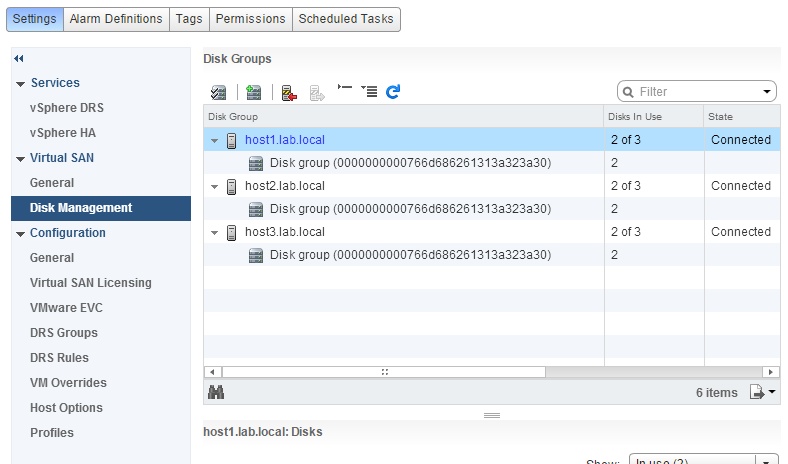
in this tutorial, I've added another fourth virtual scsi disk, of 40GB, and tagged it as a Non-SSD.
![Disk-Management.jpg]()
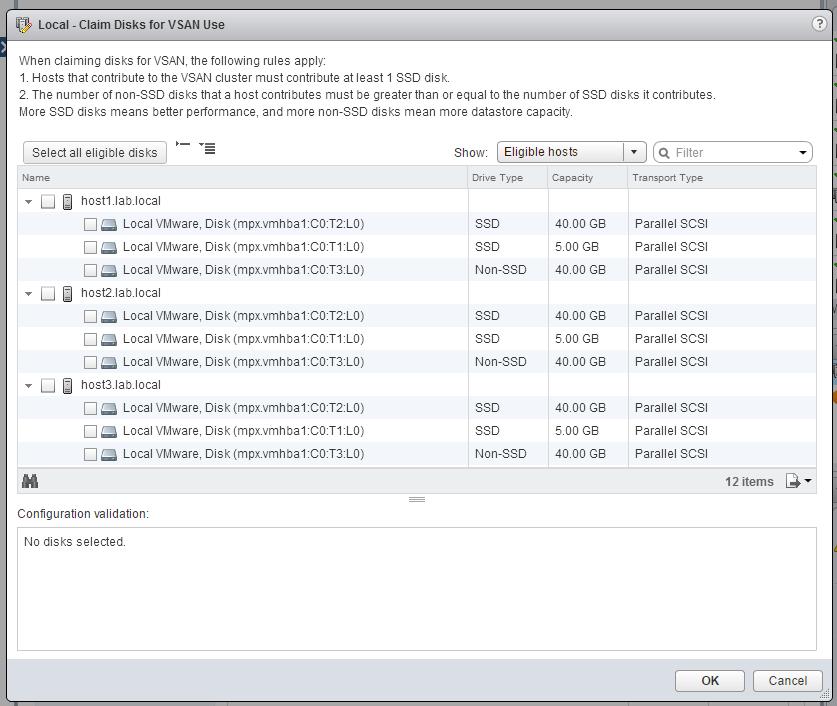
Click the Claim Disks icon, and select the Disks to use in vSAN.
![Claim-Disks.jpg]()
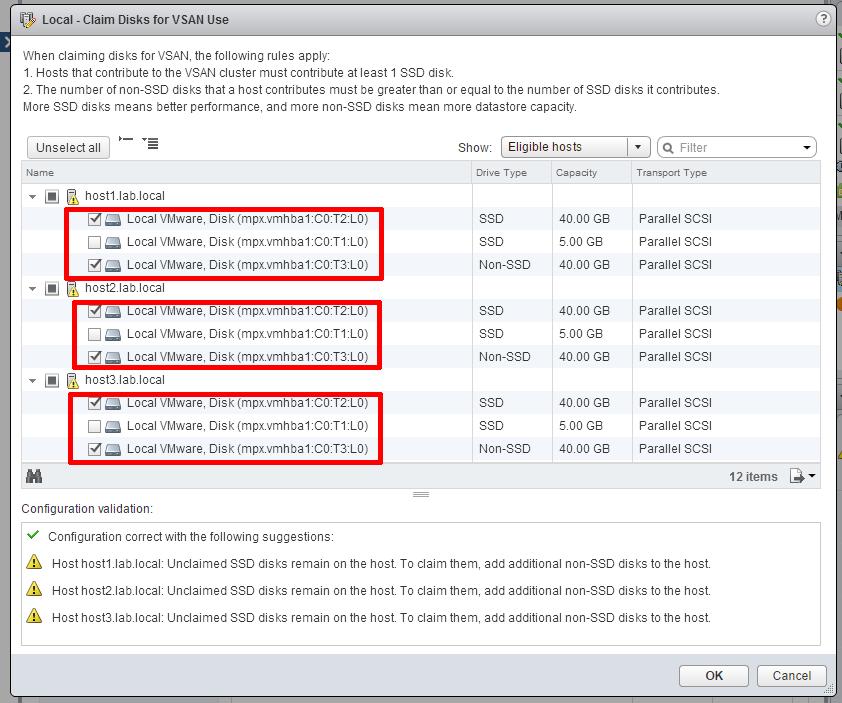
Select a 40GB SSD and 40GB Non-SSD (or disk you have added above). Repeat for all hosts, or click the Select all eligible disks, and all eligible disks on all hosts will be selected for you.
![Disk-Selection.jpg]()
Once you have selected the required disks for vSAN, Click OK. You can always add more disks to the group later.
![Disk-Selected.jpg]()
The Disk groups will be created automatically, consisting of 1 x 40GB SSD and 1 x 40GB non-SSD.
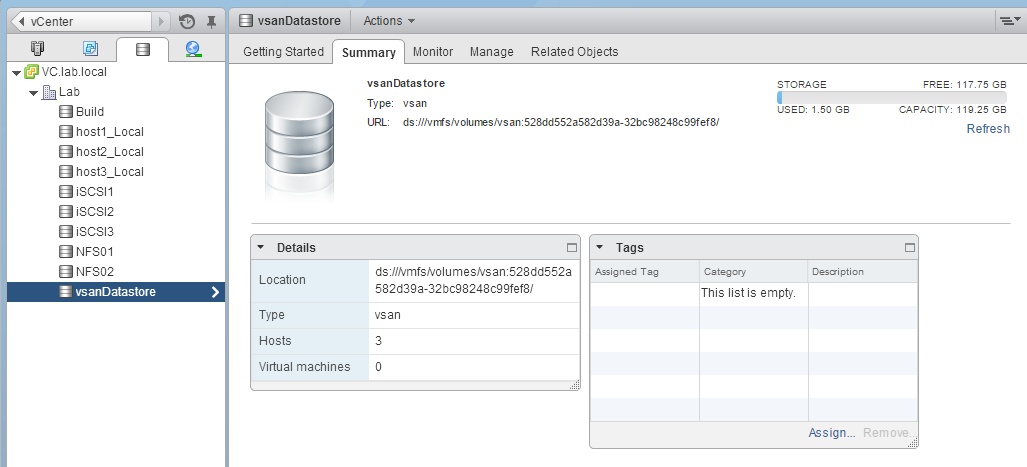
![vSAN-datastore-formed.jpg]()
You have now created a new vSAN datastore called vsanDatastore. Select Storage from the main menu.
![vsanDatastore.jpg]()
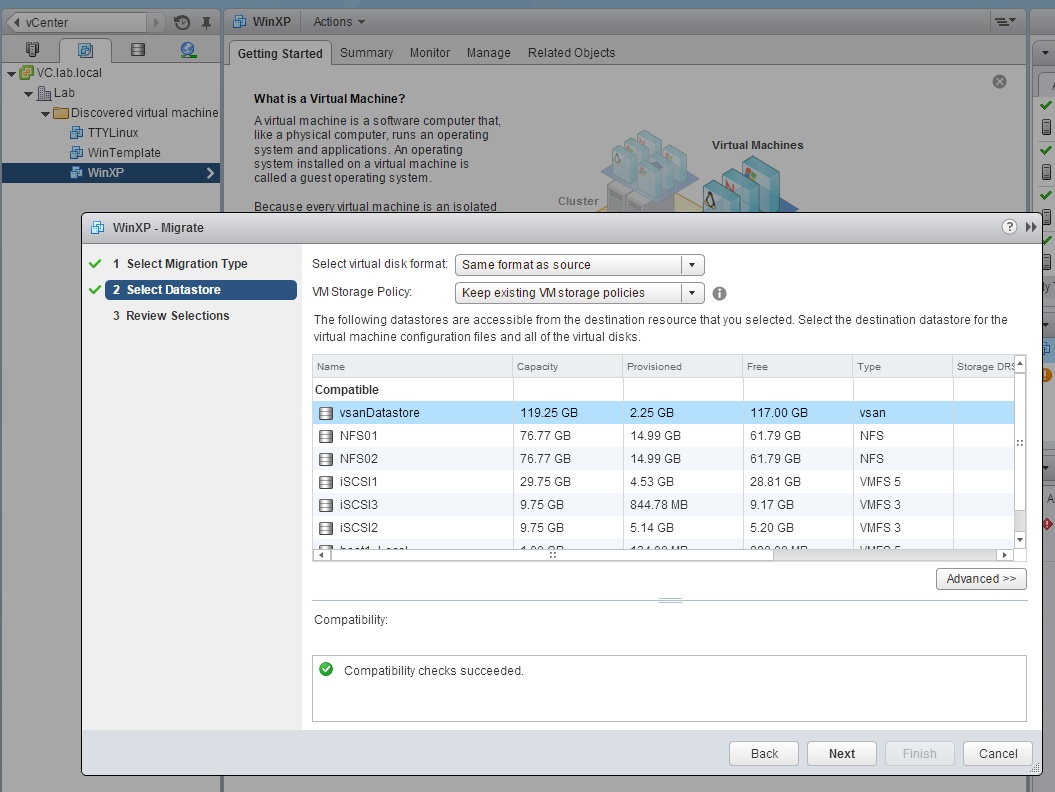
You can use this new datastore, like any other traditional datastore, create a new virtual machine on it, or migrate an existing virtual machine to it.
My Experts Exchange articles here show how to create a virtual machine
![migrate.jpg]()
The WinXP virtual machine was successfully migrated to vsanDatastore.
![migrated.jpg]()
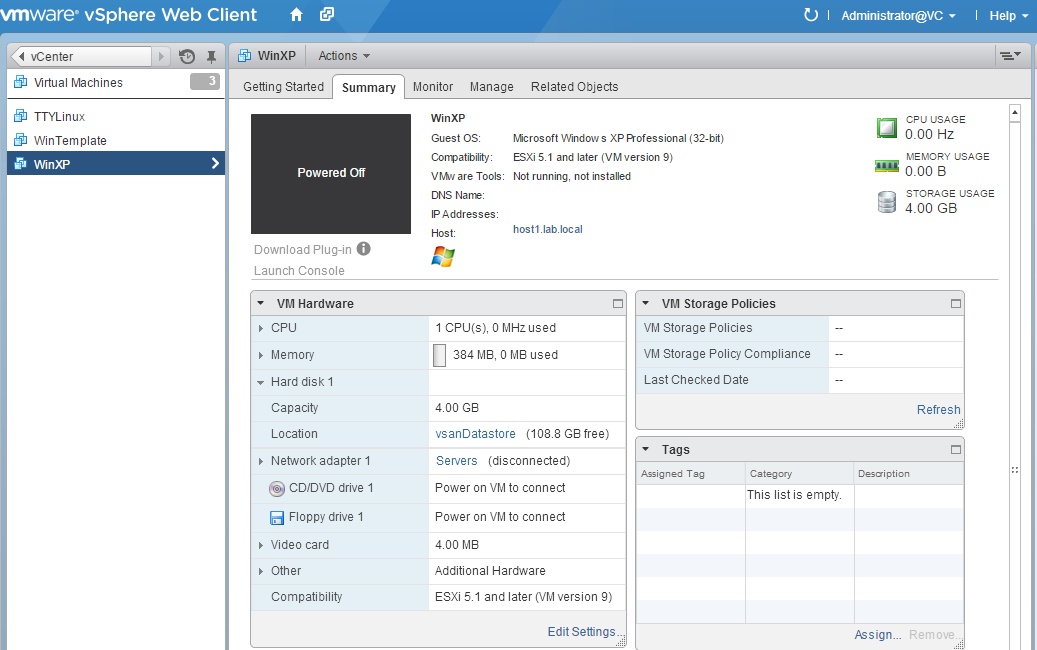
WinXP virtual machine, powered up, and resident on the new vSAN datastore vsanDatastore.
![VM-On.jpg]()
Congratulations you have installed VMware Workstation and completed the setup of vSphere 5 AutoLab 2.0, and installed and configured VMware vSAN.
Now you have completed the setup of vSphere 5.0 AutoLab 2.0, you will be able to quickly deploy new labs in the future.
Basic VMware Articles Series:
During this series of articles VMware released VMware vSphere 5.5 and VMware vSphere Hypervisor ESXi 5.5. These articles are also applicable to VMware vSphere Hypervisor ESXi 5.0 and 5.5. For consistency, I have used VMware vSphere Hypervisor ESXi 5.1 throughout this series.
Acknowledgements
VMware for the use of vSAN and VMware Workstation images.
Alastair Cooke for the use of VMware 5.0 AutoLab 2.0 in this article.
****************************************************************************
Thank you for reading my article, please leave valuable feedback. If you liked my VMware article and would like to see more Articles from me, please click the Yes button near the: Was this article helpful? at the bottom of this article just below and to the right of this information. Thank You. Do not forget if you have a question about this article or another VMware, Virtualisation, Windows Server 2012 question, why not post a Question for me and the other Experts Exchange Experts in the VMware, Virtualisation, Windows 2008, Windows 2012 Zones. I look forward to hearing from you. - Andy :- twitter @einsteinagogo
****************************************************************************
This tutorial shows how to create a test lab environment to test and demonstrate VMware vSAN, and to take it for a test drive. It's not recommended that this lab be used in production environment.
If you would like to read my Basic VMware articles, they are listed at the end of this article for your convenience.
What is VMware vSAN ?
This is not to be confused with the previous VMware vSphere product VMware vSphere Storage Appliance (VSA), which is based on a Virtual Appliance hosted on VMware vSphere (ESXi).
VMware Virtual SAN (vSAN) is built into the VMware vSphere (ESXi) 5.5 vSphere kernel. Both VSA and vSAN are similar in concept; they are both virtual but their similarities end there. vSAN provides better scalability, resilience and availability than VSA, (vSA does not scale beyond 3 hosts), and vSAN scales out better for virtualized/cloud environments, it's aimed at the Enterprise or Commercial vSphere customer. vSAN requires a minimum of three hosts for deployment, and supports SSD read and write buffering (caching). At least one SSD and one conventional magnetic hard disk drive are required per host for deployment (1 SSD, 1 HDD per host x 3 minimum). SSD caching is not supported in VSA. You cannot at present use all SSDs for a vSAN.
vSAN functionaility
- SSD caching and intelligent data placement
- Rapid storage provisioning
- Scale-out for large deployments
- Granular scaling
- Storage policy based management
What is VMware Workstation ?
VMware Workstation was VMware's first product, launched in May 1999, a Hypervisor application for Intel or AMD 64 bit processors. The current version is 11 at the time of writing this article (December 2014). It allows users to setup one or more guest machines on a single host computer. A guest machine is often referred to as a virtual machine.
VMware Workstation is a type 2 hypervisor. It's an application that installs under a Windows or Linux OS and requires a Windows or Linux OS to be present to function. Other current type 2 Hypervisors include VMware Player 7.0, Oracle Virtualbox 4.0, VMware Fusion 7.0 and Parallels Desktop 10 for Apple Mac OS X.
Type 2 hypervisors can be considered slower than a type 1 hypervisor. However, with the advent of faster desktop processors e.g. Intel i3, i5 and i7 processors, there are far more idle host CPU clock cycles available to allow virtual machines to function. On today's modern laptops and workstations we can run many virtual machines in VMware Workstation with little performance degradation, compared to running the computers on bare metal.
This makes VMware Workstation the ideal application and hypervisor to use for creating sophisticated test suites and labs if you do not own the physical hardware. Even if you do have the physical hardware, it's a great tool to have installed on a laptop to carry your lab around or test break and fix scenarios. All our laptops and desktop workstations have copies of VMware Workstation installed for this use.
In this Experts Exchange tutorial, I’m going to take time out from writing a Basic VMware Article, and show you HOW TO: Set up a lab environment for vSAN using VMware Workstation.
I'm using VMware Workstation, because we need a minimum of six virtual machines for this lab. I'm also going to use vSphere 5.0 AutoLab 2.0 by fellow VMware vExpert - Alastair Cooke. This allows the quick deployment of a VMware vSphere 5.0 Clustered environment.
What is the AutoLab?
The AutoLab is a quick easy way to build a vSphere environment for testing and learning using a single desktop or laptop PC and VMware Workstation, Fusion or ESXi. The whole lab runs in VMs on that one PC; Even ESXi runs in a VM and can then run its own VMs. With the release of AutoLab 2.0, VMware vSphere (ESXi 5.5) 5.5 is supported, and we can enable vSAN.
Source
http://professionalvmware.com/2012/05/vsphere-5-autolab/
Hardware Pre-requisites
- Intel Dual Core 64 bit CPU (with Intel VT or Intel virtualisation enabled) or AMD CPU with virtualisation enabled.
- 220GB free disk space for vSAN option, on SSD (optional)
- 32GB RAM (for vSAN option)
- Windows 7 or Windows 8.1 (Hyper-V disabled)
Software Pre-requisites
the following software products are available as free downloads and/or 30/60 day trials.
- vSphere 5 AutoLab 2.0 Software by fellow vExpert Alastair Cooke
- vSphere 5.0 AutoLab 2.0 Deployment Guide by fellow vExpert Alastair Cooke
- VMware Workstation 11.0
- VMware vSphere Hypervisor (ESXi 5.5) (u0)
(build ESXi 5.5 Build is requried - VMware-VMvisor-Installer-5.5.0-1331820.x86_64.iso)
(build vCenter Server 1312299 - VMware-VIMSetup-all-5.5.0-1312299.iso)
- vSphere PowerCLI 5.5
- VMware Tools windows.iso (from VMware Workstation)
- vSphere CLI for vSphere 5.5
- Microsoft Windows Server 2008 R2 180 day trial DVD, ISO file
- Microsoft Windows 2003 Server 32bit CDROM, ISO file
(URLs above tested and correct at 13 December 2014)
I'm going to split this Experts Exchange tutorial into two parts
- Installation of VMware Workstation and vSphere 5 AutoLab 2.0 Software, and Lab configuration.
- Install and Configuration of VMware vSAN.
PART A - Installation of VMware Workstation and vSphere 5 AutoLab 2.0 Software and the Lab configuration.
Download the vSphere 5.0 AutoLab 2.0 Deployment Guide. Alastair has provided an excellent guide to work through to setup AutoLab 2.0, so I'm not going to repeat all the steps required to setup AutoLab 2.0, but I will provide some examples, and pitfalls to avoid.
The first-time AutoLab deployment takes approximately three hours to complete, but re-deployment is much quicker.
Login as a local administrator on your computer, and download and install VMware Workstation 11.0. Download the vSphere 5 AutoLab 2.0 Software, and un-archive the software archive into the C:\Lab_Local folder.

Click the VMware Workstation icon to start VMware Workstation

The VMware Workstation workspace
Create the Lab network as shown in the Deployment Guide. You will need to run the Virtual Network Editor as an Administrator (Run As Administrator).
Task 1 – Prepare the prebuilt VMs Page 23 of the vSphere 5.0 AutoLab 2.0 Deployment Guide.
The minimum requirements for vSAN are three VMware vSphere ESXi 5.5 host servers, so open the following virtual machines in VMware Workstation and populate the build share, taking care to ensure that the Software Pre-requisites have been followed, especially the build versions of ESXi 5.5 and vCenter Server 5.5 required listed in this article. (There have been some compatibility issues highlighted with the latest version of ESXi 5.5 U2 and vCenter Server 5.5 U2 and later.)
- NAS - used to store the AutoLab media
- DC - Domain Controller
- VC - vCenter Server 5.5
- Host1 - ESXi 5.5 Host 1
- Host2 - ESXi 5.5 Host 2
- Host3 - ESXi 5.5 Host 3
Task 2 – Build DC, Windows Infrastructure - Page 27 of the vSphere 5.0 AutoLab 2.0 Deployment Guide.
Use the Validate script icon to check the Lab Build has been completed successfully.
Lab - Domain Controller virtual machine - DC
Task 3 – Build ESXi servers - Page 30 of the vSphere 5.0 AutoLab 2.0 Deployment Guide.
Deploy three ESXi 5,5 (u0) Hosts, Host1, Host2 and Host3.
Lab - ESXi Host1 virtual machine

Lab - ESXi Host2 virtual machine

Lab - ESXi Host3 virtual machine
Task 4 – Build VC, vCenter server - Page 31 of the vSphere 5.0 AutoLab 2.0 Deployment Guide.
Lab - vCenter Server virtual machine - VC
Task 5 – Populate vCenter - Page 33 of the vSphere 5.0 AutoLab 2.0 Deployment Guide.
Use the Add ESXi hosts option from the menu in the AutoLab Script Menu.
Open the URL - https://192.168.199.5:9443/vsphere-client/ on the host PC web browser or using the AutoLab Portal icon on the desktop on the vCenter Server. Login with the account details provided in the deployment guide.
You should see the following "Welcome to the VMware vSphere Web Client" screen. Click the vCenter icon, to confirm the Lab has been completed successfully, and check vCenter, Cluster and Hosts are present.
Click Host and Clusters and check that you have a Cluster called Local, and three hosts present: Host1, Host2 and Host3.
PART B - Install and Configure VMware vSAN.
We need to perform some customizations to our lab cluster Local and hosts before we can enable VMware vSAN. We need to enable a VMkernel interface on each host for vSAN Traffic.
Select host1.lab.local > Manage > Networking > VMkernel Adapters
Each host has 4 VMkernel Interfaces, select and edit vmk4 - IPStore2, and enable for Virtual SAN traffic. Repeat for host2.lab.local and host3.lab.local.
Select the cluster Local, and select the Manage tab, then vSphere HA, select Edit, and remove the Tick from Turn ON vSphere HA, to disable vSphere HA on the Cluster.
Click Virtual SAN (underneath vSphere HA) > General, select Edit and Tick the box to Turn ON Virtual SAN. Leave Add disks to Storage set to Manual. We will add the disks manually. If you select Automatoc - vSAN will select all eligible disks for you and add them.
We now need to add disks to Disk Groups. A Disk Group contains at least one SSD, and one HDD (non-SDD) drives. Each host in the lab has already been provisioned with three local SSD disks (emulated/fake SSDs), two of which are not used or claimed by the host (meaning they are not used as a VMFS datastore, flash cache or host cache storage). If you continue without the next modification to your hosts, there will be no disks to claim for vSAN, because vSAN cannot be populated solely with SSDs! SSDs are used as read and write buffers (cache) for slower magnetic HDDs (non-SSD). vSAN is similar to hybrid storage.
You will need to tag a virtual disk as non-SSD, by adding the following line to the hostx.vmx file. This needs to be done when the host is powered off. At this point it's also worth increasing the RAM in the hosts to a minimum of 6GB, the minimum for vSAN.
scsix:y.virtualSSD = 0in this tutorial, I've added another fourth virtual scsi disk, of 40GB, and tagged it as a Non-SSD.
scsi0:3.virtualSSD = 0
Select the Disk Management section in Virtual SAN

Click the Claim Disks icon, and select the Disks to use in vSAN.

Select a 40GB SSD and 40GB Non-SSD (or disk you have added above). Repeat for all hosts, or click the Select all eligible disks, and all eligible disks on all hosts will be selected for you.
Once you have selected the required disks for vSAN, Click OK. You can always add more disks to the group later.
The Disk groups will be created automatically, consisting of 1 x 40GB SSD and 1 x 40GB non-SSD.
You have now created a new vSAN datastore called vsanDatastore. Select Storage from the main menu.
You can use this new datastore, like any other traditional datastore, create a new virtual machine on it, or migrate an existing virtual machine to it.
My Experts Exchange articles here show how to create a virtual machine
- Part 7: HOW TO: Create your first Windows Virtual Machine on a VMware vSphere Hypervisor 5.1 (ESXi 5.1) Host Server
- Part 8: HOW TO: Install VMware Tools for Windows on a VMware Windows virtual machine on a VMware vSphere Hypervisor 5.1 (ESXi 5.1) Host Server
The WinXP virtual machine was successfully migrated to vsanDatastore.
WinXP virtual machine, powered up, and resident on the new vSAN datastore vsanDatastore.

Congratulations you have installed VMware Workstation and completed the setup of vSphere 5 AutoLab 2.0, and installed and configured VMware vSAN.
Now you have completed the setup of vSphere 5.0 AutoLab 2.0, you will be able to quickly deploy new labs in the future.
Basic VMware Articles Series:
During this series of articles VMware released VMware vSphere 5.5 and VMware vSphere Hypervisor ESXi 5.5. These articles are also applicable to VMware vSphere Hypervisor ESXi 5.0 and 5.5. For consistency, I have used VMware vSphere Hypervisor ESXi 5.1 throughout this series.
- Part 13: HOW TO: Configure basic networking on a VMware vSphere Hypervisor 5.1 (ESXi 5.1) Host Server
Acknowledgements
VMware for the use of vSAN and VMware Workstation images.
Alastair Cooke for the use of VMware 5.0 AutoLab 2.0 in this article.
**************************
Thank you for reading my article, please leave valuable feedback. If you liked my VMware article and would like to see more Articles from me, please click the Yes button near the: Was this article helpful? at the bottom of this article just below and to the right of this information. Thank You. Do not forget if you have a question about this article or another VMware, Virtualisation, Windows Server 2012 question, why not post a Question for me and the other Experts Exchange Experts in the VMware, Virtualisation, Windows 2008, Windows 2012 Zones. I look forward to hearing from you. - Andy :- twitter @einsteinagogo
**************************
EE Fellow, MVE, Expert of the Year 2021,2017-11, Scribe 2016-2012, Author of the Year 2018-6,2013-2012 VMware vExpert Pro, vExpert 2022-2011
Have a question about something in this article? You can receive help directly from the article author. Sign up for a free trial to get started.
Comments (4)
Commented:
Very Nicely & clearly written!!!
Thanks for sharing,
A
Author
Commented:Commented:
p.s. - do You have 3-4 clones of...yourself to have time to do all of that on E-E...?? :P
best regards
NTShad0w
Author
Commented:and all the other stuff....
Andy