

Browse All Articles > HOWTO: iSCSI with Multi-Path in a Windows Server Environment
A step-by-step introduction to multipathing, what it is, and how to set it up using iSCSI initiators with MPIO in Windows Server or desktop operating systems.
Introduction
iSCSI has fast become a good, cheap alternative to expensive Fibre Channel storage, and in most cases does not require any additional infrastructure changes. You can use the same network cable and switches as you do for most of your standard network connections - since it is based on IP over Ethernet.The thing is, reliability plays an important role in server environments, and while hardware is generally good and stable, it is still up to us to make it as reliable as possible - by adding redundancy.
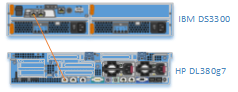
Consider this: You have a 12 Drive SAN providing iSCSI to your Windows Servers, similar to the drawing shown:
 The 12 drives are naturally in a 2 x 6 drive RAID 5 configuration, providing redundancy at the drive level. The SAN itself has two power supplies, thus providing redundancy at the power front, however, there is only 1 controller, and one network cable, providing no redundancy at the network front.
Easily resolved! Just add another controller, add another network cable, and Bob's your Uncle. Unfortunately, it's not that simple.
This article is to help you set it up properly, so that you have fully redundant, multi-path IO to your SAN for your high availability needs.
Configuring your Hardware
In our sample configuration, I'm going to include two servers and an iSCSI SAN in a Clustered environment, and we can build it up from there. Naturally, you don't need two servers, but since we are talking high availability here, you might be wanting to think about it.In addition to the two servers, we're going to use an iSCSI SAN which has dual controllers, thus providing redundancy if a controller fails. In addition to this, we're going to use both ports of each controller, so that we have redundancy if a switch fails. This is what our redundancy now looks like.
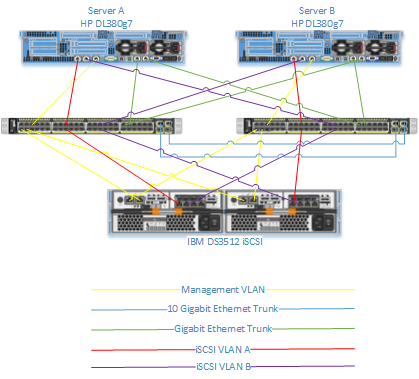 The idea is, that if any one single device fails, there is no interruption to the service.
Try it! Pretend that the left most of these two switches blows up. I've never heard of a Cisco switch blow up, but try to use your imagination. Server A would have lost its connection to the IBM SAN over iSCSI VLAN A, but that's not a problem! It has a connection to the survived switch, which in turn has a connection back to the IBM SAN.
NOTE: It is not necessary to have two separate VLAN's for your iSCSI multi-pathing, but it's highly recommended, because if you use the same VLAN (or more importantly, the same Subnet), you cannot guarantee the paths it's going to use!
As far as pathing is concerned, did you know that each server has 4 paths to the storage? It's true! Despite the fact that there are only two network cables dedicated to the iSCSI solution, there are in fact 4 paths. Port A (the left port) on Server A can in fact talk to Channel 3 of Controller A (left controller) of the SAN, and it can talk to Channel 3 of Controller B (right controller) of the SAN. This is achieved by means of the 10 Gigabit trunk between the two switches. This is therefore, two paths to the storage - one source interface, and two target interfaces. Similarly, Port B of the server can talk to Channel 4 of Controller A and Controller B - thus providing 4 channels to the storage.
IP Addressing
Knowing that iSCSI VLAN A and iSCSI VLAN B should be on different subnets, we can now set up our IP address scheme. You can pretty much use any of the private IP Schemes available. As 172.16-31 are rarely used, I'm going to use these.
Server A: iSCSI VLAN A - 172.31.1.100
Server A: iSCSI VLAN B - 172.31.2.100
Server B: iSCSI VLAN A - 172.31.1.101
Server B: iSCSI VLAN B - 172.31.2.101
SAN: Controller A - Channel 3 (VLAN A) - 172.31.1.1
SAN: Controller A - Channel 4 (VLAN B) - 172.31.2.1
SAN: Controller B - Channel 3 (VLAN A) - 172.31.1.2
SAN: Controller B - Channel 3 (VLAN B) - 172.31.2.2
Once I've documented my IP Addressing, I'm going to configure my SAN interfaces, and my Server interfaces to have these addresses. Be sure that you can ping all the SANs interfaces
Configuring your Software
Connecting to your Servers to connect to your storage has to be done in stages, and may require multiple reboots. Ensure that you do this only if you can get downtime to do it.
1. Installing MPIO
The first thing you have to do is install MPIO. A reboot is required in order to complete the installation, so do this. Installing MPIO can be done in powershell using the following commands:Import-Module ServerManager
Add-WindowsFeature Multipath-IOReboot the server. NOTE: With Windows 2012, you do not need to reboot the server after adding MPIO.
2. Running the iSCSI Initiator
iSCSI is automatically a part of Windows 2008 R2 and Windows 2012, so all we have to do is run the iSCSI Initiator Control Panel. The iSCSI service however, is installed but not configured to start automatically. Running the iSCSI Initiator for the first time will ask you if it should start the service, and configure it to automatically start. You say Yes to this.
To launch the iSCSI Initiator on Windows Core, log in to the server and run "iscsicpl" from the command prompt.
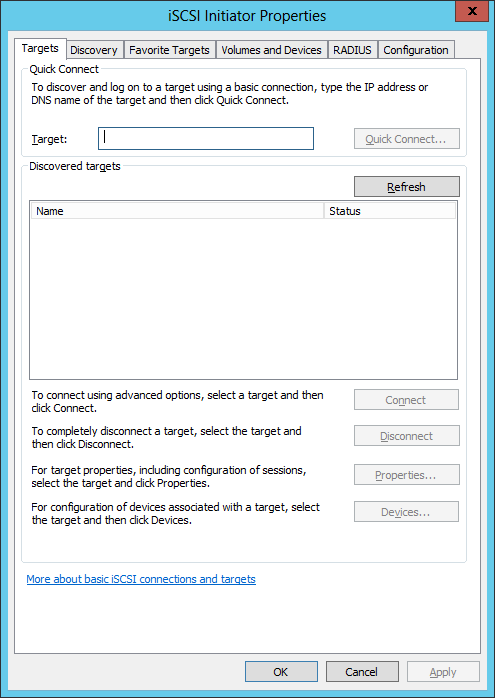
You will be presented with a screen that looks like this.
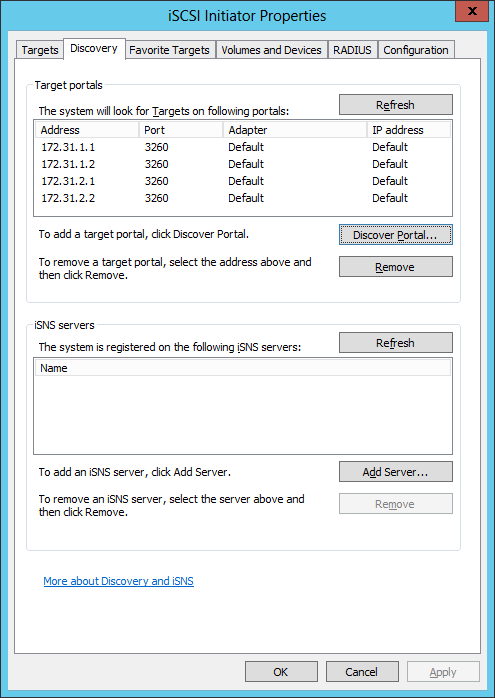
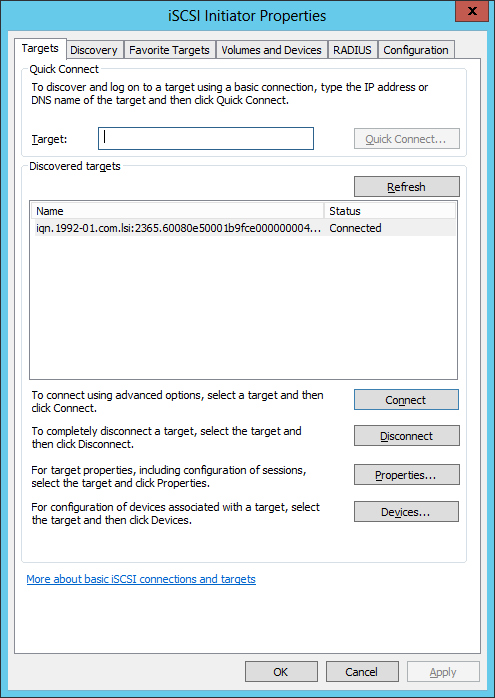
3. Add all the IP Targets
Most people would just enter in an IP address in the Target field and click "Quick Connect". We're not going to do this. What we should do is go to the "Discovery" tab and then click "Discover Portal..." and enter in the IP address of the iSCSI port on the SAN.
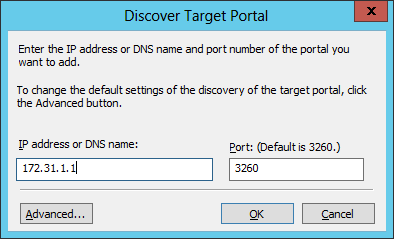 NOTE: Your SAN will most likely have management interfaces in addition to the iSCSI port interfaces - do not specify the management interfaces here!
During this process, the server will communicate with the target you are adding, and will find its name and add it to the "Targets" tab. This may take a short while and iSCSI Initiator may appear to stop responding - this is normal.
We add all IP's here so that if in the event of hardware failures, and the server is rebooted, it still has knowledge of all the target IP's it can communicate with in order to find its targets.
Repeat until all your iSCSI SANs IP's have been added
4. Define the Host in the SAN
As previously mentioned, adding the IP's will make iSCSI communicate with the SAN, so that it can discover what it's name is. During this process, the SAN also learns about the host, but doesn't quite do anything with it yet. What you usually have to do is add the host - and add it to a host group - so that we can define LUNs to the host (or group of hosts).
Since everybody's SAN is different, the process may be different for you, but I will show you what it looks like to define a host on the IBM DS3500.
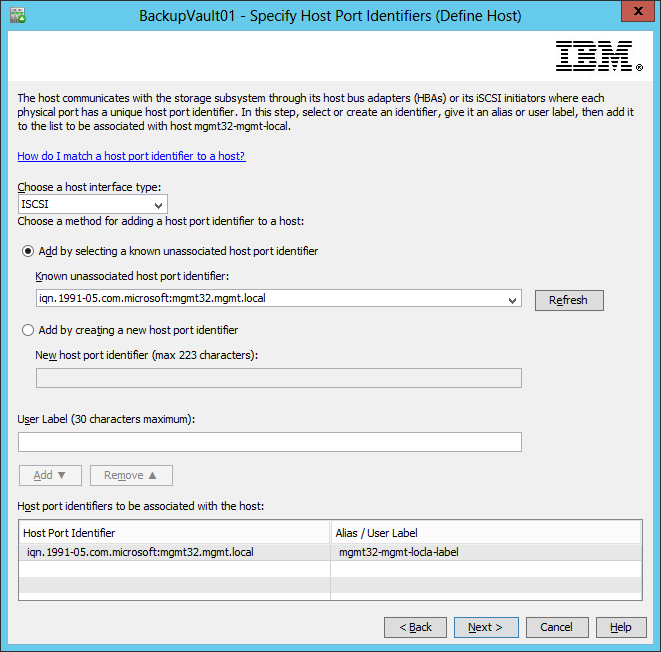 NOTE: You only have to add each host once - not multiple times like you did with the iSCSI Target IP's.
5. Provision your LUN(s)
Still at the SAN, you should now provision some LUNs to your host or host group. Doing this will make disks become available to the host when it establishes a connection through iSCSI. Again, this may look different to you but below you can see that I have connected to Logical Drives with LUN ID's 1 and 2 to my Host Group "ClusterServers", which contains the host I have just added.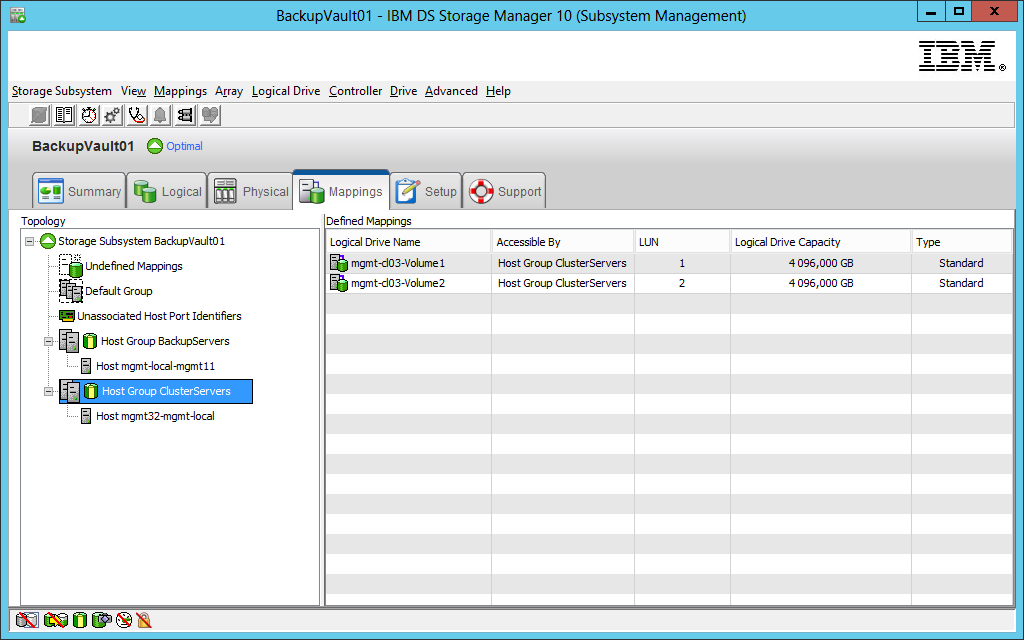
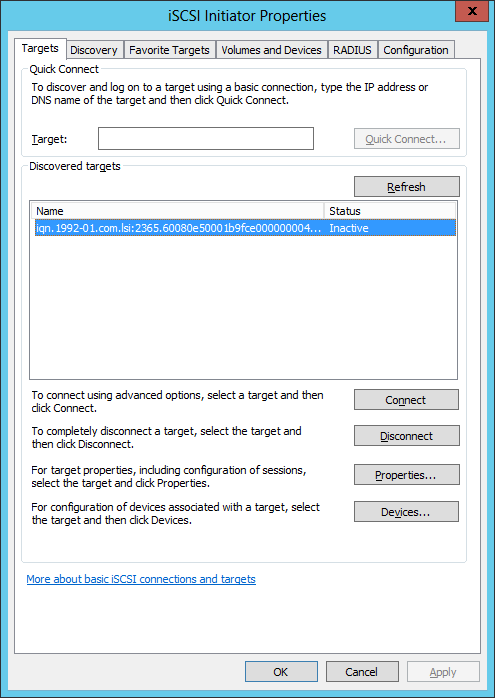
6. Connect your first path
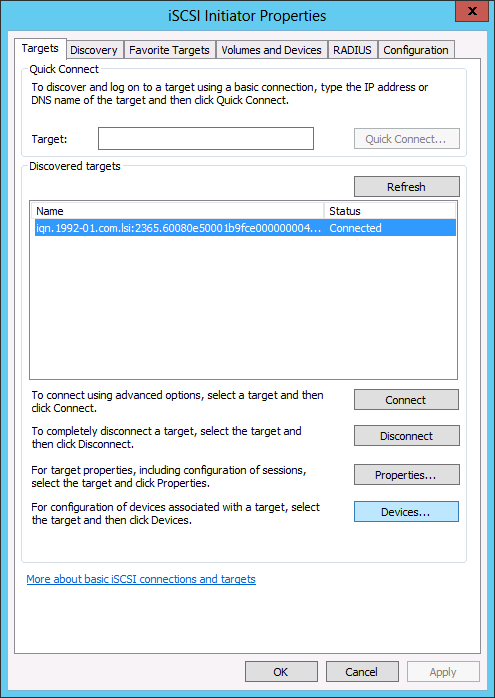
Going back to your iSCSI Initiator on your server, select the "Targets" tab. If all has gone well, you should see a single target (i.e. your SAN), and the status is Inactive.
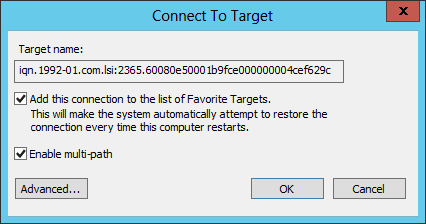
 Highlight the target, then click on "Connect". A new dialog box will appear. Ensure you check "Enable multi-path" here. DO NOT CLICK OK YET!
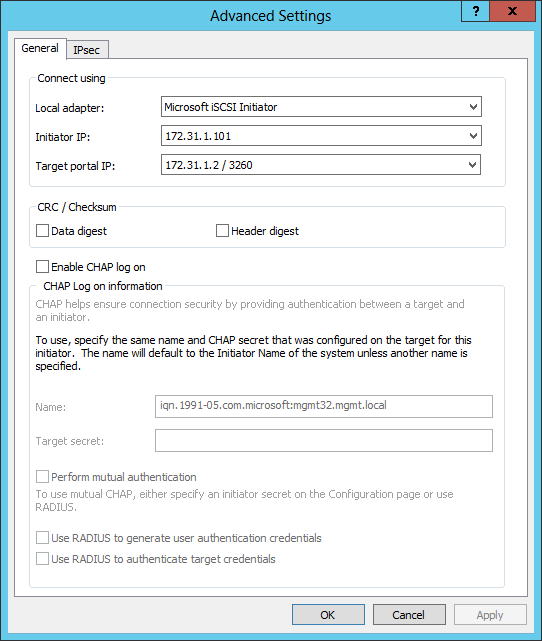
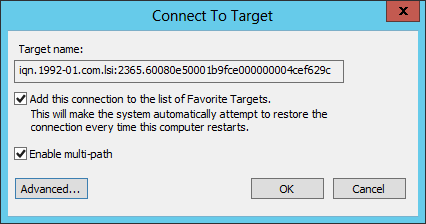 Click "Advanced", and in the Advanced box, enter in the Initiator IP, which will be one of your iSCSI interface IP's, and a Target IP which should be on the same subnet as your local interface.
 This becomes your first "path". Before we can actually add more paths though, we have to identify the disks as Multipath. The fact that you've enabled multipath on the iSCSI Initiator, and Multipath on the server, does not automatically make the disks multipath. We do this in the next section.
Once you click OK, you will see that the target is now connected.
7. Enable iSCSI MPIO
Launch the MPIO Control Panel. You will find this in your Administrative Tools in Windows 2008 R2, or in the Tools menu of Windows 2012, or by running "mpiocpl"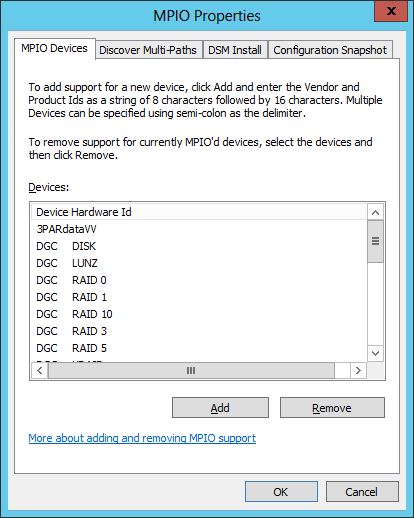 This tool will list all known hardware devices to which MPIO is supported. Fibre Channel attached SAN's generally need software known as DSM's (Device Specific Module) to support its hardware, but because iSCSI is a non-vendor specific standard, we can use Microsoft's DSM. The only thing is, this DSM may not exist on your machine yet, so we need to install it. N.B. If your vendor does provide a DSM, install this instead of following this step! It's better to use a Vendor Provided DSM rather than Microsoft's generic DSM, as Microsoft's DSM may offer you MPIO Policies which are incompatible with your SAN.
Go to the "Discover Multi-Paths" window. This window will list all SP3-compliant devices (SCSI Primary Commands - version 3) that the system can find which does NOT have any DSM loaded. This will not however show any iSCSI devices, but you still need to check "Add support for iSCSI devices" before clicking "Add".
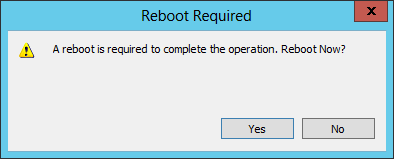
 After a few minutes, it will prompt you to reboot. This will be your final reboot.
8. Verify MPIO is available for your disks
So far, we've only created one path to our disk, but it is important to check that the disk has been successfully configured to support Multipathing. If the disk does not support multipathing, then the disk will not fail over when the primary path fails, causing some horrible, horrible downtime.Using Computer Manager (if on Windows Server Core, then use Computer Manager from another server or an administrators station and connect to the target server. DISKPART does not list the detail we wish to see), find the volumes which you provisioned from your SAN earlier, select the properties of the disk and ensure that there is an MPIO tab. If the tab is there, the disk supports it. If the tab is missing, you need to trace your steps as you have probably missed something - or the iSCSI SAN you are communicating with does not support multipathing.
9. Connect the other paths
The last step is to add the other paths to the same connection we already have established.
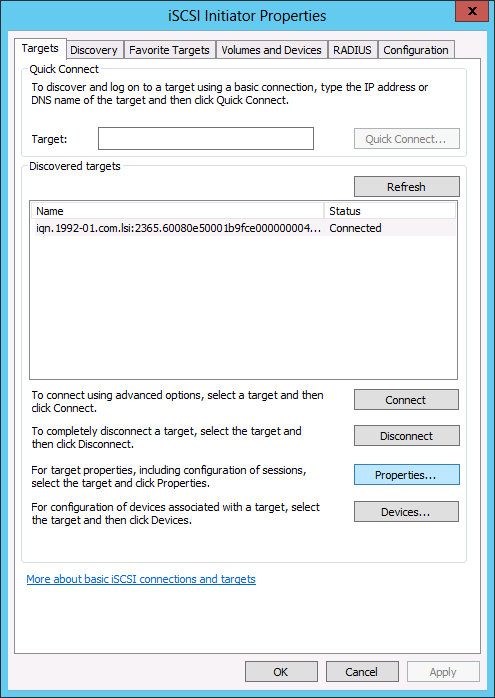
Start up the iSCSI Initiator again - where you will note that your target(s) is/are already connected. Select the one you wish to configure, then click "Properties"
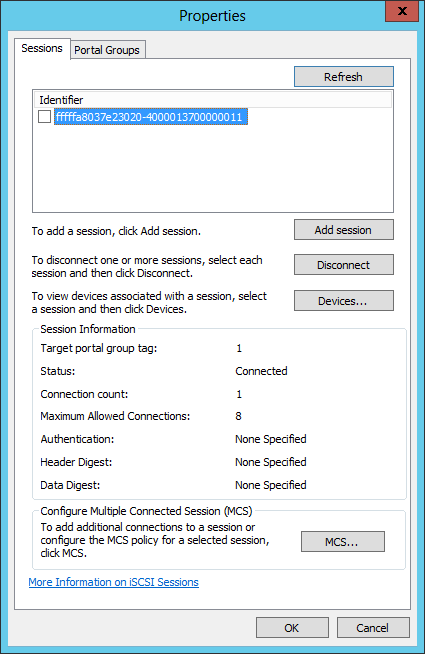 This page shows you the sessions it currently has to the target. Right now, it gives you an arbitrary Identifier, which contains the configuration for our first path. Click on "Add session", and you will see a familiar dialog.
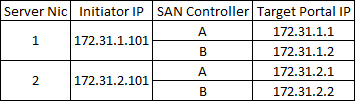
 Again, check "Enable multi-path", and click Advanced, but this time choose another path. In my scenario above, I know that I have a path to each of the two controllers, from each of my two network interfaces - this gives me 4 possible combinations, as shown in the table below.
 As per my initial connection earlier, I have already used up the first path. Now, I should configure the second path, so I configure using the second paths properties.
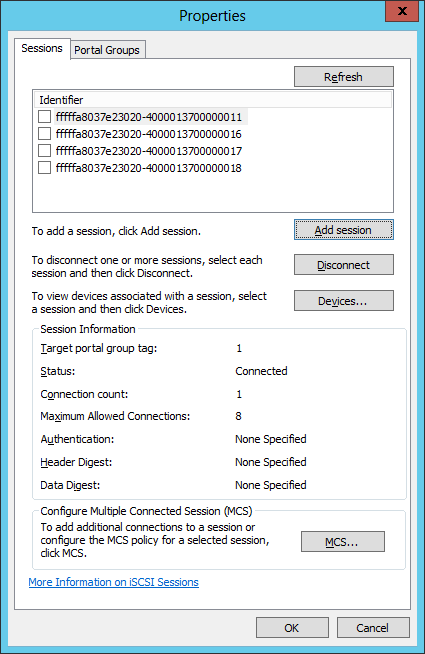
 Once you click OK and OK again, you will see that there are now two identifiers in your Session.
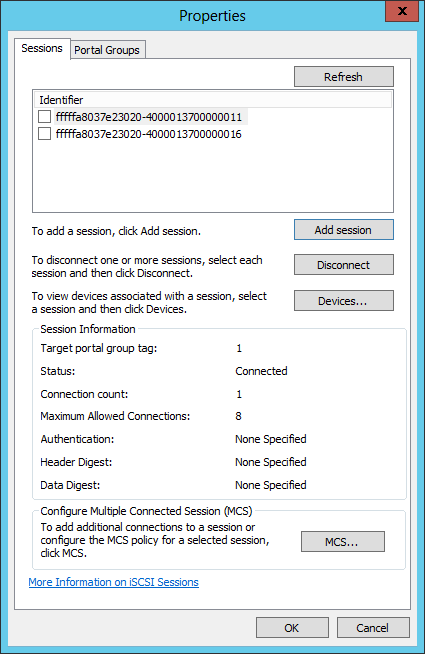 Repeat this step until you have all 4 paths.
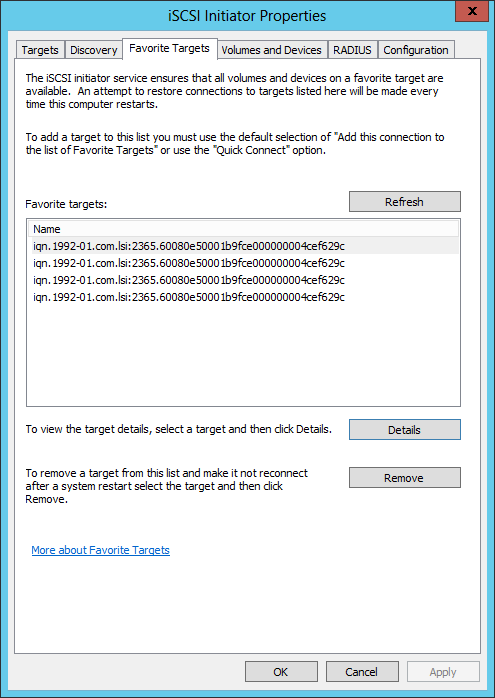
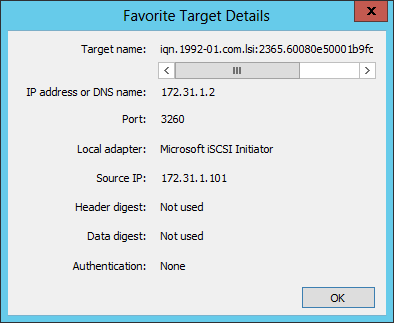
 If at any point you need to verify the information inside these connections, you will find each one listed under "Favorite Targets". The name will be the same for each, but the Details will be that of the IP configuration you had set. You cannot make changes here unfortunately, but you can remove a session here by clicking Remove, and then use the "Add Session" step to create a new session.
10. Configuring Failover
Now that we have added all the paths, we can configure our Failover policies. Each disk that you have provisioned has its own failover policy. You configure these from iSCSI Initiator, using the "Devices" button.
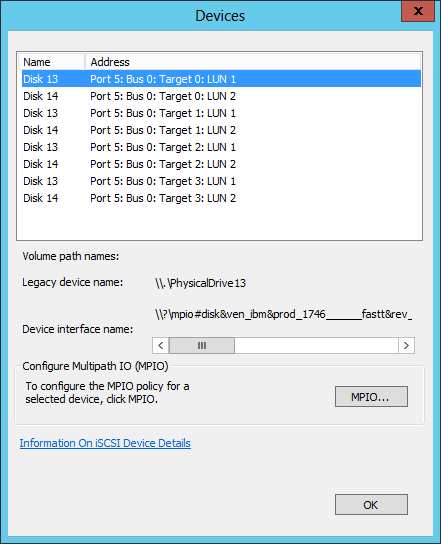 You may notice that I've got a lot of disks here when in fact I only have 2. Don't be alarmed. It's showing both disks 4 times - one for each path. This is perfectly normal. To configure MPIO, you just have to do it once per disk. Select a disk and then click MPIO
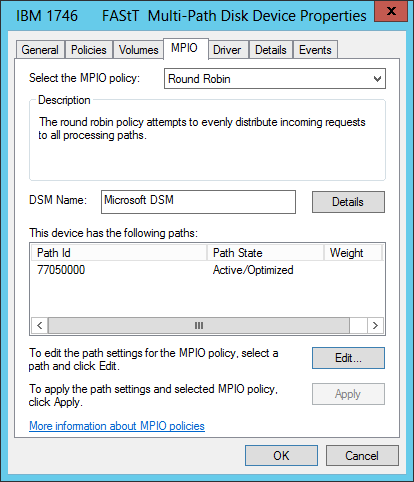
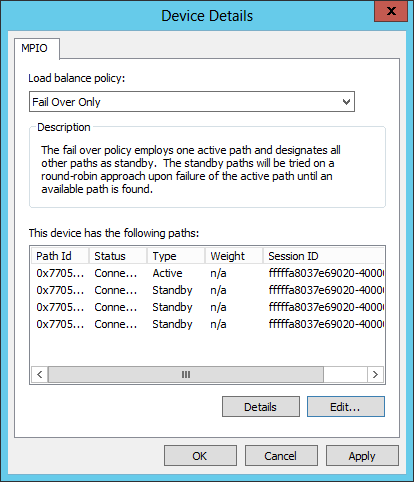
The default mode is "Round Robin", which means that the Operating system will select a path based on the number of paths. For example, Disk 13 in my screenshot will likely use Path 1 for Operation A, then Path 2 for Operation B, then Path 3 for Operation C, et cetera. The only thing is, my particular SAN doesn't enjoy operating in this mode (in fact, it won't work), so in my environment, I want to set mine to "Fail Over Only".
Choose a Load balance policy based on your hardware requirements and situation. Check your SAN documentation for guidelines. For more information about MPIO Policies, there is a link below.
11. Double-checking & Testing
It's always good to do sanity checking to ensure you've done this all properly, and the best way to verify that it's working is to check the following:
Disk Management shouldn't show the drive multiple times.
If you find that the same Disk LUN is showing up multiple times in Disk Management, then MPIO is not working properly. Most likely, the disks have not been recognised with MPIO capability. Fix this by installing MPIO for iSCSI as defined above using the MPIO Control Panel
MPIO should show all paths and their state
Checking the properties of the disk, you should see that it has 4 paths, and the Path State is as expected. In Round Robin, all will be active. In failover mode, one will be Active and the others in Standby. In Weighted mode, you will see that paths with a lower weight (higher priority) are active and the higher weight (lower priority) are standby.

The Failover Test
The final test is to ensure that it's all working. Get a colleague to run some disk utilities (e.g. robocopy some stuff to the drive), and then unplug some ethernet cables, or switch some switches off. If you've configured it well, the robocopy won't explode.
12. Repeat
Repeat these steps with the other server, and now you have two servers with shared storage so you can start your clustering fun! A link to my Clustering Article is given below.
Other Considerations
Now that you've seen how to configure Failover iSCSI for Windows Servers, you may have some other questions that you would like to ask. Unfortunately, I don't have all the answers, but luckily - Experts Exchange does! I will however go over some common thoughts from system administrators and provide food for thought.
Do I need to have a dedicated NIC iSCSI?
You do not need to have a dedicated NIC for iSCSI - you can run iSCSI on top of your current TCP/IP stack, but this is greatly discouraged. iSCSI will be contending with all other communication on your machine, and it can very quickly become a bottleneck, especially if you are re-sharing the storage via SMB.
Can I dedicate iSCSI with one interface, but two IP's?
Yes you can, but this brings in a single point of failure - the single interface, and also the single cable going to the single switch. This kind of defeats the purpose of redundancy.
Do I really need two different Subnets?
Theoretically speaking, no you do not. Having two different subnets will however will help you to identify which paths you should implement, so that you don't get yourself confused. As long as you have two network interfaces, and all the other components having some kind of redundancy, you can go with one Subnet. If for example I changed all my subnet masks for my IP Addressing above to 255.255.0.0, it would be all one subnet, and I'll still have my 4 paths per drive.
Do I really need two different VLANs?
No you do not. In fact, I have cheated a little bit, and I'm running the same VLAN for both my two subnets. Since it's a switched environment, the Switches don't really care what your subnet is - they don't work at layer 3, they work at layer 2. All they're seeing is requests from your server to the SAN is requests to a MAC address, and as long as ARP is working on your VLAN for both subnets (which it will), you're fine and dandy.
Is iSCSI the right choice for me?
iSCSI - Especially 10 Gigabit implementations - is very fast indeed. The fastest that Fibre Channel has (at time of writing) is 8 Gigabit. Saying this though, Fibre Channel is still much faster than iSCSI, despite it being 2 Gigabit slower, and that's because of its potential payload. A block in iSCSI can be maximum 65 Kilobytes whereas a block in Fibre Channel can be 128 Megabytes. Fewer blocks means less acknowledgements, which reduces your overall latency. iSCSI is cheap because it can be implemented on existing switches, with (in most cases) existing infrastructure. Fibre Channel generally requires more expensive equipment and investment, but it is highly resilient and more tolerant to failures.
Can I route iSCSI?
Yes you can, but it's not recommended. Switches, as I've already said, work on Layer 2, whereas Routers (or layer 3 switches) operate at Layer 3. More of the packet has to be read in order to know what the destination is, and the packet has to be modified before it can be sent on the wire again. This adds delay - known as latency - to the communication. The more latency that is on the line, the slower the performance will be.
Is iSCSI secure?
iSCSI can be implemented securely by introducing CHAP security, and can be further improved by adding IPSec encryption on top. This however means that all communication has to undergo encryption at the source and decryption at the target, in order to make it unreadable on the wire. The negative impact being that there is a lot more CPU overhead, and increased latency as a result. Security begins with a locked door, so if your datacenter is secure, and iSCSI does not travel outside your datacenter, then don't bother with encrypting it. Implementing CHAP security can be done without any negative impact.
Can I use host names instead of IP Addresses?
Absolutely. You can also use DHCP to configure your adapters - both SAN and Host alike - but what happens if there are communication problems, and DHCP and/or DNS are non-operational? You're snookered. By using IP's, and not involving any name resolving, you avoid these potential issues. The only downside is that things become a bit more hard to maintain, but as long as you have a good addressing scheme, it shouldn't be too much of an issue.
What is "Jumbo Packets"
Jumbo packets are packets which are up to 6 times the size of the standard 1500 Byte packets which is the standard size in Ethernet. This allows for more data to be transmitted per frame. In order to support this however, Jumbo Packets must be enabled on the SAN too (most SAN's support this), and must also be enabled on your Switches. Sending a Jumbo Frame to a switch which hasn't been configured to allow it will make it drop the packet.
Can I use IPv6 instead of IPv4?
Yes, you can - as long as your SAN supports it.
Further Reading
Some of the following links may be useful for you.
Wikipedia: iSCSI
Technet: MPIO Policies
EE Article: Storage Explored, Explained, and Exampled
EE Article: Creating a Hyper-V Cluster on Windows 2012
Any Quesions?
If you have general questions regarding iSCSI, you're at the right place. Experts Exchange is here to help all. Please submit a question rather than adding a comment to this tutorial in the hopes that I (or somebody else) will reply.
Take care, and Happy iSCSIing!
Have a question about something in this article? You can receive help directly from the article author. Sign up for a free trial to get started.
Comments (1)
Commented: