How to Install Windows 10 Technical Preview in VirtualBox

MASQ - thanks for voting me an MVE for 2023
Published:
Browse All Articles > How to Install Windows 10 Technical Preview in VirtualBox
This tutorial is mainly about using a free tool called Virtualbox to create one or more virtual machines on your computer.
This tutorial is mainly about using a free tool called Virtualbox to create one or more virtual machines on your computer. It's a bit geeky and there are the odd stages that could mess with your computer (although not permanently) so some prior knowledge is assumed. Despite that feel free to ask!
1) Virtualization
This is the process of creating a virtual computer within your real one. Once created it will behave exactly like a separate computer and programs running inside it will "think" that they are running normally inside a "real" PC. The virtual computer shares some of the physical components of your "real" PC particularly memory, network connections and access to your CD/DVD drive and a USB port.
Terminology: some quick terms you need as they will be used extensively:
Virtual Machine or VM - This is the program behaving as if it is a computer, in fact the software we are going to use will support multiple VMs so if you get the bug for virtualization you can build several machines, and, if you've enough memory in your "real" computer run them all at the same time!
Host - this is your "real" computer that the virtualization software runs on. Remember if the Host fails all the VMs will fail too.
Can my computer support virtualization?
If it was built in the last 4-5 years, then the answer is almost certainly yes; if you have Windows 8, then the answer is definitely. Older computers are likely to be capable of running VMs but it depends on settings in your computer's BIOS (that "setup" area that you press F2 or Del etc to enter when it starts up).
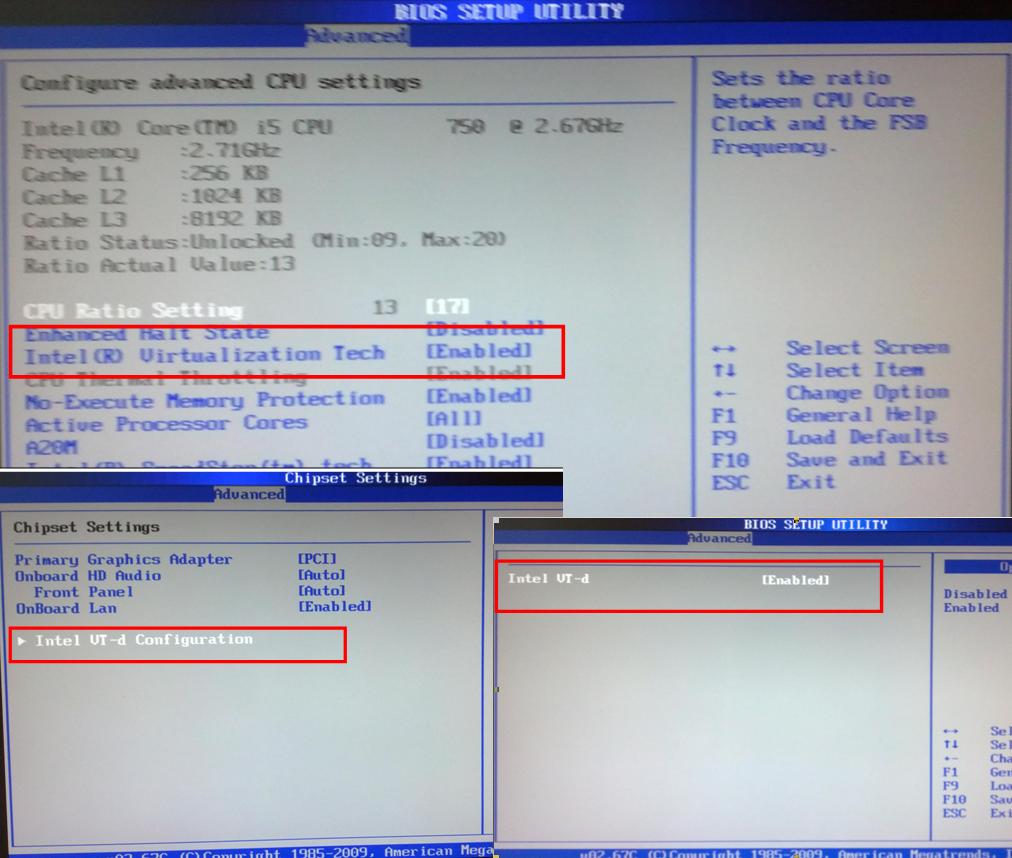
The quick and dirty way to find out and set up virtualization capabilities is to go into your computer's setup menu and hunt around for the settings to enable - you're generally looking for options for the chipset described as "Virtualization technology" "Intel Vt-X" or "AMD-V".
Once found, check that these options are set to "Enabled".
 The more formal way of doing this is to:
a) Use a utility to verify your computer is capable for running a VM, such as this one from Microsoft*.
*other tools are available
and
b) Check your manufacturer's user guide (or the motherboard manufacturer's manual) for the specifics of activating virtualization settings on your machine.
OK, I've got virtualization enabled, what do I do next?
Let's install some software to build and manage a virtual machine.
As we're going to install Windows 10 Technical Preview in this tutorial we're going to use Virtualbox from Oracle which is free to use. With some programs most recent is not necessarily best and currently Virtualbox (VB) is like this so we're going to install a recent but not newest version (version 4.3.12).
For Windows users you can get the download file directly from this link.
If you run Linux or MacOSX you can get the equivalent installer here.
For the purpose of this article I'm going to concentrate on a Windows install in Windows Vista SP2 or better.
Right-click on the downloaded installer and choose "Run as Administrator".
Allow the software to fully install, including the networking and USB add-ins (these are all set to install but each will need your approval). Bear in mind that when the networking components are installed your computer will lose its network/Internet connection for a few seconds so don't do this in the middle of a download you can't resume.
When Virtualbox finishes installing depending on what settings have been changed it will either ask you to restart your PC or it will offer to run Virtualbox automatically.
Don't run Virtualbox yet; you still need to make a few changes. In all cases I recommend you restart your computer at this point anyway.
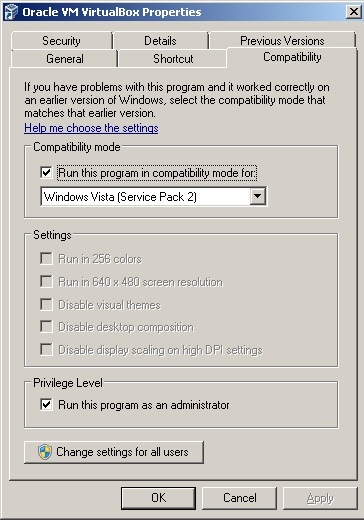
Once restarted find the launch icon for Virtualbox and again right-click on it. Choose the Compatibility tab ad set the program to run in Compatibility Mode for Vista SP2 and also to run as an Administrator.
One further tweak to make before we run Virtualbox:
You need to make sure Data Execution Prevention is enabled in your Windows installation.
Click Start, type System into the search box and select System (Control Panel) from the search results.
Click on the link for Advanced System Settings, then the Advanced tab and click the button marked Settings in the Performance section at the top of that tab.
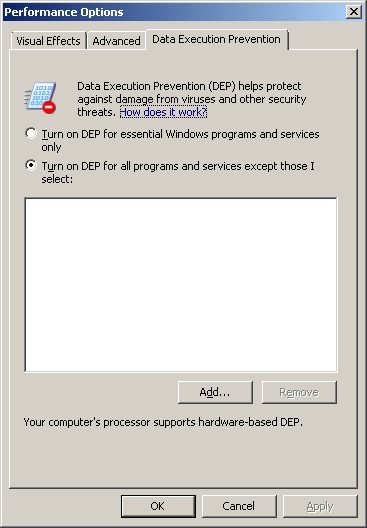 In the window that opens select the Data Execution Prevention tab and ensure that the "Turn on DEP for all programs..." (the second option) is checked. Click OK twice to close all the options boxes and then close the System window.
We're now ready to launch Virtualbox
Double click on the VB icon that you've already set to run in Vista compatibility and admin mode.
Check Virtualbox launches OK and you get no error messages. If you do it's most likely either the DEP or BIOS Virtualization settings earlier need reviewing. Check any changes have been saved.
We're now ready to create and install your Windows 10 VM - you'll need to register with Microsoft and download the .iso image file for Windows 10 TechPreview.
Join the Windows Insider Programme here.
Part 2 - Creating a VM and adding the operating system.
This assumes you have successfully installed Virtualbox following the instructions above.
Time to run Virtualbox.
Double-click on the desktop icon for VB.
You now need to create a new VM so click on the blue cogwheel icon on the top-left of the toolbar.

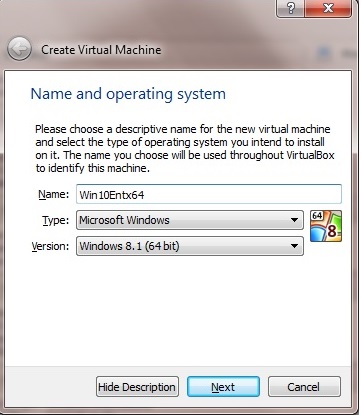
Give the new VM a useful name to help you remember what you've installed.
As we're going to install Windows 10 you'll need to select the Windows version as 8.1 with the bit version matching your installation image (if you've downloaded the x64 version it won't install in a 32bit image).
In the example here I'm installing the Enterprise x64 version so have chosen Win 8.1 64bit as the version.
When you click "Next" VB will set up your basic virtual hardware based upon the needs of the Windows version you have chosen. Allow it to choose 2GB of RAM and then to create a virtual hard drive.
If you are new to all of this choose the offered .VDI format for the drive, if you are comfortable with VMs already you might want to configure a format you already use or are familiar with (like .VHD).
Choose a dynamically allocated HDD size. This will take up fewer resources on your Host drive, although the trade-off is it will run a little slower. If you have more hard drive space than you know what to do with selecting "Fixed size" will give you a better performing VM.
Go for the default location to store your VM on your Host. The default location on your Host computer is C:\Users\[ProfileName]\VirtualBox VMs
Although the VM setup window now closes you need to add one more feature before installing Windows 10:
With your new VM highlighted, click the yellow "Settings" cogwheel on the toolbar and then click "System" on the list of components on the left. Open the "Processor" tab and add at least 1 more processor so the total of Processors on the VM is at least 2. Click OK to save your change.
Congratulations, you've created a VM ready to install Windows on!
You now need to find your downloaded image of the operating system from the Windows Insider site.
You "power up" your VM by either highlighting it and clicking the green "Start" arrow on the toolbar or by simply double-clicking it from the list of VMs on the left-hand column.
You'll now be asked to add your image file as a virtual DVD. This is the VM equivalent of inserting a physical operating system DVD into a disk drive and then booting your machine.
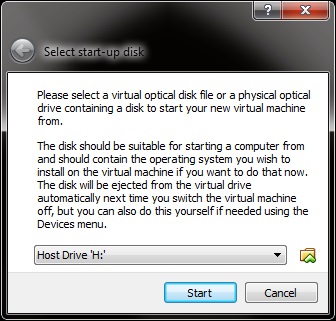
Click on the folder icon to the right of the Host Drive DVD location (your downloaded .iso file). If you have a physical DVD to install from (because you've already made a DVD from the downloaded .iso) insert it now and the VM will use it directly. Click "Start" when the .iso file has been located.
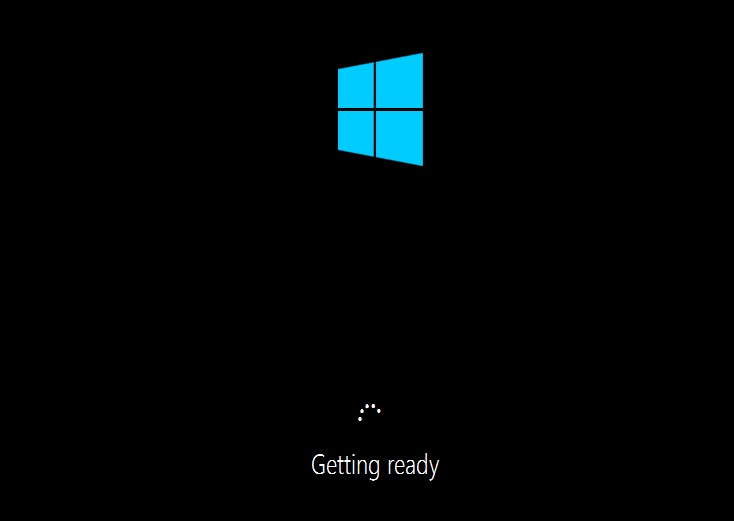
The Win 10 images take a while to load so be patient. You'll see "DVD Drive" activity at the bottom of the screen indicated by a green dot on the disk icon, as long as that is flashing everything is still OK.
 Eventually you will see the circle of dots Microsoft has animated as an hourglass replacement below the blue Window which tells you the installer is running.
If you get an error at this point it is likely to be a 0000005D error. This means the virtual environment or DEP settings on the host are still not configured correctly. Go back though the list in the first section and check you have made all the relevant changes and that they were saved. If you get a different error post here or in a separate thread for help.
Once the installer launches:
- Add your locale, language and keyboard type then click "Next"
- Click "Install Now"
- Accept the License
- Choose Custom Install
- You'll be offered a 25GB unallocated drive (you created this a few minutes ago!), simply click "Next"
Now let the Windows installer set everything up for you. You can minimise this window and use your computer for other things while this is running. The installer will automatically restart your VM once it has completed.
The Settings Page
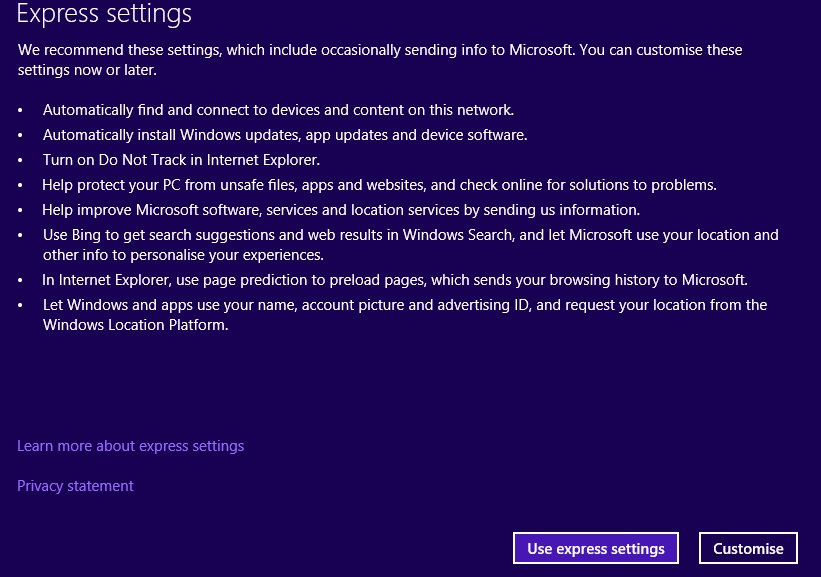
Assuming you want to hand over the minimum amount of information to Microsoft at this stage choose "Customise".
If you're connected to a network you trust (i.e. your Home Network) select "Yes" at the next page (you can change any of these settings later if you want to.
Choose the update and browser settings you want as default.
Decide on what info you want Microsoft to see to help them with developing the new operating system. (I generally set all these to "Off").
Setting up your account
Like Windows 8 you can secure your operating system with your Microsoft Account password. What Microsoft don't advertise is you can also set up a local account - they don't make it easy either!
Signing up with an email account is certainly more secure. If you're putting this on a portable device you can change your password remotely by changing the password for that email account. However you've just installed this as a VM in a "test" environment - you don't really need that added layer.
Try clicking on "Don't have an account" (even if you do!)
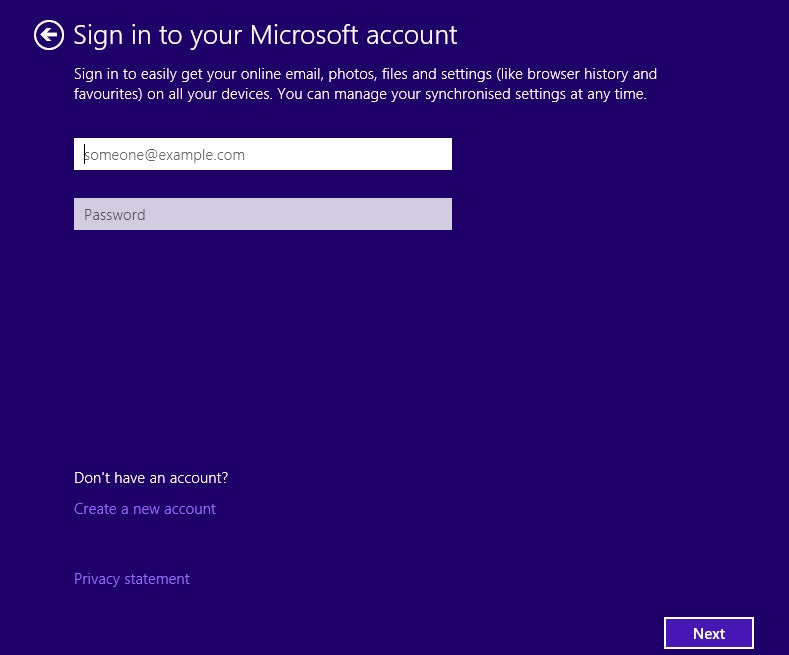
Spot that link at the bottom of the page that almost blends in with the background?
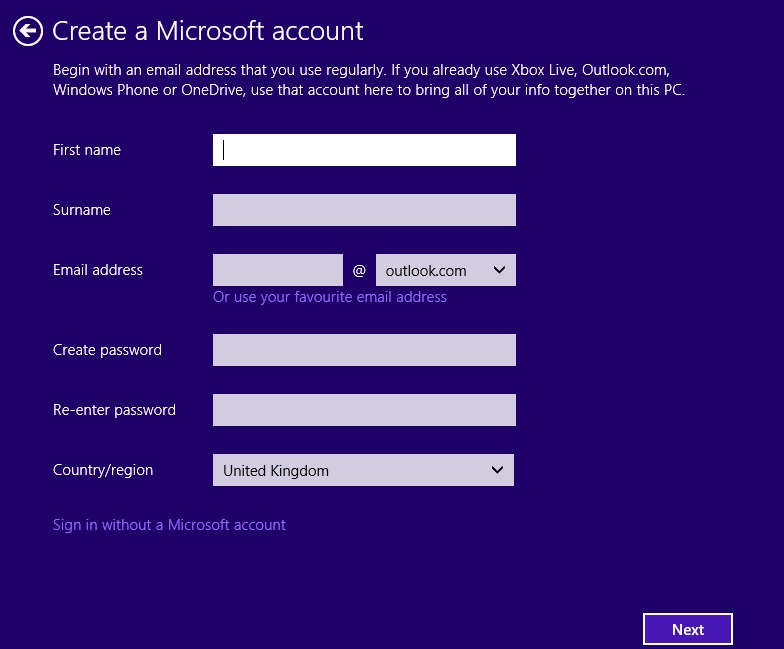
Let's "Sign in without a Microsoft account" !!
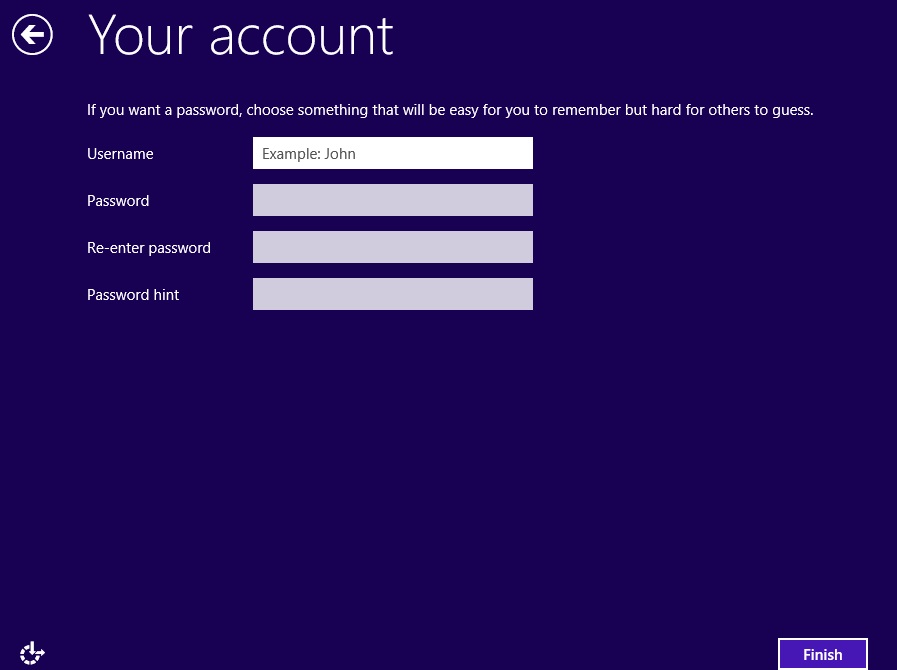 The Username you select will be used as the profile name for your account. Not that I'd particularly advocate it but you don't need to add a password (remember, if someone really wanted to get in here they need to be able to access your VM and your Host and the Host machine account is already password protected - isn't it??).

Congratulations! That's Windows 10 installed in your Virtualbox Virtual Machine!!
One more thing, now go to the Start button on the bottom left of Windows 10, Type "Windows Update" into the search box and click on the icon to run it.

You'll probably see that "No Updates are Available", but just to be sure click "Check for updates" on the left. There will be at least two "Important updates" waiting for you - make sure you install those!
Like any other newly installed system you just have basic anti-virus protection through Windows Defender so take care with your security.
Enjoy and do give feedback so Microsoft get to hear what you like and don't like about Windows 10 before it is launched to the public next year!!
(Images are from VirtualBox by Oracle and Windows 10 TechPreview by Microsoft)
1) Virtualization
This is the process of creating a virtual computer within your real one. Once created it will behave exactly like a separate computer and programs running inside it will "think" that they are running normally inside a "real" PC. The virtual computer shares some of the physical components of your "real" PC particularly memory, network connections and access to your CD/DVD drive and a USB port.
Terminology: some quick terms you need as they will be used extensively:
Virtual Machine or VM - This is the program behaving as if it is a computer, in fact the software we are going to use will support multiple VMs so if you get the bug for virtualization you can build several machines, and, if you've enough memory in your "real" computer run them all at the same time!
Host - this is your "real" computer that the virtualization software runs on. Remember if the Host fails all the VMs will fail too.
Can my computer support virtualization?
If it was built in the last 4-5 years, then the answer is almost certainly yes; if you have Windows 8, then the answer is definitely. Older computers are likely to be capable of running VMs but it depends on settings in your computer's BIOS (that "setup" area that you press F2 or Del etc to enter when it starts up).
The quick and dirty way to find out and set up virtualization capabilities is to go into your computer's setup menu and hunt around for the settings to enable - you're generally looking for options for the chipset described as "Virtualization technology" "Intel Vt-X" or "AMD-V".
Once found, check that these options are set to "Enabled".
The more formal way of doing this is to:
a) Use a utility to verify your computer is capable for running a VM, such as this one from Microsoft*.
*other tools are available
and
b) Check your manufacturer's user guide (or the motherboard manufacturer's manual) for the specifics of activating virtualization settings on your machine.
OK, I've got virtualization enabled, what do I do next?
Let's install some software to build and manage a virtual machine.
As we're going to install Windows 10 Technical Preview in this tutorial we're going to use Virtualbox from Oracle which is free to use. With some programs most recent is not necessarily best and currently Virtualbox (VB) is like this so we're going to install a recent but not newest version (version 4.3.12).
For Windows users you can get the download file directly from this link.
If you run Linux or MacOSX you can get the equivalent installer here.
For the purpose of this article I'm going to concentrate on a Windows install in Windows Vista SP2 or better.
Right-click on the downloaded installer and choose "Run as Administrator".
Allow the software to fully install, including the networking and USB add-ins (these are all set to install but each will need your approval). Bear in mind that when the networking components are installed your computer will lose its network/Internet connection for a few seconds so don't do this in the middle of a download you can't resume.
When Virtualbox finishes installing depending on what settings have been changed it will either ask you to restart your PC or it will offer to run Virtualbox automatically.
Don't run Virtualbox yet; you still need to make a few changes. In all cases I recommend you restart your computer at this point anyway.
Once restarted find the launch icon for Virtualbox and again right-click on it. Choose the Compatibility tab ad set the program to run in Compatibility Mode for Vista SP2 and also to run as an Administrator.
One further tweak to make before we run Virtualbox:
You need to make sure Data Execution Prevention is enabled in your Windows installation.
Click Start, type System into the search box and select System (Control Panel) from the search results.
Click on the link for Advanced System Settings, then the Advanced tab and click the button marked Settings in the Performance section at the top of that tab.
In the window that opens select the Data Execution Prevention tab and ensure that the "Turn on DEP for all programs..." (the second option) is checked. Click OK twice to close all the options boxes and then close the System window.
We're now ready to launch Virtualbox
Double click on the VB icon that you've already set to run in Vista compatibility and admin mode.
Check Virtualbox launches OK and you get no error messages. If you do it's most likely either the DEP or BIOS Virtualization settings earlier need reviewing. Check any changes have been saved.
We're now ready to create and install your Windows 10 VM - you'll need to register with Microsoft and download the .iso image file for Windows 10 TechPreview.
Join the Windows Insider Programme here.
Part 2 - Creating a VM and adding the operating system.
This assumes you have successfully installed Virtualbox following the instructions above.
Time to run Virtualbox.
Double-click on the desktop icon for VB.
You now need to create a new VM so click on the blue cogwheel icon on the top-left of the toolbar.
Give the new VM a useful name to help you remember what you've installed.
As we're going to install Windows 10 you'll need to select the Windows version as 8.1 with the bit version matching your installation image (if you've downloaded the x64 version it won't install in a 32bit image).
In the example here I'm installing the Enterprise x64 version so have chosen Win 8.1 64bit as the version.
When you click "Next" VB will set up your basic virtual hardware based upon the needs of the Windows version you have chosen. Allow it to choose 2GB of RAM and then to create a virtual hard drive.
If you are new to all of this choose the offered .VDI format for the drive, if you are comfortable with VMs already you might want to configure a format you already use or are familiar with (like .VHD).
Choose a dynamically allocated HDD size. This will take up fewer resources on your Host drive, although the trade-off is it will run a little slower. If you have more hard drive space than you know what to do with selecting "Fixed size" will give you a better performing VM.
Go for the default location to store your VM on your Host. The default location on your Host computer is C:\Users\[ProfileName]\VirtualBox VMs
Although the VM setup window now closes you need to add one more feature before installing Windows 10:
With your new VM highlighted, click the yellow "Settings" cogwheel on the toolbar and then click "System" on the list of components on the left. Open the "Processor" tab and add at least 1 more processor so the total of Processors on the VM is at least 2. Click OK to save your change.
Congratulations, you've created a VM ready to install Windows on!
You now need to find your downloaded image of the operating system from the Windows Insider site.
You "power up" your VM by either highlighting it and clicking the green "Start" arrow on the toolbar or by simply double-clicking it from the list of VMs on the left-hand column.
You'll now be asked to add your image file as a virtual DVD. This is the VM equivalent of inserting a physical operating system DVD into a disk drive and then booting your machine.
Click on the folder icon to the right of the Host Drive DVD location (your downloaded .iso file). If you have a physical DVD to install from (because you've already made a DVD from the downloaded .iso) insert it now and the VM will use it directly. Click "Start" when the .iso file has been located.
The Win 10 images take a while to load so be patient. You'll see "DVD Drive" activity at the bottom of the screen indicated by a green dot on the disk icon, as long as that is flashing everything is still OK.
Eventually you will see the circle of dots Microsoft has animated as an hourglass replacement below the blue Window which tells you the installer is running.
If you get an error at this point it is likely to be a 0000005D error. This means the virtual environment or DEP settings on the host are still not configured correctly. Go back though the list in the first section and check you have made all the relevant changes and that they were saved. If you get a different error post here or in a separate thread for help.
Once the installer launches:
- Add your locale, language and keyboard type then click "Next"
- Click "Install Now"
- Accept the License
- Choose Custom Install
- You'll be offered a 25GB unallocated drive (you created this a few minutes ago!), simply click "Next"
Now let the Windows installer set everything up for you. You can minimise this window and use your computer for other things while this is running. The installer will automatically restart your VM once it has completed.
The Settings Page
Assuming you want to hand over the minimum amount of information to Microsoft at this stage choose "Customise".
If you're connected to a network you trust (i.e. your Home Network) select "Yes" at the next page (you can change any of these settings later if you want to.
Choose the update and browser settings you want as default.
Decide on what info you want Microsoft to see to help them with developing the new operating system. (I generally set all these to "Off").
Setting up your account
Like Windows 8 you can secure your operating system with your Microsoft Account password. What Microsoft don't advertise is you can also set up a local account - they don't make it easy either!
Signing up with an email account is certainly more secure. If you're putting this on a portable device you can change your password remotely by changing the password for that email account. However you've just installed this as a VM in a "test" environment - you don't really need that added layer.
Try clicking on "Don't have an account" (even if you do!)
Spot that link at the bottom of the page that almost blends in with the background?
Let's "Sign in without a Microsoft account" !!
The Username you select will be used as the profile name for your account. Not that I'd particularly advocate it but you don't need to add a password (remember, if someone really wanted to get in here they need to be able to access your VM and your Host and the Host machine account is already password protected - isn't it??).
Congratulations! That's Windows 10 installed in your Virtualbox Virtual Machine!!
One more thing, now go to the Start button on the bottom left of Windows 10, Type "Windows Update" into the search box and click on the icon to run it.
You'll probably see that "No Updates are Available", but just to be sure click "Check for updates" on the left. There will be at least two "Important updates" waiting for you - make sure you install those!
Like any other newly installed system you just have basic anti-virus protection through Windows Defender so take care with your security.
Enjoy and do give feedback so Microsoft get to hear what you like and don't like about Windows 10 before it is launched to the public next year!!
(Images are from VirtualBox by Oracle and Windows 10 TechPreview by Microsoft)
MASQ - thanks for voting me an MVE for 2023
Have a question about something in this article? You can receive help directly from the article author. Sign up for a free trial to get started.
Comments (9)
Commented:
As shown in my attachment. The "Run the Program as an Administrator" is grayed out.
Commented:
I do appreciate knowing that Oracle is working on a version of Extensions that will support Win10.
Thanks.
Author
Commented:Load the Additions .iso then launch a command window, change to the virtual CD drive and run
Open in new window
Then go to Device Manager open the graphics adapter and update the driver pointing at the C:\Drivers folder.If the Additions driver is found and updated you should be able to resolve your resolution problem with your display.
Commented:
Commented:
View More