How to Create a Branded Webinar Program in Marketo


Published:
Browse All Articles > How to Create a Branded Webinar Program in Marketo
Purpose
This article will demonstrate how to create a branded webinar program in Marketo. Marketo is a marketing automation system which allows businesses to drive lead generation and engagement through various inbound marketing channels. If you choose to conduct webinars as a means of inbound marketing, then it is important to carry your branding throughtout every step of your program. You have already chosen to put time and effort into building your webinar program, so capitalize on your investment in the channel. Don't ignore the opportunity to increase brand awareness and trust by maintaining consistency in your branding throughout engagement with your target audience.
Overview
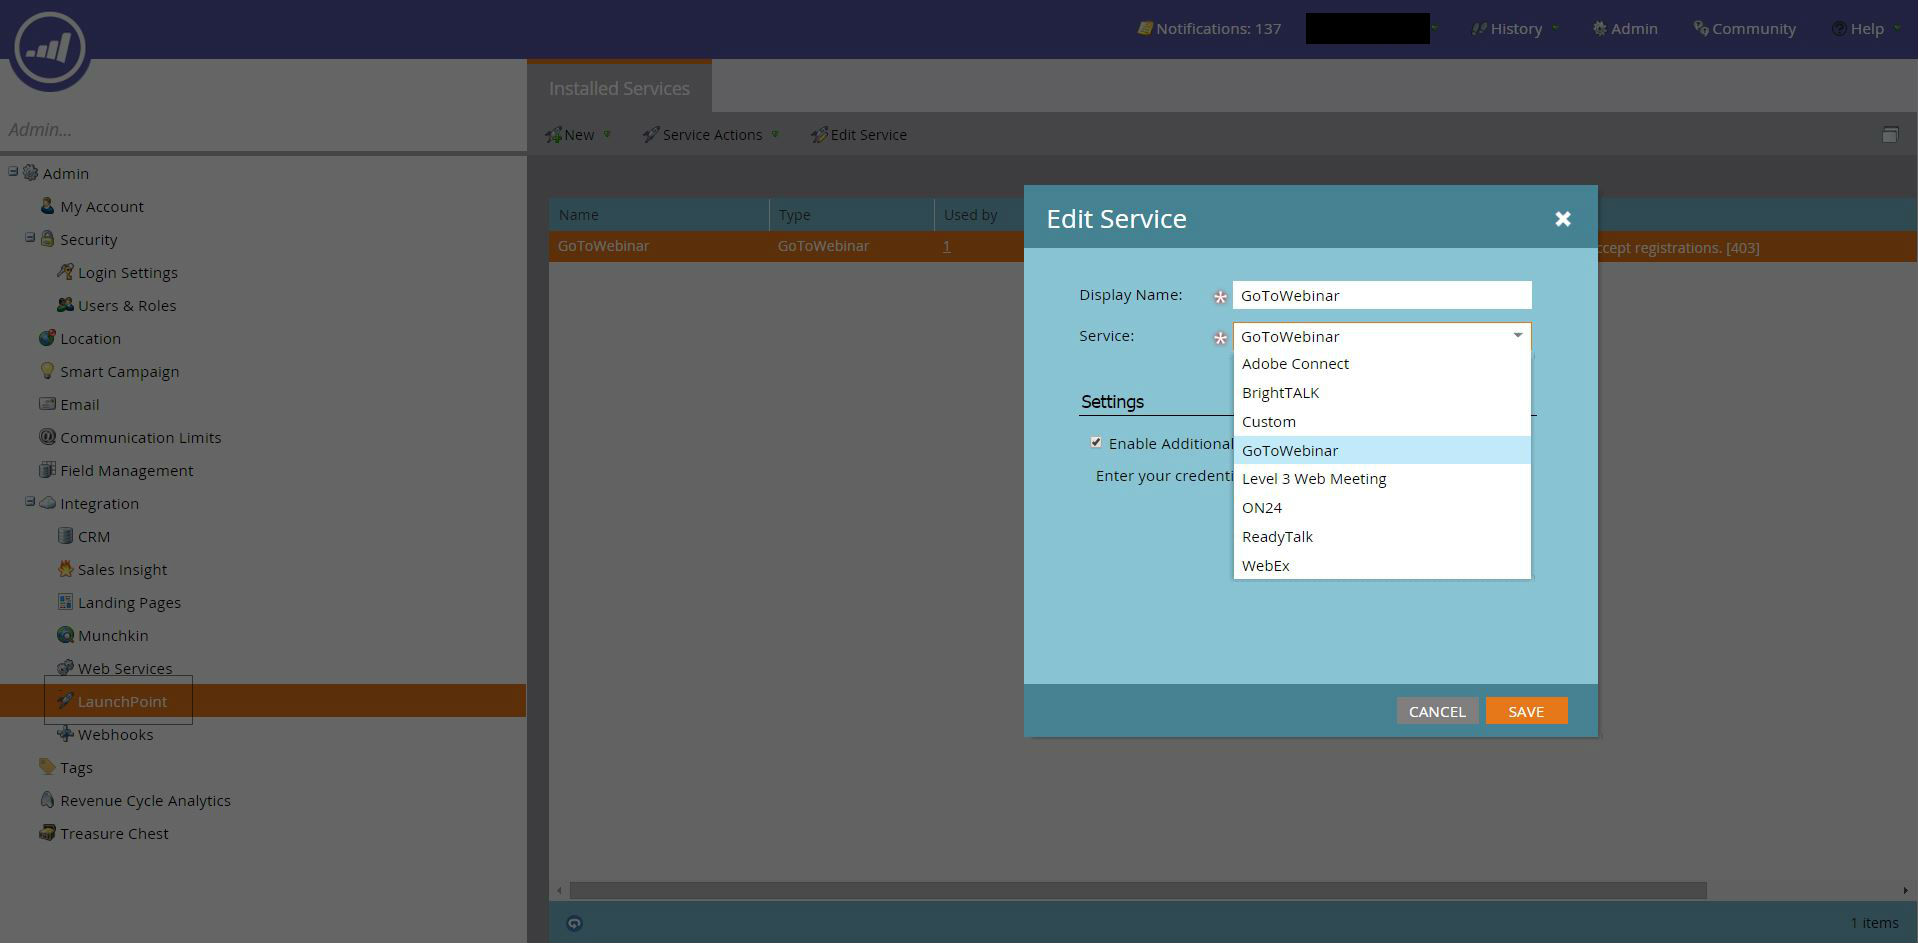
To create a webinar in Marketo, you must first set up a connection with your preferred webinar provider. This is completed in the Admin area of the system (you must have Admin permissions to access the LaunchPoint area). Marketo makes it easy to connect to a webinar provider and get your first program running. However, the email templates and landing pages from the webinar provider are often limited in their branding options, and don't deliver the same branded user experience. This article dives into the steps necessary to develop a clear and brand-oriented webinar program with your branded templates.
![Marketo-Admin-LaunchPoint.JPG]() The image above is in the Admin area of the Marketo system. It displays the available connectors from Marketo partners. This is where you choose the proper webinar for your program.
The image above is in the Admin area of the Marketo system. It displays the available connectors from Marketo partners. This is where you choose the proper webinar for your program.
Introduction
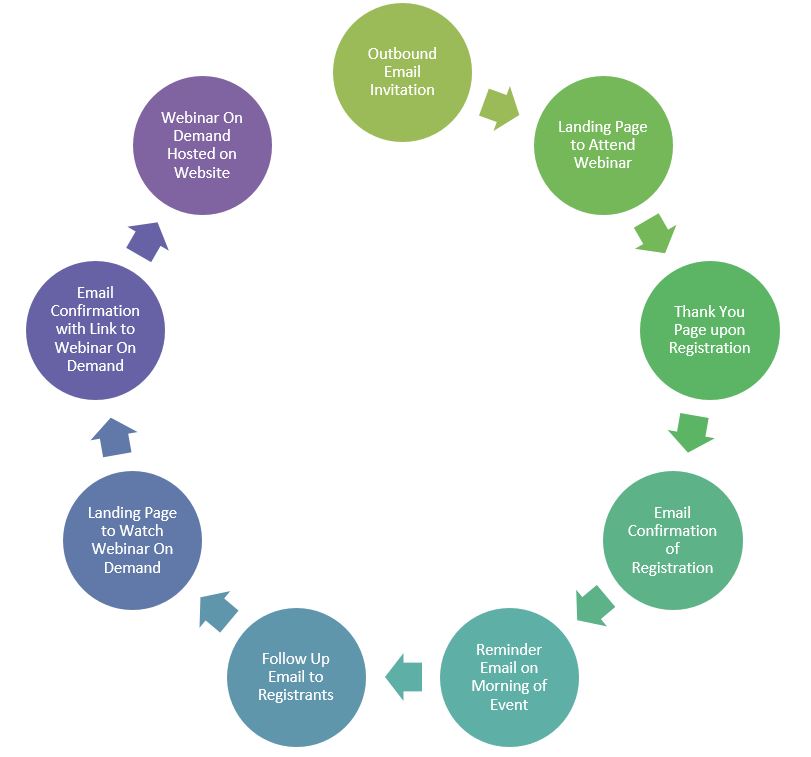
The diagram below describes the movement of the end-user through the assets used in the webinar program. You will need to create 9 assets - a combination of emails, landing pages, and social sharing buttons.
![Webinar-Flows.jpg]() Above is a graphical representation of the assets and their presence in the webinar program.
Above is a graphical representation of the assets and their presence in the webinar program.
Assets
Pre-Webinar
Post-Webinar
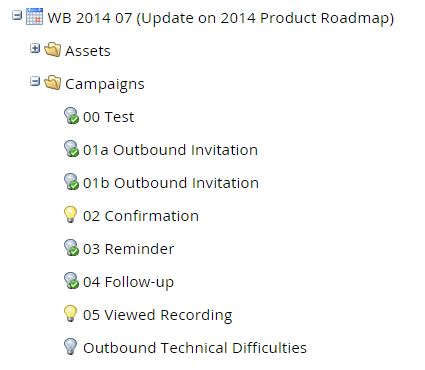
![Marketo-Webinar-Assets.JPG]() The image above demonstrates the organization of assets in the webinar program. The use of numbering before the name of the asset is to keep them in order of appearance throughout the program.
The image above demonstrates the organization of assets in the webinar program. The use of numbering before the name of the asset is to keep them in order of appearance throughout the program.
Reminders and Tips
Pre-Webinar Registration
On-Demand Webinar Registration (if necessary)
On Demand Webinar Thank You
Outbound Invitation
Step 1 of the autoresponse: write the email (suggested copy below):
Dear [First Name],
You have successfully registered for our upcoming webinar, [webinar name here], presented by [webinar presenter's role] [webinar presenter's name]. On [date of webinar] at [time of webinar], click here to join the webinar*. This link should not be shared with others. It is unique to you. Below is your access info:
Date: [date of webinar]
Time: [time of webinar]
Webinar ID: [webinar ID - displayed in the test email you send to yourself through your webinar platform]
Dial-In: [toll free number - displayed in the test email you send to yourself through your webinar platform]
Access Code: {{my.Access Code:default=edit me}}*
Audio Pin: Shown after joining the webinar
For optimal audio quality, you may also listen to the webinar through your computer speakers.
GoToWebinar System Requirements
----
*The first link should be use this Marketo token: {{member.webinar url:default=edit me}} When the person registers for the webinar, they are given a personal login url that is unique to them. The second unique item is the Webinar ID.
----
Create a separate branded landing page with the following requirements:
PC-based attendees
Required: Windows® 8, 7, Vista, XP or 2003 Server
Mac®-based attendees
Required: Mac OS® X 10.6 or newer
Mobile attendees
Required: iPhone®, iPad®, Android™ phone or Android tablet
Read GoToWebinar's Audio Checklist for tips on using your computer's microphone and speakers with GoToWebinar.
----
Follow Up – Attendees
Autoresponder (after event, on demand)
Deep Dive - Social Sharing Button
Smart Campaigns (Event Flows)
![Marketo-Webinar-SmartCampaigns.JPG]() The image above displays the smart campaigns utilized in a webinar program. The final smart campaign (outbound technical difficulties) is not a necessary campaign, but is useful to have on hand in case any technical issues arise during the webinar, and you need to communicate to registrants quickly.
The image above displays the smart campaigns utilized in a webinar program. The final smart campaign (outbound technical difficulties) is not a necessary campaign, but is useful to have on hand in case any technical issues arise during the webinar, and you need to communicate to registrants quickly.
Outbound Invitation
Outbound Invitation b
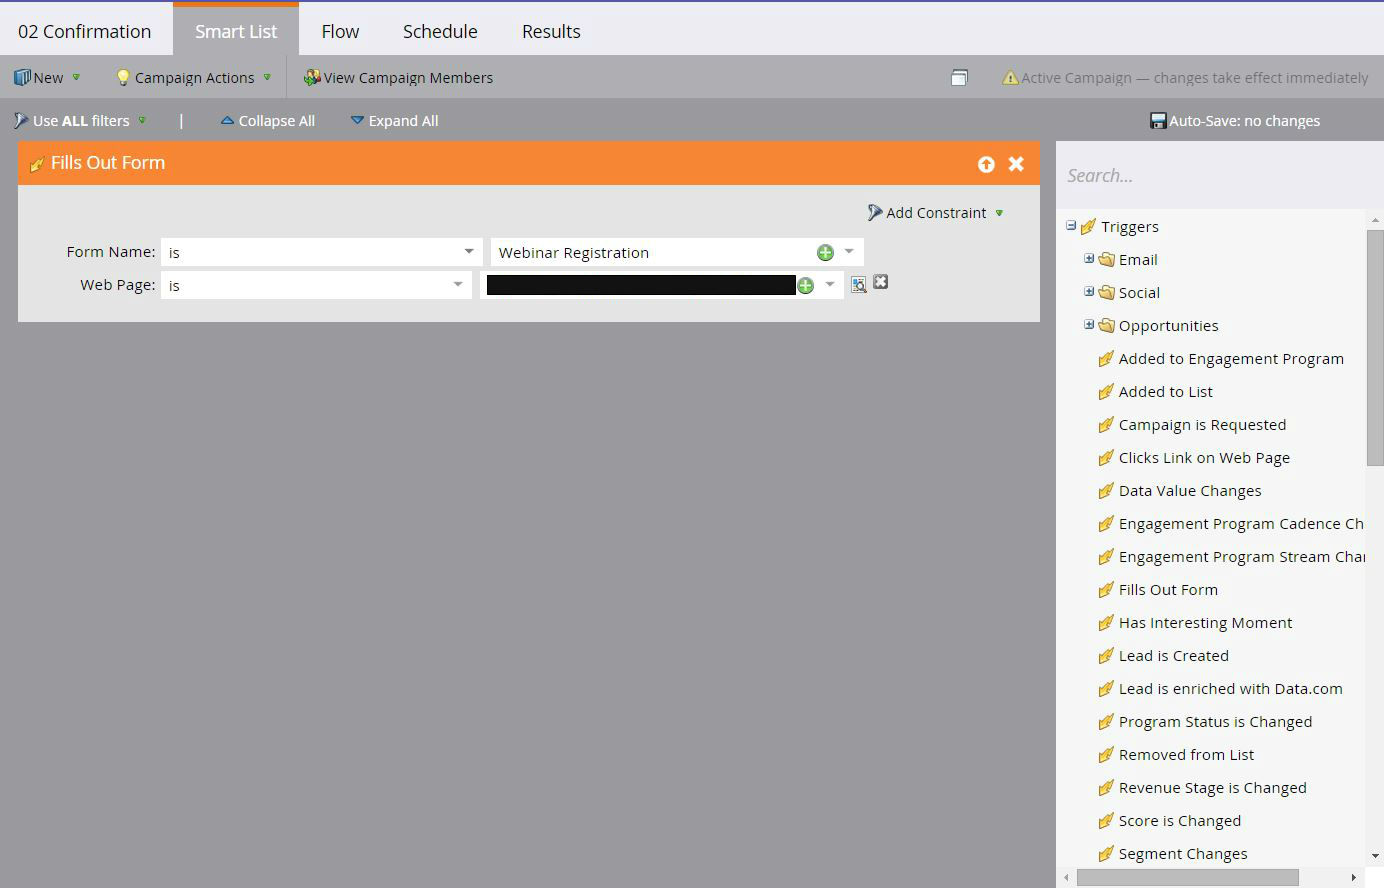
Confirmation Email
![Confirmation-Email-SmartList.JPG]() The image above shows the "smart list" for the confirmation email.
The image above shows the "smart list" for the confirmation email.
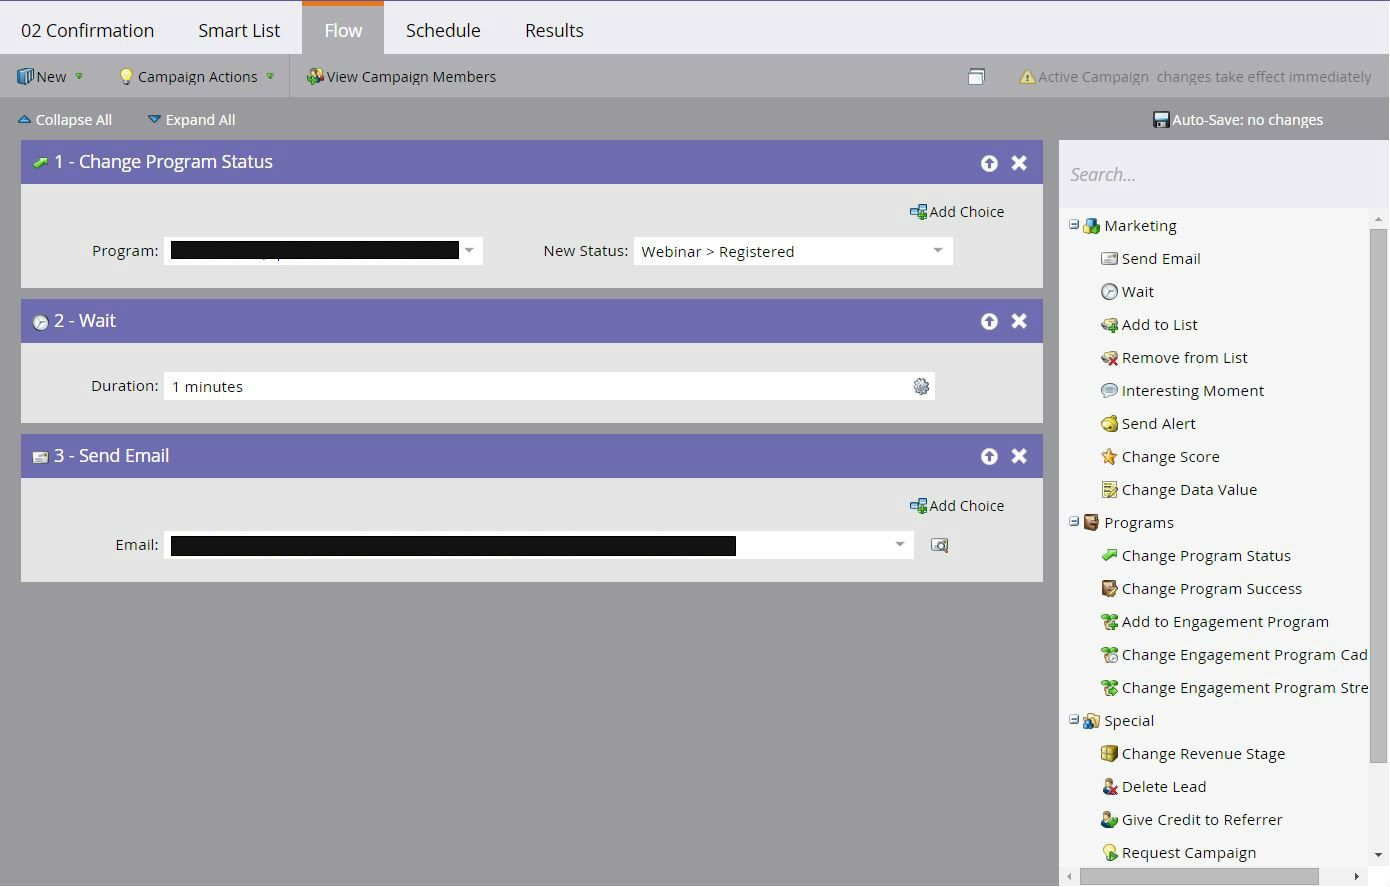
![Confirmation-Email-Flow.JPG]() The image above shows the "flow" for the confirmation email.
The image above shows the "flow" for the confirmation email.
Reminder Email
Follow-Up Email
Viewed Recording
This article will demonstrate how to create a branded webinar program in Marketo. Marketo is a marketing automation system which allows businesses to drive lead generation and engagement through various inbound marketing channels. If you choose to conduct webinars as a means of inbound marketing, then it is important to carry your branding throughtout every step of your program. You have already chosen to put time and effort into building your webinar program, so capitalize on your investment in the channel. Don't ignore the opportunity to increase brand awareness and trust by maintaining consistency in your branding throughout engagement with your target audience.
Overview
To create a webinar in Marketo, you must first set up a connection with your preferred webinar provider. This is completed in the Admin area of the system (you must have Admin permissions to access the LaunchPoint area). Marketo makes it easy to connect to a webinar provider and get your first program running. However, the email templates and landing pages from the webinar provider are often limited in their branding options, and don't deliver the same branded user experience. This article dives into the steps necessary to develop a clear and brand-oriented webinar program with your branded templates.
 The image above is in the Admin area of the Marketo system. It displays the available connectors from Marketo partners. This is where you choose the proper webinar for your program.
Introduction
The diagram below describes the movement of the end-user through the assets used in the webinar program. You will need to create 9 assets - a combination of emails, landing pages, and social sharing buttons.
 Above is a graphical representation of the assets and their presence in the webinar program.
Assets
Pre-Webinar
- Registration Landing Page
- Thank You Landing Page
- Social Sharing Button
- Outbound Invitation
- Outbound Invitation 2*
- Registration Error List
Post-Webinar
- Follow Up Email
- On Demand Registration Landing Page
- On Demand Thank You Landing Page
- On Demand Email Autoresponder
- Slide Deck (Design Studio)
 The image above demonstrates the organization of assets in the webinar program. The use of numbering before the name of the asset is to keep them in order of appearance throughout the program.
Reminders and Tips
- Create a url structure that you will follow across all webinar programs. For example, you can use the format:
- [title-of-webinar]-webinar
.html for all live webinar registration pages - [title-of-webinar]-webinar
-thank-you for all live webinarthank you pages - webinar-demand-[title-of-w
ebinar].ht ml for all webinar on demand registration pages - webinar-demand-[title-of-w
ebinar]-th ank-you.ht ml for all webinar on demand thank you pages
- [title-of-webinar]-webinar
- Keep SEO in mind when developing copy for your webinar. Think about the keywords that your target demographic might search to find your content and the benefits that your company provides to clients. Use a strong headline that includes the main keyword you want to target, and include body text to describe the webinar with words that matter.
- If you have time, change the meta for your landing pages to be indexed by search engines.
- Remember to turn off automatic emails from your webinar platform once you have created the email in Marketo (otherwise, you will send duplicate messaging to registrants).
Pre-Webinar Registration
- Research what your competitors are doing for their landing pages, or find a design that you like that you can emulate in your program. Work with a designer to create a solid template that can be replicated for all of your webinar programs.
- Elements to include:
- Your company's logo
- A design that follows your brand's primary colors and designs
- A form (Prior to setting up this program, a webinar registration form should be set up in the Design Studio. The fields for this form must match up with the fields required in the setup of the webinar, for example, in GoToWebinar. On the landing page, ensure that the correct follow up page is chosen for your program.)
- A headline that uses keywords targeted toward your demographic and their needs
- Date, time, time zone, presenter's name and presenter's title
- A picture of the presenter
- Body text describing the focus of the webinar
- This page confirms that the user has been registered and an email with their access information will be sent to the email address that they provided.
- Elements to include:
- Headline of the webinar
- Social sharing buttons: the social sharing buttons must be set up separately. Ensure that the correct social button for this program is included in your landing page.
On-Demand Webinar Registration (if necessary)
- If you are able to record your webinar and upload it to a landing page, this landing page will allow you to use this content to draw in new customers interested in the topics that you present.
- Upon completion of the live webinar, you must create a redirect rule in the Admin area to redirect from pre-webinar registration to on-demand registration (Admin>Landing Pages>Rules>New Redirect Rule)
- Elements to include on this page:
- Headline of the webinar
- A form to download the resource (this is a different form than the registration page, since it is now considered a piece of content. Make sure to edit the follow up page to be the Thank You page for the on-demand webinar.
- Date, time, time zone, presenter's name and presenter's title
- A picture of the presenter
- Body text describing the focus of the webinar
On Demand Webinar Thank You
- Confirms that they will receive an email that contains the link to the on demand webinar that they requested.
- Elements to include: Headline of the webinar & social sharing buttons
Outbound Invitation
- This email is sent to the applicable audiences in your funnel to raise awareness for the virtual event.
- Elements to Include:
- Subject line that ties to the headline of the webinar
- Email copy that briefly describes the key points of the webinar
- From Name (this can be the webinar presneter, or a member of the team putting on the webinar, depending on the needs of your company). You can also A/B test different senders to see if a particular person results in higher open and click-through rates.
- To see the what necessary items need to be in the webinar autoresponse email, do a test sign-up and review the email that is sent to your inbox.
- The Dial-In, Webinar ID, and Access Code will be displayed to you. The Webinar ID will be unique to the webinar, but not unique to the attendee. The Webinar URL and Acess Code will be unique to the attendee, so you must use the tokens present in Marketo through the event adaptor (discussed in the introduction of this article).
- Remember to turn off the autoresponse in your webinar platform, once you have created and tested your branded version in Marketo.
- Below is an example of the email copy that will best display your important webinar details, the link to enter the webinar, and a link to the system requirements. You should create a separate landing page with GoToWebinar system requirements so that you do not have to take up real estate in the body of the email.
Step 1 of the autoresponse: write the email (suggested copy below):
Dear [First Name],
You have successfully registered for our upcoming webinar, [webinar name here], presented by [webinar presenter's role] [webinar presenter's name]. On [date of webinar] at [time of webinar], click here to join the webinar*. This link should not be shared with others. It is unique to you. Below is your access info:
Date: [date of webinar]
Time: [time of webinar]
Webinar ID: [webinar ID - displayed in the test email you send to yourself through your webinar platform]
Dial-In: [toll free number - displayed in the test email you send to yourself through your webinar platform]
Access Code: {{my.Access Code:default=edit me}}*
Audio Pin: Shown after joining the webinar
For optimal audio quality, you may also listen to the webinar through your computer speakers.
GoToWebinar System Requirements
----
*The first link should be use this Marketo token: {{member.webinar url:default=edit me}} When the person registers for the webinar, they are given a personal login url that is unique to them. The second unique item is the Webinar ID.
----
Create a separate branded landing page with the following requirements:
PC-based attendees
Required: Windows® 8, 7, Vista, XP or 2003 Server
Mac®-based attendees
Required: Mac OS® X 10.6 or newer
Mobile attendees
Required: iPhone®, iPad®, Android™ phone or Android tablet
Read GoToWebinar's Audio Checklist for tips on using your computer's microphone and speakers with GoToWebinar.
----
Follow Up – Attendees
- This email is sent upon completion of the virtual event. an email will be created both for attendees and for no-shows to the event.
- The call to action should be the webinar on-demand (taken straight to the un-gated recording) and the registration for the next webinar.
- Thank the user for attending the event, or offering an apology for those who could not attend, and give them the opportunity to register for the next webinar.
Autoresponder (after event, on demand)
- This email is sent to those who fill out the form to watch the on-demand recording.
- In this email, include the link to the recorded webinar. You can also include links to the next live webinar registration.
Deep Dive - Social Sharing Button
- Contained on Thank You landing pages.
- Must be edited before webinar with “Live Webinar” information, and after webinar with “On Demand Webinar” information.
- Elements to edit pre-webinar:
- Advanced Options>Share URL (Other Landing Page, select pre-webinar registration landing page)
- Share Flow>Share Messages (Edit short-hand, title, and body for Facebook, LinkedIn, and Twitter)
- Elements to edit post-webinar:
- Advanced Options>Share URL (Other Landing Page, select post-webinar registration landing page)
- Share Flow>Share Messages (Replace “Live” with “On Demand” in short-hand titles)
- If you can spend time optimizing your copy for SEO with keywords relevant to your audience, you will have greater success in driving new leads through social presence in your users' networks.
Smart Campaigns (Event Flows)
 The image above displays the smart campaigns utilized in a webinar program. The final smart campaign (outbound technical difficulties) is not a necessary campaign, but is useful to have on hand in case any technical issues arise during the webinar, and you need to communicate to registrants quickly.
Outbound Invitation
- This email contains an invitation to your leads or target audience, and directs to the live webinar registration.
- Keep the copy short and direct. It is helpful to use bullet points to get across the key points quickly.
- Set this to go out at least a week prior to the event (3 weeks in advance is best, but this is up for interpretation based on your audience).
Outbound Invitation b
- This email contains a second invitation for the virtual event. It should have different copy from the initial outbound email, perhaps building upon the weaknesses of the first email.
- Utilize a new subject line so that your audience takes notice if they have not yet registered.
- Set this to send a week prior to the event to capture straggling leads and your audience that has not yet engaged with the event promotion.
Confirmation Email
- This email will be triggered when someone registers for the webinar
- Flows shown in the screenshot below
 The image above shows the "smart list" for the confirmation email.
 The image above shows the "flow" for the confirmation email.
Reminder Email
- This email can be sent a day before the event, or the morning of the event.
- Remind registrants about the live webinar. Create excitement for the event, and include the key points of the webinar.
Follow-Up Email
- This email is sent after the live event. Send to all registrants (attendees and no-shows).
- Include a link to the recorded webinar for users to share with colleagues who might find the content interesting.
- If you have another upcoming webinar, promote the webinar here. If you do not have upcoming webinars, include another piece of content that relates to the benefits delivered in this webinar (for example, if the webinar was on SEO best practices, you could send a whitepaper on SEO best practices).
Viewed Recording
- This triggered campaign tracks all users that view the recorded version of the webinar. If the user clicks the link in the autoresponder email that brings them to the video recording, it is counted as a view. This is up to you depending on what is most applicable to your business.
Have a question about something in this article? You can receive help directly from the article author. Sign up for a free trial to get started.
Comments (0)