Add Commands to the Quick Access Toolbar in Microsoft® Office


Published:
Browse All Articles > Add Commands to the Quick Access Toolbar in Microsoft® Office
This article describes how to add commands to the Quick Access Toolbar (QAT). The instructions apply generally to Office 2007 and later versions, but Microsoft® Word 2013 was used for the specific steps and figures.
The Quick Access Toolbar (QAT) is a feature that was introduced in Office 2007. It gives you immediate access to commands that you want to be always available or to commands that are not in the Ribbon interface. The QAT can be positioned either above or below the Ribbon and is limited to a single line containing your chosen command icons.
Figure 1 shows the QAT (outlined in red) above the Ribbon. In this example, there are many commands in the QAT. This results in the document title being moved from its default position at the center of the title bar. Because the QAT shares the existing title bar, the height of the command area remains the same.
![Figure-1-Extended-QAT-above-Ribbon.png]() Figure 1. QAT positioned above the Ribbon
Figure 1. QAT positioned above the Ribbon
Figure 2 shows the QAT (outlined in red) below the Ribbon. Since there are no other objects in the QAT toolbar area, you can have many more command icons. As you can see in Figure 2, the QAT toolbar increases the height of the command area.
![Figure-2-Extended-QAT-below-Ribbon.png]()
Personally, I prefer the QAT positioned below the Ribbon for the following reasons:
To add commands to the QAT, follow these steps:
1. Click the dropdown menu arrow at the leftmost edge of the QAT (outlined in red), and select the More Commands… option (outlined in red). See Figure 3.
![Figure-3-Step-1a-Add-Command-to-QAT.png]() Figure 3. QAT dropdown menu and More Commands... option
Figure 3. QAT dropdown menu and More Commands... option
The Customize the Quick Access Toolbar window opens as shown in Figure 4.
![Figure-4-Step-1b-Add-Command-to-QAT.png]() Figure 4. The Customize Quick Access Toolbar window
Figure 4. The Customize Quick Access Toolbar window
2. You can select from the following menu options on the Choose commands from dropdown menu:
The scrolling list on the left displays the commands you can choose. Steps 3 through 7 are shown in Figure 5 below.
3. In the scrolling list on the left, select the command you want to add to the QAT (example outlined in red).
4. In the Customize Quick Access Toolbar dropdown menu (outlined in red), you can choose to apply the command to the QAT for all documents (the default option), or to add the command only to the QAT for the current document.
5. Click the Add>> button (outlined in red). The command you selected will move to the scrolling list on the right.
6. Continue adding commands until you’re done.
7. Click the OK button (outlined in red) to close the window.
![Figure-5-Step-2-Add-Command-to-QAT.png]()
Newly-added commands are appended to the bottom of the scrolling list on the right. On the QAT itself, these commands will be added at the end of the toolbar. You can control the order in which the commands appear on the QAT by moving them up or down in the scrolling list.
1. Select the command that you want to move (outlined in red).
2. Use the Up or Down arrow (outlined in red) to position the command where you want it.
3. Click the OK button (outlined in red) to close the window.
![Figure-6-Step-3-Add-Command-to-QAT.png]() Figure 6. Moving commands in the QAT
Figure 6. Moving commands in the QAT
Having immediate access to frequently-used commands on the QAT can increase the efficiency of your workflow and give you more control of your Office environment.
What Is the Quick Access Toolbar?
The Quick Access Toolbar (QAT) is a feature that was introduced in Office 2007. It gives you immediate access to commands that you want to be always available or to commands that are not in the Ribbon interface. The QAT can be positioned either above or below the Ribbon and is limited to a single line containing your chosen command icons.
Figure 1 shows the QAT (outlined in red) above the Ribbon. In this example, there are many commands in the QAT. This results in the document title being moved from its default position at the center of the title bar. Because the QAT shares the existing title bar, the height of the command area remains the same.
 Figure 1. QAT positioned above the Ribbon
Figure 2 shows the QAT (outlined in red) below the Ribbon. Since there are no other objects in the QAT toolbar area, you can have many more command icons. As you can see in Figure 2, the QAT toolbar increases the height of the command area.

Figure 2. QAT positioned below the Ribbon
Personally, I prefer the QAT positioned below the Ribbon for the following reasons:
- My QAT has a lot of command icons and I prefer the document title to remain in a consistent position.
- The QAT is closer to the document itself, which reduces the amount of space my cursor has to traverse on the screen.
- If I want to reduce the height of the command area, I can collapse the Ribbon.
How Do You Add Commands to the QAT?
To add commands to the QAT, follow these steps:
1. Click the dropdown menu arrow at the leftmost edge of the QAT (outlined in red), and select the More Commands… option (outlined in red). See Figure 3.
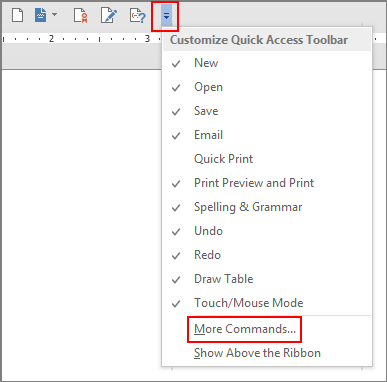 Figure 3. QAT dropdown menu and More Commands... option
The Customize the Quick Access Toolbar window opens as shown in Figure 4.
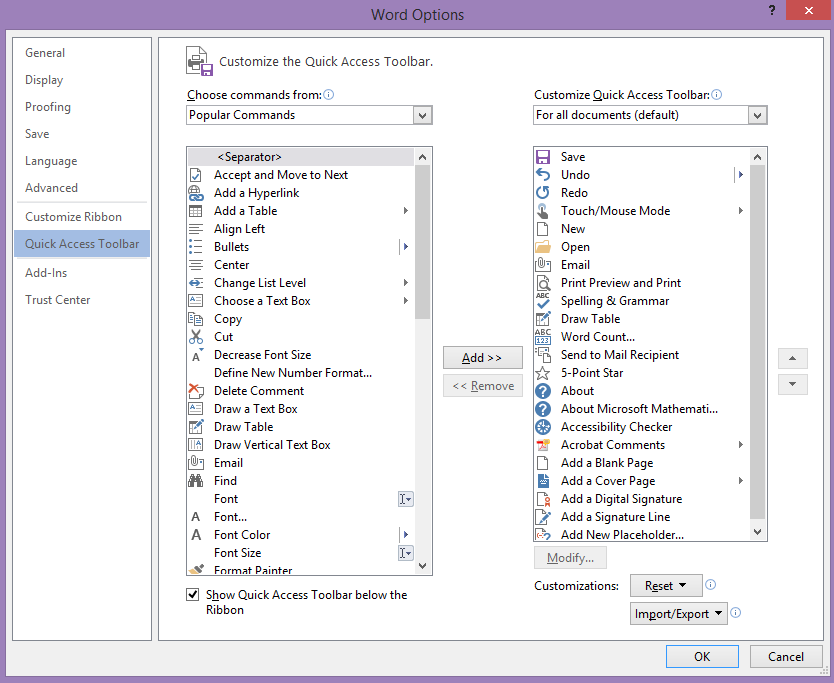 Figure 4. The Customize Quick Access Toolbar window
2. You can select from the following menu options on the Choose commands from dropdown menu:
- Popular Commands
- Commands Not in the Ribbon
- All Commands
- Macros
The scrolling list on the left displays the commands you can choose. Steps 3 through 7 are shown in Figure 5 below.
3. In the scrolling list on the left, select the command you want to add to the QAT (example outlined in red).
4. In the Customize Quick Access Toolbar dropdown menu (outlined in red), you can choose to apply the command to the QAT for all documents (the default option), or to add the command only to the QAT for the current document.
5. Click the Add>> button (outlined in red). The command you selected will move to the scrolling list on the right.
6. Continue adding commands until you’re done.
7. Click the OK button (outlined in red) to close the window.
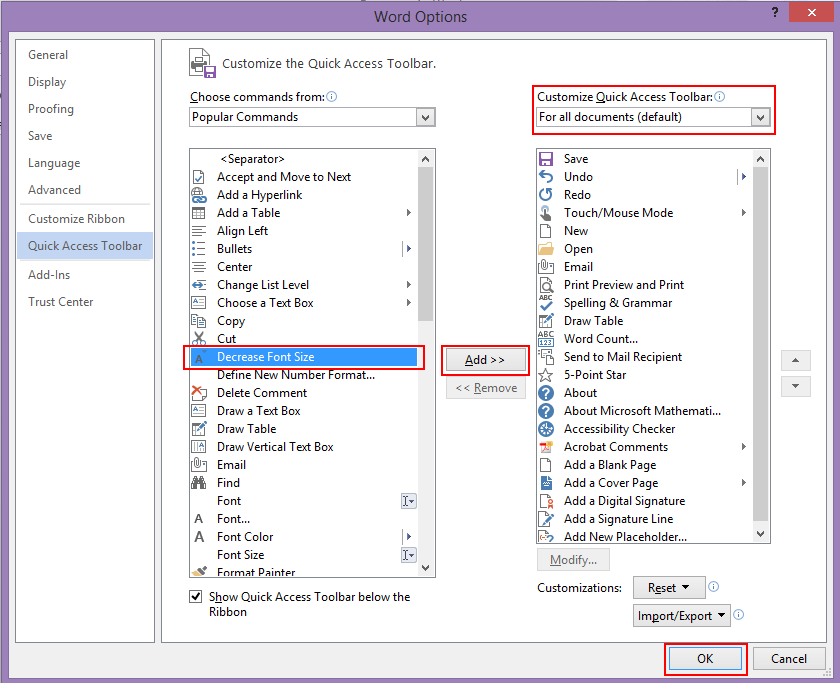
Figure 5. Selecting commands to add to the QAT
Changing the Order of Commands on the QAT
Newly-added commands are appended to the bottom of the scrolling list on the right. On the QAT itself, these commands will be added at the end of the toolbar. You can control the order in which the commands appear on the QAT by moving them up or down in the scrolling list.
1. Select the command that you want to move (outlined in red).
2. Use the Up or Down arrow (outlined in red) to position the command where you want it.
3. Click the OK button (outlined in red) to close the window.
 Figure 6. Moving commands in the QAT
Having immediate access to frequently-used commands on the QAT can increase the efficiency of your workflow and give you more control of your Office environment.
Have a question about something in this article? You can receive help directly from the article author. Sign up for a free trial to get started.
Comments (3)
Author
Commented:I had a few formatting issues with placement of the figure captions. After many editing attempts, including showing frames and editing the HTML, I've temporarily given up perfecting the formatting and will come back to that when I update the article sometime in the future.
I also realize that I repeated "outlined in red" frequently in the text. I'm working on developing accessible content and am experimenting with methods that make it easier for people with disabilities to follow my instructions. When I outline portions of an image, it may be clear to most readers what is indicated, but it may not be clear to someone who is visually impaired or has cognitive challenges.
Commented:
Toolbar customisation used to be part of Normal.dot in older version of Word
Author
Commented:In Word 2007, you can copy the .QAT file to another Word 2007 installation. Do a search for the .QAT file because it's located in different directories depending on the version of Windows.
In Word 2010 or word 2013, you can Import/Export the QAT file from the Customize Quick Access Toolbar window. The QAT settings are in a file called Word.OfficeUI in the C:\Users\[username]\AppDat