Customize your Word Toolbar for Maximum Efficiency

Published:
Browse All Articles > Customize your Word Toolbar for Maximum Efficiency
Microsoft Word is a program we have all encountered at some point, but very few of us have dug deep into its full scope of features, let alone customized it to suit our needs. Luckily making the ribbon (aka toolbar, first introduced in Word 2007) work for you is extremely simple, and can save you lots of time in the long run.
![Ribbon01.PNG]()
Keep in mind customizing the ribbon is specific to Microsoft Word and changes will not be applied across other Microsoft Office programs. The customization also has its limits, you can’t rename, change the icons, or order of the default commands (it will become clear what you can and can’t change).
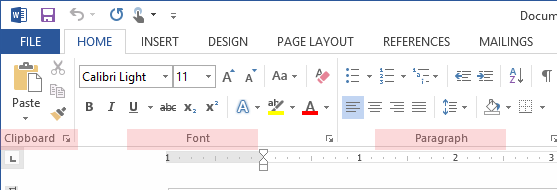
The ribbon is different than the quick access toolbar, which can also be customized (more on that later) and shown below or above the ribbon. This toolbar only shows icons for various actions, and can be helpful for even faster access to your most commonly used tools.
![Ribbon02a.PNG]()
Right click on the Ribbon > Customize the Ribbon
(This is also where you can show the quick access toolbar)
![Ribbon02.png]() This window will pop-up, allowing you to apply changes to your ribbon.
This window will pop-up, allowing you to apply changes to your ribbon.
![Ribbon03a.PNG]() From here you can customize both your ribbon and quick access toolbar by selecting from a lengthy list of Word's commands and adding/removing them from your ribbon.
From here you can customize both your ribbon and quick access toolbar by selecting from a lengthy list of Word's commands and adding/removing them from your ribbon.
Let's Set Up a Save Tab in Our Ribbon
One of the most frustrating things can be the lack of an easy access to “Save As” in Word, without having to leave your content screen through the File Tab. We will set up a Save Tab to help make it more seamless.
With we click “New Tab” on the bottom, we are presented with a new Tab and a new Group.
![Ribbon04a.PNG]() A group is the section within a Tab, we can see the name underneath the commands it holds.
A group is the section within a Tab, we can see the name underneath the commands it holds.
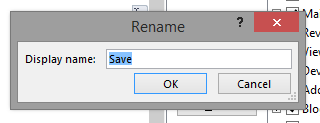
![Ribbon01a.png]() Name your Tab by selecting it, and clicking “Rename” in the option window.
Name your Tab by selecting it, and clicking “Rename” in the option window.
![ribbon04b.PNG]() Name your Group (where your commands are actually housed) as well. Select the Group, and click “Rename” in the option window.
Name your Group (where your commands are actually housed) as well. Select the Group, and click “Rename” in the option window.
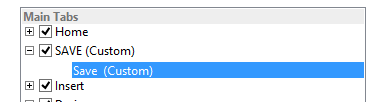
![Ribbon04.PNG]() Now we can see our new Tab and Group, properly named in the options window.
Now we can see our new Tab and Group, properly named in the options window.
![Ribbon05.PNG]() But on no! There are no commands in the Tab and Group we just created, we’ll have to go back into the customization window to add some in.
But on no! There are no commands in the Tab and Group we just created, we’ll have to go back into the customization window to add some in.
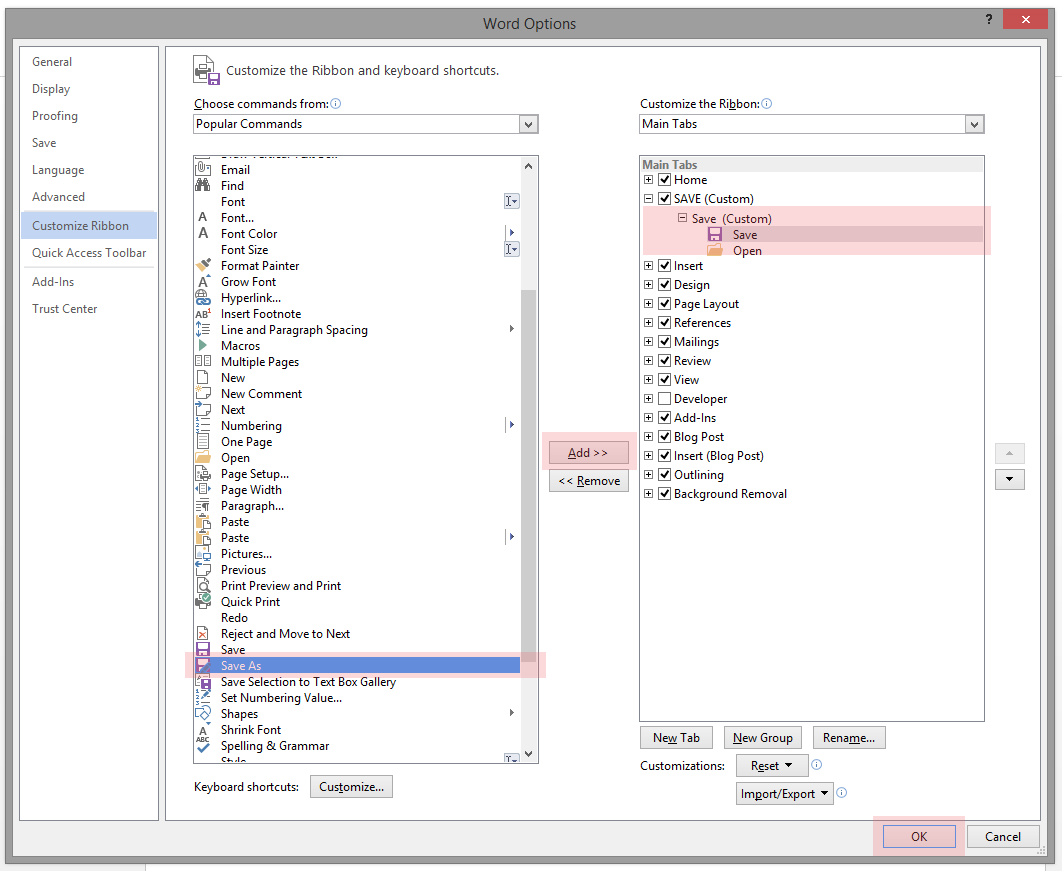
![Ribbon05a.PNG]() Select the Save Tab on the right hand side to be sure you are editing the correct one. Then, on the left hand side, navigate to the commands you want to add to your Group, select the, and click “Add >>” to pull them into your Group. Be sure to click “Ok” to save and apply your changes.
Select the Save Tab on the right hand side to be sure you are editing the correct one. Then, on the left hand side, navigate to the commands you want to add to your Group, select the, and click “Add >>” to pull them into your Group. Be sure to click “Ok” to save and apply your changes.
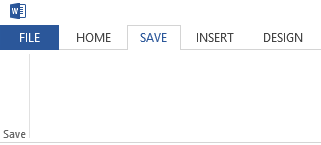
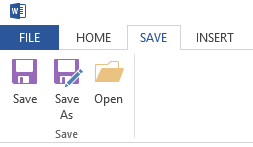
![Ribbon06.PNG]() Now we can see the commands properly added to the Group in our Tab!
Now we can see the commands properly added to the Group in our Tab!
![Ribbon07.PNG]() Start Customizing
Start Customizing
These basic steps can be essential in bringing your most used commands to the Tabs you use the most in Microsoft Word, saving time in your next project, and headaches in trying to remember where the commands might live.
When you save your Word document, the changes to your Tabs will be saved as well, and you will see your customized Ribbon and Quick Access Toolbar the next time you open Word.
Think about what commands you use more frequently, how you might organize them, and start customizing to increase your workflow efficiency today!
What is the Ribbon?
The ribbon is the top expanded toolbar visible in your Word document.
Keep in mind customizing the ribbon is specific to Microsoft Word and changes will not be applied across other Microsoft Office programs. The customization also has its limits, you can’t rename, change the icons, or order of the default commands (it will become clear what you can and can’t change).
The ribbon is different than the quick access toolbar, which can also be customized (more on that later) and shown below or above the ribbon. This toolbar only shows icons for various actions, and can be helpful for even faster access to your most commonly used tools.

Start Customizing your Ribbon
It's very easy to get going in customizing the tools you see on your ribbon and various tabs.Right click on the Ribbon > Customize the Ribbon
(This is also where you can show the quick access toolbar)
 This window will pop-up, allowing you to apply changes to your ribbon.
 From here you can customize both your ribbon and quick access toolbar by selecting from a lengthy list of Word's commands and adding/removing them from your ribbon.
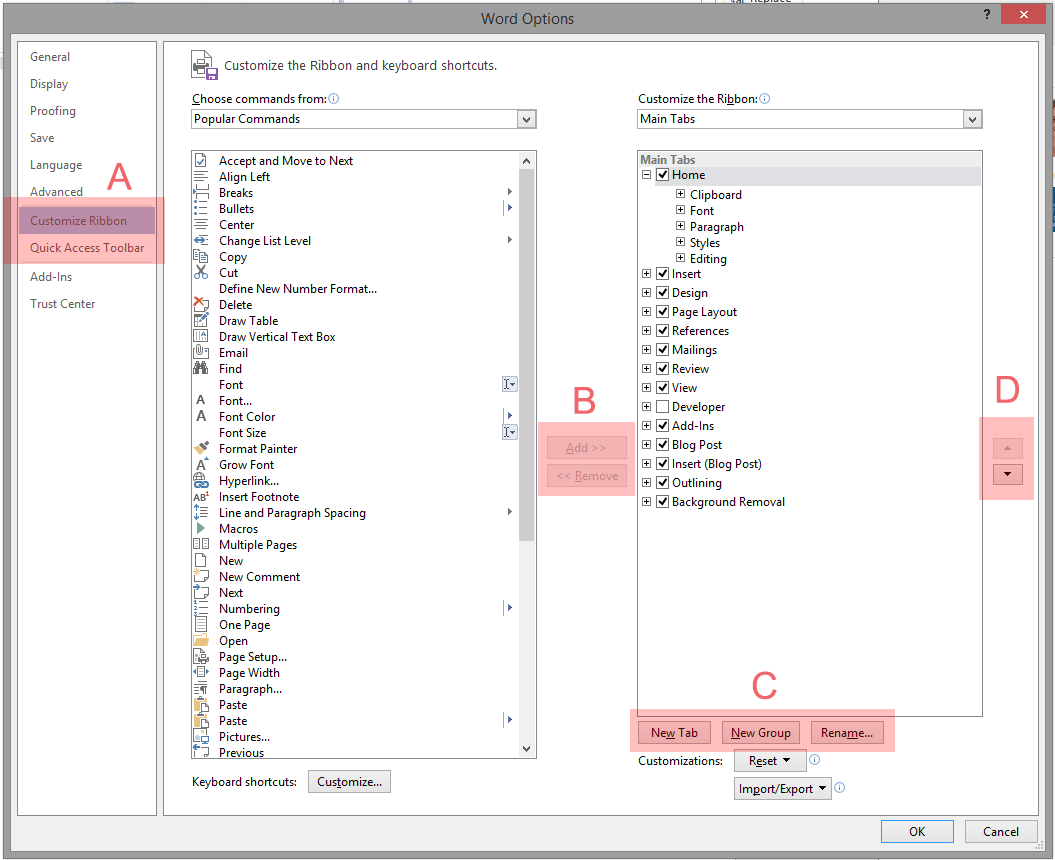
A. Select the toolbar you want to customize (ribbon or quick access). This will reveal the commands available for you to add/remove
B. Select the command you want to add, select "Add >>" to move it over to the right hand column (the toolbar you are editing).
C. Add, remove, or rename the Tabs to your toolbar.
D. Set the order of your toolbar. Use the arrows and checkboxes to move the Tabs you use most to the leftmost side of the toolbar.
Let's Set Up a Save Tab in Our Ribbon
One of the most frustrating things can be the lack of an easy access to “Save As” in Word, without having to leave your content screen through the File Tab. We will set up a Save Tab to help make it more seamless.
With we click “New Tab” on the bottom, we are presented with a new Tab and a new Group.
 A group is the section within a Tab, we can see the name underneath the commands it holds.
 Name your Tab by selecting it, and clicking “Rename” in the option window.
 Name your Group (where your commands are actually housed) as well. Select the Group, and click “Rename” in the option window.
 Now we can see our new Tab and Group, properly named in the options window.
 But on no! There are no commands in the Tab and Group we just created, we’ll have to go back into the customization window to add some in.
 Select the Save Tab on the right hand side to be sure you are editing the correct one. Then, on the left hand side, navigate to the commands you want to add to your Group, select the, and click “Add >>” to pull them into your Group. Be sure to click “Ok” to save and apply your changes.
 Now we can see the commands properly added to the Group in our Tab!
 Start Customizing
These basic steps can be essential in bringing your most used commands to the Tabs you use the most in Microsoft Word, saving time in your next project, and headaches in trying to remember where the commands might live.
When you save your Word document, the changes to your Tabs will be saved as well, and you will see your customized Ribbon and Quick Access Toolbar the next time you open Word.
Think about what commands you use more frequently, how you might organize them, and start customizing to increase your workflow efficiency today!
Have a question about something in this article? You can receive help directly from the article author. Sign up for a free trial to get started.
Comments (0)