

Browse All Articles > How to Archive Emails in Outlook 2013 in Detail
Outlook is primarily used as email application that offers storage and maintenance of emails, contacts, a calendar, journals and so on. When you work in Outlook all your data is saved on your email server or on your computer. Data files that are saved on the server are named OST (Offline Storage Table) and files that are saved in your computer are termed PST (Personal Storage Table).
What is PST file?
PST files stores your data on the computer and basically used by home users or small organization. Most users use an ISP (Internet Service Provider) to connect with the Internet via POP3 and IMAP accounts. The maximum size of a PST in Outlook 2010 is 50GB.
Does your information in Outlook start disappearing?
We cannot imagine our lifestyle without the Internet whether it is personal or professional. We are used to some form of e-communication. Outlook and other email clients behave as a mediator for communications. The constant exchange of mails leads to exceeding the limit of your mailbox and that affect the performance of application. So to make space in Outlook, archiving is the best policy to back up data without any loss.
Why archive your emails?
Archiving is a process where the current storage of data in a PST file is divided and stored in a separate PST file. The Outlook mailbox size increases with the regular exchange of messages. So, to increase the availability we can move the mails that may be important but not used so far to another location as an archive. Archives reduce the size of the Outlook Data File. With the increase in storage there occurs a slowdown in the performance of Outlook and archiving helps us to prevent it. We’ll see in the coming sections how to archive emails in Microsoft Outlook 2013 and the different types of archiving options offered.
Types of archiving in Outlook 2013
Basically there are two types of archiving – Manual Archiving and Auto Archiving
Manual Archiving
NOTE: Once moved the emails won’t be available in their source folder.
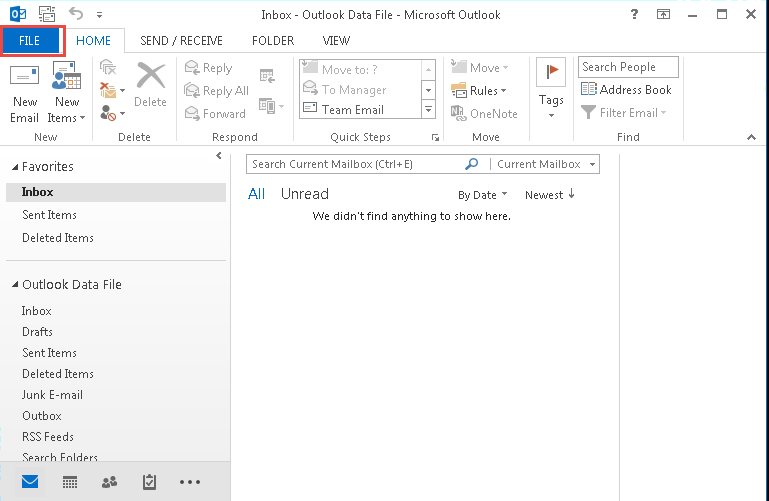
Step 1: Click on the “FILE” menu once you enter Outlook.
![1.png]()
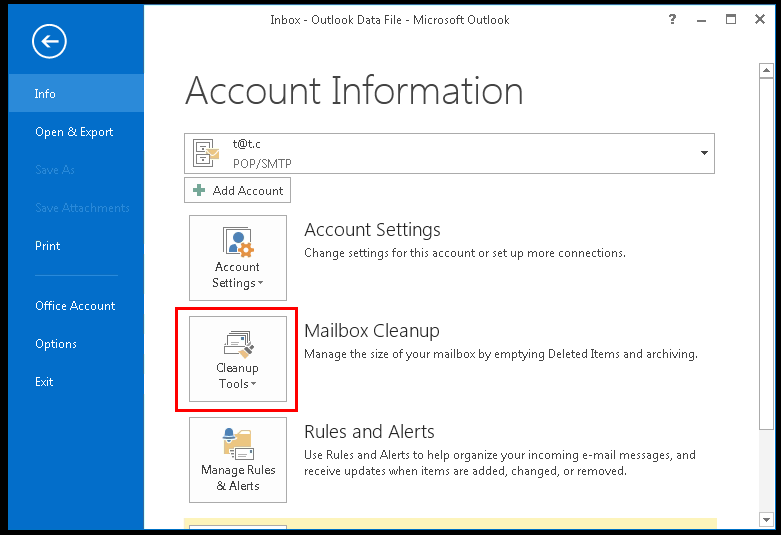
Step 2: Click on “Cleanup Tool” box seen on the Account Information page.
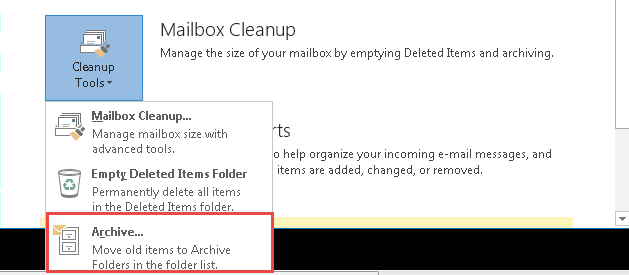
![21.png]() Step 3: Click on “Archive...” from the drop down menu.
Step 3: Click on “Archive...” from the drop down menu.
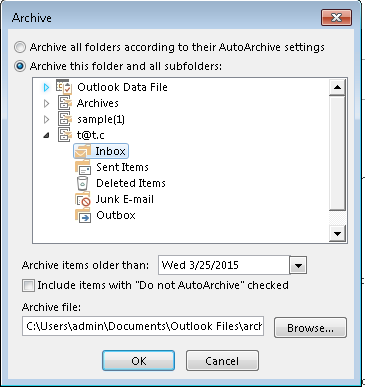
![22.png]() Step 4: Once we select archive, we will get a dialog box as shown below. There will be two options:
Step 4: Once we select archive, we will get a dialog box as shown below. There will be two options:
![23.png]() NOTE: If the user wants to include the folders that are excluded in AutoArchive\, they can enable the check box that reads – Include Items with “Do not AutoArchive” checked.
NOTE: If the user wants to include the folders that are excluded in AutoArchive\, they can enable the check box that reads – Include Items with “Do not AutoArchive” checked.
Step 5: Click the Browse button if you want to change the default store location for your archive.
Step 6: Click on Ok to begin archiving
Auto-Archiving
In AutoArchiving, the emails are automatically moved to archive if user has mentioned the preferred location, the days after which archiving takes place, and so on.
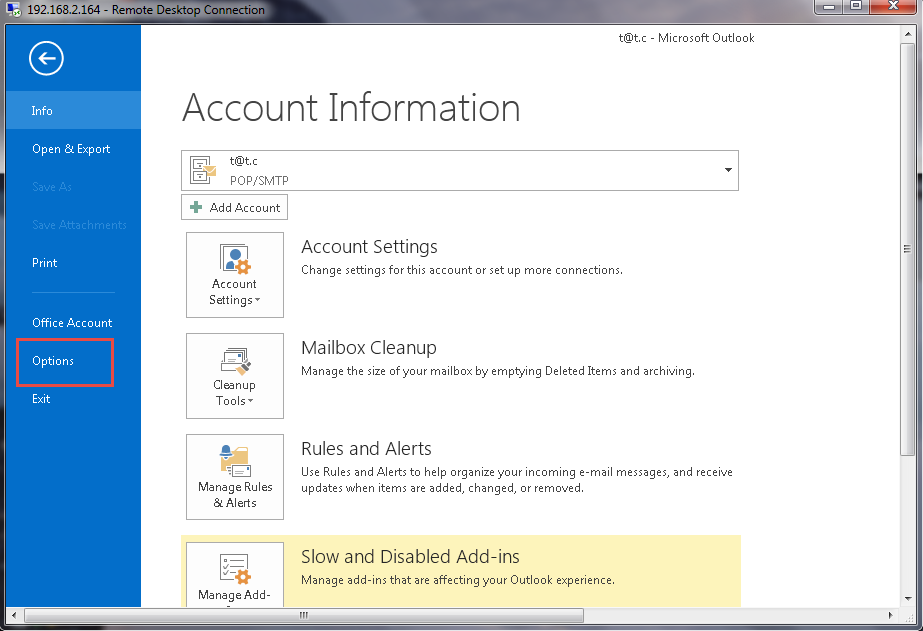
Step 1: Run Outlook and click on “FILE” menu seen on the top.
Step 2: Select “Options” from Account Information screen.
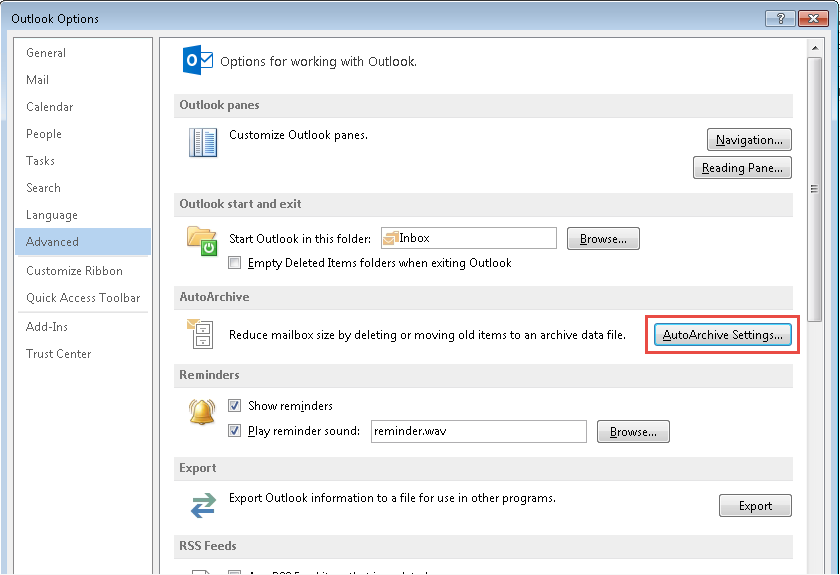
![24.png]() Step 3: Select “Advanced” from the Outlook Options window
Step 3: Select “Advanced” from the Outlook Options window
![25.png]() Step 4: Click on “AutoArchive Settings...” to make the required changes. One can change the time at which archiving should take place, the location at which it must be stored, and so on. There are many options that should be set:
Step 4: Click on “AutoArchive Settings...” to make the required changes. One can change the time at which archiving should take place, the location at which it must be stored, and so on. There are many options that should be set:
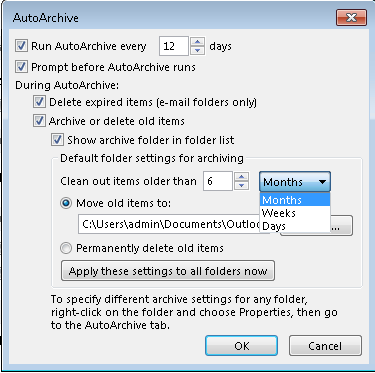
Step 4.1: Put a tick on the checkbox “Run AutoArchive every…days” and change the number of days to specify how often the AutoArchive should be done.
Step 4.2: If you want to get notified about archiving, click on the checkbox “Prompt before AutoArchive runs”.
Step 4.3: Archive options in “During AutoArchive”:
Step 4.5: Click on the radio button “Move old items to” to either the default location or the one you have selected for storing the archive output.
Step 4.6: Click on the radio button “Permanently delete old items” to remove old items.
NOTE: If the user wants to specify the settings to a specific folder then right-click on the folder, choose Properties and reset to AutoArchive.
![26.png]() Step 5: Once finished, click on “Ok” button to implement the changes
Step 5: Once finished, click on “Ok” button to implement the changes
To view folder after archiving Go to File >> Open >> Outlook Data File >> Select the Archive folder. After archiving storage space is freed up and the efficiency of Outlook will definitely improve. Now the question arises which option of archiving is suitable. If you have set the rules in Auto Archiving then you don’t need to do Manual Achieving as Auto Archive automatically archive all data according to specify date and time. If you want to archive data in bulk then you can do this via Manual Archiving Method.
What is PST file?
PST files stores your data on the computer and basically used by home users or small organization. Most users use an ISP (Internet Service Provider) to connect with the Internet via POP3 and IMAP accounts. The maximum size of a PST in Outlook 2010 is 50GB.
Does your information in Outlook start disappearing?
We cannot imagine our lifestyle without the Internet whether it is personal or professional. We are used to some form of e-communication. Outlook and other email clients behave as a mediator for communications. The constant exchange of mails leads to exceeding the limit of your mailbox and that affect the performance of application. So to make space in Outlook, archiving is the best policy to back up data without any loss.
Why archive your emails?
Archiving is a process where the current storage of data in a PST file is divided and stored in a separate PST file. The Outlook mailbox size increases with the regular exchange of messages. So, to increase the availability we can move the mails that may be important but not used so far to another location as an archive. Archives reduce the size of the Outlook Data File. With the increase in storage there occurs a slowdown in the performance of Outlook and archiving helps us to prevent it. We’ll see in the coming sections how to archive emails in Microsoft Outlook 2013 and the different types of archiving options offered.
Types of archiving in Outlook 2013
Basically there are two types of archiving – Manual Archiving and Auto Archiving
Manual Archiving
NOTE: Once moved the emails won’t be available in their source folder.
Step 1: Click on the “FILE” menu once you enter Outlook.
Step 2: Click on “Cleanup Tool” box seen on the Account Information page.
 Step 3: Click on “Archive...” from the drop down menu.
 Step 4: Once we select archive, we will get a dialog box as shown below. There will be two options:
- “Archive all folders according to their AutoArchive settings”
- “Archive this folder and all sub folders”
 NOTE: If the user wants to include the folders that are excluded in AutoArchive\, they can enable the check box that reads – Include Items with “Do not AutoArchive” checked.
Step 5: Click the Browse button if you want to change the default store location for your archive.
Step 6: Click on Ok to begin archiving
Auto-Archiving
In AutoArchiving, the emails are automatically moved to archive if user has mentioned the preferred location, the days after which archiving takes place, and so on.
Step 1: Run Outlook and click on “FILE” menu seen on the top.
Step 2: Select “Options” from Account Information screen.
 Step 3: Select “Advanced” from the Outlook Options window
 Step 4: Click on “AutoArchive Settings...” to make the required changes. One can change the time at which archiving should take place, the location at which it must be stored, and so on. There are many options that should be set:
Step 4.1: Put a tick on the checkbox “Run AutoArchive every…days” and change the number of days to specify how often the AutoArchive should be done.
Step 4.2: If you want to get notified about archiving, click on the checkbox “Prompt before AutoArchive runs”.
Step 4.3: Archive options in “During AutoArchive”:
- “Delete expired items (e-mail folders only)”
- “Archive or delete old items”
- “Show archive folder in folder list”
Step 4.5: Click on the radio button “Move old items to” to either the default location or the one you have selected for storing the archive output.
Step 4.6: Click on the radio button “Permanently delete old items” to remove old items.
NOTE: If the user wants to specify the settings to a specific folder then right-click on the folder, choose Properties and reset to AutoArchive.
 Step 5: Once finished, click on “Ok” button to implement the changes
To view folder after archiving Go to File >> Open >> Outlook Data File >> Select the Archive folder. After archiving storage space is freed up and the efficiency of Outlook will definitely improve. Now the question arises which option of archiving is suitable. If you have set the rules in Auto Archiving then you don’t need to do Manual Achieving as Auto Archive automatically archive all data according to specify date and time. If you want to archive data in bulk then you can do this via Manual Archiving Method.
Have a question about something in this article? You can receive help directly from the article author. Sign up for a free trial to get started.
Comments (1)
Commented: