SQL Server database migration - The Detach/Attach method


Published:
Browse All Articles > SQL Server database migration - The Detach/Attach method
In this article I will describe the Detach & Attach method as one possible migration process and I will add the extra tasks needed for an upgrade when and where is applied so it will cover all.
Migrating a database is moving it to another instance, within the same server or to another server. Many of the database migrations also includes an upgrade, meaning that the database will be moved to a more recent version of the database engine.
The Detach/Attach method can be used if the downtime period is not an issue since the database will be unavailable during all process.
NOTES:
The Detach/Attach method can be used if the downtime period is not an issue since the database will be unavailable during all process.
NOTES:
- This migration method is for user databases only. System databases, Jobs, DTSX Packages, Reports and any other database object are not covered in this article.
- A sysadmin role is necessary to execute any of the provided steps.
Some considerations
A database can only be detached if is not currently in use so assure that no one is connected before detaching the database. Update statistics can be performed to update information about the data in the tables and indexes. Also requires exclusive access to the database.
If the database is being replicated, it must be unpublished first before be detached.
If a database snapshot exists on the database, before you can detach the database, you must drop all of its snapshots.
If the database is being mirrored then it cannot be detached until the database mirroring session is terminated.
Before start - Only for Upgrades
In the case of a migration being part of an upgrade then the first pre requisite is to run the SQL Server Upgrade Advisor to analyze the earlier version of the SQL Server database, and then generates a report that identifies issues to fix either before or after the upgrade. Those issues are not covered by this article either.
Step 0 - Preparation
Make sure that you know the name and the current location of all data files and log files for the database since you will need to know which files will be copied.
For larger files you can shrink them before detach the database so will save time during the copy process. For data files use shrink with truncate only option so will only release all free space at the end of the file to the operating system but does not perform any page movement inside the file. It will be faster and will not cause fragmentations.
Step 1
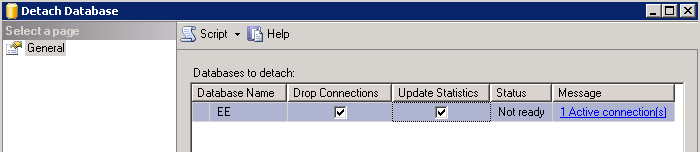
For detach the source database you can use the detach interface provided by SSMS (right-click on the database name, chose Tasks/Detach... and then check the Drop Connections and Update Statistics options.
If a database snapshot exists on the database, before you can detach the database, you must drop all of its snapshots.
If the database is being mirrored then it cannot be detached until the database mirroring session is terminated.
Before start - Only for Upgrades
In the case of a migration being part of an upgrade then the first pre requisite is to run the SQL Server Upgrade Advisor to analyze the earlier version of the SQL Server database, and then generates a report that identifies issues to fix either before or after the upgrade. Those issues are not covered by this article either.
Step 0 - Preparation
Make sure that you know the name and the current location of all data files and log files for the database since you will need to know which files will be copied.
For larger files you can shrink them before detach the database so will save time during the copy process. For data files use shrink with truncate only option so will only release all free space at the end of the file to the operating system but does not perform any page movement inside the file. It will be faster and will not cause fragmentations.
Step 1
For detach the source database you can use the detach interface provided by SSMS (right-click on the database name, chose Tasks/Detach... and then check the Drop Connections and Update Statistics options.
 The same operation can be executed by the following T-SQL commands:
USE [master]
GO
--Disconnect any connection to the database to assure nobody else is connected
-- and set it to Single User mode to require exclusive access on the database
ALTER DATABASE [EE] SET  SINGLE_USER WITH ROLLBACK IMMEDIATE
GO
USE [master]
GO
-- Perform Update Statistics and Detach the database
EXEC master.dbo.sp_detach_db @dbname = N'EE', @skipchecks = 'false'
GO
Note: "EE" is the database name used for this example. You need to replace it with your real database name.
Step 2
Now you can copy the database files (usually .mdf, .ndf, and .ldf files) that are associated with the database, from the source location path to the correct path in the destination server.
Important: Do not delete the source files after the copy since they will be used to attach back the database if a rollback will be necessary.
Step 3
Attach the database on the destination server by pointing to the files that you just copied to the destination server in the previous step.
You can attach the database by using the interface provided by SSMS (right-click on the Databases folder and chose Attach...) and locate the .MDF file by clicking the "Add..." button.
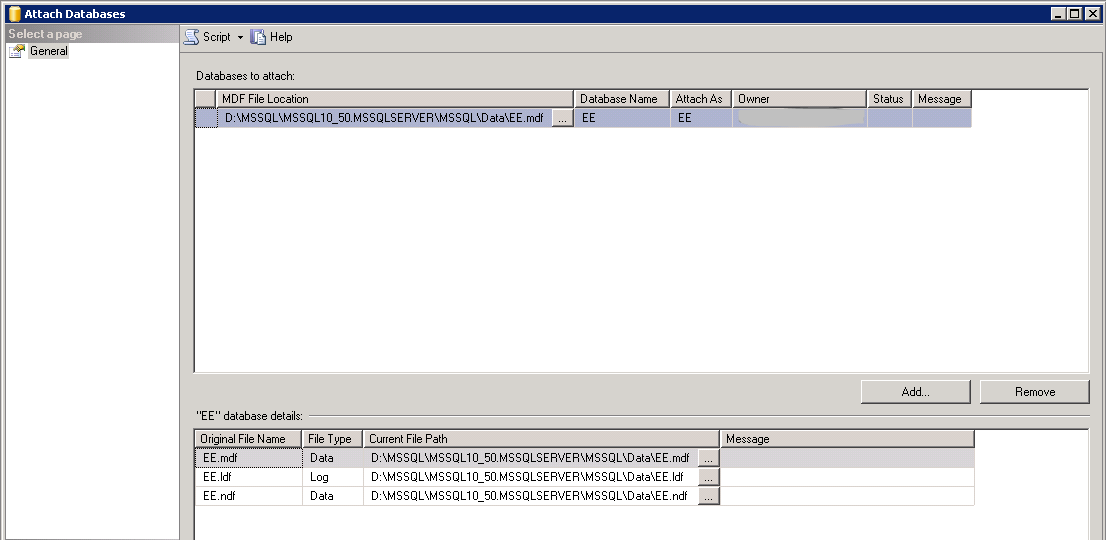
All the information presented in this screen is the information from the source database, like the Database Name, Owner and the file names and locations.
If there is already a database with the same name then you will need to provide a new name by clicking in "Attach As" column, and for change the file locations click in the "..." button in front of the desired file in the "Current File Path" column and locate the correct file or files (they should be in the path where you copied them on the previous step).
If there is already a database with the same name then you will need to provide a new name by clicking in "Attach As" column, and for change the file locations click in the "..." button in front of the desired file in the "Current File Path" column and locate the correct file or files (they should be in the path where you copied them on the previous step).
The same operation can be done with the following T-SQL command:
USE [master]
GO
CREATE DATABASE [EE] ON
( FILENAME = N'D:\MSSQL\MSSQL10_50.MSSQLSERVER\MSSQL\Data\EE.mdf' ),
( FILENAME = N'D:\MSSQL\MSSQL10_50.MSSQLSERVER\MSSQL\Data\EE.ldf' ),
( FILENAME = N'D:\MSSQL\MSSQL10_50.MSSQLSERVER\MSSQL\Data\EE.ndf' )
 FOR ATTACH
GO
Step 4 - Only for Upgrades
In the case of a migration being part of an upgrade then there is an extra step that is to change the compatibility level of the migrated database so his behaviour will be compatible with the current version of SQL Server.
In the case of a migration being part of an upgrade then there is an extra step that is to change the compatibility level of the migrated database so his behaviour will be compatible with the current version of SQL Server.
After that you should rebuild all indexes but if time is an issue then alternatively run DBBC UPDATEUSAGE on the database to correct any incorrect row or page counts and update the statistics for all the tables in the database with the UPDATE STATISTICS command.
Step 5
After database migration you will need to transfer the logins and passwords from the old instance to the new one and map those logins to the database users. Microsoft has a good and complete article about that so I just leave here the link to the article.
After all these done is highly recommend that you perform a full backup of the migrated database.
Have a question about something in this article? You can receive help directly from the article author. Sign up for a free trial to get started.
Comments (1)
Commented: