Migration from pop3 to Exchange

Published:
Browse All Articles > Migration from pop3 to Exchange
Microsoft has released various new features which are capable of handling various tasks. One of these tasks is ‘Migration from pop3 to Exchange Server’. Pop3 data stores various data along mailboxes like contacts, tasks, etc. So, it becomes the need of the users to migrate pop emails to Exchange.
Why Migration
1. Creating a Mailbox in the Exchange Database,
2. Import your .PST file in that folder using a mailbox import command in Exchange,
3. Configure it with Outlook.
In this blog we are going through the entire migration process. First of all, we’ll start with creating a new folder in Exchange database.
1. Creating Mailbox in Exchange Database
As we know that the .pst files are used for pop3 account or can say pop3 uses .pst file extension. This .pst (personal storage table) files stores all your messages & other items & is being kept on computer only. So when you want to migrate pop3 to exchange, you need to import this .PST file to Exchange. But, this is not possible directly; for this you have to create a Mailbox in Exchange Database. Thereafter, you can easily transport .pst file to Exchange.
2. Importing .PST file to Exchange
At the very first step to import .pst file, you need to find the locations where your .PST files are kept for simplicity. Mainly, the locations of pst files is: In Personal Storage Table on your Hard drive.
But if your PST files are saved elsewhere, you can also locate them by using the quick search on your computer. Let’s come to the Importing procedure. Here in this example, we have imported pst files in Exchange 2013.
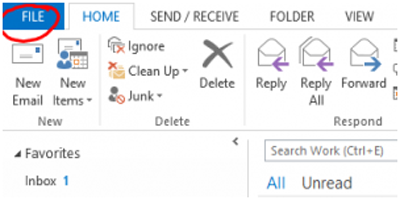
Step 1: Open Outlook 2013, click on the File tab.
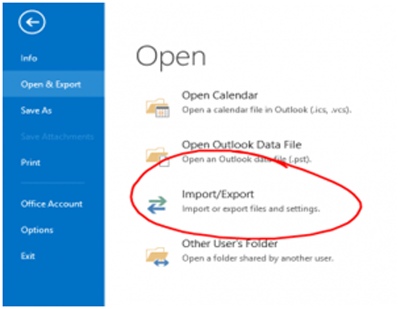
![1.png]() Step 2: Select Open & Export & click on Import/Export wizard.
Step 2: Select Open & Export & click on Import/Export wizard.
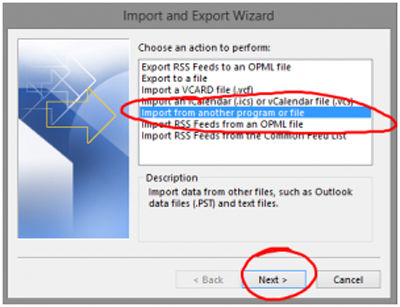
![2.png]() Step 3: Then select ‘Import from another program or file’ & click Next.
Step 3: Then select ‘Import from another program or file’ & click Next.
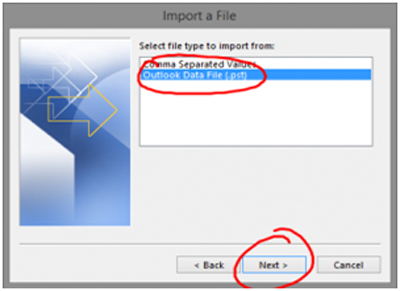
![3.png]() Step 4: Select Outlook Data File (.pst) and Next.
Step 4: Select Outlook Data File (.pst) and Next.
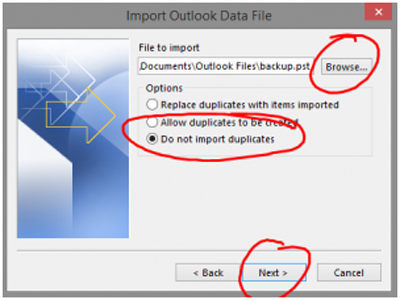
![4.png]() Step 5: Browse the file you want to locate & Select ‘Do not import duplicates’ and Next.
Step 5: Browse the file you want to locate & Select ‘Do not import duplicates’ and Next.
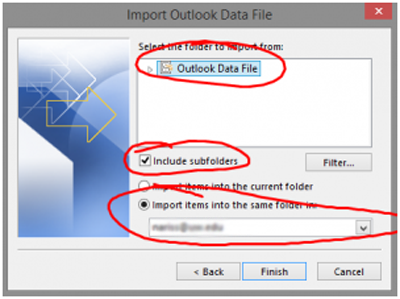
![5.png]() Step 6: Then, select on Outlook Data File (as shown below) & don’t forget to tick Include Subfolders. There is one more options there, whether to ‘Import items into the current folders, or to ‘Import items into the same folder’. So click on ‘Import items into the same folder’ & Click Finish.
Step 6: Then, select on Outlook Data File (as shown below) & don’t forget to tick Include Subfolders. There is one more options there, whether to ‘Import items into the current folders, or to ‘Import items into the same folder’. So click on ‘Import items into the same folder’ & Click Finish.
![6.png]() So, following these steps you will easily import pst file to Exchange. But if you have multiple .pst files, repeat these steps until all your pst file is imported.
So, following these steps you will easily import pst file to Exchange. But if you have multiple .pst files, repeat these steps until all your pst file is imported.
3. Configuring it with Outlook
Then, it's time for configuring the imported .PST files in the Outlook. One feature i.e., Outlook Anywhere mode for Exchange enables outlook clients to connect to Exchange Server.
Step 1: Go to Outlook 2013, click File.
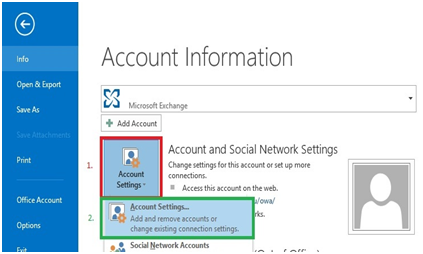
![7.png]() Step 2: Under Info, go to the Account Settings & click it.
Step 2: Under Info, go to the Account Settings & click it.
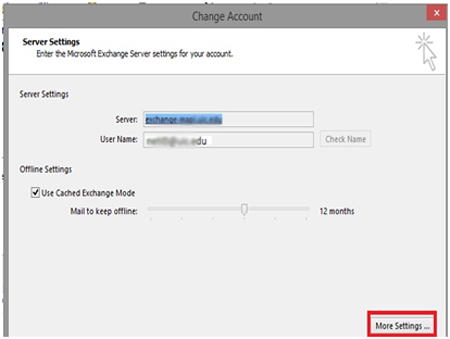
![8.png]() Step 3: Then, go to more settings option.
Step 3: Then, go to more settings option.
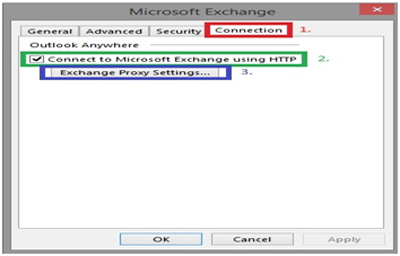
![9.png]() Step 4: Here, go to connection tab & tick the box ‘connect to Exchange using HTTP’ & then again click ‘Exchange Proxy Settings’.
Step 4: Here, go to connection tab & tick the box ‘connect to Exchange using HTTP’ & then again click ‘Exchange Proxy Settings’.
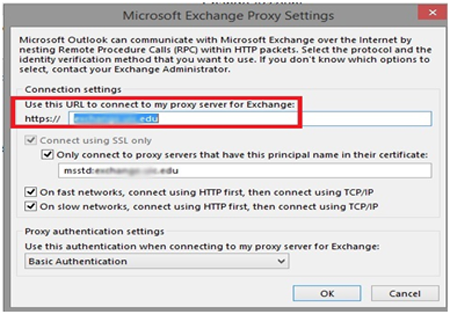
![10.png]() Step 5: In this window, give the URL to connect to your proxy server for Exchange & also make sure that checkbox of ‘Connect using SSL only’ is checked properly then write msstd:exchange.xyz.org in the field as shown below.
Step 5: In this window, give the URL to connect to your proxy server for Exchange & also make sure that checkbox of ‘Connect using SSL only’ is checked properly then write msstd:exchange.xyz.org in the field as shown below.
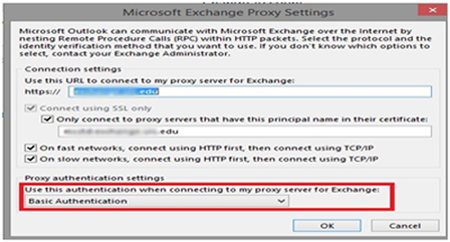
![11.png]() Step 6: Also, check boxes for ‘On fast networks.’ & ‘On slow networks’ should be marked. At the end, verify that Proxy authentication settings is set to ‘Basic Authentication’. Click Ok.
Step 6: Also, check boxes for ‘On fast networks.’ & ‘On slow networks’ should be marked. At the end, verify that Proxy authentication settings is set to ‘Basic Authentication’. Click Ok.
![12.png]() As you click on OK, configuration will be done. After that you can access all your mails in Outlook.
As you click on OK, configuration will be done. After that you can access all your mails in Outlook.
Conclusion:
In this blog segment, we had an overview on Migration from POP3 to Exchange. The process to convert POP mail to Exchange is simple & has been explained in this featured article. The need for migration exists because of some database errors & this can be easily done with the help of the steps being mentioned above in this segment.
If you think this article is helpful, please let me know & click the blue & white button: Good Article? This will help me in finding out your valuable response towards the article & will motivate me in writng my future articles. Thanks & Regards!
Why Migration
- Due to some database errors, troubleshooting problem occurs with existing mailboxes.
- Also, managing database becomes so hard.
1. Creating a Mailbox in the Exchange Database,
2. Import your .PST file in that folder using a mailbox import command in Exchange,
3. Configure it with Outlook.
In this blog we are going through the entire migration process. First of all, we’ll start with creating a new folder in Exchange database.
1. Creating Mailbox in Exchange Database
As we know that the .pst files are used for pop3 account or can say pop3 uses .pst file extension. This .pst (personal storage table) files stores all your messages & other items & is being kept on computer only. So when you want to migrate pop3 to exchange, you need to import this .PST file to Exchange. But, this is not possible directly; for this you have to create a Mailbox in Exchange Database. Thereafter, you can easily transport .pst file to Exchange.
2. Importing .PST file to Exchange
At the very first step to import .pst file, you need to find the locations where your .PST files are kept for simplicity. Mainly, the locations of pst files is: In Personal Storage Table on your Hard drive.
But if your PST files are saved elsewhere, you can also locate them by using the quick search on your computer. Let’s come to the Importing procedure. Here in this example, we have imported pst files in Exchange 2013.
Step 1: Open Outlook 2013, click on the File tab.
 Step 2: Select Open & Export & click on Import/Export wizard.
 Step 3: Then select ‘Import from another program or file’ & click Next.
 Step 4: Select Outlook Data File (.pst) and Next.
 Step 5: Browse the file you want to locate & Select ‘Do not import duplicates’ and Next.
 Step 6: Then, select on Outlook Data File (as shown below) & don’t forget to tick Include Subfolders. There is one more options there, whether to ‘Import items into the current folders, or to ‘Import items into the same folder’. So click on ‘Import items into the same folder’ & Click Finish.
 So, following these steps you will easily import pst file to Exchange. But if you have multiple .pst files, repeat these steps until all your pst file is imported.
3. Configuring it with Outlook
Then, it's time for configuring the imported .PST files in the Outlook. One feature i.e., Outlook Anywhere mode for Exchange enables outlook clients to connect to Exchange Server.
Step 1: Go to Outlook 2013, click File.
 Step 2: Under Info, go to the Account Settings & click it.
 Step 3: Then, go to more settings option.
 Step 4: Here, go to connection tab & tick the box ‘connect to Exchange using HTTP’ & then again click ‘Exchange Proxy Settings’.
 Step 5: In this window, give the URL to connect to your proxy server for Exchange & also make sure that checkbox of ‘Connect using SSL only’ is checked properly then write msstd:exchange.xyz.org in the field as shown below.
 Step 6: Also, check boxes for ‘On fast networks.’ & ‘On slow networks’ should be marked. At the end, verify that Proxy authentication settings is set to ‘Basic Authentication’. Click Ok.
 As you click on OK, configuration will be done. After that you can access all your mails in Outlook.
Conclusion:
In this blog segment, we had an overview on Migration from POP3 to Exchange. The process to convert POP mail to Exchange is simple & has been explained in this featured article. The need for migration exists because of some database errors & this can be easily done with the help of the steps being mentioned above in this segment.
If you think this article is helpful, please let me know & click the blue & white button: Good Article? This will help me in finding out your valuable response towards the article & will motivate me in writng my future articles. Thanks & Regards!
Have a question about something in this article? You can receive help directly from the article author. Sign up for a free trial to get started.
Comments (0)