Assign File & Folder permissions (via Group Policy)


13+ Year IT and Army Veteran. Quick witted and knowledgeable professional who is always willing and ready to share information.
Published:
Browse All Articles > Assign File & Folder permissions (via Group Policy)
Oftentimes, we have certain folders that we don't want our users getting into. Instead of a going through the hassle of changing permissions on a bunch of folders, let's have Group Policy handle it for us.
Today, we are going to learn how to assign file and folder permissions across a domain. Not only can you grant (or deny) users and groups access to specific folders, you can also configure audit settings as well as file or folder ownership through this process. This process can be extremely helpful and help save time if you have to assign permissions to a large number of systems with a common setup.
Please keep in mind that this process is only available to a domain with a server running the Group Policy Management feature... standalone systems and workgroups still need to manually assign these permissions!
Let's get started!
1) Open up Server Manager.
2) In the left pane, expand Features, then expand Group Policy Management, and continue to drill down until you get to your target domain.
3) Under that domain, right click Group Policy Objects.
4) Name your new Group Policy Object (GPO) "User Folder Permissions", leave Source Starter GPO as (none).
![24499.png]() Step 4 - Creating a new GPO
5) Right click on the newly created "User Folder Permissions" GPO, and select Edit GPO.
Step 4 - Creating a new GPO
5) Right click on the newly created "User Folder Permissions" GPO, and select Edit GPO.
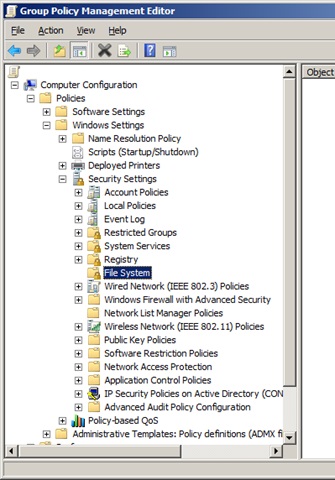
6) Navigate to Computer Configuration > Policies > Windows Settings > Security Settings > File System.
![File-System.jpg]() Step 6 - Navigate to File System
7) Right click in the left pane and select Add File...
Step 6 - Navigate to File System
7) Right click in the left pane and select Add File...
8) Expand to the directory or file that you wish to assign permissions to, and left click to select it. Click OK.
9) The Database Security window will appear. Click on the Advanced button.
10) You will now be on the Advanced Security Settings window. At the top, you will see three tabs: Permissions, Auditing, and Owner. For now, let's stay on the Permissions tab.
![Advanced-Security-Settings.jpg]() Step 10 - The Advanced Security Settings Window
11) On the aptly named Permissions tab, you can assign user permissions, but in a more in-depth way than the regular Security tab. Either select a user and click Edit... or click Add... to add a new user to the permissions.
Step 10 - The Advanced Security Settings Window
11) On the aptly named Permissions tab, you can assign user permissions, but in a more in-depth way than the regular Security tab. Either select a user and click Edit... or click Add... to add a new user to the permissions.
12) We can see that there is a slew of permissions you can give your users, but you can also choose where you want those permissions to go. There are options for combinations of the target folder (This folder), the subfolders, and the files. Use the dropdown menu to mix and match. Assign permissions as needed, then click OK.
13) Next, we'll move on to the Auditing tab. Settings under this tab will allow us to log audits for events tied to permissions, like if a user attempts to access or delete a file and fails. Assigning audit entries is the same as assigning permissions, except you are instead stating what you want type of events you want audited. Assign auditing as needed, then click OK.
14) Finally we will move to the Owner tab. Here, you can assign who the owner of the file(s)/folder(s) is. The own of a file of folder has the ability to control how permissions are set on the object, and to whom the permissions are granted. I would suggest the system administrator in the case for system files, and whomever the user is for user folders. Once you're done assigning an owner, click OK.
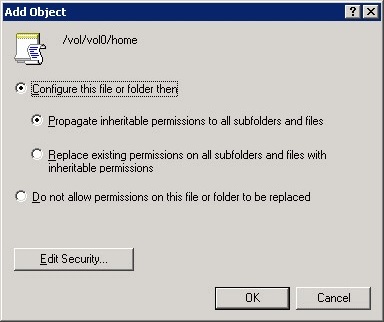
15) Click OK to close the Database Security window. You will now be greeted with the Add Object window.
![Add-Object.jpg]() Step 15 - The Add Object window
16) There are three options here:
Step 15 - The Add Object window
16) There are three options here:
17) Close out the Group Policy Management Editor window.
18) Head back to the Server Manager window, right click on the domain you want to apply this GPO to, and select Link an Existing GPO...
19) Select your new User Folder Permissions GPO, then click OK.
20) In the right pane, select the Linked Group Policy Objects tab, right click on User Folder Permissions, and select Enforced.
That's it! You can speed the Group Policy process along by executing a GPUPDATE /FORCE on the command line, but the default settings have client systems update every 90-120 minutes.
Please keep in mind that this process is only available to a domain with a server running the Group Policy Management feature... standalone systems and workgroups still need to manually assign these permissions!
Let's get started!
1) Open up Server Manager.
2) In the left pane, expand Features, then expand Group Policy Management, and continue to drill down until you get to your target domain.
3) Under that domain, right click Group Policy Objects.
4) Name your new Group Policy Object (GPO) "User Folder Permissions", leave Source Starter GPO as (none).
 Step 4 - Creating a new GPO
6) Navigate to Computer Configuration > Policies > Windows Settings > Security Settings > File System.
 Step 6 - Navigate to File System
8) Expand to the directory or file that you wish to assign permissions to, and left click to select it. Click OK.
9) The Database Security window will appear. Click on the Advanced button.
10) You will now be on the Advanced Security Settings window. At the top, you will see three tabs: Permissions, Auditing, and Owner. For now, let's stay on the Permissions tab.
 Step 10 - The Advanced Security Settings Window
12) We can see that there is a slew of permissions you can give your users, but you can also choose where you want those permissions to go. There are options for combinations of the target folder (This folder), the subfolders, and the files. Use the dropdown menu to mix and match. Assign permissions as needed, then click OK.
13) Next, we'll move on to the Auditing tab. Settings under this tab will allow us to log audits for events tied to permissions, like if a user attempts to access or delete a file and fails. Assigning audit entries is the same as assigning permissions, except you are instead stating what you want type of events you want audited. Assign auditing as needed, then click OK.
14) Finally we will move to the Owner tab. Here, you can assign who the owner of the file(s)/folder(s) is. The own of a file of folder has the ability to control how permissions are set on the object, and to whom the permissions are granted. I would suggest the system administrator in the case for system files, and whomever the user is for user folders. Once you're done assigning an owner, click OK.
15) Click OK to close the Database Security window. You will now be greeted with the Add Object window.
 Step 15 - The Add Object window
- Configure this file or folder then - Propagate inheritable permissions to all subfolders and files. Basically, all the subfolders and files will inherit permissions from the parent folder. If there is a mismatch or conflict, explicit permissions that were assigned to the subfolders or files with take effect instead of the inherited permissions.
- Configure this file or folder then - Replace existing permissions on all subfolders and files with inheritable permissions. With this, you're overwriting the settings on all subfolders and files with the ones on the parent, so they will have identical permissions to the parent folder.
- Do not allow permissions on this file or folder to be replaced. This setting is more for subfolders and files that you DON'T want to inherit permissions. For this to be effective, you would need to make an additional entry for those subfolders and files you don't want to inherit permissions (Like you want to lock down the Windows folder, but you don't want the Web\Wallpaper folder to get locked down, you would create an entry for the Web\Wallpaper folder, then select this.)
17) Close out the Group Policy Management Editor window.
18) Head back to the Server Manager window, right click on the domain you want to apply this GPO to, and select Link an Existing GPO...
19) Select your new User Folder Permissions GPO, then click OK.
20) In the right pane, select the Linked Group Policy Objects tab, right click on User Folder Permissions, and select Enforced.
That's it! You can speed the Group Policy process along by executing a GPUPDATE /FORCE on the command line, but the default settings have client systems update every 90-120 minutes.
13+ Year IT and Army Veteran. Quick witted and knowledgeable professional who is always willing and ready to share information.
Have a question about something in this article? You can receive help directly from the article author. Sign up for a free trial to get started.
Comments (2)
Commented:
Commented:
I use a a variable like "%AppData%\ProgramYYZ"?
I tried this, since we need to add a local Admin to such a folder, but noting happens.