How to re-install Windows XP (When you are unable to repair the system)


Published:
Browse All Articles > How to re-install Windows XP (When you are unable to repair the system)
Disclosure:
Use this tutorial only when no other options helps to get Windows XP running without any problems and you don't want to format the drive. The back up of the data is the responsible of the user, however there is a description of how to do this..
This tutorial will describe what you need to do in case you need to re install Windows XP on your computer. This is a most common procedure when Windows XP is not booting correctly or the Windows Registry is damaged and it is not able to repair it.
Preparation:
Before you start to re install Windows, make sure that you have a back up of the data that you need.
If you don't have a back up from your data on another drive that don't contain Windows (preferably an external drive). Then you can try the following program Redo Backup to make a back up of your files. You may need to ask some one else to burn this program to a CD. Boot from the CD to back up your data.
The data that you need to back up is mostly found in the My Documents map located in the following map C;\Documents and Settings\<user name>\My Documents where the <user name> is the name of the user that you use to log in.
If you have stored important data in another location than the My Documents map, make a copy of these data also.
Once you have a back up of your data you the following items for re-install Windows XP:
Most of the times you will still have the data after re-installing Windows XP, but in case the data is lossed use the back up to restore the data.
If you need to install drivers for your raid controller or other I/O controllers make sure that you have them on a floppy, a CD or some other media. Most manufactures of Raid, SCSI and SATA controllers supply the drives together with the I/O card.
You also need the drivers of your motherboard and the graphic card.
To setup the PC for booting from CD, you can follow the instructions in the section 'How to change the start sequence in the bios' at the bottom of this article.
Let's start:
Put the Windows XP CD in the CD / DVD player and boot from the CD.
If you need to Install drivers for RAID, SCSI or SATA controller cards need to press F6, when it's displayed on the screen.
It can take some time bfore the menu appears where you can select the drivers .
You can find the instructions for installing the drivers using the F6 option here
If you don't need to install RAID, SCSI or SATA drivers do nothing.
The setup will now continue to loading the needed files for starting the Setup Wizard
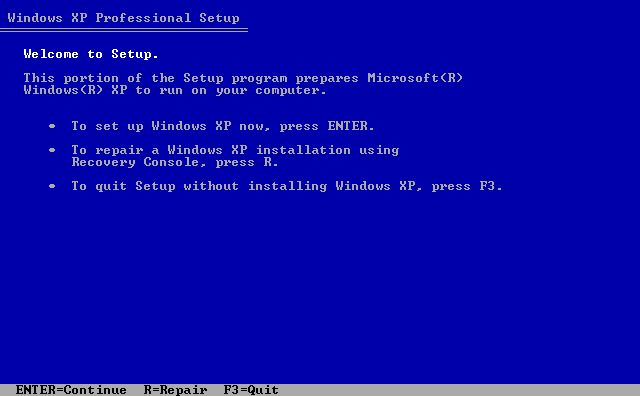
When the set-up wizard let you choose between installing XP, Recovering Mode and Exit, press Enter to set up Windows XP. See the image named start from the Windows XP Setup
After reading the Windows XP License press F8 to continue.
The wizard will detect that a previous version of windows if it Windows XP version on the CD matches with the one that is already installed on your PC.
Choose option R "To repair the selected Windows XP installation". See the image named Windows Previous Installation.
You may can get a warning from the set up wizard that a previous windows folder already exists. Press L to remove the folder and deleting the existing version.
Proceed the rest of the installation as normal.
Final:
When windows XP is started, you need to install the drivers for the motherboard, graphic cards and other devices again. This because the Windows Registry is complete build up again from the start.
After installing the drivers you need to update Internet Explorer to version7. Below are instructions of how to do this.
Reinstall Internet Explorer 7
When Windows XP is repaired and is running correctly, reinstall Internet Explorer 7. To do this, you will need the Internet Explorer 7 installation package. This package is available through Windows Update. Also, the package may still be on the computer from the first time that you installed Internet Explorer 7. Locate the installation package in the folder in which you saved the files, and reinstall the program.
Note This package may be located in the Temporary Internet Files folder. If you cannot locate the Internet Explorer 7 installation package, visit the following Microsoft Web site to obtain this package:
http://www.microsoft.com/windows/ie/downloads/default.mspx
To connect to the Microsoft download site, you must have a functional Web browser. If Internet Explorer 6 does not work on the computer after you uninstall Internet Explorer 7, you cannot download the Internet Explorer 7 installation package. In this situation, you can use a computer that has a functional Web browser to download the Internet Explorer 7 installation package. Then, use a shared network drive to install the program onto the repaired computer. If you cannot use a shared network for this purpose, copy the Internet Explorer 7 installation package onto a CD, and install Internet Explorer 7 on the repaired computer from the CD.
Check the My Documents map to verify that you have the data. If you had used the same user name during the installation as you had before performing the re-installation the date should be in the same map. If not you need to look in the map C:\Documents and Settings using the windows explorer look for the previous user name. If you open the previous user name you see the map named My Documents. Open this map to see if the data is in it.
If the data is on that location you can copy the files from that location to your current My Documents map.
It can happen that when you don't see the data you need to use the back up files.
You also need to re-install all the other programs that you use, such as Office.
Note:
Windows will be updating itself when connected to the Internet, since all the updates that where installed are removed. So if you have an CD with SP2 on it, windows will download SP3 and install it.
How to change the start sequence in the bios:
Warning This procedure may involve changing your CMOS (Complementary Metal Oxide Semiconductor) settings and changing your Basic Input/Output System (BIOS). Incorrect changes to the BIOS of your computer can result in serious problems. Microsoft cannot guarantee that problems that result from changes to your BIOS can be solved. Change your CMOS settings at your own risk. Incorrect or corrupted CMOS and BIOS settings can cause startup problems or shutdown problems.
If you must adjust the BIOS startup sequence of your computer so that it can start from the installation CD, the sequence should be in the following order:
* CD drive
* Hard disk
* Floppy disk drive
During startup, BIOS searches for a disk that has an operating system it can load. On a computer that has an operating system installed, this is usually the hard disk. The BIOS is configured to search disks on the computer in a certain order, called the startup sequence. If the computer hard disk is configured in the BIOS as the first disk in the startup sequence, the computer starts by using the hard disk and does not search the CD drive for a startup disk.
To configure the BIOS to search the CD drive for a startup disk before it searches the hard disk, follow these steps:
1. Restart your computer.
2. When the computer first starts, it performs the power-on self test (POST). This test checks that all connected devices are functioning. As part of the POST, the memory is checked. During the memory test, a message will appear that tells you how to access the BIOS. For example, you may see the following message or a similar message that explains how to start the BIOS setup:
PRESS DEL TO ENTER SETUP
In this example, you must press the DEL key immediately after the memory test is finished to start the setup process. You may have to press the key several times to make sure that you access the BIOS setup.
Tip There are other keys that may provide access to the BIOS. They include the following:
* F1
* F2
* F10
* CTRL+ENTER
* ALT+ENTER
* CTRL+ALT+ESC
* CTRL+ALT+INSERT
If you are not sure how to access the BIOS setup, see the user manual for your computer's motherboard.
3. Look for the startup sequence settings (also known as boot sequence or boot order). You can usually use the arrow keys to move through the menus and settings.
4. When you find the startup sequence setting, you can usually press ENTER to modify it. Press the PLUS SIGN (+) or MINUS SIGN (-) key until the CD drive is selected as the startup disk.
Tip More information about how to modify the BIOS can be found in your user manual. It usually contains descriptions of the menus and instructions on how to modify the options. The BIOS itself usually contains context-sensitive Help with the individual steps.
5. As soon as you have specified the CD drive as the first location to search for a startup disk, you can usually press ESC to return to the menus. In the main menu, select the option SAVE AND EXIT SETUP or a similar option. When the confirmation SAVE TO CMOS AND EXIT or a similar option appears, select YES.
6. If you cannot select YES, type the letter y.
Note BIOS uses a QWERTY keyboard layout. If your keyboard settings follow a different layout, you will have to press the Y key as it appears on a QWERTY keyboard.
7. After you exit the BIOS setup, your computer will restart.
8. Make sure that the computer starts by using the CD drive. Insert the Windows XP installation CD and restart the computer. If this is successful, you can start reinstalling Windows XP.
If you are not comfortable trying to perform this task, you may want to ask someone whom you know for help.
Resources:
How to perform an in-place upgrade (reinstallation) of Windows XP by Microsoft: http://support.microsoft.com/kb/978788
Installing Windows XP: http://xphelpandsupport.mvps.org/installing_windows_xp.htm
Windows XP: Reinstall Preserving User Data: http://web.mit.edu/ist/products/winxp/advanced/reinstall-repair-deep.html![start from the Windows XP Setup]()
![Windows Previous Installation]()
Use this tutorial only when no other options helps to get Windows XP running without any problems and you don't want to format the drive. The back up of the data is the responsible of the user, however there is a description of how to do this..
This tutorial will describe what you need to do in case you need to re install Windows XP on your computer. This is a most common procedure when Windows XP is not booting correctly or the Windows Registry is damaged and it is not able to repair it.
Preparation:
Before you start to re install Windows, make sure that you have a back up of the data that you need.
If you don't have a back up from your data on another drive that don't contain Windows (preferably an external drive). Then you can try the following program Redo Backup to make a back up of your files. You may need to ask some one else to burn this program to a CD. Boot from the CD to back up your data.
The data that you need to back up is mostly found in the My Documents map located in the following map C;\Documents and Settings\<user name>\My Documents where the <user name> is the name of the user that you use to log in.
If you have stored important data in another location than the My Documents map, make a copy of these data also.
Once you have a back up of your data you the following items for re-install Windows XP:
An original Windows XP CD that is on the system (If you have an English version of Windows XP use an English Windows XP cd)
When using a Raid, SCSI or SATA card have the drivers for this card on a floppy
The original license key of Windows XP
The PC is setup to boot from CD
Most of the times you will still have the data after re-installing Windows XP, but in case the data is lossed use the back up to restore the data.
If you need to install drivers for your raid controller or other I/O controllers make sure that you have them on a floppy, a CD or some other media. Most manufactures of Raid, SCSI and SATA controllers supply the drives together with the I/O card.
You also need the drivers of your motherboard and the graphic card.
To setup the PC for booting from CD, you can follow the instructions in the section 'How to change the start sequence in the bios' at the bottom of this article.
Let's start:
Put the Windows XP CD in the CD / DVD player and boot from the CD.
If you need to Install drivers for RAID, SCSI or SATA controller cards need to press F6, when it's displayed on the screen.
It can take some time bfore the menu appears where you can select the drivers .
You can find the instructions for installing the drivers using the F6 option here
If you don't need to install RAID, SCSI or SATA drivers do nothing.
The setup will now continue to loading the needed files for starting the Setup Wizard
When the set-up wizard let you choose between installing XP, Recovering Mode and Exit, press Enter to set up Windows XP. See the image named start from the Windows XP Setup
After reading the Windows XP License press F8 to continue.
The wizard will detect that a previous version of windows if it Windows XP version on the CD matches with the one that is already installed on your PC.
Choose option R "To repair the selected Windows XP installation". See the image named Windows Previous Installation.
You may can get a warning from the set up wizard that a previous windows folder already exists. Press L to remove the folder and deleting the existing version.
Proceed the rest of the installation as normal.
Final:
When windows XP is started, you need to install the drivers for the motherboard, graphic cards and other devices again. This because the Windows Registry is complete build up again from the start.
After installing the drivers you need to update Internet Explorer to version7. Below are instructions of how to do this.
Reinstall Internet Explorer 7
When Windows XP is repaired and is running correctly, reinstall Internet Explorer 7. To do this, you will need the Internet Explorer 7 installation package. This package is available through Windows Update. Also, the package may still be on the computer from the first time that you installed Internet Explorer 7. Locate the installation package in the folder in which you saved the files, and reinstall the program.
Note This package may be located in the Temporary Internet Files folder. If you cannot locate the Internet Explorer 7 installation package, visit the following Microsoft Web site to obtain this package:
http://www.microsoft.com/windows/ie/downloads/default.mspx
To connect to the Microsoft download site, you must have a functional Web browser. If Internet Explorer 6 does not work on the computer after you uninstall Internet Explorer 7, you cannot download the Internet Explorer 7 installation package. In this situation, you can use a computer that has a functional Web browser to download the Internet Explorer 7 installation package. Then, use a shared network drive to install the program onto the repaired computer. If you cannot use a shared network for this purpose, copy the Internet Explorer 7 installation package onto a CD, and install Internet Explorer 7 on the repaired computer from the CD.
Check the My Documents map to verify that you have the data. If you had used the same user name during the installation as you had before performing the re-installation the date should be in the same map. If not you need to look in the map C:\Documents and Settings using the windows explorer look for the previous user name. If you open the previous user name you see the map named My Documents. Open this map to see if the data is in it.
If the data is on that location you can copy the files from that location to your current My Documents map.
It can happen that when you don't see the data you need to use the back up files.
You also need to re-install all the other programs that you use, such as Office.
Note:
Windows will be updating itself when connected to the Internet, since all the updates that where installed are removed. So if you have an CD with SP2 on it, windows will download SP3 and install it.
How to change the start sequence in the bios:
Warning This procedure may involve changing your CMOS (Complementary Metal Oxide Semiconductor) settings and changing your Basic Input/Output System (BIOS). Incorrect changes to the BIOS of your computer can result in serious problems. Microsoft cannot guarantee that problems that result from changes to your BIOS can be solved. Change your CMOS settings at your own risk. Incorrect or corrupted CMOS and BIOS settings can cause startup problems or shutdown problems.
If you must adjust the BIOS startup sequence of your computer so that it can start from the installation CD, the sequence should be in the following order:
* CD drive
* Hard disk
* Floppy disk drive
During startup, BIOS searches for a disk that has an operating system it can load. On a computer that has an operating system installed, this is usually the hard disk. The BIOS is configured to search disks on the computer in a certain order, called the startup sequence. If the computer hard disk is configured in the BIOS as the first disk in the startup sequence, the computer starts by using the hard disk and does not search the CD drive for a startup disk.
To configure the BIOS to search the CD drive for a startup disk before it searches the hard disk, follow these steps:
1. Restart your computer.
2. When the computer first starts, it performs the power-on self test (POST). This test checks that all connected devices are functioning. As part of the POST, the memory is checked. During the memory test, a message will appear that tells you how to access the BIOS. For example, you may see the following message or a similar message that explains how to start the BIOS setup:
PRESS DEL TO ENTER SETUP
In this example, you must press the DEL key immediately after the memory test is finished to start the setup process. You may have to press the key several times to make sure that you access the BIOS setup.
Tip There are other keys that may provide access to the BIOS. They include the following:
* F1
* F2
* F10
* CTRL+ENTER
* ALT+ENTER
* CTRL+ALT+ESC
* CTRL+ALT+INSERT
If you are not sure how to access the BIOS setup, see the user manual for your computer's motherboard.
3. Look for the startup sequence settings (also known as boot sequence or boot order). You can usually use the arrow keys to move through the menus and settings.
4. When you find the startup sequence setting, you can usually press ENTER to modify it. Press the PLUS SIGN (+) or MINUS SIGN (-) key until the CD drive is selected as the startup disk.
Tip More information about how to modify the BIOS can be found in your user manual. It usually contains descriptions of the menus and instructions on how to modify the options. The BIOS itself usually contains context-sensitive Help with the individual steps.
5. As soon as you have specified the CD drive as the first location to search for a startup disk, you can usually press ESC to return to the menus. In the main menu, select the option SAVE AND EXIT SETUP or a similar option. When the confirmation SAVE TO CMOS AND EXIT or a similar option appears, select YES.
6. If you cannot select YES, type the letter y.
Note BIOS uses a QWERTY keyboard layout. If your keyboard settings follow a different layout, you will have to press the Y key as it appears on a QWERTY keyboard.
7. After you exit the BIOS setup, your computer will restart.
8. Make sure that the computer starts by using the CD drive. Insert the Windows XP installation CD and restart the computer. If this is successful, you can start reinstalling Windows XP.
If you are not comfortable trying to perform this task, you may want to ask someone whom you know for help.
Resources:
How to perform an in-place upgrade (reinstallation) of Windows XP by Microsoft: http://support.microsoft.com/kb/978788
Installing Windows XP: http://xphelpandsupport.mvps.org/installing_windows_xp.htm
Windows XP: Reinstall Preserving User Data: http://web.mit.edu/ist/products/winxp/advanced/reinstall-repair-deep.html

Have a question about something in this article? You can receive help directly from the article author. Sign up for a free trial to get started.
Comments (3)
Author
Commented:Author
Commented:Commented:
Though I think it would be better to move the ['embed'] codes to the points in the process where those screens would actually appear. Just my $0.02...
I was considering doing a repair install on a machine that doesn't really need one, just to be able to take pics of those screens for an article here, until I found this with a search (I wish it was easier to browse articles here).