

Browse All Articles > What's New With Access 2010 Macros
Access 2010 provides both users and developers with an excellent means of automating the databases that they build. Microsoft has completely revamped the macro designer in Access 2010. Furthermore, they have added a plethora of new features that make macros more powerful and utilitarian. Finally, using macros, you can create a database safe for running on the Internet. You cannot accomplish this using VBA (Visual Basic for Applications) programming code. This article explores the new macro designer, and other new macro features available in Access 2010. After reading this article, you will be able to take full advantage of what Access 2010 macros have to offer.
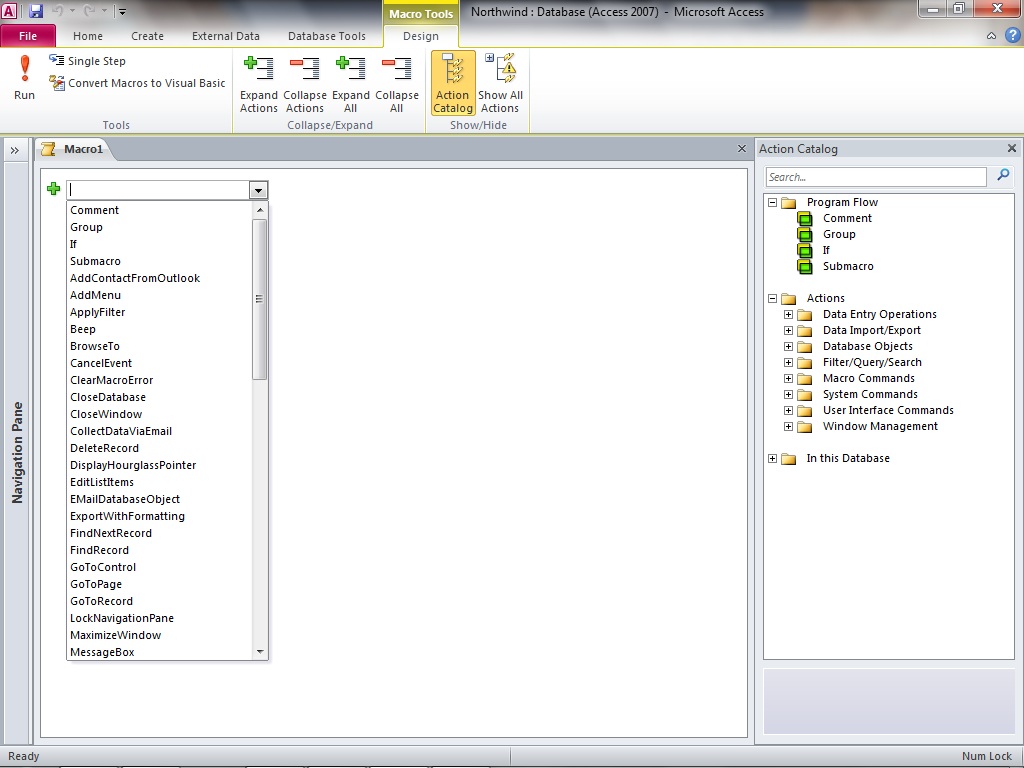
Let’s begin by exploring the Access 2010 macro designer. As you can see in Figure 1, the macro designer in Access 2010 looks significantly different than that of its predecessors. You can select an action from the Add New Action dropdown (see Figure 2), or you can drag and drop actions from the Action Catalog over to the macro designer.
![Figure 1]()
![Figure 2]()
A great tip with the macro designer allows you to quickly place an If statement around existing macro actions. Without this tip, if you need to add an If statement to a macro you must drag and drop all the actions that you want to place within the If one statement at a time into the If statement. To easily surround existing statements in a macro with an If statement, you must first select the statements that you want to place within the If. You can select multiple statements using your Shift key. Once you have selected the statements, simply right-click and select Make If Block from the context-sensitive menu. Access will insert the If statement around the selected statements. You might be surprised to learn that Access 2010 macros allow for nested If statements. This is a new feature which serves to make Access 2010 macros that much more flexible and powerful.
Another tip with the macro designer allows you to quickly and easily add comments to a macro. You simply type an apostrophe in the macro action, and then type your comment. When you move out of the action, Access will insert the comment (see Figure 3).
![Figure 3]()
It is also important that you understand how to work with SubMacros. Submacros are like subroutines in a programming module; they allow you to place more than one routine in a macro. This means you can create many macro routines without having to create several separate macros. You should include submacros that perform related functions within one particular macro. For example, you might build a macro that contains all the routines required for form handling and another that has all the routines needed for report handling.
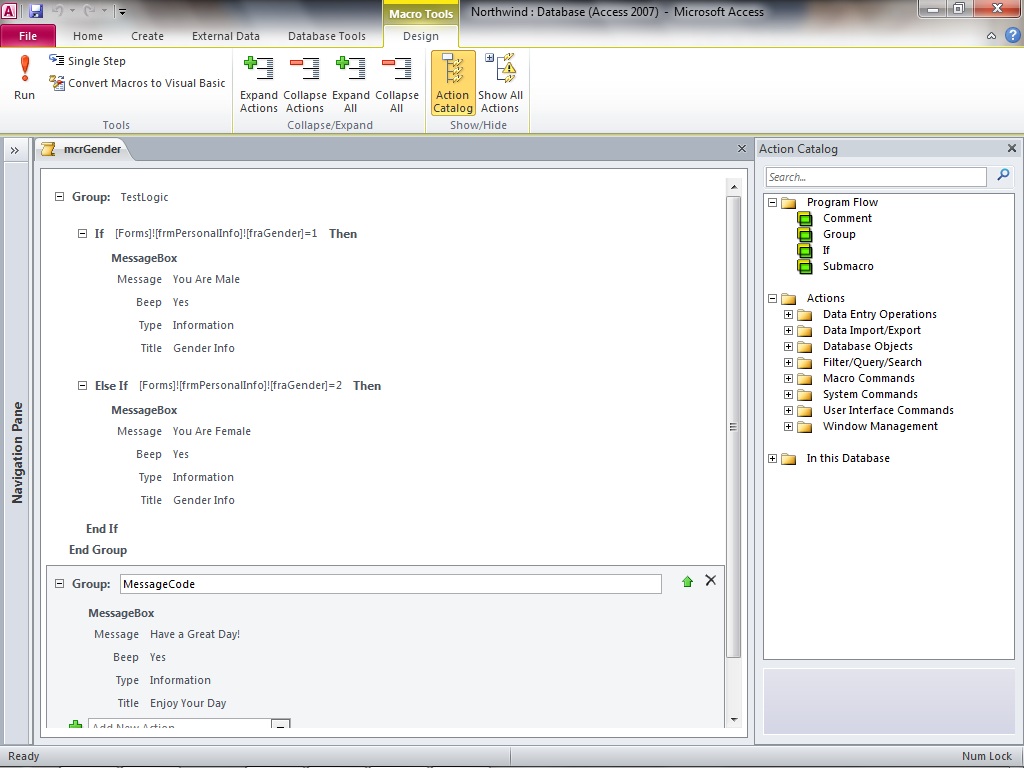
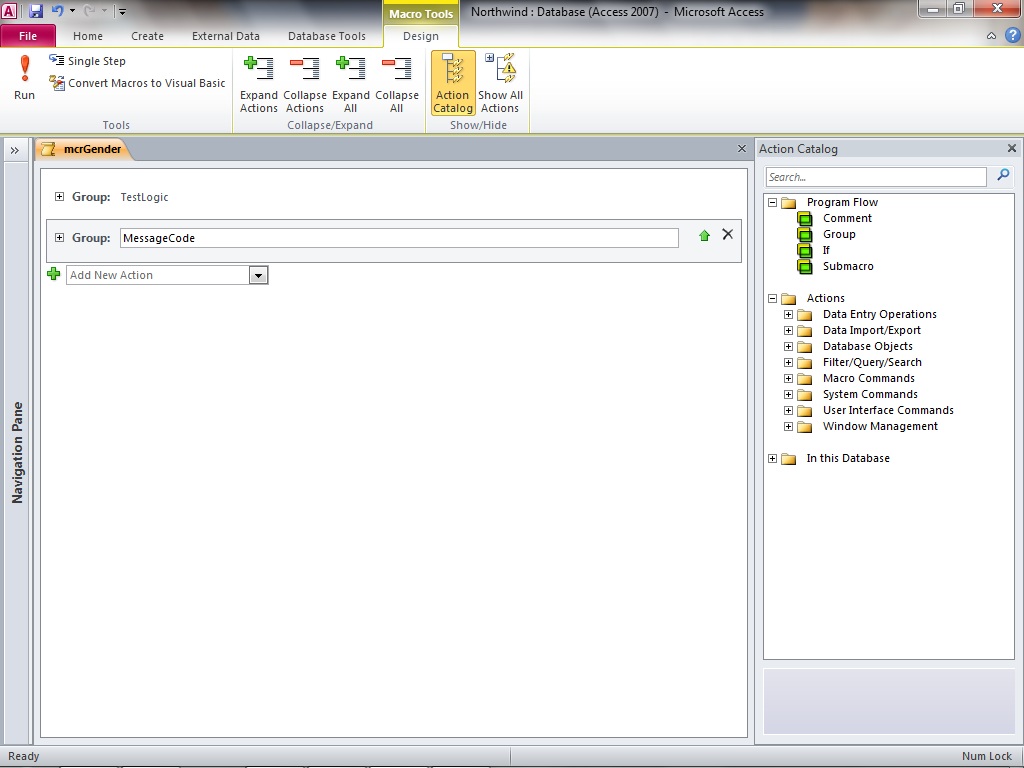
A feature you might notice when exploring macros are Macro Groups. Using Macro Groups you can logically place the actions in the macro into groups so that when you collapse and expand a group, all of the actions within that group disappear and then appear. Figure 4 shows a macro with the Macro Groups expanded and Figure 5 shows the same macro with the groups collapsed.
![Figure 4]()
![Figure 5]()
Yet another important feature of Access 2010 macros is the Show All Actions button. If you deselect that button (it is a toggle), Access shows only those macro actions available in trusted databases. If you plan to explore the new Web databases, you will want to deselect this button. If you select the button, both trusted and untrusted actions appear. If you are certain that you don’t need to take your database to the Web, and you don’t mind operating in an untrusted environment, this option is for you.
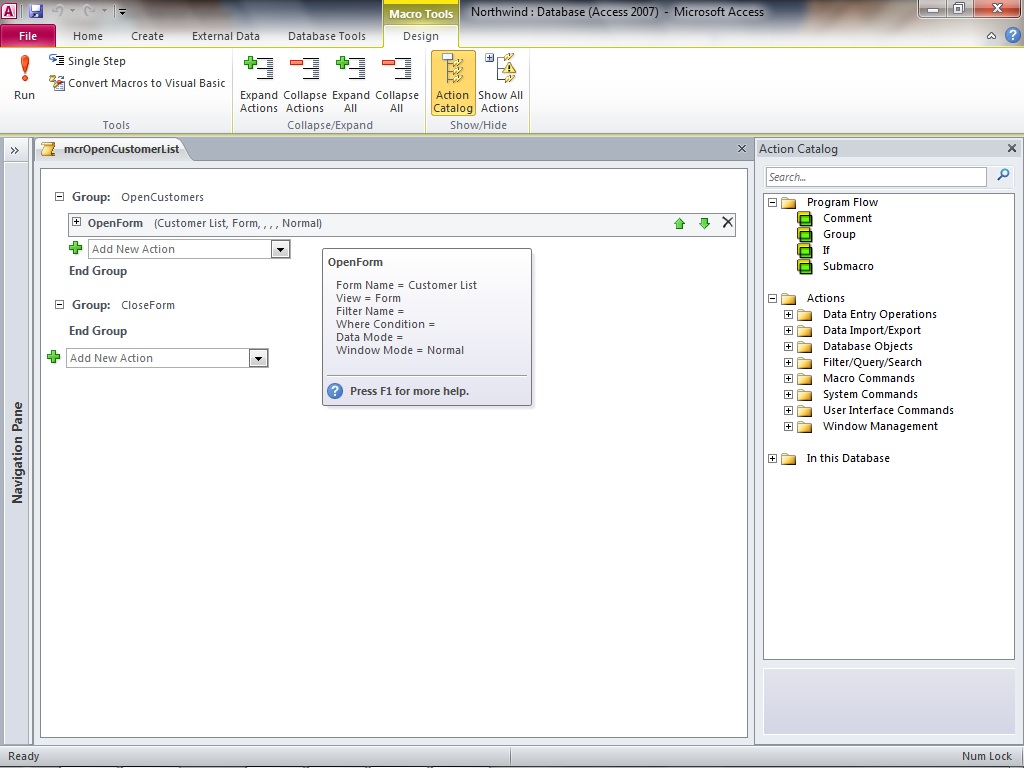
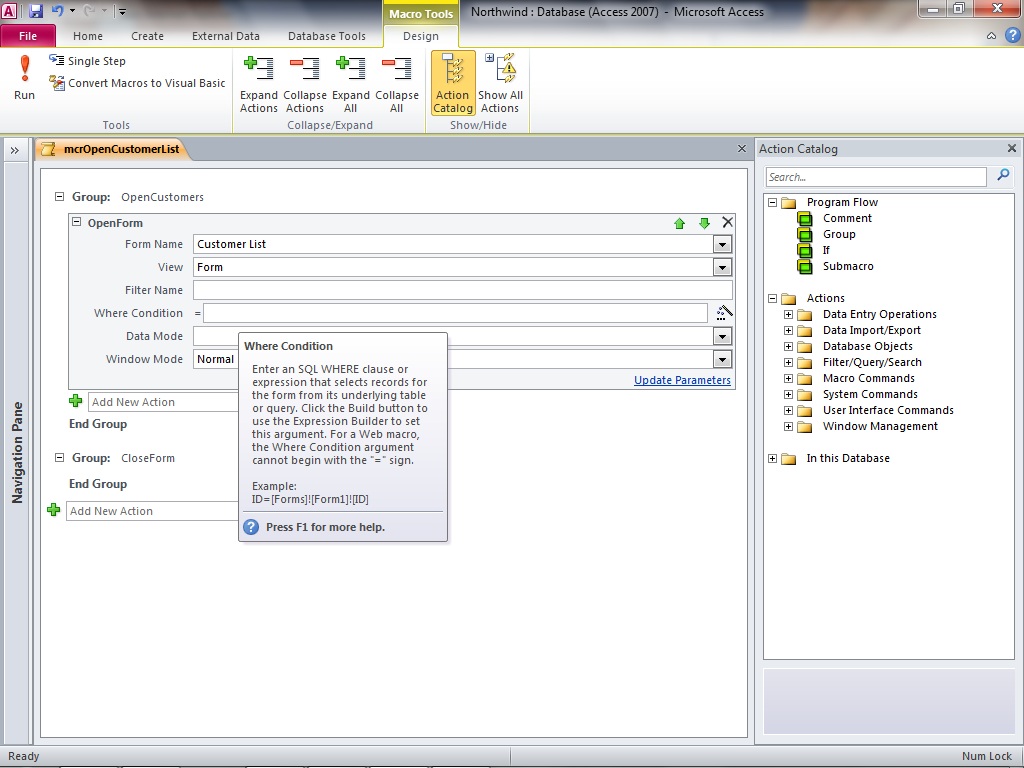
Access 2010 provides a lot of assistance when you are creating a macro. The two features that provide you with the most help are tooltips for collapsed actions and argument quick tips. Take a look at Figure 6. Notice that when you hover your mouse pointer over a collapsed action such as an OpenForm action, a tip appears showing you all of the arguments and their values. Figure 7 shows that when you hover your mouse pointer over an argument, a tip appears defining that argument.
![Figure 6]()
![Figure 7]()
Now that you’ve learned how to use the macro designer, it’s time to learn about some of the new features of macros. Probably the most exciting feature is the ability to add data macros to your tables. A data macro is a macro that executes in response to data changing within a table. Data macros are like triggers in SQL Server. The following are the events that you can respond to:
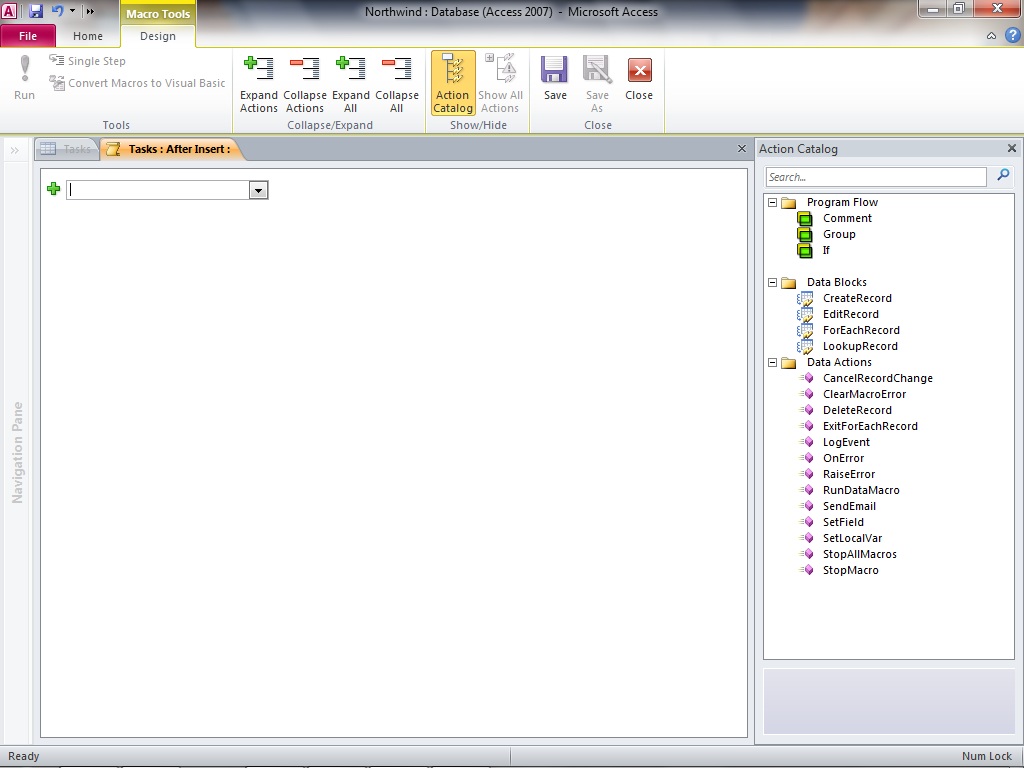
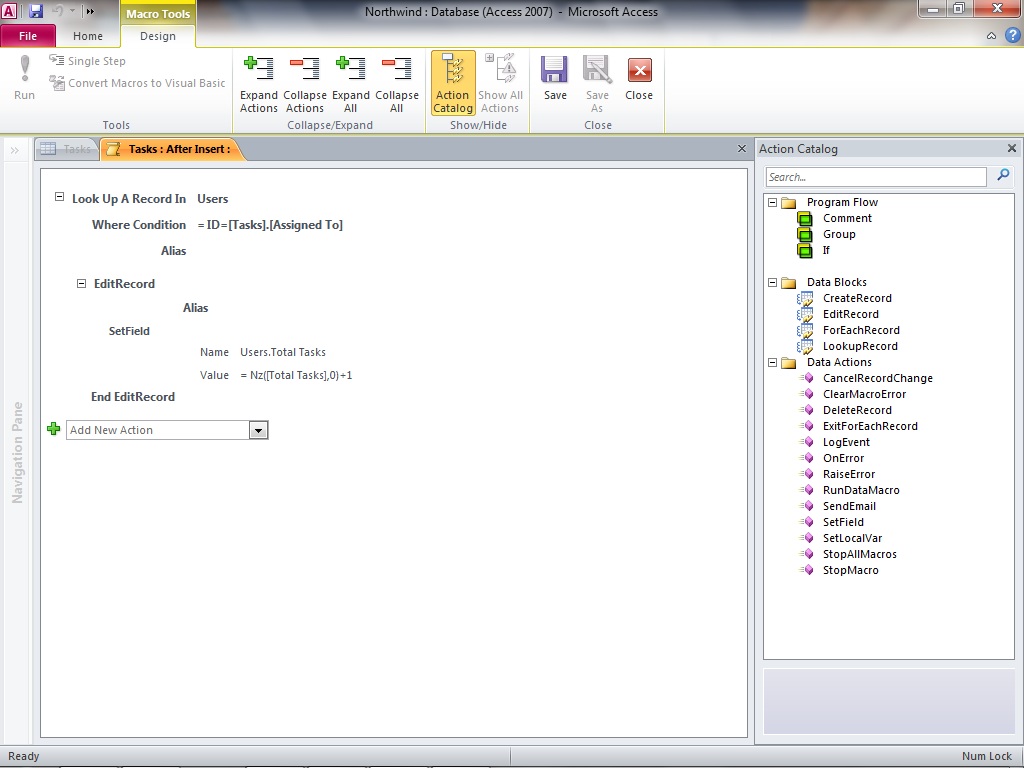
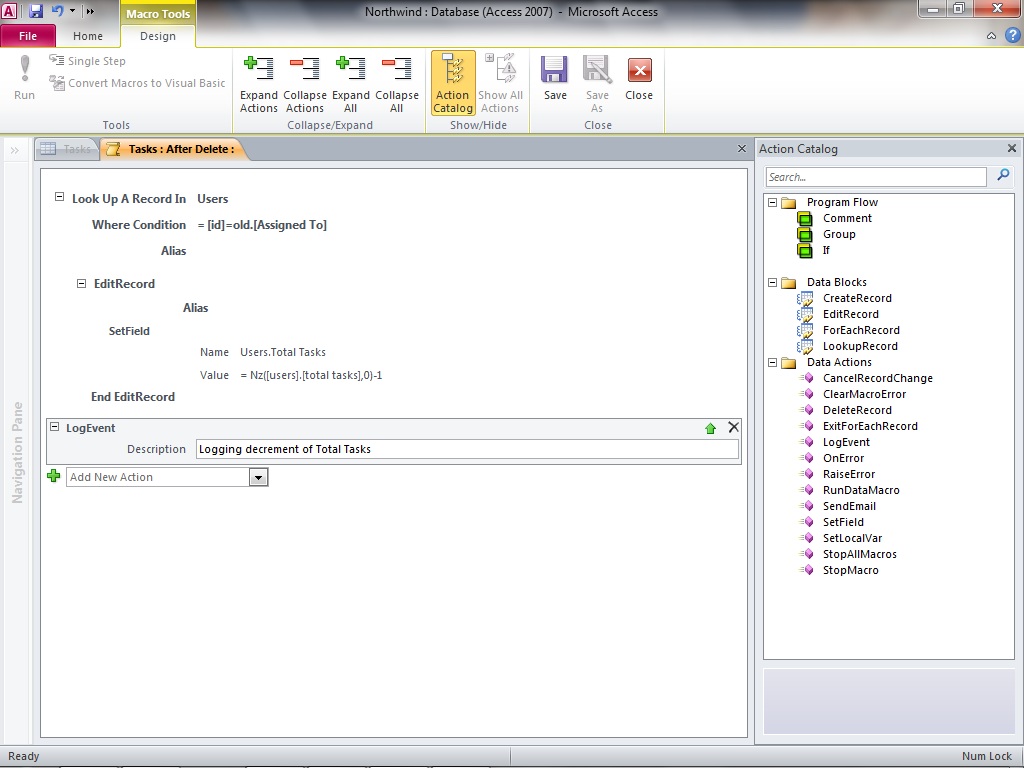
To create a data macro, you must first open the table to which you want to add the data macro. Then select the Table tab. Your screen should look similar to Figure 8. Here you can select the type of data macro you want to create. If you select After Insert, your screen appears as in Figure 9. Here you write the data macro that you want to execute after the user inserts a row into your table. Figure 10 provides an example of an After Insert macro. The macro finds a record in the Users table with a user id that matches the user id of the inserted row. It then edits the record, incrementing the Total Tasks column by one. The After Delete macro looks the same as the After Insert macro, except that it decrements rather than increments the Total Tasks value.
![Figure 8]()
![Figure 9]()
![Figure 10]()
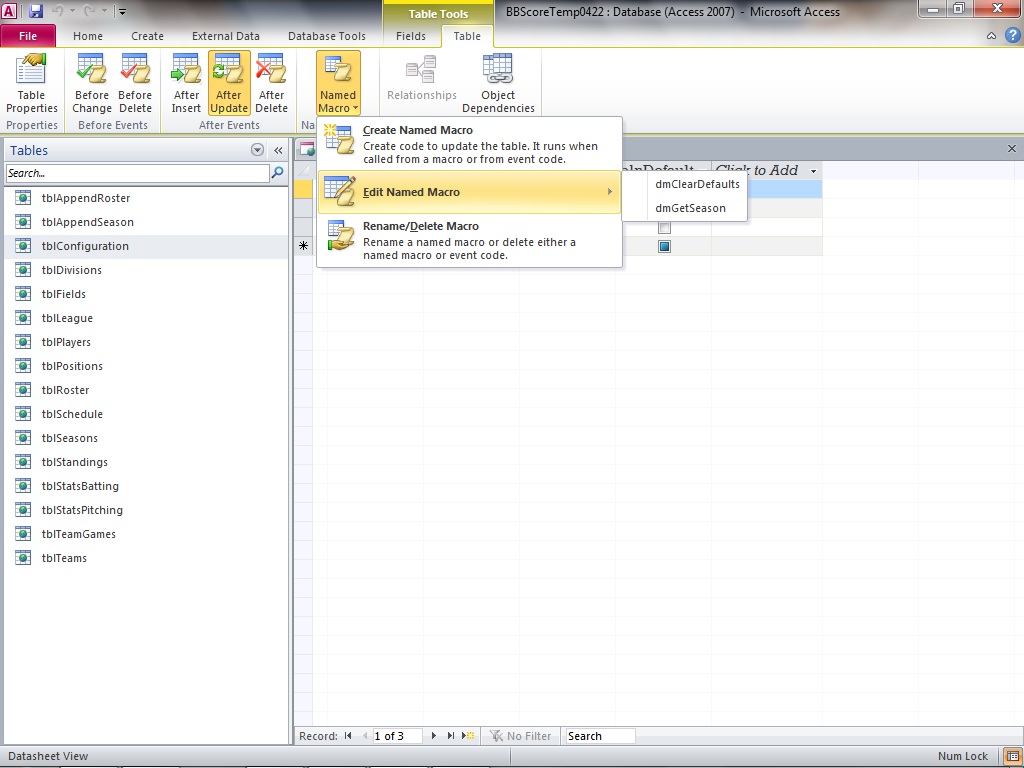
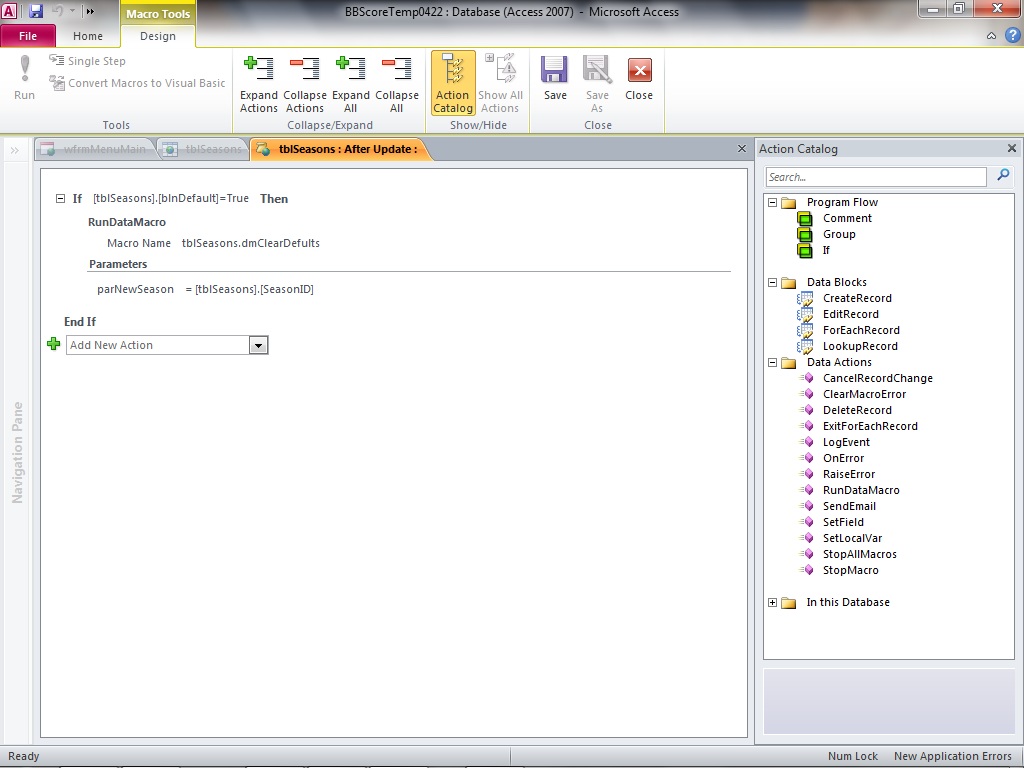
In addition to writing data macros that are triggered by an event, you can create named data macros. You can call these macros from anywhere in the application, and you can even pass parameters to the named data macros that you build. You create and edit named data macros while viewing the Table tab with the desired table open. You simply click to open the Named Macro dropdown. Notice in Figure 11 that you can create a named macro, edit an existing named macro, rename a data macro, or delete a data macro. A data macro is similar to a standard macro except that it can receive parameters and it is associated with a specific table (see Figure 12). Notice in Figure 12 that the data macro is associated with tblSeasons and that it receives a parameter called parNewSeason. You might wonder how you call the named data macro. Figure 13 provides an example. Notice that it uses the RunDataMacro action to run the named macro, passing it the contents of the SeasonID field.
![Figure 11]()
![Figure 12]()
![Figure 13]()
Microsoft introduced embedded macros with Access 2007. Rather than standalone macros, which appear in the Navigation Pane, embedded macros are associated with an event that happens to an object. For example, you can create an embedded macro that executes when a form loads, when a user clicks a command button, or when text in a textbox changes. An embedded macro looks like Figure 14. Notice that it looks like a standalone macro except that the title bar indicates the object and event that it is associated with (in this case the On Click event of the cmdSayHello command button on frmCustomers).
![Figure 14]()
There is a new macro action introduced with Access 2010 that you should be aware of. It is the BrowseTo action. It allows you to place a subform within a subform control, replacing the existing subform with the one specified in the action arguments. An example appears in Figure 15. Notice the action arguments. The Object Type allows you to designate whether a form or report will replace the subform control that you designate in the Path To Subform Control argument. The syntax for the Path To Subform Control argument looks like this:
frmMain.fsubMain
![Figure 15]()
In this example, fsubMain is a subform control on frmMain. Notice that the syntax requires that you separate the name of the subform from the name of the main form using a period. The Object Name argument is frmCustomers. frmCustomers is the name of the form that will appear in the fsubMain control. Here is a more complex example of the BrowseTo action.
frmMain.fsubMain>frmMenu.fsubform
The example places the form designated in the Object Name argument within the subform control called fsubForm contained on the frmMenu form which is found in the fsubMain subform control found on the form called frmMain. Although this syntax may take a little getting used to, it actually makes a lot of sense compared to how we referenced subforms in the past.
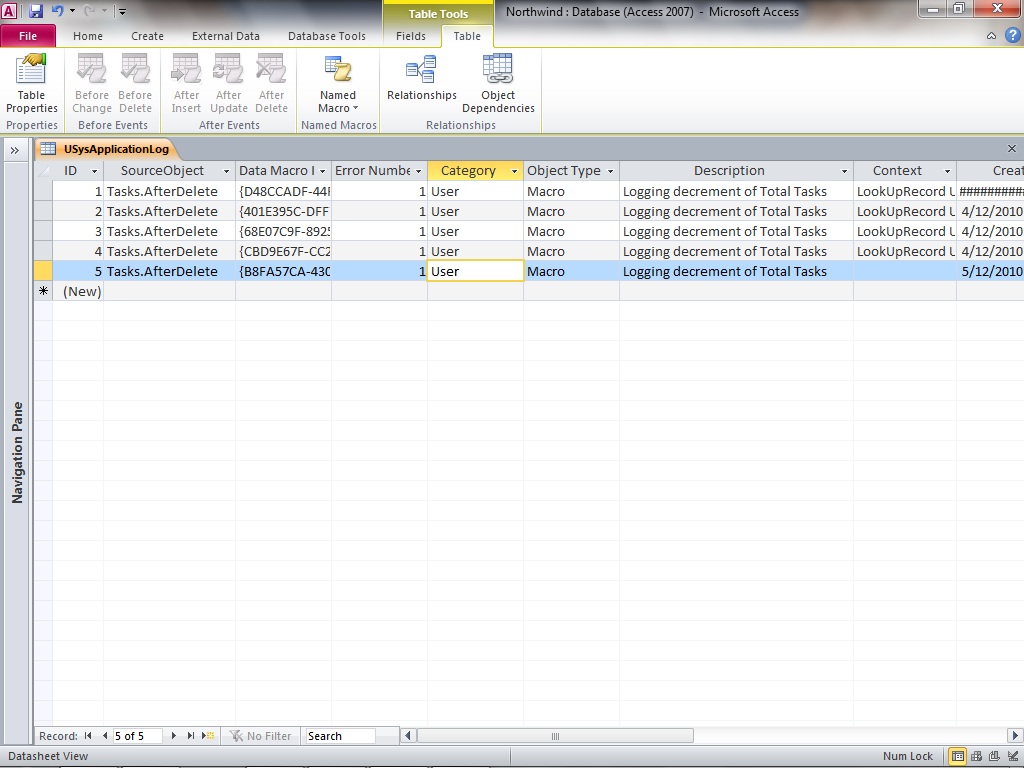
A great new macro action is LogEvent. This action allows you to very easily log information to the system table called USysApplicationLog. An example of the use of this event appears in Figure 16. This action, placed in this case in the After Insert event of a table, adds data to the USysApplicationLog table. As you can see in Figure 17, Access adds entries in the table called USysApplicationLog each time the user updates a record. Access places the value in the description of the LogEvent action in the Description column of the table.
![Figure 16]()
![Figure 17]()
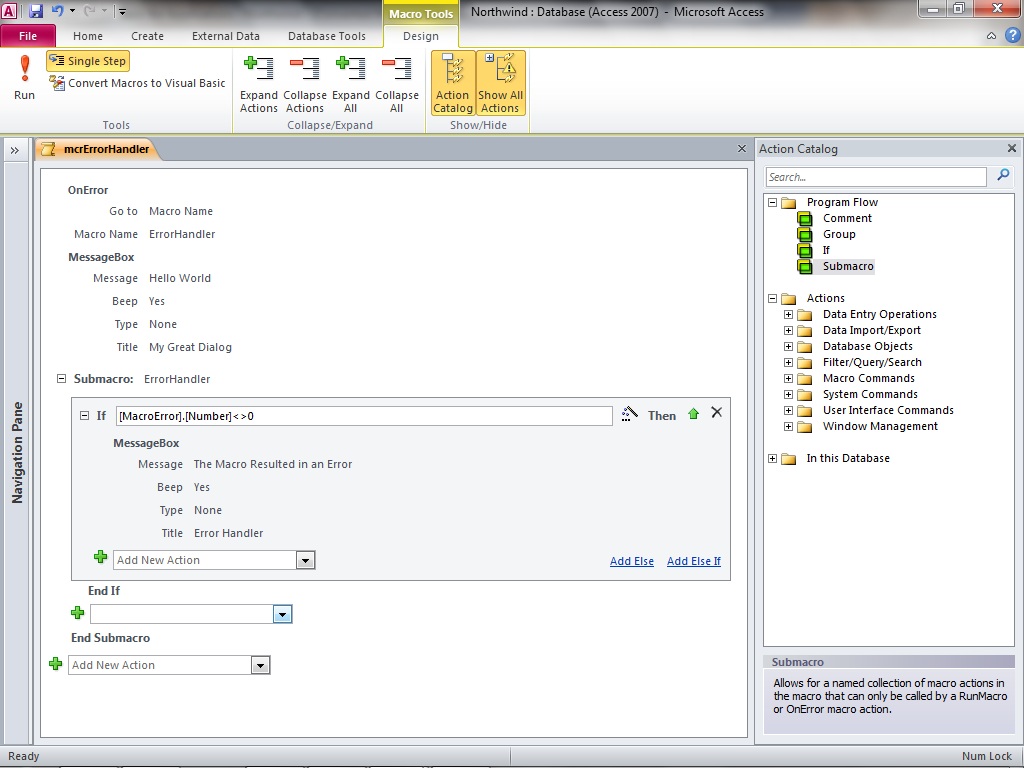
Access 2010 allows for improved error handling. Using the On Error action, along with the MacroError.Description property, you can gracefully respond to errors that occur. Figure 18 illustrates a macro that contains error handling. Notice that it first uses the On Error action to designate what should happen when an error occurs. If you look at the ErrorHandler SubMacro, you can see that it displays a message if the error number is non-zero.
![Figure 18]()
Although macros in earlier versions of Access were greatly criticized, I suggest that you give the new and improved Access 2010 macros a try. You just might be pleasantly surprised at what you find.
This article is based upon a chapter in Alison Balter's book, "Using Microsoft Access 2010." The book is published by SAMS, and is available on Amazon.com.
Let’s begin by exploring the Access 2010 macro designer. As you can see in Figure 1, the macro designer in Access 2010 looks significantly different than that of its predecessors. You can select an action from the Add New Action dropdown (see Figure 2), or you can drag and drop actions from the Action Catalog over to the macro designer.

A great tip with the macro designer allows you to quickly place an If statement around existing macro actions. Without this tip, if you need to add an If statement to a macro you must drag and drop all the actions that you want to place within the If one statement at a time into the If statement. To easily surround existing statements in a macro with an If statement, you must first select the statements that you want to place within the If. You can select multiple statements using your Shift key. Once you have selected the statements, simply right-click and select Make If Block from the context-sensitive menu. Access will insert the If statement around the selected statements. You might be surprised to learn that Access 2010 macros allow for nested If statements. This is a new feature which serves to make Access 2010 macros that much more flexible and powerful.
Another tip with the macro designer allows you to quickly and easily add comments to a macro. You simply type an apostrophe in the macro action, and then type your comment. When you move out of the action, Access will insert the comment (see Figure 3).

It is also important that you understand how to work with SubMacros. Submacros are like subroutines in a programming module; they allow you to place more than one routine in a macro. This means you can create many macro routines without having to create several separate macros. You should include submacros that perform related functions within one particular macro. For example, you might build a macro that contains all the routines required for form handling and another that has all the routines needed for report handling.
A feature you might notice when exploring macros are Macro Groups. Using Macro Groups you can logically place the actions in the macro into groups so that when you collapse and expand a group, all of the actions within that group disappear and then appear. Figure 4 shows a macro with the Macro Groups expanded and Figure 5 shows the same macro with the groups collapsed.
Yet another important feature of Access 2010 macros is the Show All Actions button. If you deselect that button (it is a toggle), Access shows only those macro actions available in trusted databases. If you plan to explore the new Web databases, you will want to deselect this button. If you select the button, both trusted and untrusted actions appear. If you are certain that you don’t need to take your database to the Web, and you don’t mind operating in an untrusted environment, this option is for you.
Access 2010 provides a lot of assistance when you are creating a macro. The two features that provide you with the most help are tooltips for collapsed actions and argument quick tips. Take a look at Figure 6. Notice that when you hover your mouse pointer over a collapsed action such as an OpenForm action, a tip appears showing you all of the arguments and their values. Figure 7 shows that when you hover your mouse pointer over an argument, a tip appears defining that argument.
Now that you’ve learned how to use the macro designer, it’s time to learn about some of the new features of macros. Probably the most exciting feature is the ability to add data macros to your tables. A data macro is a macro that executes in response to data changing within a table. Data macros are like triggers in SQL Server. The following are the events that you can respond to:
After data is inserted
After data is updated
After data is deleted
Before data is deleted
Before data is changed
After data is updated
After data is deleted
Before data is deleted
Before data is changed
To create a data macro, you must first open the table to which you want to add the data macro. Then select the Table tab. Your screen should look similar to Figure 8. Here you can select the type of data macro you want to create. If you select After Insert, your screen appears as in Figure 9. Here you write the data macro that you want to execute after the user inserts a row into your table. Figure 10 provides an example of an After Insert macro. The macro finds a record in the Users table with a user id that matches the user id of the inserted row. It then edits the record, incrementing the Total Tasks column by one. The After Delete macro looks the same as the After Insert macro, except that it decrements rather than increments the Total Tasks value.

In addition to writing data macros that are triggered by an event, you can create named data macros. You can call these macros from anywhere in the application, and you can even pass parameters to the named data macros that you build. You create and edit named data macros while viewing the Table tab with the desired table open. You simply click to open the Named Macro dropdown. Notice in Figure 11 that you can create a named macro, edit an existing named macro, rename a data macro, or delete a data macro. A data macro is similar to a standard macro except that it can receive parameters and it is associated with a specific table (see Figure 12). Notice in Figure 12 that the data macro is associated with tblSeasons and that it receives a parameter called parNewSeason. You might wonder how you call the named data macro. Figure 13 provides an example. Notice that it uses the RunDataMacro action to run the named macro, passing it the contents of the SeasonID field.

Microsoft introduced embedded macros with Access 2007. Rather than standalone macros, which appear in the Navigation Pane, embedded macros are associated with an event that happens to an object. For example, you can create an embedded macro that executes when a form loads, when a user clicks a command button, or when text in a textbox changes. An embedded macro looks like Figure 14. Notice that it looks like a standalone macro except that the title bar indicates the object and event that it is associated with (in this case the On Click event of the cmdSayHello command button on frmCustomers).

There is a new macro action introduced with Access 2010 that you should be aware of. It is the BrowseTo action. It allows you to place a subform within a subform control, replacing the existing subform with the one specified in the action arguments. An example appears in Figure 15. Notice the action arguments. The Object Type allows you to designate whether a form or report will replace the subform control that you designate in the Path To Subform Control argument. The syntax for the Path To Subform Control argument looks like this:
frmMain.fsubMain

In this example, fsubMain is a subform control on frmMain. Notice that the syntax requires that you separate the name of the subform from the name of the main form using a period. The Object Name argument is frmCustomers. frmCustomers is the name of the form that will appear in the fsubMain control. Here is a more complex example of the BrowseTo action.
frmMain.fsubMain>frmMenu.f
The example places the form designated in the Object Name argument within the subform control called fsubForm contained on the frmMenu form which is found in the fsubMain subform control found on the form called frmMain. Although this syntax may take a little getting used to, it actually makes a lot of sense compared to how we referenced subforms in the past.
A great new macro action is LogEvent. This action allows you to very easily log information to the system table called USysApplicationLog. An example of the use of this event appears in Figure 16. This action, placed in this case in the After Insert event of a table, adds data to the USysApplicationLog table. As you can see in Figure 17, Access adds entries in the table called USysApplicationLog each time the user updates a record. Access places the value in the description of the LogEvent action in the Description column of the table.
Access 2010 allows for improved error handling. Using the On Error action, along with the MacroError.Description property, you can gracefully respond to errors that occur. Figure 18 illustrates a macro that contains error handling. Notice that it first uses the On Error action to designate what should happen when an error occurs. If you look at the ErrorHandler SubMacro, you can see that it displays a message if the error number is non-zero.
Although macros in earlier versions of Access were greatly criticized, I suggest that you give the new and improved Access 2010 macros a try. You just might be pleasantly surprised at what you find.
This article is based upon a chapter in Alison Balter's book, "Using Microsoft Access 2010." The book is published by SAMS, and is available on Amazon.com.
Have a question about something in this article? You can receive help directly from the article author. Sign up for a free trial to get started.
Comments (1)
Commented: