Guide: Creating a Hyper-V Cluster

Published:
Browse All Articles > Guide: Creating a Hyper-V Cluster
Guide: Build a Hyper-V Cluster
We all know that Hyper-V is a cost effective solution (see https://www.experts-exchange.com/A_7831.html), and now we want to take advantage of it, right? Unfortunately, hardware fails, leading to downtime, angry people, and depression.
We don't want that, so this guide is going to take you through building a fully fault tolerant Hyper-V Cluster.
This guide is intended for people who have at least a little experience with Windows Servers.
In order to follow this guide you will need:
If you wish to cheat, and do this purely for fun, you can create two Virtual Machines in something like VMware or even Hyper-V - but you will still need access to shared storage. In this situation, I would recommend a cheap NAS which supports iSCSI (for example, Synology or Drobo)
This article is not going to cover configuring or attaching the storage to the server - because there are so many storage platforms available - but we will discuss best practices when configuring storage.
There are three main things that people want when it comes to a virtual machine - performance, reliability and availability. By having two or more servers in your cluster, we're providing availability. Reliability is dependent on how well your virtual machines are configured, but also determined by whether or not you have redundant paths to your hardware. Performance - now that's an interesting concept.
Four main things influence a computer's performance:
For clustered servers, the following is recommended:
My configuration:
When you install your server, do it with the storage disconnected. Because you haven't got your Multiple IO paths set up yet, your installation may be slower and you may also inadvertently use one of the shared storage disks.
OK I have to tell you this straight out, and you're not going to like me.
Hyper-V Clustering does NOT SUPPORT NIC Teaming
"That's all Right" you'll probably say. "I'll just join two network cards to the same VSwitch and let Hyper-V take care of anything for me, just like VMware". Wrong. Virtual network interfaces can only be bound to one physical interface.
You can be rogue like me, and do NIC teaming anyway, and the Cluster Validator won't complain about it, but be prepared to have some really strange issues including Virtual Mac addresses bouncing between the two switch ports. Switches do not like this. So far I've experienced problems like this on Intel Teaming and HP Teaming.
When I do experience these problems, I just shut down one of the teamed ports on the switch. At least, this teamed configuration still gives me the ability to recover from a NIC failure - I just enable the shut down port.
My setup:
Nic 1 - Team 1 - Trunk Port - No untagged (no default VLAN)
Nic 2 - Team 1 - Trunk Port - No untagged (no default VLAN)
Nic 3 - Unteamed - VLAN 25 (so that I can get to it regardless of the team failure)
Nic 4 - Disconnected
Be sure that all networks which are presented to each server is available to all the servers in the cluster.
Because I'm such an uber-nerd, I'm going to be making my cluster consist of Windows Core, but you can choose to use a standard Windows operating system. My operating system of choice is going to be Windows 2008 R2 SP1 Datacenter Core.
I've chosen Datacenter because I intend to run a huge amount of virtual machines on it, and as long as they are Microsoft Servers, they will automatically be licensed. NOTE: Licensed and activated are two things - you will still need to activate your virtual machines. SP1 for me is quite important, due to the improvements Hyper-V has received since R2 and R2 SP1.
On Windows Normal, open up Server Manager, select the root of your Server Manager console, and then select "Configure Server Manager Remote Management", and then check the box "Enable remote management of this server from other computers"
![Configure Server Manager Remote]()
NOTE: These instructions are for Windows 2008 R2 or better. If you have Windows 2008, you will have to use OCSETUP. Please find more resources on how to use OCSETUP, or on a GUI server, use Server Manager Roles to add the following roles.
Build all of your servers.
Important Note : If you're using an autobuild like I do, be sure not to install Failover-Clustering as part of the build, but remember to add it before creating the cluster below.
Telnet Client is not required, but it's a very useful tool for doing open port testing - always useful to have on servers and workstations.
Attach your storage to your physical servers, install the manufacturer's DSM - this is the driver that works along with the MPIO driver to provide seamless failover in the case of a path failure.
It is not necessary or recommended to configure your storage with partitions at this point!
Be certain that the two servers can talk to each other. In Windows 2003 Clustering, you had to have the servers on the same subnet. This is no longer a requirement.
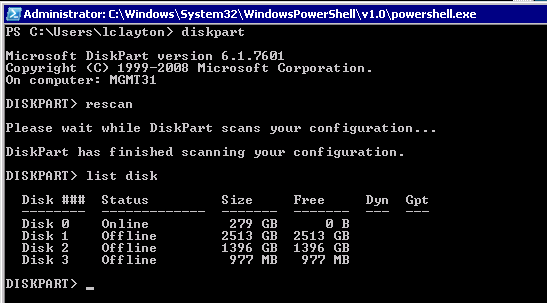
Use DISKPART or Server Mangager / Storage Management to verify that you can only see one of each disk. If you can see two, then your multipath drivers (DSM) have not been installed. Please refer to your manufacturer to find your Multipath Drivers. Even in an iSCSI system, where you have multiple paths, Windows will be careful to use only one path at a time, but it's always best practice to use the vendor supplied Multipath drivers.
![Disk Connectivity]()
Since we're using Windows Core, we're going to have to do this from a different workstation. Prepare your workstation first by downloading and installing the RSAT (Remote Server Administration Tools). Be sure to download the one that supports the OS of your servers.
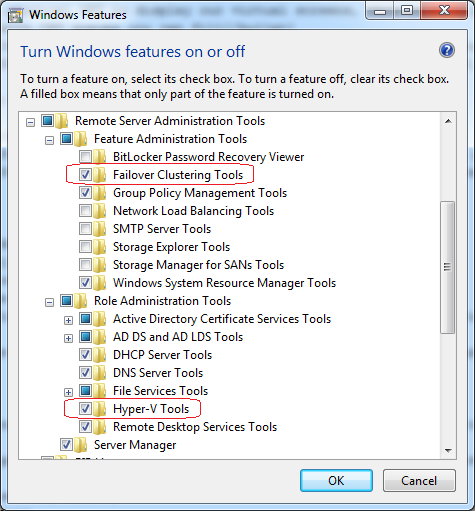
Once RSAT is installed, go into your Control Panel, go into "Programs" and then select "Turn Windows features on or off". In the window, scroll down expand "Remote Server Administration Tools, and children nodes, and then check at least "Failover Clustering Tools" and "Hyper-V Tools".
![Adding Windows Features]()
From your Administrative Tools start menu (you may need to unhide this from your start menu first), open up "Failover Cluster Manager"
Right click "Failover Cluster Manager" and then select "Create a Cluster". For the purposes of our people who've never done this before, I'm going to screenshot every step.
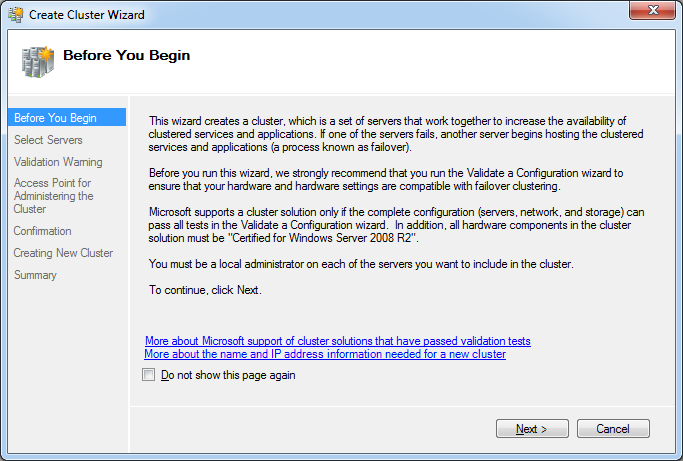
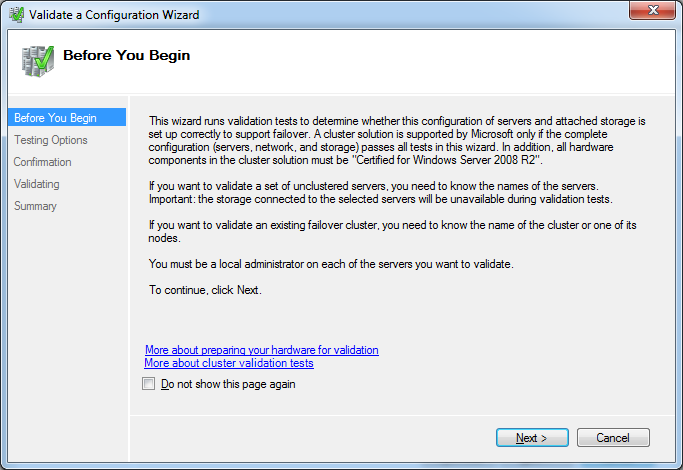
![Before you begin.]() Click "Next"
Click "Next"
![Select Servers]() Enter your server name and click Add to select your intended cluster servers. When you click Add, it will verify that it has cluster services installed before adding it to the list. Click "Next"
Enter your server name and click Add to select your intended cluster servers. When you click Add, it will verify that it has cluster services installed before adding it to the list. Click "Next"
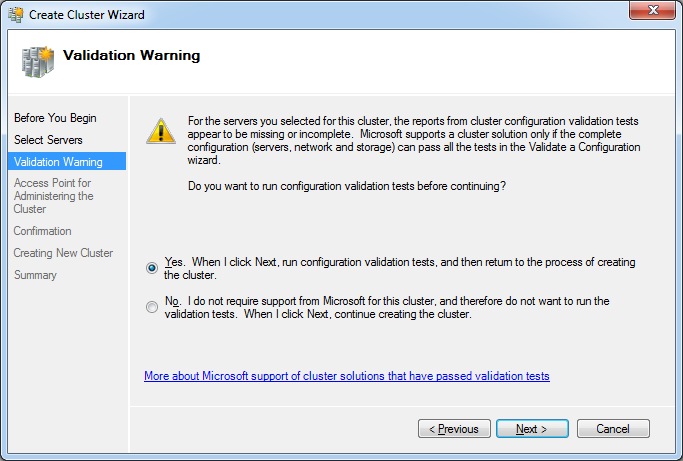
![Validation Warning]() This is an important message. Microsoft will not support a cluster which does not pass these validation tests. You can validate a cluster anytime, before creating and during running. This validation will ensure that your hardware and configuration is cluster-worthy. "Click Next".
This is an important message. Microsoft will not support a cluster which does not pass these validation tests. You can validate a cluster anytime, before creating and during running. This validation will ensure that your hardware and configuration is cluster-worthy. "Click Next".
![Before you Begin Again]() Click "Next".
Click "Next".
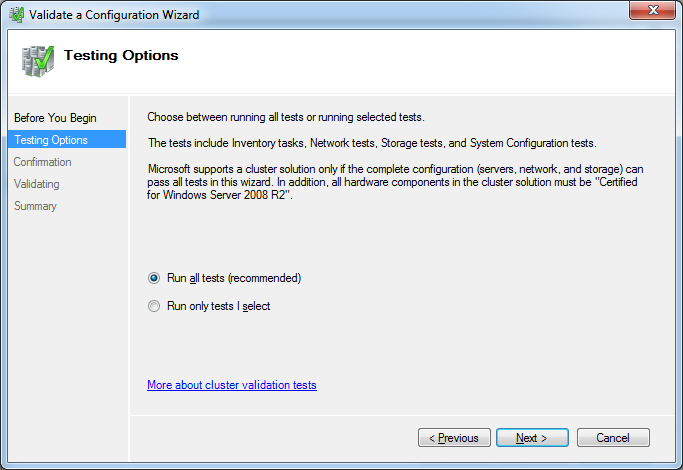
![Testing Options]() Of course, we'll keep "Run all tests" selected. Click "Next".
Of course, we'll keep "Run all tests" selected. Click "Next".
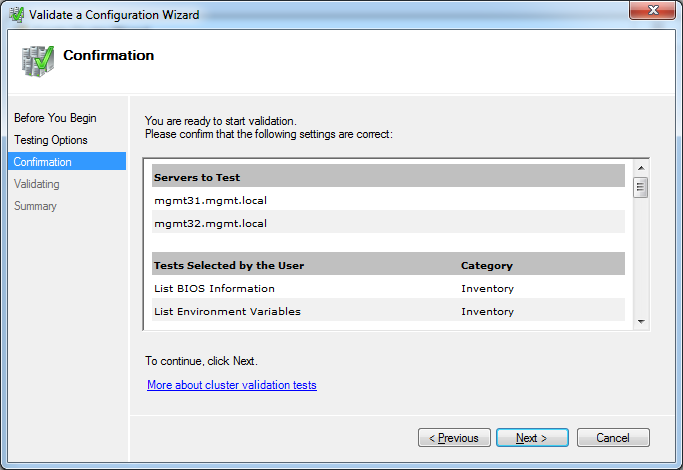
![Testing Confirmation]() Click "Next" again if you're happy with the information it lists. A new window will open while it performs these tests.
Click "Next" again if you're happy with the information it lists. A new window will open while it performs these tests.
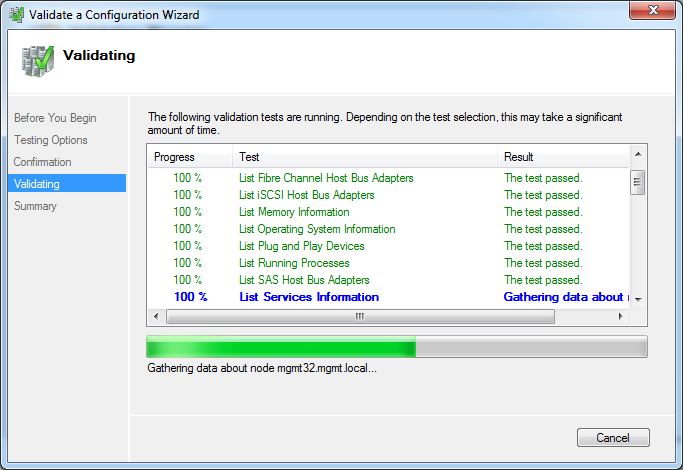
![Validating]() This is what the Validating screen looks like. Just be patient :) If you do see some warnings (red text) come up, don't panic, wait for the end report. Cluster Validation will try to test things you don't have.
This is what the Validating screen looks like. Just be patient :) If you do see some warnings (red text) come up, don't panic, wait for the end report. Cluster Validation will try to test things you don't have.
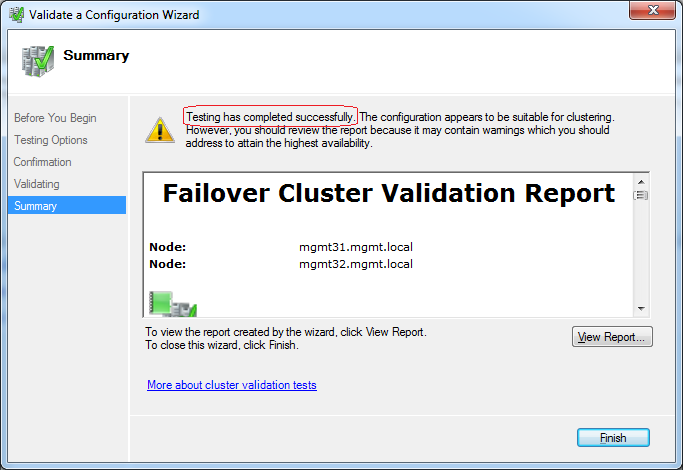
![Summary]() Done! Feel free to View Report (you'll have to if you get a big red X), and view the things it's complaining about, but if it says "Testing has completed successfully" like it has for me, go ahead and click "Finish". Don't get excited, because you're not actually finished yet.
Done! Feel free to View Report (you'll have to if you get a big red X), and view the things it's complaining about, but if it says "Testing has completed successfully" like it has for me, go ahead and click "Finish". Don't get excited, because you're not actually finished yet.
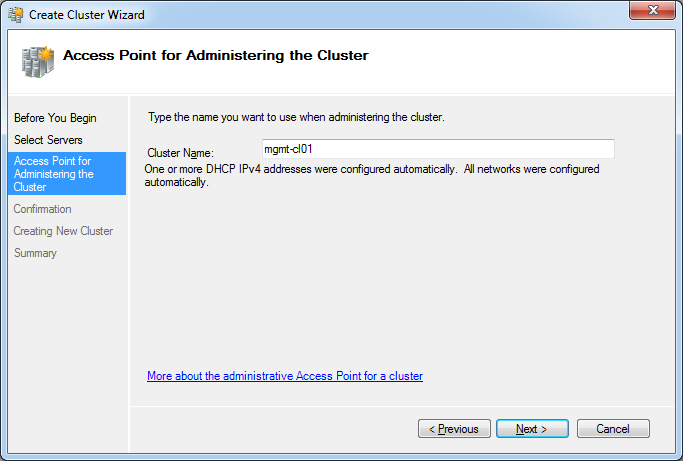
![Access Point for Administering the Cluster]() On this screen, we give the cluster a unique name. This is a virtual name which one of the cluster servers will own, and you should always use this name from now on when you talk to the cluster. the Cluster Service will automatically create an A record pointing to the IP address of the server which is owning the this Cluster Service resource. Please click "Next".
On this screen, we give the cluster a unique name. This is a virtual name which one of the cluster servers will own, and you should always use this name from now on when you talk to the cluster. the Cluster Service will automatically create an A record pointing to the IP address of the server which is owning the this Cluster Service resource. Please click "Next".
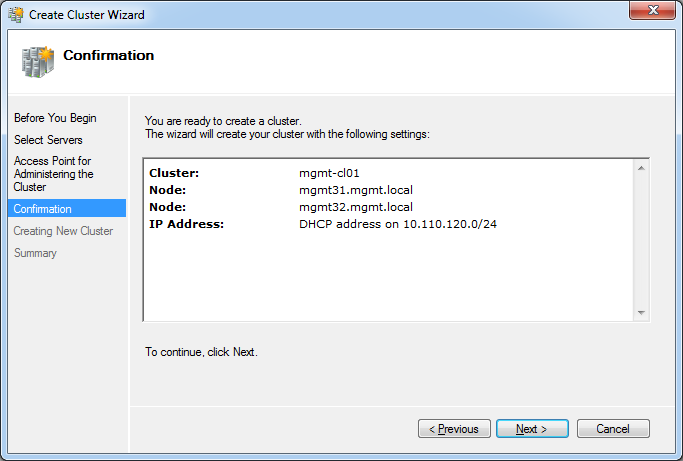
![Confirmation]() Click Next on the confirmation screen. It is telling you "DHCP address" because our cluster servers are configured with DHCP (this is fine and supported - but naturally, not recommended).
Click Next on the confirmation screen. It is telling you "DHCP address" because our cluster servers are configured with DHCP (this is fine and supported - but naturally, not recommended).
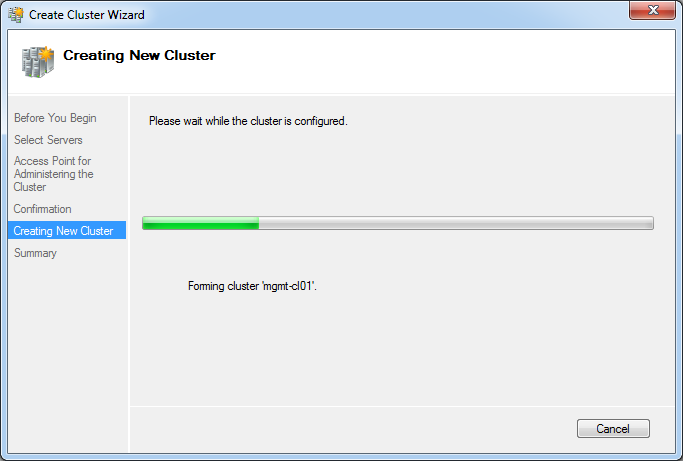
![Creating Cluster]()
The Wizard will now create the cluster
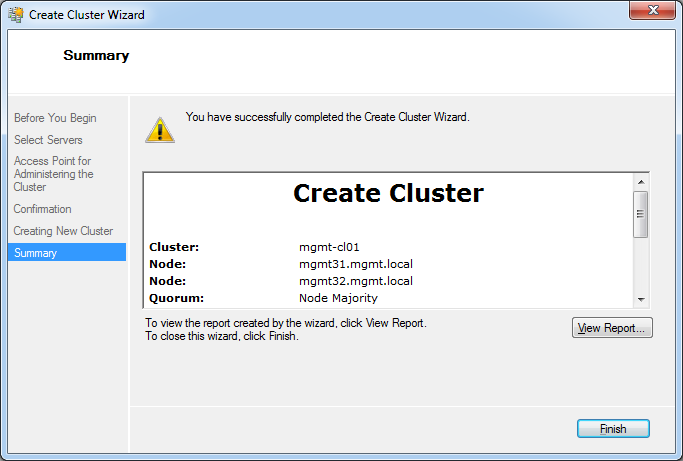
![Summary]() Finished! Congratulations, you are now the proud owner of a cluster. It's showing me a warning, because it's a 2 node cluster and I don't have a Quorum disk - yet :D Click "Finish"
Finished! Congratulations, you are now the proud owner of a cluster. It's showing me a warning, because it's a 2 node cluster and I don't have a Quorum disk - yet :D Click "Finish"
In order for a cluster to operate efficiently, it needs to use shared storage. All volumes you add to the cluster, automatically becomes a "Cluster Disk". Cluster Disks can only be owned and accessed by one node at the time, and that node is determined by the running applications node.
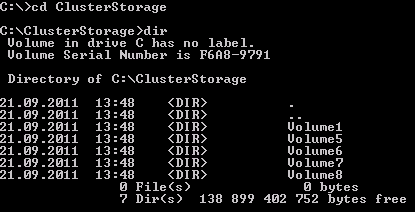
Cluster Disks can be converted into Cluster Shared Volumes. This is similar to a Quorum disk, because the cluster is owned by one server, but can be read and written to by all the nodes (servers) in a cluster. Cluster Shared volumes will appear as a directory on the hosts themselves, and the same directory structure will be visible on all hosts. Here is an example of the structure
![ClusterStorage]()
Note that the free space is for the host's C: drive - but you can view the free space of each Cluster Shared volume by doing a DIR in the Volume1,Volume2, etc directory itself.
Finally, a Quorum disk is a disk which is there to assist with split brain. This is when you have an even number of cluster nodes, and network communication is lost in the the exact middle. Of course, Node1 thinks that Node2 has gone down, and Node2 thinks that Node1 has gone down. Actually, neither node has gone down, but in the end, one of the nodes has to take over the entire cluster. The Quorum node, because it's part of the shared storage, should still hopefully be accessible during a network failure, and the nodes talk with each other there to determine who's going to be kicked out of the cluster. If a decision cannot be made, then the host which owns the cluster at the time will kick the nodes it can't talk to out.
Quorum disks are not required NOR recommended in an odd number of nodes. For example, if there are 3 nodes, you will always have a server majority in the event of the network failing. Naturally, if all 3 nodes lose network connectivity, the Cluster owner will win, but at this point, nobody can use the cluster, so it doesn't matter.
You should always create a Quorum Disk, even if you don't use it. That way it's there if you need it.
If you've just finished building your cluster from the instructions above, your Failover Cluster Manager will now show you a rather complicate screen. Naturally, the bigger your screen, the more daunting it will look. Don't let this put you off.
We're going to park this utility for the moment (minimize it).
Please start up Server Manager from a non-core server
Right click the Server Manager (root) node, and select "Connect to Another Computer" and specify one of the servers which are part of the cluster - it won't matter which one you choose.
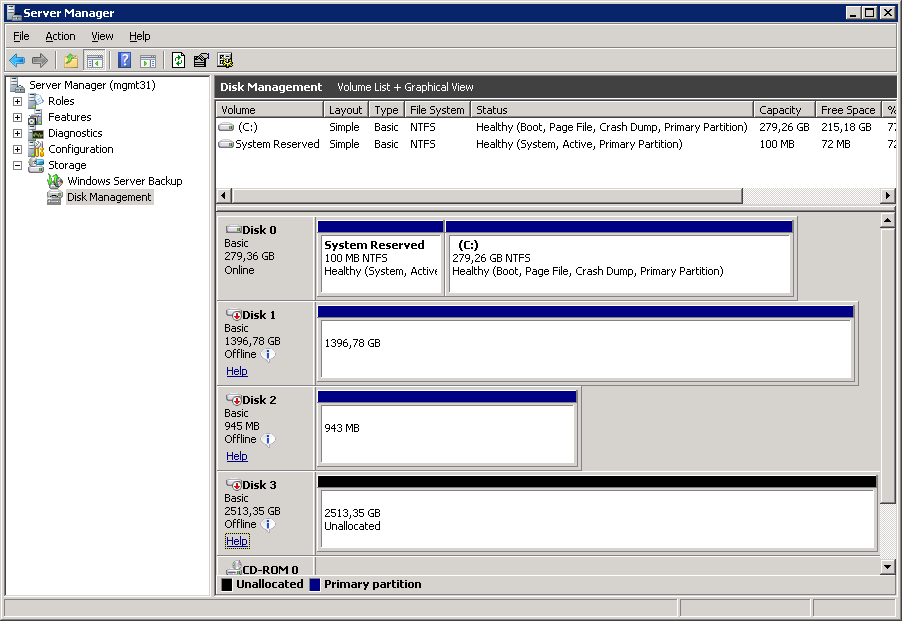
Expand the Storage node, and then select "Disk Management"
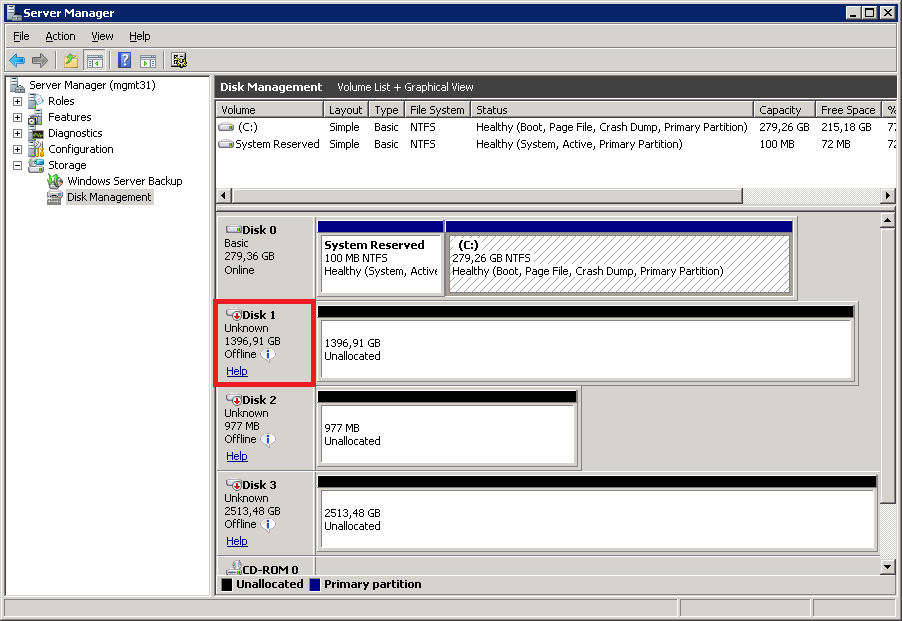
You will notice that you have several "Unknown" and "Offline" disks. Usually this would be cause for panic, but it's actually a good thing.
![Disk Management (Before)]()
Right click all of the Disks you wish to add to the cluster in the area I've highlighted in red above, and then select "Online"
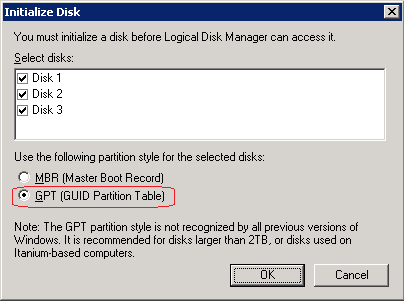
Now, right click any one of the disks (in the same area) and then select "Initialize Disk"
![Initialize Disk]()
Be sure to select "GPT (GUID Partition Table)" before clicking OK!
In my setup above, I'm going to use Disk 1 for the Cluster Shared Volume, and disk 2 for the Quorum. Disk 3 is intended for a Pass-through disk, and I won't cover adding it here, as it is already covered in my other article - https://www.experts-exchange.com/A_7829.html
Naturally, you will have different disk numbers (and even possibly different disk numbers between hosts, but that doesn't matter), so please use your designated disks.
Right click your intended Quorum disk, and select "New Simple Volume". Choose a drive letter that won't possibly conflict with anything else. Since it's the Quorum disk, I'm going to choose "Q". Give the Volume a label of "Quorum" - this is so that we can identify it easily. Do NOT enable file and folder compression. In fact, don't enable this on ANY of your cluster storage.
Right click your intended Cluster Shared Volume, and create a simple volume. Format it but do not assign a drive letter or drive path! I'd also suggest calling it a volume name that will mean something to you.
Once you've created all the partitions you want (I won't create one for the last disk, because it's not covered in this guide), you have to make all the disks "Offline" again. The Offline ensures that the operating system does not interfere with these disks. The cluster will control these disks from now.
![Disk Management (After)]()
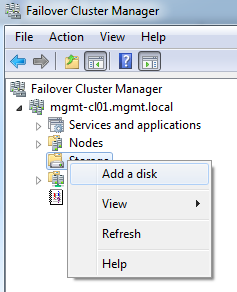
Please bring your Failover Cluster Manager forward again, expand the cluster, and then select the "Storage" node. Right click the "Storage Node" and then select "Add a Disk"
![Add a Disk]()
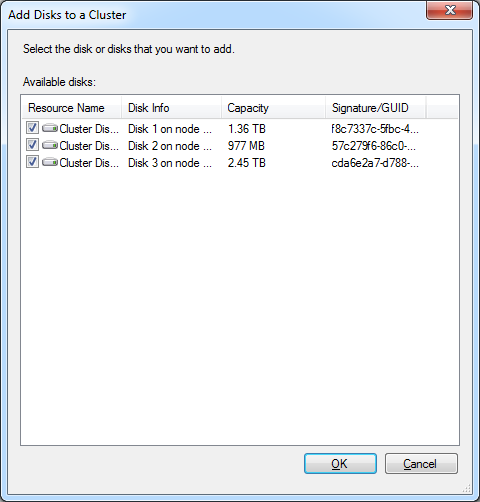
Because we've prepared these disks, they are available to add. Cluster Disks have to be GUID based, because it uses the GUID to track the resource.
![Add Disks to Cluster]()
After the disks have been added, they will appear in the Summary of Storage. These disks automatically become "Available Storage" because they are not allocated to anything yet. The first thing I do is to rename them from their default "Cluster Disk 1" into something else, so that I can identify them more easily. I've renamed my two to "Quorum Disk" and "Cluster Volume 1" respectively. Right click - properties will allow you to change the name.
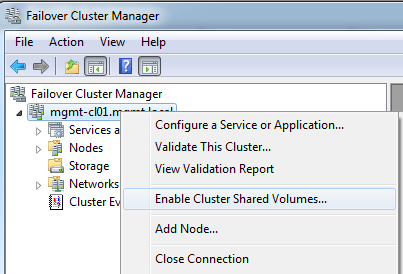
Let's now create our Cluster Shared Volume, but first, we have to enable Cluster Shared Volumes.
Right click the Cluster Node and select "Enable Cluster Shared Volumes"
![Enable Cluster Shared Volumes]()
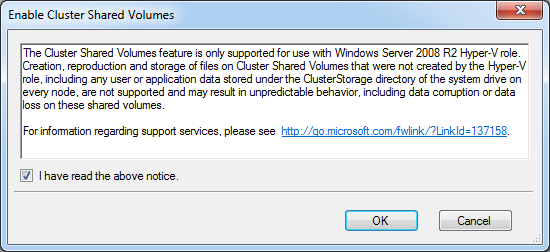
Read the notice, and check the box to say you have read the above notice, and then click "OK"
![Shared Volume Notice]()
Select the new node named "Cluster Shared Volumes" which has appeared, right click it and then select "Add Storage"
![Add Storage]()
Only select the disks which you intend to use as a Cluster Shared Volume, and then click "OK". The Cluster Shared Volume will be configured and added, and then brought online by one of the nodes.
Finally, our Quorum. A lot of confusion exists around the quorum, but the rule is simple - an even amount of nodes (servers), then a quorum is highly recommended. An odd number of servers, and a quorum is not recommended.
Do not follow these next steps if you have an even number of nodes.
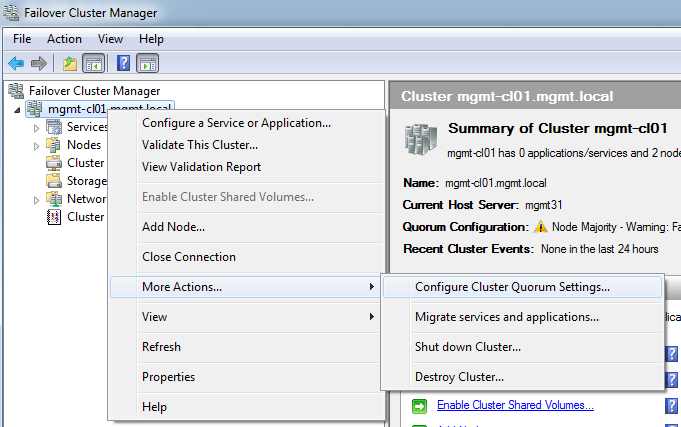
We turn the quorum on and off by changing the cluster majority node mode. To do this, right click the cluster name node, hover over "More Actions" and then select "Configure Cluster Quorum Settings"
![Configure Cluster Quorum Settings]()
Again, I will screenshot every step, with comments below the step.
![Before You Begin]() After reading the notice, select "Next"
After reading the notice, select "Next"
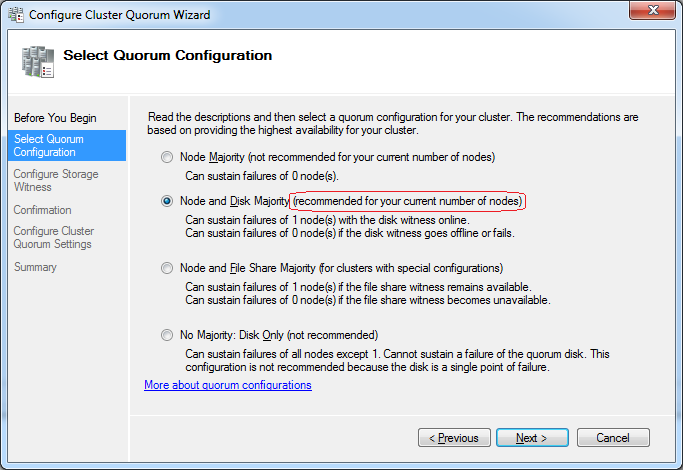
![Select Quorum Configuration]() Choose the Quorum Configuration which it recommends for your current number of nodes, and then click "Next".
Choose the Quorum Configuration which it recommends for your current number of nodes, and then click "Next".
![Configure Storage Witness]() Select the disk we prepared earlier, and then click "Next"
Select the disk we prepared earlier, and then click "Next"
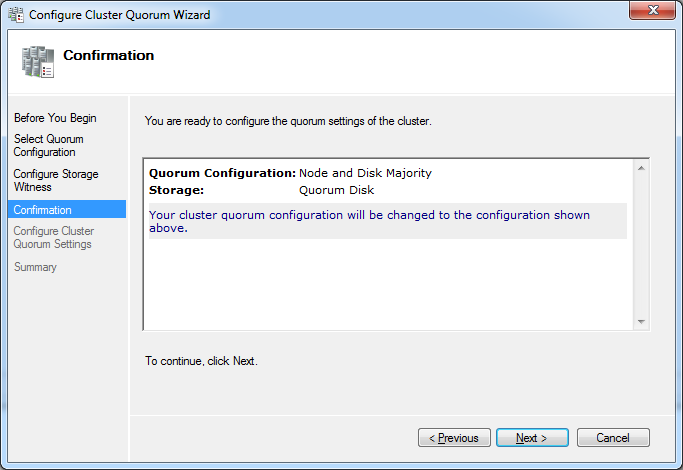
![Confirmation]() At the Confirmation Screen, click "Next"
At the Confirmation Screen, click "Next"
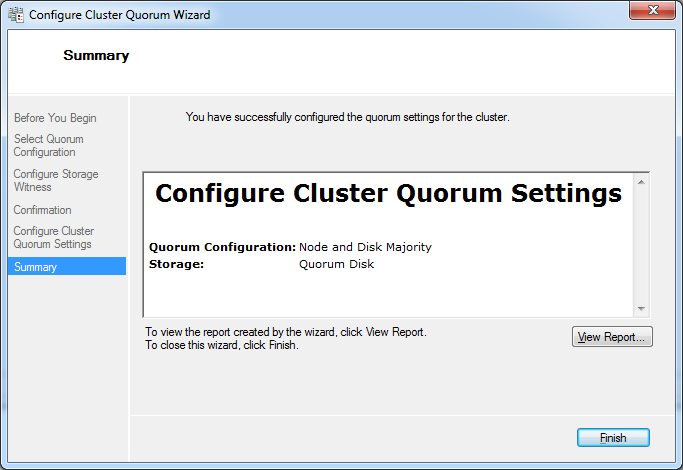
![Summary]() The summary will confirm that you've been successful.
The summary will confirm that you've been successful.
If you had an even number of nodes, and you add a node, you need to go through this again to change the Quorum Configuration to be Node Majority. When you do this, your Quorum will become Available Storage again, but that's fine, just leave it there and ignore it :)
The Quorum will ALWAYS be hosted by the server which holds the Cluster Resource - i.e. the server which holds the Cluster IP address and manages the cluster. If you ever need to take down this host, you need to move the Cluster and Quorum off it. Do this by jumping to a command prompt on one of the hosts, and typing
My cluster is now nice and healthy.
In order to create virtual machines, I have to create virtual networks for the VM's to use. There are many ways one can do this, so the example I'm giving you is for my real world scenario. Unfortunately, you cannot create or manage virtual networks inside Failover Cluster Manager, and here we now run Hyper-V Manager instead.
When I created my team earlier, I also added a VLAN to the team. The teaming software then created a new virtual adapter - it is this virtual adapter I intend to use for my new Virtual Network. Naturally, I had to do this on both servers. I'm creating VLANS because my teams are connected to trunk ports. If you do not have trunk ports, then just use the physical NIC or the team NIC - whichever is applicable.
Add both of your nodes to Hyper-V manager - since you have to do this to both of them.
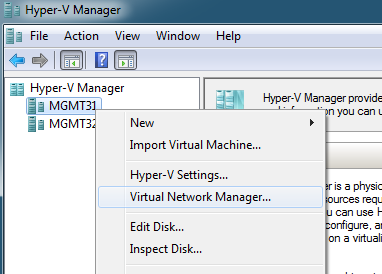
Right click one of the nodes, and then select Virtual Network Manager
![Virtual Network Manager]()
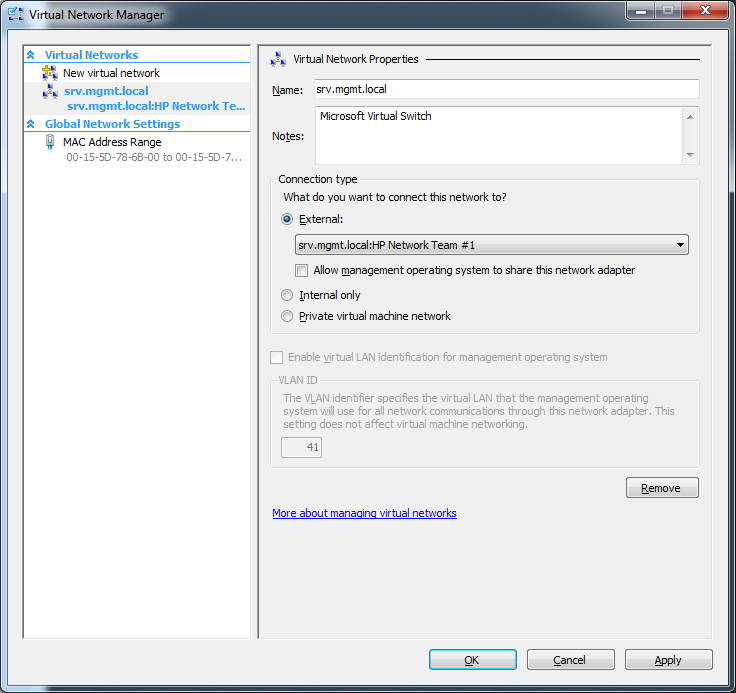
Click Add, and then on the created Virtual network, give it a Name and then choose the network interface.
![Virtual Network Manager]()
The default check for "Allow management operating system to share this network adapter" should be removed If this is an isolated network (like a VLAN). If you do not un-check this, it will create both a virtual network, and a virtual adapter on the server. Leaving this checkbox checked will cause you quite a severe headache, because your host will start receiving IP's for networks you probably don't want it to. Be warned though if you un-check this box, it will complain regardless, and lie that you won't be able to communicate to the server. My configuration calls for me to un-check this, but -
If you do not have a fancy configuration like I do, then you must keep this checked, otherwise you are going to turn your physical network card into a virtual network - and you will no longer be able to talk to your server
Use the same Name on all servers, otherwise you will have an issue when moving a Virtual Machine from one node to another.
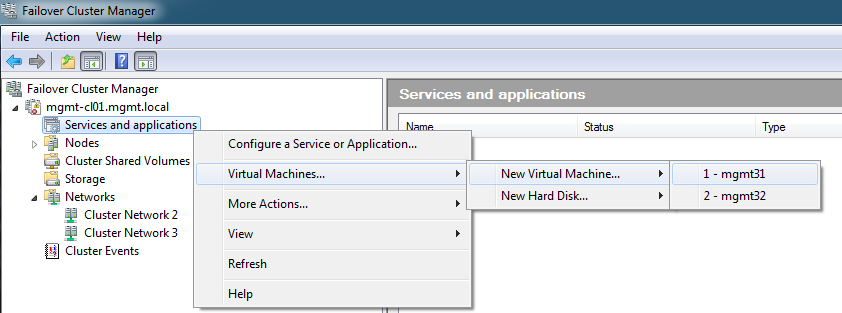
Now that we have a fully functioning cluster, let's actually use the cluster. Because we want to create a Highly Available Machine - i.e. a machine that the cluster is aware of and moves around if required - then we should use Failover Cluster Manager. Follow the err.. following instructions.
![New Virtual Machine]() Right click Services and applications, move over "Virtual Machines", move over "New Virtual Machine" and then select a host. A host must always be selected when placing a machine - but the machine can be moved to another host afterwards.
Right click Services and applications, move over "Virtual Machines", move over "New Virtual Machine" and then select a host. A host must always be selected when placing a machine - but the machine can be moved to another host afterwards.
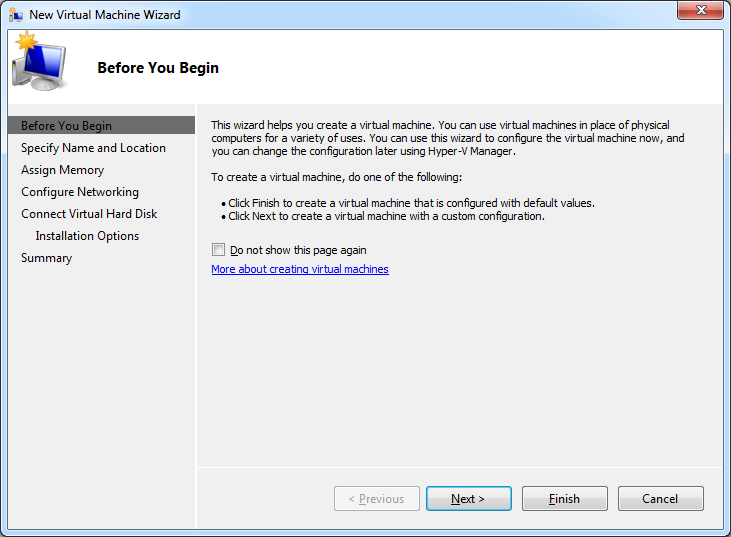
![Yet another Before You Begin]() Click "Next". Interesting that it allows you to click Finish. This means that if you feel you've entered enough information, you can click Finish at any time. We will go through all the screens though.
Click "Next". Interesting that it allows you to click Finish. This means that if you feel you've entered enough information, you can click Finish at any time. We will go through all the screens though.
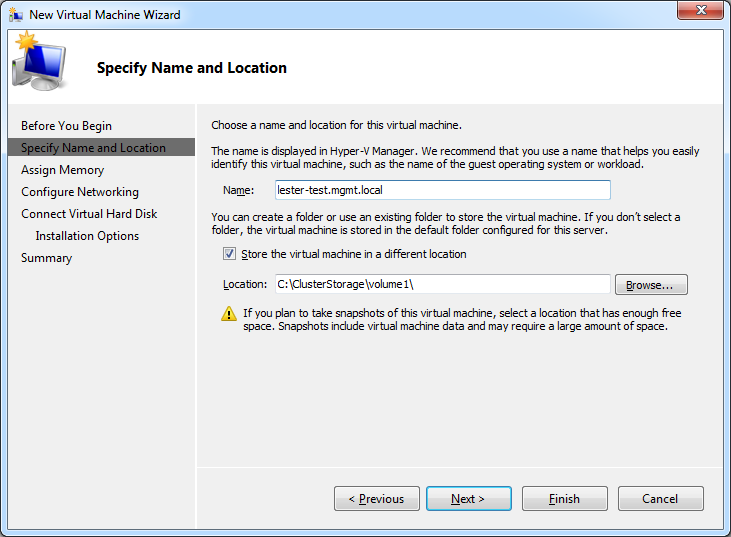
![Specify Name and Location]() Specify the name of the virtual machine and the location of it. NOTE - This location is actually the location on the host - not your machine where you're running Failover Cluster Manager from. Specify the root path of the Cluster Shared Volume as explained much earlier in this guide. You can Click Browse to browse to it - it will browse the host. Click "Next"
Specify the name of the virtual machine and the location of it. NOTE - This location is actually the location on the host - not your machine where you're running Failover Cluster Manager from. Specify the root path of the Cluster Shared Volume as explained much earlier in this guide. You can Click Browse to browse to it - it will browse the host. Click "Next"
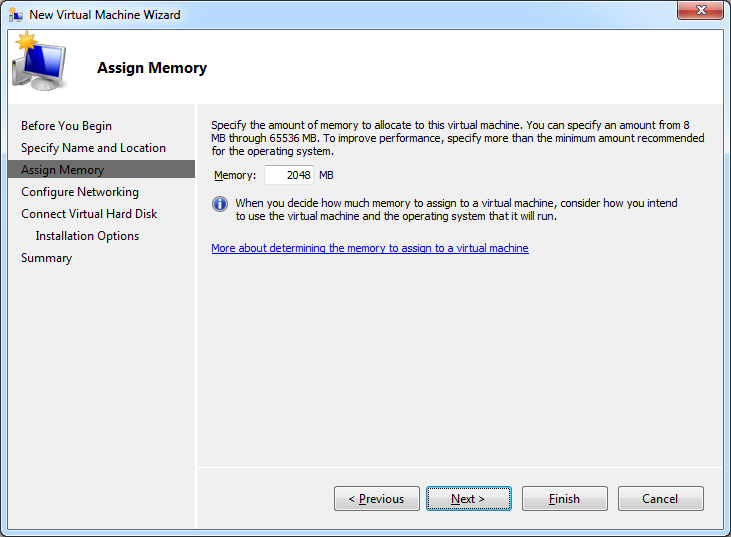
![Assign Memory]() Set the amount of memory you'd like to assign. Click "Next"
Set the amount of memory you'd like to assign. Click "Next"
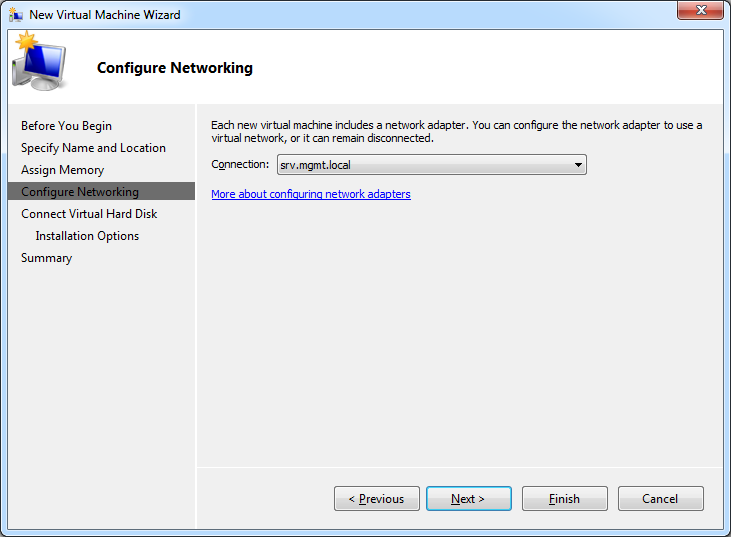
![Configure Networking]() Use the drop down to choose the network location we created a little while ago. Click "Next"
Use the drop down to choose the network location we created a little while ago. Click "Next"
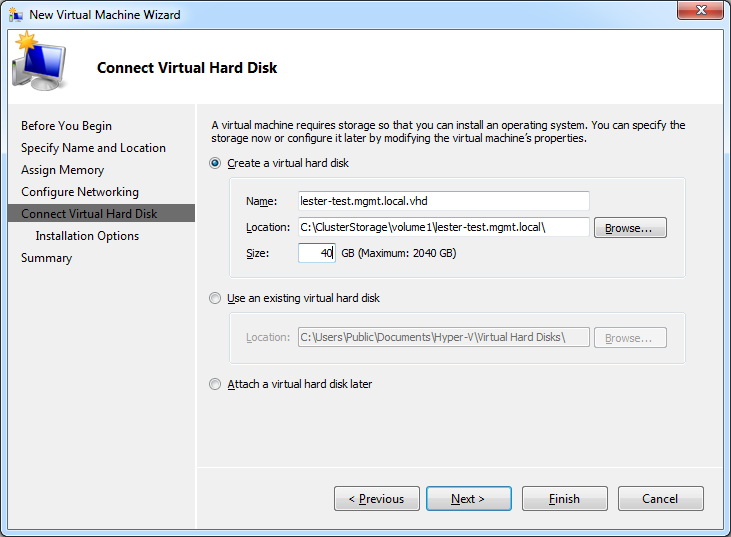
![Connect Virtual Hard Disk]() Choose a more realistic size for your virtual machine, and then click "Next"
Choose a more realistic size for your virtual machine, and then click "Next"
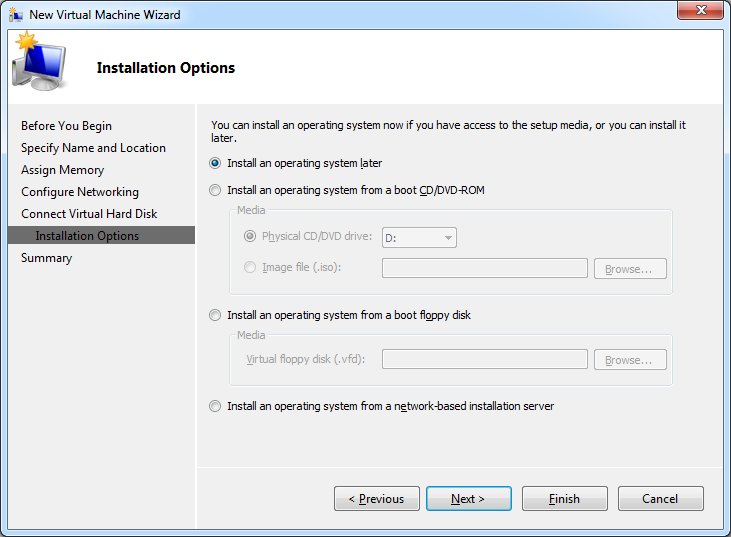
![Installation Options]() Configure your Installation Options as per your requirements. I'm going to choose "Install an operating system later". If you choose "Install an operating system from a network-based installation server" - which is what I'll be doing ANYWAY, then the Virtual Machine will boot from network first. Click Next.
Configure your Installation Options as per your requirements. I'm going to choose "Install an operating system later". If you choose "Install an operating system from a network-based installation server" - which is what I'll be doing ANYWAY, then the Virtual Machine will boot from network first. Click Next.
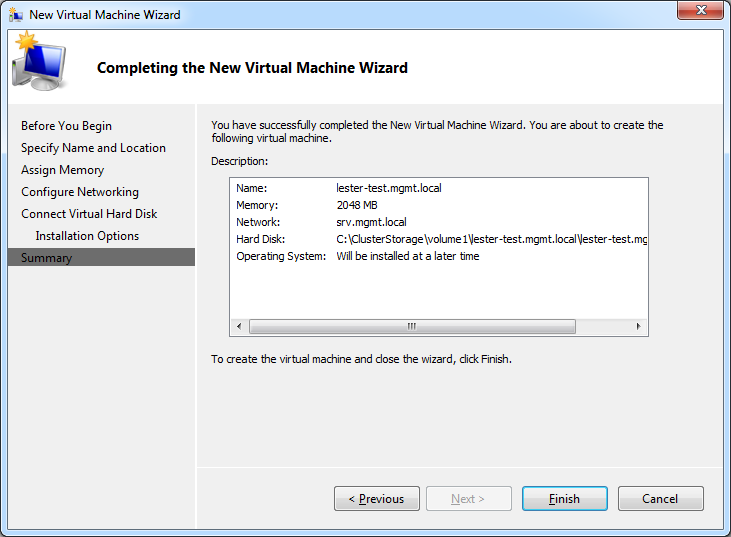
![Completing the New Virtual Machine Wizard]() Click "Finish" and watch your Virtual Machine being created.
Click "Finish" and watch your Virtual Machine being created.
![Summary]() The summary will confirm that it's a highly available virtual machine, which means your Virtual machine can now be moved from one host to another seamlessly - you can even do this while it's running and users are using it.
The summary will confirm that it's a highly available virtual machine, which means your Virtual machine can now be moved from one host to another seamlessly - you can even do this while it's running and users are using it.
There are many sources on the Internet and on online bookshops which will guide you through keeping your cluster in good shape. I currently run two clusters (the one I've documented here is the second one) plus a VMware cluster. 7 servers in total running 220 virtual machines.
You do have another software option to manage your Virtual Machines - and that is SCVMM (System Center Virtual Machine Manger). This does make a lot of your common tasks easier to do, and it's highly recommended.
If you ever need to use pass-through disks - what I also refer to as Raw LUNS, you can follow my other guide on EE - https://www.experts-exchange.com/A_7829.html
Please be sure not to over commit any of your servers! The whole idea of a cluster is high availability, and your boss is not going to be impressed when you tell him that one of the nodes failed and you didn't have enough memory to run everything on the other one!
All virtual disks that get created are Thin Provisioned - that means they start small and get bigger as they get fuller. Watch out for your free space! It's very easy to over commit on disk too, and then suddenly run out. the Cluster is very kind though, and will pause any running virtual machines if this happens to you.
Do not defrag a thin provisioned virtual disk! A thin provisioned disk can get fragmented very easily both at the Virtual file system, and also on the physical storage. Virtually defragging, or physically defragging this disk is not advised, because there is a chance you can degrade the performance. It's OK to virtually defrag a fixed-size virtual disk.
Don't be stingy! Just because you have a limited amount of cores on your server, doesn't mean you can't over-allocate on virtual CPU's. A 64 core server can quite happily run 100 virtual servers with between 1 and 4 vCPU's each. Of course, if each one of those servers is running BOINC or SETI, then expect a bit of an issue :)
Hyper-V Clustering requires a domain, and naturally when you create your cluster, you will have a domain controller somewhere, that it would talk to. Whatever you do, DO NOT migrate this physical server to become a virtual machine in your cluster! Always have at least one physical writeable domain controller - with DNS (and DHCP for the Cluster Nodes, if applicable) because the Cluster nodes have to authenticate to Active Directory and obtain their configuration before they work! If you experience a power failure, you will want to be sure to start up your physical Domain Controller first, and then your cluster nodes.
I hope you have found this guide to be helpful.
Introduction
We all know that Hyper-V is a cost effective solution (see https://www.experts-exchange.com/A_7831.html), and now we want to take advantage of it, right? Unfortunately, hardware fails, leading to downtime, angry people, and depression.
We don't want that, so this guide is going to take you through building a fully fault tolerant Hyper-V Cluster.
This guide is intended for people who have at least a little experience with Windows Servers.
Prerequisites
In order to follow this guide you will need:
2 or more Physical Servers
Shared Storage - iSCSI or Fiber Channel
A few cans of coke to keep you going. Coffee is also acceptable.
Windows 2008 R2 SP1 Standard, Enterprise or Datacenter. You can get away with Windows 2008, but I highly recommend at least Windows 2008 R2. You can also perform these steps with demo versions of Windows 2008 R2, or Technet/MSDN subscription editions.
A domain and an account with Domain Admin privileges.
If you wish to cheat, and do this purely for fun, you can create two Virtual Machines in something like VMware or even Hyper-V - but you will still need access to shared storage. In this situation, I would recommend a cheap NAS which supports iSCSI (for example, Synology or Drobo)
This article is not going to cover configuring or attaching the storage to the server - because there are so many storage platforms available - but we will discuss best practices when configuring storage.
Storage Best Practices
There are three main things that people want when it comes to a virtual machine - performance, reliability and availability. By having two or more servers in your cluster, we're providing availability. Reliability is dependent on how well your virtual machines are configured, but also determined by whether or not you have redundant paths to your hardware. Performance - now that's an interesting concept.
Four main things influence a computer's performance:
GPU - Since we're not actually relying on a physical GPU to display our virtual screens, this is moot point
CPU - The more logical CPU's you have, the more CPU queues you can fill. Bear in mind though, that only 1 thread can be allocated to 1 CPU at a time - and usually the mroe cores your server is, the slower the MhZ of the CPU tends to be. A Virtual Machine running on a quad core 2.8 Ghz CPU will run faster than a Virtual Machine running on a 10 core 2.0 GhZ CPU
Memory - Each virtual machine will use the OS's memory, and provided it's not paging to disk, this should usually be fast
Disk - Fiber Channel is way faster than iSCSI. Even 4 Gbps fiber channel is faster than 10 Gbps iSCSI. Fiber Channel can have maximum packet size of 128 MB whereas iSCSI (or more so to the point, TCP/IP), can have packet size of 64 KB. Bigger packets means less confirmations, which leads to more, and subsequently faster throughput.
For clustered servers, the following is recommended:
Each physical server should have minimum dedicated raid 1 for the OS
You should allocate a dedicated raid array for your Cluster Volume Disks. Raid 1+0 would be best, but you can also go for raid 5+0, 6+0, and at a pinch just raids 1,5 or 6.
You should allocate a dedicated raid array for your Cluster Disks. Raid 5 is sufficient, but if you need high performance, then naturally go with a faster raid.
My configuration:
I have 2 HP Proliant DL380 G6's with 64 GB RAM and 2 CPU's Quad Core with hyper-threading
Each server has its own raid 1 logical disk
Both servers are connected to an MSA2012fc with redundant paths
I have a RAID 1+0 array with a 1.5 TB volume dedicated to my Cluster Volume Disks. Cluster Volume Disks are shared between hosts (also known as members of a cluster, or nodes of a cluster)
I have a Raid 5 array with 2 volumes, the first volume being 1024 MB for my Quorum, and the rest a volume for my Cluster Disks.
When you install your server, do it with the storage disconnected. Because you haven't got your Multiple IO paths set up yet, your installation may be slower and you may also inadvertently use one of the shared storage disks.
Networking Best Practices
OK I have to tell you this straight out, and you're not going to like me.
Hyper-V Clustering does NOT SUPPORT NIC Teaming
"That's all Right" you'll probably say. "I'll just join two network cards to the same VSwitch and let Hyper-V take care of anything for me, just like VMware". Wrong. Virtual network interfaces can only be bound to one physical interface.
You can be rogue like me, and do NIC teaming anyway, and the Cluster Validator won't complain about it, but be prepared to have some really strange issues including Virtual Mac addresses bouncing between the two switch ports. Switches do not like this. So far I've experienced problems like this on Intel Teaming and HP Teaming.
When I do experience these problems, I just shut down one of the teamed ports on the switch. At least, this teamed configuration still gives me the ability to recover from a NIC failure - I just enable the shut down port.
My setup:
Nic 1 - Team 1 - Trunk Port - No untagged (no default VLAN)
Nic 2 - Team 1 - Trunk Port - No untagged (no default VLAN)
Nic 3 - Unteamed - VLAN 25 (so that I can get to it regardless of the team failure)
Nic 4 - Disconnected
Be sure that all networks which are presented to each server is available to all the servers in the cluster.
Installing the Server
Because I'm such an uber-nerd, I'm going to be making my cluster consist of Windows Core, but you can choose to use a standard Windows operating system. My operating system of choice is going to be Windows 2008 R2 SP1 Datacenter Core.
I've chosen Datacenter because I intend to run a huge amount of virtual machines on it, and as long as they are Microsoft Servers, they will automatically be licensed. NOTE: Licensed and activated are two things - you will still need to activate your virtual machines. SP1 for me is quite important, due to the improvements Hyper-V has received since R2 and R2 SP1.
Install the servers as you would any other server
Give your servers the names you desire
Join the computers to your domain (required)
Be sure to enable Remote Management:
On Windows Core, run SCONFIG, go to option 4, and enable 1) Allow MMC Remote Management, 2) Enable Windows PowerShell and 3) Allow Server Manager Remote Management
On Windows Normal, open up Server Manager, select the root of your Server Manager console, and then select "Configure Server Manager Remote Management", and then check the box "Enable remote management of this server from other computers"

Installing Cluster Software
NOTE: These instructions are for Windows 2008 R2 or better. If you have Windows 2008, you will have to use OCSETUP. Please find more resources on how to use OCSETUP, or on a GUI server, use Server Manager Roles to add the following roles.
Log into your server as a Domain Admin
Run Powershell (Start Powershell.exe)
Run the following powershell commands:
Import-Module ServerManager
Add-WindowsFeature Hyper-V,Multipath-IO,Telnet-Client,Failover-ClusteringBuild all of your servers.
Important Note : If you're using an autobuild like I do, be sure not to install Failover-Clustering as part of the build, but remember to add it before creating the cluster below.
Telnet Client is not required, but it's a very useful tool for doing open port testing - always useful to have on servers and workstations.
Attach your storage
Attach your storage to your physical servers, install the manufacturer's DSM - this is the driver that works along with the MPIO driver to provide seamless failover in the case of a path failure.
It is not necessary or recommended to configure your storage with partitions at this point!
Be certain that the two servers can talk to each other. In Windows 2003 Clustering, you had to have the servers on the same subnet. This is no longer a requirement.
Use DISKPART or Server Mangager / Storage Management to verify that you can only see one of each disk. If you can see two, then your multipath drivers (DSM) have not been installed. Please refer to your manufacturer to find your Multipath Drivers. Even in an iSCSI system, where you have multiple paths, Windows will be careful to use only one path at a time, but it's always best practice to use the vendor supplied Multipath drivers.
Create your cluster
Since we're using Windows Core, we're going to have to do this from a different workstation. Prepare your workstation first by downloading and installing the RSAT (Remote Server Administration Tools). Be sure to download the one that supports the OS of your servers.
Once RSAT is installed, go into your Control Panel, go into "Programs" and then select "Turn Windows features on or off". In the window, scroll down expand "Remote Server Administration Tools, and children nodes, and then check at least "Failover Clustering Tools" and "Hyper-V Tools".
From your Administrative Tools start menu (you may need to unhide this from your start menu first), open up "Failover Cluster Manager"
Right click "Failover Cluster Manager" and then select "Create a Cluster". For the purposes of our people who've never done this before, I'm going to screenshot every step.
 Click "Next"
 Enter your server name and click Add to select your intended cluster servers. When you click Add, it will verify that it has cluster services installed before adding it to the list. Click "Next"
 This is an important message. Microsoft will not support a cluster which does not pass these validation tests. You can validate a cluster anytime, before creating and during running. This validation will ensure that your hardware and configuration is cluster-worthy. "Click Next".
 Click "Next".
 Of course, we'll keep "Run all tests" selected. Click "Next".
 Click "Next" again if you're happy with the information it lists. A new window will open while it performs these tests.
 This is what the Validating screen looks like. Just be patient :) If you do see some warnings (red text) come up, don't panic, wait for the end report. Cluster Validation will try to test things you don't have.
 Done! Feel free to View Report (you'll have to if you get a big red X), and view the things it's complaining about, but if it says "Testing has completed successfully" like it has for me, go ahead and click "Finish". Don't get excited, because you're not actually finished yet.
 On this screen, we give the cluster a unique name. This is a virtual name which one of the cluster servers will own, and you should always use this name from now on when you talk to the cluster. the Cluster Service will automatically create an A record pointing to the IP address of the server which is owning the this Cluster Service resource. Please click "Next".
 Click Next on the confirmation screen. It is telling you "DHCP address" because our cluster servers are configured with DHCP (this is fine and supported - but naturally, not recommended).
The Wizard will now create the cluster
 Finished! Congratulations, you are now the proud owner of a cluster. It's showing me a warning, because it's a 2 node cluster and I don't have a Quorum disk - yet :D Click "Finish"
Cluster Volumes Explained
In order for a cluster to operate efficiently, it needs to use shared storage. All volumes you add to the cluster, automatically becomes a "Cluster Disk". Cluster Disks can only be owned and accessed by one node at the time, and that node is determined by the running applications node.
Cluster Disks can be converted into Cluster Shared Volumes. This is similar to a Quorum disk, because the cluster is owned by one server, but can be read and written to by all the nodes (servers) in a cluster. Cluster Shared volumes will appear as a directory on the hosts themselves, and the same directory structure will be visible on all hosts. Here is an example of the structure
Note that the free space is for the host's C: drive - but you can view the free space of each Cluster Shared volume by doing a DIR in the Volume1,Volume2, etc directory itself.
Finally, a Quorum disk is a disk which is there to assist with split brain. This is when you have an even number of cluster nodes, and network communication is lost in the the exact middle. Of course, Node1 thinks that Node2 has gone down, and Node2 thinks that Node1 has gone down. Actually, neither node has gone down, but in the end, one of the nodes has to take over the entire cluster. The Quorum node, because it's part of the shared storage, should still hopefully be accessible during a network failure, and the nodes talk with each other there to determine who's going to be kicked out of the cluster. If a decision cannot be made, then the host which owns the cluster at the time will kick the nodes it can't talk to out.
Quorum disks are not required NOR recommended in an odd number of nodes. For example, if there are 3 nodes, you will always have a server majority in the event of the network failing. Naturally, if all 3 nodes lose network connectivity, the Cluster owner will win, but at this point, nobody can use the cluster, so it doesn't matter.
You should always create a Quorum Disk, even if you don't use it. That way it's there if you need it.
Prepare your Shared Storage for the cluster.
If you've just finished building your cluster from the instructions above, your Failover Cluster Manager will now show you a rather complicate screen. Naturally, the bigger your screen, the more daunting it will look. Don't let this put you off.
We're going to park this utility for the moment (minimize it).
Please start up Server Manager from a non-core server
Right click the Server Manager (root) node, and select "Connect to Another Computer" and specify one of the servers which are part of the cluster - it won't matter which one you choose.
Expand the Storage node, and then select "Disk Management"
You will notice that you have several "Unknown" and "Offline" disks. Usually this would be cause for panic, but it's actually a good thing.
Right click all of the Disks you wish to add to the cluster in the area I've highlighted in red above, and then select "Online"
Now, right click any one of the disks (in the same area) and then select "Initialize Disk"
Be sure to select "GPT (GUID Partition Table)" before clicking OK!
In my setup above, I'm going to use Disk 1 for the Cluster Shared Volume, and disk 2 for the Quorum. Disk 3 is intended for a Pass-through disk, and I won't cover adding it here, as it is already covered in my other article - https://www.experts-exchange.com/A_7829.html
Naturally, you will have different disk numbers (and even possibly different disk numbers between hosts, but that doesn't matter), so please use your designated disks.
Right click your intended Quorum disk, and select "New Simple Volume". Choose a drive letter that won't possibly conflict with anything else. Since it's the Quorum disk, I'm going to choose "Q". Give the Volume a label of "Quorum" - this is so that we can identify it easily. Do NOT enable file and folder compression. In fact, don't enable this on ANY of your cluster storage.
Right click your intended Cluster Shared Volume, and create a simple volume. Format it but do not assign a drive letter or drive path! I'd also suggest calling it a volume name that will mean something to you.
Once you've created all the partitions you want (I won't create one for the last disk, because it's not covered in this guide), you have to make all the disks "Offline" again. The Offline ensures that the operating system does not interfere with these disks. The cluster will control these disks from now.
Adding the Hard Disks to your Cluster
Please bring your Failover Cluster Manager forward again, expand the cluster, and then select the "Storage" node. Right click the "Storage Node" and then select "Add a Disk"
Because we've prepared these disks, they are available to add. Cluster Disks have to be GUID based, because it uses the GUID to track the resource.
After the disks have been added, they will appear in the Summary of Storage. These disks automatically become "Available Storage" because they are not allocated to anything yet. The first thing I do is to rename them from their default "Cluster Disk 1" into something else, so that I can identify them more easily. I've renamed my two to "Quorum Disk" and "Cluster Volume 1" respectively. Right click - properties will allow you to change the name.
Let's now create our Cluster Shared Volume, but first, we have to enable Cluster Shared Volumes.
Right click the Cluster Node and select "Enable Cluster Shared Volumes"
Read the notice, and check the box to say you have read the above notice, and then click "OK"
Select the new node named "Cluster Shared Volumes" which has appeared, right click it and then select "Add Storage"
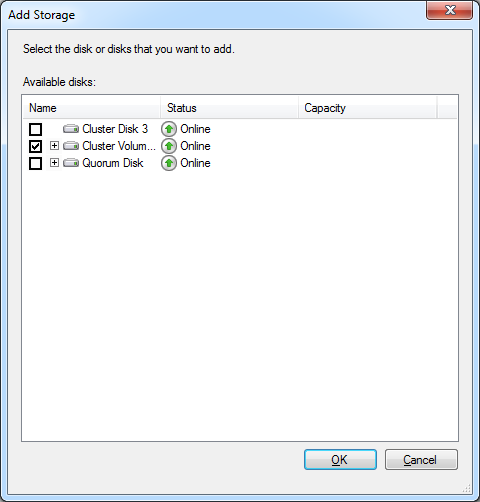
Only select the disks which you intend to use as a Cluster Shared Volume, and then click "OK". The Cluster Shared Volume will be configured and added, and then brought online by one of the nodes.
Finally, our Quorum. A lot of confusion exists around the quorum, but the rule is simple - an even amount of nodes (servers), then a quorum is highly recommended. An odd number of servers, and a quorum is not recommended.
Do not follow these next steps if you have an even number of nodes.
We turn the quorum on and off by changing the cluster majority node mode. To do this, right click the cluster name node, hover over "More Actions" and then select "Configure Cluster Quorum Settings"
Again, I will screenshot every step, with comments below the step.
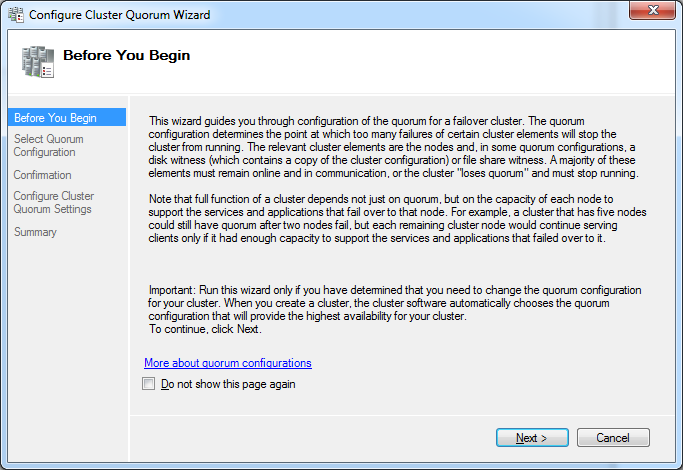 After reading the notice, select "Next"
 Choose the Quorum Configuration which it recommends for your current number of nodes, and then click "Next".
 Select the disk we prepared earlier, and then click "Next"
 At the Confirmation Screen, click "Next"
 The summary will confirm that you've been successful.
If you had an even number of nodes, and you add a node, you need to go through this again to change the Quorum Configuration to be Node Majority. When you do this, your Quorum will become Available Storage again, but that's fine, just leave it there and ignore it :)
The Quorum will ALWAYS be hosted by the server which holds the Cluster Resource - i.e. the server which holds the Cluster IP address and manages the cluster. If you ever need to take down this host, you need to move the Cluster and Quorum off it. Do this by jumping to a command prompt on one of the hosts, and typing
Cluster Group "Cluster Group" /moveMy cluster is now nice and healthy.
Add Virtual Networks
In order to create virtual machines, I have to create virtual networks for the VM's to use. There are many ways one can do this, so the example I'm giving you is for my real world scenario. Unfortunately, you cannot create or manage virtual networks inside Failover Cluster Manager, and here we now run Hyper-V Manager instead.
When I created my team earlier, I also added a VLAN to the team. The teaming software then created a new virtual adapter - it is this virtual adapter I intend to use for my new Virtual Network. Naturally, I had to do this on both servers. I'm creating VLANS because my teams are connected to trunk ports. If you do not have trunk ports, then just use the physical NIC or the team NIC - whichever is applicable.
Add both of your nodes to Hyper-V manager - since you have to do this to both of them.
Right click one of the nodes, and then select Virtual Network Manager
Click Add, and then on the created Virtual network, give it a Name and then choose the network interface.
The default check for "Allow management operating system to share this network adapter" should be removed If this is an isolated network (like a VLAN). If you do not un-check this, it will create both a virtual network, and a virtual adapter on the server. Leaving this checkbox checked will cause you quite a severe headache, because your host will start receiving IP's for networks you probably don't want it to. Be warned though if you un-check this box, it will complain regardless, and lie that you won't be able to communicate to the server. My configuration calls for me to un-check this, but -
If you do not have a fancy configuration like I do, then you must keep this checked, otherwise you are going to turn your physical network card into a virtual network - and you will no longer be able to talk to your server
Use the same Name on all servers, otherwise you will have an issue when moving a Virtual Machine from one node to another.
Let's use our cluster!
Now that we have a fully functioning cluster, let's actually use the cluster. Because we want to create a Highly Available Machine - i.e. a machine that the cluster is aware of and moves around if required - then we should use Failover Cluster Manager. Follow the err.. following instructions.
 Right click Services and applications, move over "Virtual Machines", move over "New Virtual Machine" and then select a host. A host must always be selected when placing a machine - but the machine can be moved to another host afterwards.
 Click "Next". Interesting that it allows you to click Finish. This means that if you feel you've entered enough information, you can click Finish at any time. We will go through all the screens though.
 Specify the name of the virtual machine and the location of it. NOTE - This location is actually the location on the host - not your machine where you're running Failover Cluster Manager from. Specify the root path of the Cluster Shared Volume as explained much earlier in this guide. You can Click Browse to browse to it - it will browse the host. Click "Next"
 Set the amount of memory you'd like to assign. Click "Next"
 Use the drop down to choose the network location we created a little while ago. Click "Next"
 Choose a more realistic size for your virtual machine, and then click "Next"
 Configure your Installation Options as per your requirements. I'm going to choose "Install an operating system later". If you choose "Install an operating system from a network-based installation server" - which is what I'll be doing ANYWAY, then the Virtual Machine will boot from network first. Click Next.
 Click "Finish" and watch your Virtual Machine being created.
 The summary will confirm that it's a highly available virtual machine, which means your Virtual machine can now be moved from one host to another seamlessly - you can even do this while it's running and users are using it.
Where to go from here/tips
There are many sources on the Internet and on online bookshops which will guide you through keeping your cluster in good shape. I currently run two clusters (the one I've documented here is the second one) plus a VMware cluster. 7 servers in total running 220 virtual machines.
You do have another software option to manage your Virtual Machines - and that is SCVMM (System Center Virtual Machine Manger). This does make a lot of your common tasks easier to do, and it's highly recommended.
If you ever need to use pass-through disks - what I also refer to as Raw LUNS, you can follow my other guide on EE - https://www.experts-exchange.com/A_7829.html
Please be sure not to over commit any of your servers! The whole idea of a cluster is high availability, and your boss is not going to be impressed when you tell him that one of the nodes failed and you didn't have enough memory to run everything on the other one!
All virtual disks that get created are Thin Provisioned - that means they start small and get bigger as they get fuller. Watch out for your free space! It's very easy to over commit on disk too, and then suddenly run out. the Cluster is very kind though, and will pause any running virtual machines if this happens to you.
Do not defrag a thin provisioned virtual disk! A thin provisioned disk can get fragmented very easily both at the Virtual file system, and also on the physical storage. Virtually defragging, or physically defragging this disk is not advised, because there is a chance you can degrade the performance. It's OK to virtually defrag a fixed-size virtual disk.
Don't be stingy! Just because you have a limited amount of cores on your server, doesn't mean you can't over-allocate on virtual CPU's. A 64 core server can quite happily run 100 virtual servers with between 1 and 4 vCPU's each. Of course, if each one of those servers is running BOINC or SETI, then expect a bit of an issue :)
Hyper-V Clustering requires a domain, and naturally when you create your cluster, you will have a domain controller somewhere, that it would talk to. Whatever you do, DO NOT migrate this physical server to become a virtual machine in your cluster! Always have at least one physical writeable domain controller - with DNS (and DHCP for the Cluster Nodes, if applicable) because the Cluster nodes have to authenticate to Active Directory and obtain their configuration before they work! If you experience a power failure, you will want to be sure to start up your physical Domain Controller first, and then your cluster nodes.
I hope you have found this guide to be helpful.
Have a question about something in this article? You can receive help directly from the article author. Sign up for a free trial to get started.
Comments (5)
Commented:
Commented:
Commented:
Commented:
Commented:
Storage Explored, Explained, and Exampled
HOWTO: iSCSI with Multi-Path in a Windows Server Environment