

Browse All Articles > Setting up an Android Development Environment on Windows
Android is growing in popularity and we are seeing more and more developments. It is not that difficult, but does require a bit of manual effort in setting up your development environment properly. Here are the steps I have taken to setup my development environment on Windows.
Before you start you will need to download an IDE like Eclipse. I downloaded Eclipse Classic 3.6. Eclipse does not install like a usual windows application so you have to manually copy the eclipse folder to a suitable location on your hard drive then create yourself a shortcut.
Install the JDK if you do not have it already.
Install the Android SDK starter package I downloaded the windows executable from here
make a note of the install path as you will need this in the next step. In my case it was "C:\Program Files\Android\android-sdk-windows" . When the starter package install has finished agree to run and then select the "accept all" check box to download all the SDK tools.
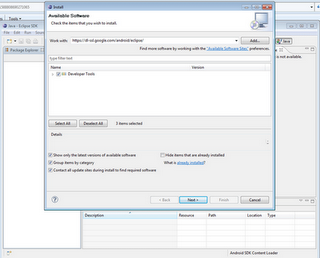
Install the ADT Plugin. Open Eclipse and select Help/Install New Software click add in the top right corner then enter ADT Plugin for the name and input the following link.
https://dl-ssl.google.com/android/eclipse/
![screenshot1]()
then click next, accept the agreement and click finish to install the plugin.
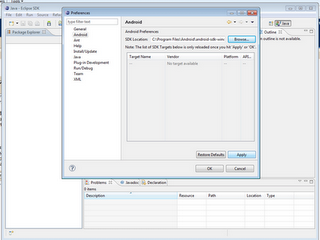
To configure the ADT plugin click Window/Preferences, select android on the left then paste in or browse to the path of your sdk location.
![screenshot2]()
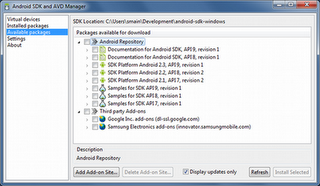
To add platforms or other components double-click the SDK Manager.ext file at the root of the Android SDK directory. Here you can also setup virtual devices.
![screenshot3]()
To debug and run your application you can setup a virtual device otherwise known as an AVD.
To create an AVD go to Window \ Android SDK Manager , AVD Manager
then select virtual devices on the left. Click new to launch the AVD dialog.
Give the AVD a name this can be any name for your reference. It is possible to have many different AVD's
with different configurations. I called my first one avd1.
You will then need to choose a target, this is the target system image that will run on the virtual device.
The dropdown will list the target platforms that you installed earlier through the SDK manager.
There are some additional options that you can specify if you want to:
SD Card - this creates a virtual SD card for your virtual device at the size you specify.
Skin - this is the target device type / screen resolution.
Thats everything setup you are now ready to start coding your first Android application.
Before you start you will need to download an IDE like Eclipse. I downloaded Eclipse Classic 3.6. Eclipse does not install like a usual windows application so you have to manually copy the eclipse folder to a suitable location on your hard drive then create yourself a shortcut.
Install the JDK if you do not have it already.
Install the Android SDK starter package I downloaded the windows executable from here
make a note of the install path as you will need this in the next step. In my case it was "C:\Program Files\Android\android-sdk-
Install the ADT Plugin. Open Eclipse and select Help/Install New Software click add in the top right corner then enter ADT Plugin for the name and input the following link.
https://dl-ssl.google.com/android/eclipse/
then click next, accept the agreement and click finish to install the plugin.
To configure the ADT plugin click Window/Preferences, select android on the left then paste in or browse to the path of your sdk location.
To add platforms or other components double-click the SDK Manager.ext file at the root of the Android SDK directory. Here you can also setup virtual devices.
To debug and run your application you can setup a virtual device otherwise known as an AVD.
To create an AVD go to Window \ Android SDK Manager , AVD Manager
then select virtual devices on the left. Click new to launch the AVD dialog.
Give the AVD a name this can be any name for your reference. It is possible to have many different AVD's
with different configurations. I called my first one avd1.
You will then need to choose a target, this is the target system image that will run on the virtual device.
The dropdown will list the target platforms that you installed earlier through the SDK manager.
There are some additional options that you can specify if you want to:
SD Card - this creates a virtual SD card for your virtual device at the size you specify.
Skin - this is the target device type / screen resolution.
Thats everything setup you are now ready to start coding your first Android application.
Have a question about something in this article? You can receive help directly from the article author. Sign up for a free trial to get started.
Comments (4)
Commented:
Author
Commented:Commented:
Commented:
Just a thought.
You could have also included dteps to enable the android virtual device to use virtualization from bios. And then enable it in eclipse.It will increase the speed of the emulator considerably.