PaperPort - How To Achieve More Than Five Scanning Profiles in the Standard Edition


50+ years in computers
EE FELLOW 2017 — first ever recipient of Fellow award
MVE 2015,2016,2018
CERTIFIED GOLD EXPERT
DISTINGUISHED EXPERT
EE FELLOW 2017 — first ever recipient of Fellow award
MVE 2015,2016,2018
CERTIFIED GOLD EXPERT
DISTINGUISHED EXPERT
Published:
Browse All Articles > PaperPort - How To Achieve More Than Five Scanning Profiles in the Standard Edition
PaperPort is a popular document imaging/management product from Nuance Communications, previously known as ScanSoft. PaperPort is in widespread use by both individuals and businesses.
The current version of PaperPort is 14. The previous version was 12. Yes, Nuance got superstitious and skipped 13. Both of these most recent versions come in two editions, Professional and Standard, although the Nuance folks do not call it Standard – they simply leave Professional off the name, i.e., PaperPort 12 and PaperPort Professional 12; PaperPort 14 and PaperPort Professional 14. In this article, I refer to them as PP-Std and PP-Pro, and all such references are valid for versions 12 and 14.
There are numerous differences between PP-Std and PP-Pro. The comparison matrices may be seen in the Files section at this PaperPort wiki in these files:
Comparison Matrix of PP12 Standard and PP12 Professional.pdf
Comparison Matrix of PP14 Standard and PP14 Professional.pdf
As shown in the documents above, one of the differences between PP-Std and PP-Pro is that the former allows only five Scanning Profiles to be created, while the latter allows an unlimited number. However, it turns out that PP-Std will properly handle an unlimited number of Scanning Profiles. The problem is that it won't let you create them. This is easy to overcome by creating the file containing the Scanning Profiles outside of PP-Std. This article describes two ways to do it.
Statement regarding legality before going further: The PaperPort End-User License Agreements for versions 12 and 14 are posted in the Files section of the wiki at the link above in the following files:
PaperPort 12 EULA.pdf
PaperPort 14 EULA.pdf
There is nothing in either of these EULAs preventing the usage of PP-Std and PP-Pro as described in this article.
With that said, on to the solution. The file containing the Scanning Profiles is a plain text file in XML format called Profiles.xml. For both PP-Std and PP-Pro it is located here:
PP12 in XP
c:\Documents and Settings\All Users\Application Data\Nuance\PaperPort\12\Profiles.xml
PP14 in XP
c:\Documents and Settings\All Users\Application Data\Nuance\PaperPort\14\Profiles.xml
PP12 in Vista, W7, W8
c:\Users\All Users\Nuance\PaperPort\12\Profiles.xml
PP14 in Vista, W7, W8
c:\Users\All Users\Nuance\PaperPort\14\Profiles.xml
Here's an example of what Profiles.xml looks like:
The solution to getting more than five Scanning Profiles in PP-Std is to create a new Profiles.xml file (with as many Scanning Profiles as you want) outside of PP-Std and then simply copy the new file over the current one (good practice, of course, is to save the current one to a safe location just in case something goes awry and you need to restore it). Below are two ways to create a new Profiles.xml file.
Method 1: Utilize PP-Pro
If you have PP-Pro, create all of the Scanning Profiles there and then copy its Profiles.xml file to the PP-Std system. Very simple and works a charm! Two comments with this method: (i) Before overwriting the PP-Std Profiles.xml file, copy it to Profiles-restore.xml. This is just a safety measure in case things get messed up and you need to restore it. (ii) Exit PP-Std before overwriting its Profiles.xml file with the one from the PP-Pro system.
Method 2: Use PP-Std and an XML or Text Editor
This is more difficult but can be done without having access to PP-Pro. Here are the steps:
(1) Exit PP-Std.
(2) Copy Profiles.xml to Profiles-restore.xml. This is just a safety measure in case the process goes haywire and you need to restore it. Copy it again to Profiles-save.xml, which is the file you'll be using later in step (5) below.
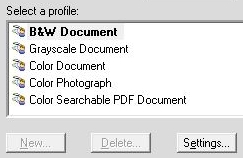
(3) Run PP-Std and click the Scan Settings button on the ribbon, which brings up the Scan or Get Photo pane. In a fresh installation of PP-Std, the Select a profile section of that pane looks like this:
![Scanning Profiles fresh install PP14-Std]()
Notice that the New... and the Delete... buttons are disabled. It seems that the philosophy of PP-Std is to provide five Scanning Profiles – no more, no less. I think it should allow the user to delete profiles and then add new ones up to a maximum of five, but that's not the way it works. PP-Pro, of course, has the New... and the Delete... buttons enabled.
(4) Now you're ready to add new Scanning Profiles, which you're going to do by modifying the existing ones. Highlight a profile in the Scan or Get Photo pane and then click the Settings... button. Change its parameters to whatever you want for the new profile and give it a new name. The key point is that this modifies Profiles.xml accordingly. You may, of course, do this on any or all of the five Scanning Profiles.
(5) Exit PP-Std. The basic idea now is to combine the changed/current Profiles.xml file with the saved/previous Profiles-save.xml file. This may be done with an XML editor or even a plain text editor, like Notepad. Just be careful not to have duplicate entries when you combine the two files. Also be careful to have just one beginning XML tag of Profiles and one ending XML tag of /Profiles. Between those two tags you may have any number of pairs of profile name tags, that is, tags like Profile name="whatever..." and /Profile, meaning the new/combined Profiles.xml file may have an unlimited number of Scanning Profiles. PP-Std will show all of them and they will all function properly!
Enjoy your PaperPort 12 or PaperPort 14 (Standard edition) with as many Scanning Profiles as you'd like!
If you find this article to be helpful, please click the thumbs-up icon below. This lets me know what is valuable for EE members and provides direction for future articles. Thanks very much! Regards, Joe
The current version of PaperPort is 14. The previous version was 12. Yes, Nuance got superstitious and skipped 13. Both of these most recent versions come in two editions, Professional and Standard, although the Nuance folks do not call it Standard – they simply leave Professional off the name, i.e., PaperPort 12 and PaperPort Professional 12; PaperPort 14 and PaperPort Professional 14. In this article, I refer to them as PP-Std and PP-Pro, and all such references are valid for versions 12 and 14.
There are numerous differences between PP-Std and PP-Pro. The comparison matrices may be seen in the Files section at this PaperPort wiki in these files:
Comparison Matrix of PP12 Standard and PP12 Professional.pdf
Comparison Matrix of PP14 Standard and PP14 Professional.pdf
As shown in the documents above, one of the differences between PP-Std and PP-Pro is that the former allows only five Scanning Profiles to be created, while the latter allows an unlimited number. However, it turns out that PP-Std will properly handle an unlimited number of Scanning Profiles. The problem is that it won't let you create them. This is easy to overcome by creating the file containing the Scanning Profiles outside of PP-Std. This article describes two ways to do it.
Statement regarding legality before going further: The PaperPort End-User License Agreements for versions 12 and 14 are posted in the Files section of the wiki at the link above in the following files:
PaperPort 12 EULA.pdf
PaperPort 14 EULA.pdf
There is nothing in either of these EULAs preventing the usage of PP-Std and PP-Pro as described in this article.
With that said, on to the solution. The file containing the Scanning Profiles is a plain text file in XML format called Profiles.xml. For both PP-Std and PP-Pro it is located here:
PP12 in XP
c:\Documents and Settings\All Users\Application Data\Nuance\PaperPort\12\P
PP14 in XP
c:\Documents and Settings\All Users\Application Data\Nuance\PaperPort\14\P
PP12 in Vista, W7, W8
c:\Users\All Users\Nuance\PaperPort\12\
PP14 in Vista, W7, W8
c:\Users\All Users\Nuance\PaperPort\14\
Here's an example of what Profiles.xml looks like:
<?xml version="1.0" encoding="UTF-8"?>
<Profiles>
<Profile name="B&W PDF Searchable Best Duplex" view-order="-1" version="1">
<Description>B&W PDF Searchable Best Duplex</Description>
<ImgProc auto-orient="1" auto-crop="0" auto-crop-type="0" scale="0" page-size-percent-based="1" page-size="43" page-size-percent="100" page-size-width="0" page-size-height="0" page-size-units="1" delete-blankpage="1" Auto-straighten="1" Auto-enhance="0" EraseEdges="0" EraseEdges-left="0" EraseEdges-right="0" EraseEdges-top="0" EraseEdges-bottom="0" EraseEdges-units="1" SinglePageItems="0" BlankPageSeparated="0" Auto-enhance_LightColor="14803425" Auto-enhance_DarkColor="1973790"/>
<ScanSettings resBW="32" resGray="200" resColor="32" imgtype="0" auto-brightBW="0" auto-brightGray="1" auto-brightColor="0" brightnessBW="75" brightnessGray="50" brightnessColor="50" landscape="0" contrastGray="50" contrastColor="50" page-size="43" units="1" color-drop="1" SourceType="-2147483120"/>
<Destination txt-format="16" PrefixName="" DocumentName="NewScan" SuffixName="nnnnn" SeparatorName="" UseCustom="1" Compression-mode="0" Use-MRC="0" Copy-folder_notes="0" Do-AllInOne-index="0" UseCustomPrefix="0" View-result="0"/>
<OCR language="0" page-layout="0" retain-graphics="0"/>
</Profile>
<Profile name="Color JPG Best" view-order="-1" version="1">
<Description>Color JPG Best</Description>
<ImgProc auto-orient="0" auto-crop="0" auto-crop-type="0" scale="0" page-size-percent-based="1" page-size="43" page-size-percent="100" page-size-width="0" page-size-height="0" page-size-units="1" delete-blankpage="0" Auto-straighten="1" Auto-enhance="0" EraseEdges="0" EraseEdges-left="0" EraseEdges-right="0" EraseEdges-top="0" EraseEdges-bottom="0" EraseEdges-units="1" SinglePageItems="1" BlankPageSeparated="0" Auto-enhance_LightColor="14803425" Auto-enhance_DarkColor="1973790"/>
<ScanSettings resBW="4" resGray="200" resColor="4" imgtype="2" auto-brightBW="1" auto-brightGray="1" auto-brightColor="0" brightnessBW="50" brightnessGray="50" brightnessColor="50" landscape="0" contrastGray="50" contrastColor="50" page-size="43" units="1" color-drop="1" SourceType="4"/>
<Destination txt-format="21" PrefixName="" DocumentName="NewScan" SuffixName="nnnnn" SeparatorName="" UseCustom="1" Compression-mode="0" Use-MRC="0" Copy-folder_notes="0" Do-AllInOne-index="0" UseCustomPrefix="0" View-result="0" OCR="0"/>
<OCR language="0" page-layout="1" retain-graphics="1"/>
</Profile>
<Profile name="Grayscale PDF Searchable Best Simplex" view-order="-1" version="1">
<Description>Grayscale PDF Searchable Best Simplex</Description>
<ImgProc auto-orient="1" auto-crop="0" auto-crop-type="0" scale="0" page-size-percent-based="1" page-size="43" page-size-percent="100" page-size-width="0" page-size-height="0" page-size-units="1" delete-blankpage="0" Auto-straighten="1" Auto-enhance="0" EraseEdges="0" EraseEdges-left="0" EraseEdges-right="0" EraseEdges-top="0" EraseEdges-bottom="0" EraseEdges-units="1" SinglePageItems="0" BlankPageSeparated="0" Auto-enhance_LightColor="14803425" Auto-enhance_DarkColor="1973790"/>
<ScanSettings resBW="32" resGray="8" resColor="4" imgtype="1" auto-brightBW="0" auto-brightGray="0" auto-brightColor="0" brightnessBW="50" brightnessGray="75" brightnessColor="50" landscape="0" contrastGray="50" contrastColor="50" page-size="43" units="1" color-drop="1" SourceType="4"/>
<Destination txt-format="16" PrefixName="" DocumentName="NewScan" SuffixName="nnnnn" SeparatorName="" UseCustom="1" Compression-mode="0" Use-MRC="0" Copy-folder_notes="0" Do-AllInOne-index="0" UseCustomPrefix="0" View-result="0"/>
<OCR language="0" page-layout="0" retain-graphics="0"/>
</Profile>
<Profile name="B&W TIF" view-order="-1" version="1">
<Description>B&W TIF</Description>
<ImgProc auto-orient="0" auto-crop="0" auto-crop-type="0" scale="0" page-size-percent-based="1" page-size="43" page-size-percent="100" page-size-width="0" page-size-height="0" page-size-units="1" delete-blankpage="0" Auto-straighten="1" Auto-enhance="0" EraseEdges="0" EraseEdges-left="0" EraseEdges-right="0" EraseEdges-top="0" EraseEdges-bottom="0" EraseEdges-units="1" SinglePageItems="0" BlankPageSeparated="0" Auto-enhance_LightColor="14803425" Auto-enhance_DarkColor="1973790"/>
<ScanSettings resBW="32" resGray="32" resColor="200" imgtype="0" auto-brightBW="0" auto-brightGray="0" auto-brightColor="1" brightnessBW="50" brightnessGray="50" brightnessColor="50" landscape="0" contrastGray="50" contrastColor="50" page-size="43" units="1" color-drop="1" SourceType="4"/>
<Destination txt-format="25" PrefixName="" DocumentName="NewScan" SuffixName="nnnnn" SeparatorName="" UseCustom="1" Compression-mode="0" Use-MRC="0" Copy-folder_notes="0" Do-AllInOne-index="0" UseCustomPrefix="0" View-result="0"/>
<OCR language="0" page-layout="1" retain-graphics="1"/>
</Profile>
</Profiles>The solution to getting more than five Scanning Profiles in PP-Std is to create a new Profiles.xml file (with as many Scanning Profiles as you want) outside of PP-Std and then simply copy the new file over the current one (good practice, of course, is to save the current one to a safe location just in case something goes awry and you need to restore it). Below are two ways to create a new Profiles.xml file.
Method 1: Utilize PP-Pro
If you have PP-Pro, create all of the Scanning Profiles there and then copy its Profiles.xml file to the PP-Std system. Very simple and works a charm! Two comments with this method: (i) Before overwriting the PP-Std Profiles.xml file, copy it to Profiles-restore.xml. This is just a safety measure in case things get messed up and you need to restore it. (ii) Exit PP-Std before overwriting its Profiles.xml file with the one from the PP-Pro system.
Method 2: Use PP-Std and an XML or Text Editor
This is more difficult but can be done without having access to PP-Pro. Here are the steps:
(1) Exit PP-Std.
(2) Copy Profiles.xml to Profiles-restore.xml. This is just a safety measure in case the process goes haywire and you need to restore it. Copy it again to Profiles-save.xml, which is the file you'll be using later in step (5) below.
(3) Run PP-Std and click the Scan Settings button on the ribbon, which brings up the Scan or Get Photo pane. In a fresh installation of PP-Std, the Select a profile section of that pane looks like this:
Notice that the New... and the Delete... buttons are disabled. It seems that the philosophy of PP-Std is to provide five Scanning Profiles – no more, no less. I think it should allow the user to delete profiles and then add new ones up to a maximum of five, but that's not the way it works. PP-Pro, of course, has the New... and the Delete... buttons enabled.
(4) Now you're ready to add new Scanning Profiles, which you're going to do by modifying the existing ones. Highlight a profile in the Scan or Get Photo pane and then click the Settings... button. Change its parameters to whatever you want for the new profile and give it a new name. The key point is that this modifies Profiles.xml accordingly. You may, of course, do this on any or all of the five Scanning Profiles.
(5) Exit PP-Std. The basic idea now is to combine the changed/current Profiles.xml file with the saved/previous Profiles-save.xml file. This may be done with an XML editor or even a plain text editor, like Notepad. Just be careful not to have duplicate entries when you combine the two files. Also be careful to have just one beginning XML tag of Profiles and one ending XML tag of /Profiles. Between those two tags you may have any number of pairs of profile name tags, that is, tags like Profile name="whatever..." and /Profile, meaning the new/combined Profiles.xml file may have an unlimited number of Scanning Profiles. PP-Std will show all of them and they will all function properly!
Enjoy your PaperPort 12 or PaperPort 14 (Standard edition) with as many Scanning Profiles as you'd like!
If you find this article to be helpful, please click the thumbs-up icon below. This lets me know what is valuable for EE members and provides direction for future articles. Thanks very much! Regards, Joe
50+ years in computers
EE FELLOW 2017 — first ever recipient of Fellow award
MVE 2015,2016,2018
CERTIFIED GOLD EXPERT
DISTINGUISHED EXPERT
EE FELLOW 2017 — first ever recipient of Fellow award
MVE 2015,2016,2018
CERTIFIED GOLD EXPERT
DISTINGUISHED EXPERT
Have a question about something in this article? You can receive help directly from the article author. Sign up for a free trial to get started.
Comments (2)
Commented:
Great suggestion 2 comments:
1 My PP 14.5 std stores file in C:\ProgramData\Nuance\Pape
2. Notepad++ great free app for viewin/editing xml files.
Many thanks
Author
Commented:Sorry I'm just replying to your 25-Mar-2016 comment now. I don't recollect seeing it when it first came in and only just now saw it when I received a notification that you endorsed the article today — btw, thanks for that!
> My PP 14.5 std stores file in C:\ProgramData\Nuance\Pape
You will also find it at C:\Users\All Users\Nuance\PaperPort\14\
> Notepad++ great free app for viewing/editing xml files.
I have Notepad++ installed and agree that it is a great free app, although I use it only for test purposes, since I do all of my text editing with my fav text editor that I've been using forever. But thanks for the tip to our readers! Regards, Joe