How to install Exchange Server 2013 from Command Prompt


Tamilan... Passion about Messaging & Collaboration Technologies. Available in Experts Exchange during IST Hours.
Published:
Browse All Articles > How to install Exchange Server 2013 from Command Prompt
In this post, we will have a look on how to install Exchange Server 2013 from command prompt, instead of using the graphical user interface.
Below are the steps that are to be performed to install Exchange Server 2013.
1. Domain Controller and Global Catalog server requirement
2. Operating System requirement
3. Coexistence of Legacy version of Exchange
4. Prerequisites installation
5. Installing Exchange Server
6. Preparing Schema
7. Preparing Active Directory
8. Installing Exchange Server 2013 in Command Prompt
Domain Controller and Global Catalog server requirement
Schema Master - Windows Server 2003 SP2
Global Catalog server and Domain Controller - Windows Server 2008
Domain and Forest Function Level has to be Windows 2003 or later
Operating System requirement
Exchange Server 2013 can be installed only on Windows Server 2008 R2 Sp1 and Windows Server 2012
Coexistence of Legacy version of Exchange
Exchange server 2007 and Exchange Server 2010 can co exist with Exchange Server 2013 (You need a Rollup for Exchange 2007 and Exchange 2010 has to be ungraded to Service Pack 3. Both the rollup and Exchange 2010 Sp3 will be released on First quarter of Year 2013). Exchange Server 2003 needs to be uninstalled before installing Exchange Server 2013.
Prerequisites installation
These prerequisites are to be installed using Windows Server 2008 R2 ( http://technet.microsoft.com/en-us/library/bb691354(v=exchg.150))
Microsoft .NET Framework 4.5 RC
Windows Management Framework 3.0
Microsoft Unified Communications Managed API 4.0, Core Runtime 64-bit
Microsoft Office 2010 Filter Pack 64 bit
Microsoft Office 2010 Filter Pack SP1 64 bit
Microsoft Knowledge Base article KB974405 (Windows Identity Foundation)
Knowledge Base article KB2619234 (Enable the Association Cookie/GUID that is used by RPC over HTTP to also be used at the RPC layer in Windows 7 and in Windows Server 2008 R2)
Knowledge Base article KB2533623 (Insecure library loading could allow remote code execution)
Note: Once you have installed the "Microsoft Unified Communications Managed API 4.0, Core Runtime 64-bit ", you have to uninstall the component "Microsoft Visual C++ 11 Beta Redistributable (x64)"
Register ASP.NET with .NET Framework 4.5 in Internet Information Services (IIS) using the command below. This needs to be done from the command prompt and once the registration is completed, reset IIS using IISRESET command.
Schema Preparation can be done from the command prompt as shown below
Navigate to the Exchange 2013 installation file path and execute the setup.exe file with the following switch:
![Prepare Schema]()
Prepare Active Directory
Navigate to the Exchange 2013 installation file path and execute the setup.exe file with the following switch:
![Prepare AD]()
Once the Active Directory Preparation is completed, default set of below Security Groups related to Exchange Server 2013 will be created automatically
![Security Groups]()
Installing Exchange Server
For this demo, we assume the following details:
1. I am going to install Exchange Server 2013 with Client Access, Mailbox and Management Tools.
2. I am assuming that this server is an external internet-facing Client Access Server
3. I am changing the installation Directory to a different drive
![Installation]()
Once the Exchange installation is completed, you can user the URL https:\\CASServerName\ECP to login to the Exchange Admin Center
Below are the steps that are to be performed to install Exchange Server 2013.
1. Domain Controller and Global Catalog server requirement
2. Operating System requirement
3. Coexistence of Legacy version of Exchange
4. Prerequisites installation
5. Installing Exchange Server
6. Preparing Schema
7. Preparing Active Directory
8. Installing Exchange Server 2013 in Command Prompt
Domain Controller and Global Catalog server requirement
Schema Master - Windows Server 2003 SP2
Global Catalog server and Domain Controller - Windows Server 2008
Domain and Forest Function Level has to be Windows 2003 or later
Operating System requirement
Exchange Server 2013 can be installed only on Windows Server 2008 R2 Sp1 and Windows Server 2012
Coexistence of Legacy version of Exchange
Exchange server 2007 and Exchange Server 2010 can co exist with Exchange Server 2013 (You need a Rollup for Exchange 2007 and Exchange 2010 has to be ungraded to Service Pack 3. Both the rollup and Exchange 2010 Sp3 will be released on First quarter of Year 2013). Exchange Server 2003 needs to be uninstalled before installing Exchange Server 2013.
Prerequisites installation
These prerequisites are to be installed using Windows Server 2008 R2 ( http://technet.microsoft.com/en-us/library/bb691354(v=exchg.150))
Microsoft .NET Framework 4.5 RC
Windows Management Framework 3.0
Microsoft Unified Communications Managed API 4.0, Core Runtime 64-bit
Microsoft Office 2010 Filter Pack 64 bit
Microsoft Office 2010 Filter Pack SP1 64 bit
Microsoft Knowledge Base article KB974405 (Windows Identity Foundation)
Knowledge Base article KB2619234 (Enable the Association Cookie/GUID that is used by RPC over HTTP to also be used at the RPC layer in Windows 7 and in Windows Server 2008 R2)
Knowledge Base article KB2533623 (Insecure library loading could allow remote code execution)
Note: Once you have installed the "Microsoft Unified Communications Managed API 4.0, Core Runtime 64-bit ", you have to uninstall the component "Microsoft Visual C++ 11 Beta Redistributable (x64)"
Register ASP.NET with .NET Framework 4.5 in Internet Information Services (IIS) using the command below. This needs to be done from the command prompt and once the registration is completed, reset IIS using IISRESET command.
%SystemDrive%\Windows\Microsoft.NET\Framework64\v4.0.30319\aspnet_regiis.exe -ir -enableSchema Preparation can be done from the command prompt as shown below
Navigate to the Exchange 2013 installation file path and execute the setup.exe file with the following switch:
D:\Exchange-2013>Setup.exe /PrepareSchema /IAcceptExchangeServerLicenseTerms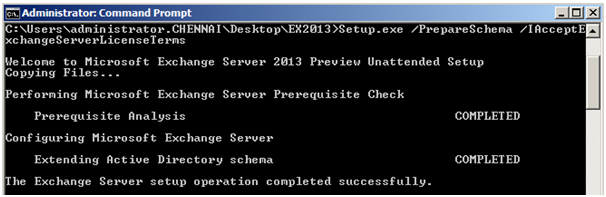
Prepare Active Directory
Navigate to the Exchange 2013 installation file path and execute the setup.exe file with the following switch:
D:\Exchange-2013>Setup.exe /PrepareAD /OrganizationName:OrganizationName /IAcceptExchangeServerLicenseTerms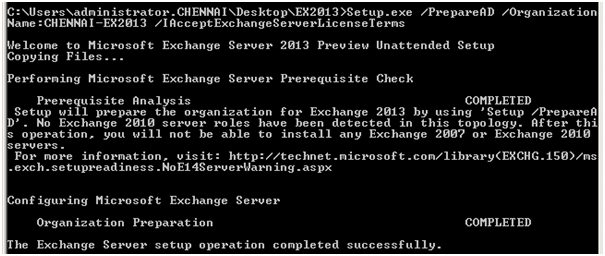
Once the Active Directory Preparation is completed, default set of below Security Groups related to Exchange Server 2013 will be created automatically

Installing Exchange Server
For this demo, we assume the following details:
1. I am going to install Exchange Server 2013 with Client Access, Mailbox and Management Tools.
2. I am assuming that this server is an external internet-facing Client Access Server
3. I am changing the installation Directory to a different drive
D:\Exchange-2013>Setup.exe /Mode:Install /Roles:ClientAccess, Mailbox, ManagementTools /t E:\Exchange-Installation /ExchangeCASServerDomain:Chennai-Exchange /IAcceptExchangeServerLicenseTerms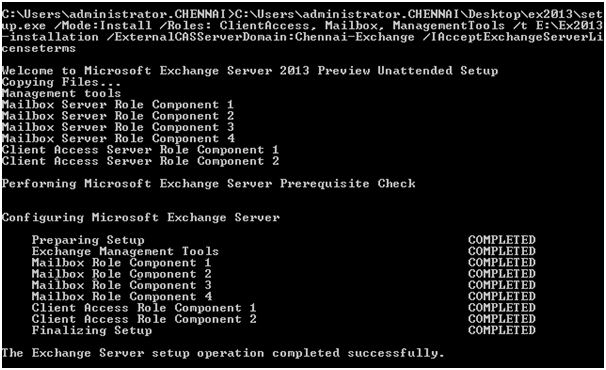
Once the Exchange installation is completed, you can user the URL https:\\CASServerName\ECP to login to the Exchange Admin Center
Tamilan... Passion about Messaging & Collaboration Technologies. Available in Experts Exchange during IST Hours.
Have a question about something in this article? You can receive help directly from the article author. Sign up for a free trial to get started.
Comments (0)