Displaying Checkboxes In An SSRS Report


1998: C++ - SQL Server 6.5
2000-2007: C++, VB6, C#, java - SQL Server 7.0-2005
2008-...: SQL Server 2005-2016
2014-2017: MVP Data Platform
2000-2007: C++, VB6, C#, java - SQL Server 7.0-2005
2008-...: SQL Server 2005-2016
2014-2017: MVP Data Platform
Published:
Browse All Articles > Displaying Checkboxes In An SSRS Report
Introduction
On the forums I now and then encounter questions asking for the possibility to display a checkbox control on a Reporting Services report. And the methods usually presented are either through images or by using a certain font one way or another. However, as of SQL Server 2008 R2 there is actually a third and interesting alternative which comes really close to actually having a control!In this article I'll be presenting those three methods.
Screenshots are made using SSRS 2012, and so is the Checkboxes.rdl available for download on my Skydrive.
Checkbox Control, huh?
You may be wondering why people would want to put a checkbox on a report. After all, reports are not capable of accepting input - except through parameters but that's a different story - and isn't that what a checkbox is all about?Not entirely. Reporting Services is not only used for data exploration. Sometimes people use it to produce data-driven printouts, such as letters or even checklists. In that perspective, having checkbox control functionality would indeed be useful.
A Silly Scenario
My imagination is failing me a little today so I came up with this silly example: a recipe checklist. And today we’ll be cooking some pasta sauce!This is the query that produces the list of ingredients:
select 'Yummy Pasta Sauce' as Recipe, 'zucchini' as Ingredient, 1 as Quantity, 'piece' as Unit, 1 as Needed
                      union select 'Yummy Pasta Sauce', 'mushrooms', 500, 'g', 1
                      union select 'Yummy Pasta Sauce', 'minced meat', 1, 'kg', 1
                      union select 'Yummy Pasta Sauce', 'Brussel sprouts', 1, 'kg', 0
                      union select 'Yummy Pasta Sauce', 'onion', 2, 'piece', 1
                      union select 'Yummy Pasta Sauce', 'tomato sauce', 1, 'L', 1
union select 'Yummy Pasta Sauce', 'potato', 1, 'piece', 0I’m cheating a bit here, all the data is hardcoded in the query. Normally you’d of course have a database that contains your recipes.
And I’ve also introduced some ingredients which I wouldn’t really want in my sauce, such as Brussels sprouts. Silly, but it gives me a good excuse to use the red checkbox.
Time to explore the possibilities.
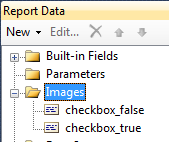
Method 1: Images
I will not be going into full detail to explain the usage of images in SSRS reports. If you need additional information on that, please first read my previous article that covers all possibilities of putting images on reports.As I don’t have access to an inventory of stock images, I opened my favorite drawing program, Paint.NET, and created two images myself. Then I embedded both images in the report:
I created a dataset using the query above. Then I set up a Table with a group on the Recipe field whilst adding a header row to display the name of the recipe.
The first column will show the ingredient details, using the following expression:
=Fields!Quantity.Value & " "
                          & Fields!Unit.Value
& " of " & Fields!Ingredient.ValueIn the second column in the detail level cell, I did a drag & drop of one of my images. That gives the following pop-up:
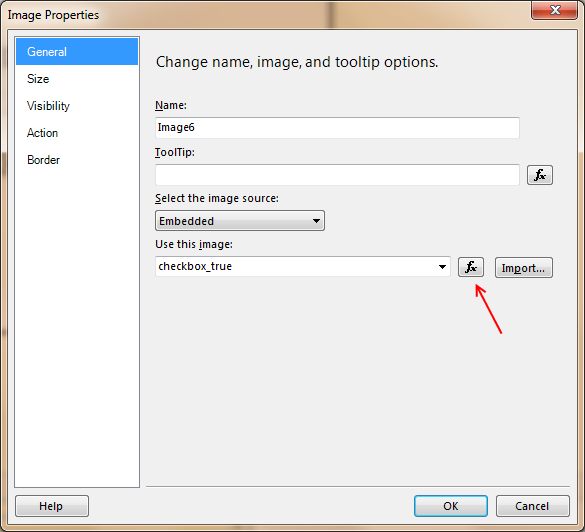
Clicking the fx button brings up the brings up the Expression editor, in which I created the following expression:
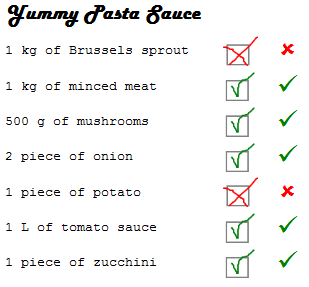
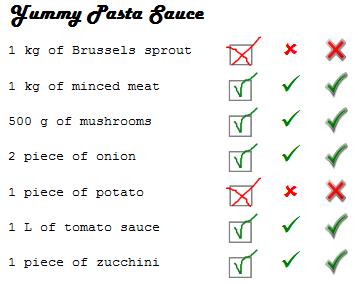
=IIF(Fields!Needed.Value = 1, "checkbox_true", "checkbox_false")Rendering the report shows us:
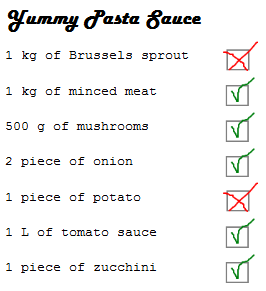
While easy to implement, a disadvantage to this method is that you need to get hold of the images. For my example I created them myself to avoid any copyright issues, but I wouldn’t call them fit for professional purposes. For a recipe list they serve just fine though!
Mission one accomplished: the report shows some image-based textboxes! On to mission two then!
Method 2: The Wingdings Font
I won’t be going into too much detail on this method either. It’s already been explained by Krzysztof Kryczka in his article here.In short, you just use the Wingdings font with the appropriate character to show an image.
In my table, I added an additional column to the right of the last one and entered the following expression:
=IIF(Fields!Needed.Value = 1, Chr(252), Chr(251))As you can see in the character table on Krzysztof’s site, character 252 is a check mark while 251 is a cross. Using the Chr() function, I can put the character on the report without typing the letter. (I actually doubt that they even match a letter so typing it would be difficult anyway.)
After setting some font-related properties, here’s what the rendered report looks like:
A small disadvantage to this method is that the Wingdings font needs to be installed on the SSRS server.
Mission two accomplished! On to number three!
Method 3: The Indicator Control
Have you already used the Indicator control? It’s new since SQL Server 2008 R2!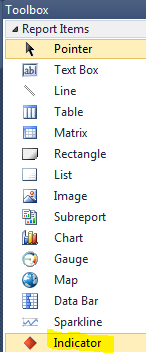
Let’s create a third column to the right of the last one and drag an Indicator into it. That brings up following pop-up:
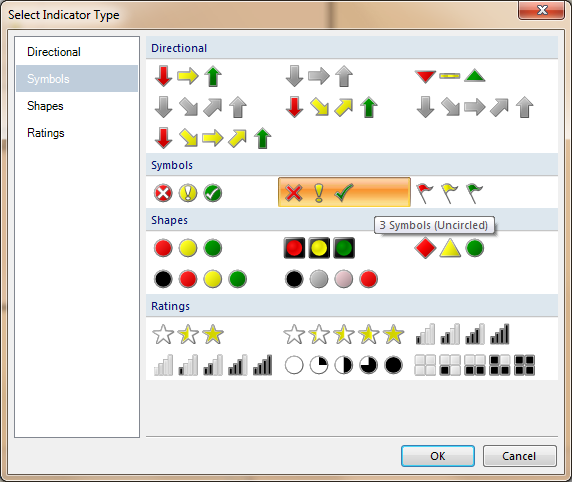
In our context here the “3 Symbols (Uncircled)” seem like a valid option, so I’m selecting that.
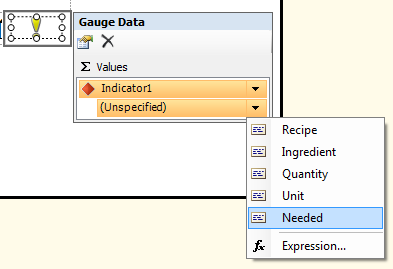
The next step is to inform the indicator which field it should use. In our case, it’s the Needed field. It can be selected by using the dropdown next to (Unspecified).
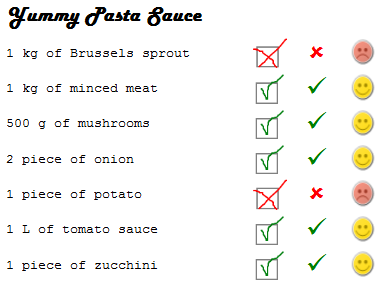
Let’s have a look at the rendered report now:
We’ve used the built-in Indicator control to show check marks, mission three accomplished!
(remark from audience:)
Erm, mister SSRS dude sir, how does the indicator know what image it should show?(me thinking:)
Darn, they noticed I cheated a little.
You’re right, I have something to confess. I made use of some handy defaults of the Indicator to skip some steps.
Ready to have some fun? Add the following line to the query in the dataset:
union select 'Yummy Pasta Sauce', 'Let''s break it!', 1, 'attempt', 100Without any other changes, render the report:
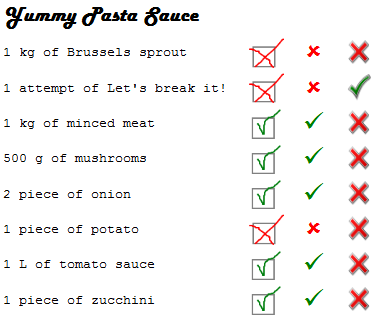
Oh my, look at that! The image and font-based check marks are still okay but the Indicator is broken!
Right, next test, in the additional query line added earlier, change the 100 to 2 and render the report:
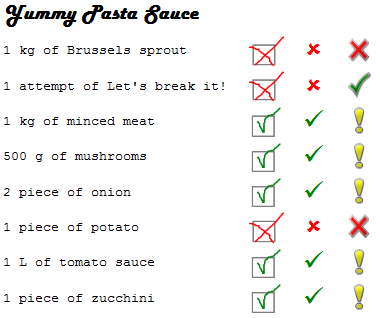
That surely didn’t better the situation, it made it worse! Don’t worry, the explanation is fairly easy. Let’s have a look at the actual settings of the indicator. Open the Indicator properties by right-clicking the indicator and selecting Indicator Properties. Then select the Value and States page:
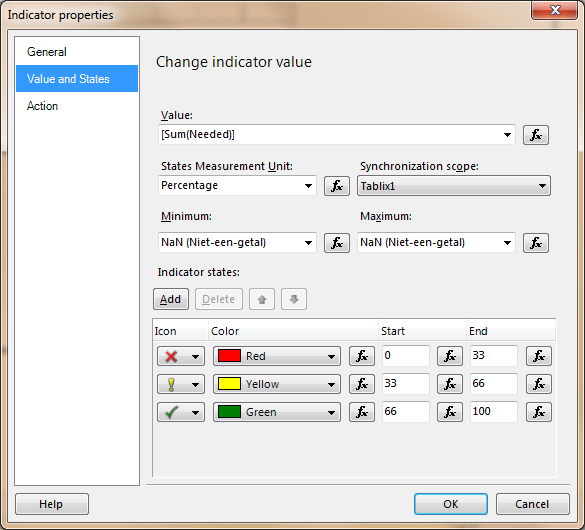
As you can see, the units are measured using percentages with “red” starting at zero while ending at 33. That means that, based on all available values in the dataset, all values that fall in the first 33% will become red.
And that is exactly what the two tests above demonstrate. If we take the last one, the value ranges from zero to two. So zero is 0%, 1 is 50% and 2 is 100%. That’s why all ones end up as the yellow exclamation mark!
If all you need is a green/red check mark like in our example, you need to ensure that you’ve only got two possible values and the “red” value needs to be lower than the “green” value. That way you can make use of the default values of the indicator, making implementation a piece of cake.
Alternatively, if you’d like to customize the behavior of the indicator, that’s an option as well. Have a look at what the Icon dropdown produces:

Any of those built-in icons can be selected. Customizing the color is easy too, just use the Color dropdown. And of course the numeric ranges can be changed as well.
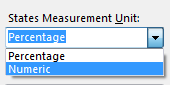
If the percentage-based measurement doesn’t work out well in your situation, you can switch to Numeric:
If that hasn’t convinced you yet, then I don’t know what will...
Alright alright, one more:
Conclusion
In this article I’ve demonstrated three different methods of implementing checkboxes in SSRS reports. Contrary to what is currently still believed, it is actually possible to add checkboxes to a report making use of just built-in functionality!Remember: have fun!
Valentino.
References
MSDN: Indicators
Originally appeared at my blog: http://blog.hoegaerden.be/2012/08/04/displaying-checkboxes-in-an-ssrs-report/
1998: C++ - SQL Server 6.5
2000-2007: C++, VB6, C#, java - SQL Server 7.0-2005
2008-...: SQL Server 2005-2016
2014-2017: MVP Data Platform
2000-2007: C++, VB6, C#, java - SQL Server 7.0-2005
2008-...: SQL Server 2005-2016
2014-2017: MVP Data Platform
Have a question about something in this article? You can receive help directly from the article author. Sign up for a free trial to get started.
Comments (11)
Commented:
"Yes" vote above.
Author
Commented:Commented:
Nata
EE Page Editor
Author
Commented:Commented:
Congratulations !! It was a pretty close contest, but yours emerged as the eventual winner.
Check out the "official" announcement : http://blog.experts-exchange.com/ee-blog/announcing-the-nexus-7-contest-winner-and-other-awesome-articles/
View More