Increase the size of a volume on an EqualLogic PS4000XV SAN


Published:
Browse All Articles > Increase the size of a volume on an EqualLogic PS4000XV SAN
You have a Windows 2008 R2 server that is nearly out of disk space on its ‘D’ drive. The ‘D’ drive is a volume on an Equal Logic PS4000XV Storage Area Network. This is a production server and the change needs to be done immediately in the middle of the day without service interruption.
Whenever possible, I prefer to make changes like this outside of production hours or as scheduled downtime if you operate in a 24/7 environment since there is a chance that something could go wrong. When you have an issue like this that for whatever reason doesn’t get caught by your proactive monitoring systems and waiting will result in downtime anyway, the pros outweigh the cons of making a non-scheduled change (It may be a resume generating event otherwise).
Open the management console of your SAN and login as you normally would. If the volume you are going to expand is part of a “Volume Collection”, take a snapshot of the volume collection before beginning this process.
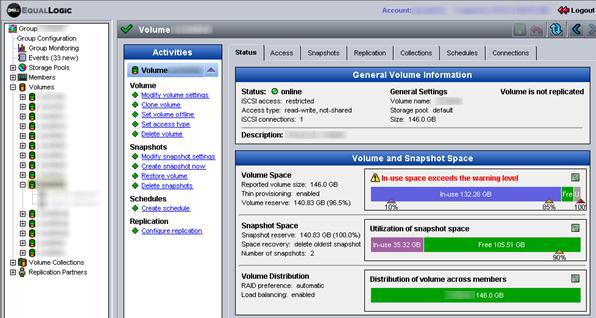
Locate the volume that needs to be expanded and select it. Verify you have the correct volume selected. Under “Activities” click “Modify volume settings”:
![Enter a brief description of your file (required)]()
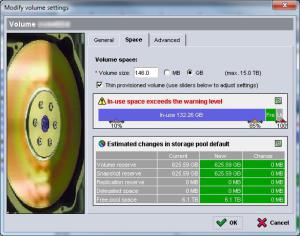
Click the “Space” Tab:
![Enter a brief description of your file (required)]()
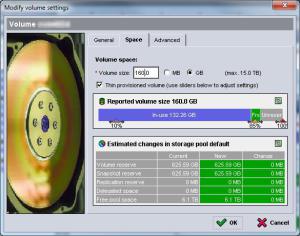
Enter the new size for the volume keeping in mind that a volume cannot be shrunk:
![Enter a brief description of your file (required)]()
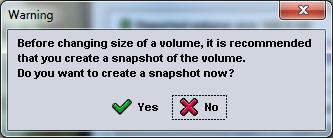
If you did not create a snapshot before beginning this process, click “Yes”. This will only create a snapshot of the volume that is being modified and not of all the volumes in the “Volume Collection” if it is part of one.
![Enter a brief description of your file (required)]()
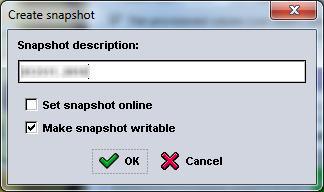
If you clicked yes in the previous step to create a snapshot, you will receive this dialog box. Enter a name for the snapshot and click “OK”:
![Enter a brief description of your file (required)]()
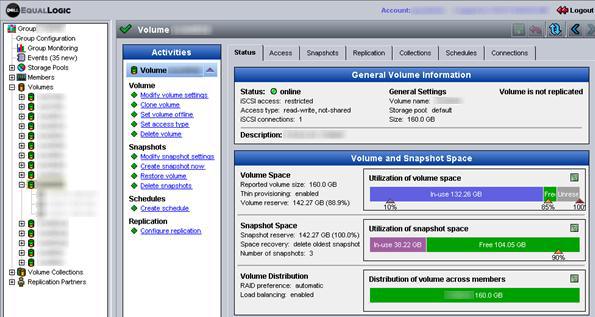
The volume on the SAN has now been expanded. This doesn’t help your server though since it isn’t yet aware that there’s more space on the drive.
![Enter a brief description of your file (required)]()
Login to the server that is connected to this volume and launch Computer Management. In the Storage>Disk Management section, you’ll notice the drive is still the same exact size as it was before and there is no free space that isn’t partitioned unless there was previously unpartitioned space.
![Enter a brief description of your file (required)]()
Right click “Disk Management” and select “Refresh”:
![Enter a brief description of your file (required)]()
The un-partioned free space will now show up on the drive, but hasn’t yet been added to the actual partition:
![Enter a brief description of your file (required)]()
Right click the partition (‘D’ drive in the image below) and select “Extend Volume”:
![Enter a brief description of your file (required)]()
Click “Next”:
![Enter a brief description of your file (required)]()
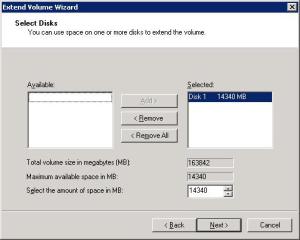
Click “Next” to add all of the new free space to the ‘D’ partition:
![Enter a brief description of your file (required)]()
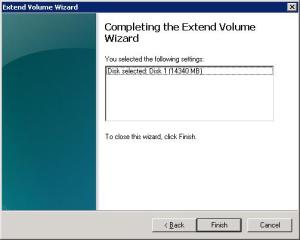
Click “Finish”:
![Enter a brief description of your file (required)]()
Whenever possible, I prefer to make changes like this outside of production hours or as scheduled downtime if you operate in a 24/7 environment since there is a chance that something could go wrong. When you have an issue like this that for whatever reason doesn’t get caught by your proactive monitoring systems and waiting will result in downtime anyway, the pros outweigh the cons of making a non-scheduled change (It may be a resume generating event otherwise).
Open the management console of your SAN and login as you normally would. If the volume you are going to expand is part of a “Volume Collection”, take a snapshot of the volume collection before beginning this process.
Locate the volume that needs to be expanded and select it. Verify you have the correct volume selected. Under “Activities” click “Modify volume settings”:
Click the “Space” Tab:
Enter the new size for the volume keeping in mind that a volume cannot be shrunk:
If you did not create a snapshot before beginning this process, click “Yes”. This will only create a snapshot of the volume that is being modified and not of all the volumes in the “Volume Collection” if it is part of one.
If you clicked yes in the previous step to create a snapshot, you will receive this dialog box. Enter a name for the snapshot and click “OK”:
The volume on the SAN has now been expanded. This doesn’t help your server though since it isn’t yet aware that there’s more space on the drive.
Login to the server that is connected to this volume and launch Computer Management. In the Storage>Disk Management section, you’ll notice the drive is still the same exact size as it was before and there is no free space that isn’t partitioned unless there was previously unpartitioned space.

Right click “Disk Management” and select “Refresh”:

The un-partioned free space will now show up on the drive, but hasn’t yet been added to the actual partition:
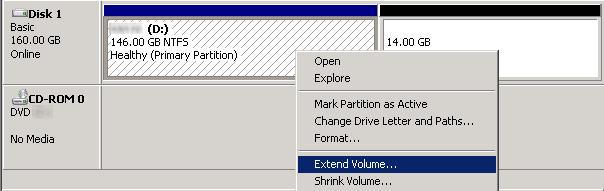
Right click the partition (‘D’ drive in the image below) and select “Extend Volume”:
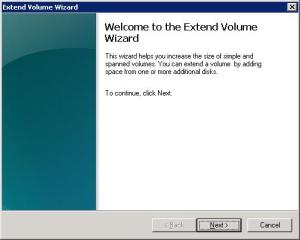
Click “Next”:
Click “Next” to add all of the new free space to the ‘D’ partition:
Click “Finish”:

Have a question about something in this article? You can receive help directly from the article author. Sign up for a free trial to get started.
Comments (0)