Become an Administrator :: Server Configuration

Published:
Browse All Articles > Become an Administrator :: Server Configuration
Table of Contents:
Lesson 1 - Installing Windows Server 2012
Lesson 2 - Configuring Server 2012 (this article)
Lesson 3 - Active Directory
As described before (lesson 1), we have installed Windows Server 2012, and set up the administrator password. Now we are going to make some system configurations before installing any roles or features to our server.
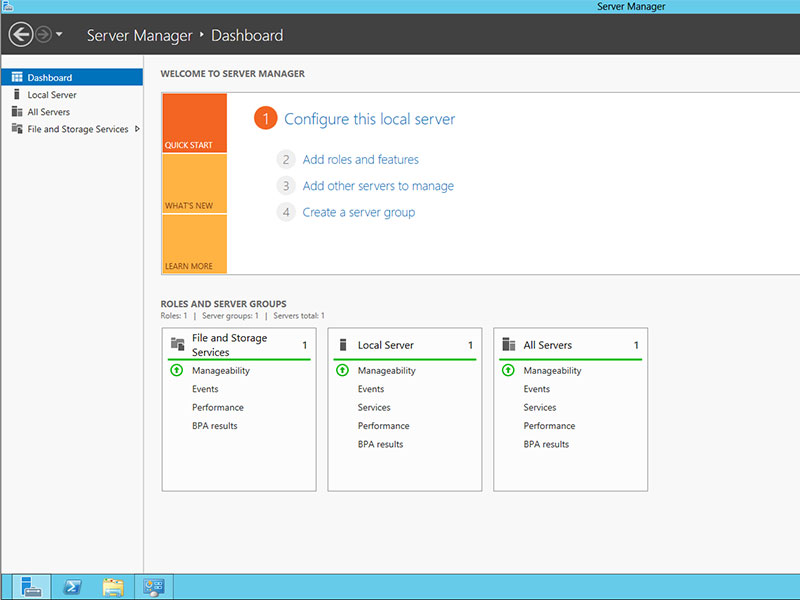
so, when you log in with your administrator account, first thing you'll notice is the modified SERVER MANAGER dashboard.
![server manager]() HINT: in you want to see the metro interface, click windows icon from your keyboard
HINT: in you want to see the metro interface, click windows icon from your keyboard
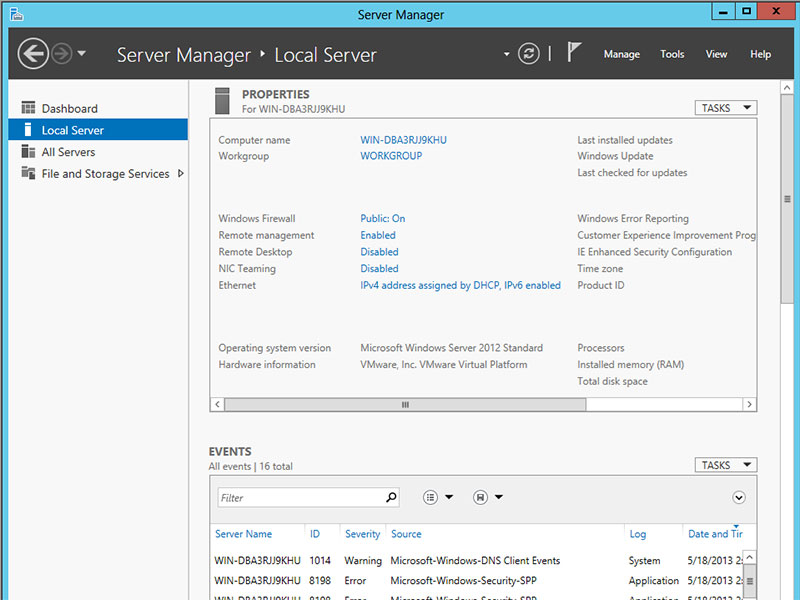
as you see in the figure, you can add roles and features connect to other servers or create groups. for now, we are going to configure and customize or server, so click on LOCAL SERVER on the left side. you'll see this screen:
![local server]() inside this screen you'll find our server initial configuration and general information, which we will customize now.
inside this screen you'll find our server initial configuration and general information, which we will customize now.
first, we will change our server name, so click on the computer name . from the windows that appeared (system properties ) click on change . type your desired server name (in my case i named it server12) and hit OK. you will need to restart the system to apply settings.
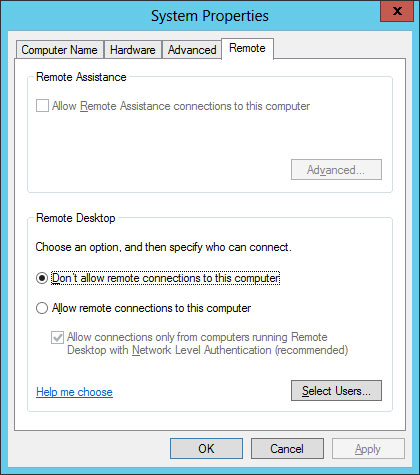
![server name]() next step is to configure the remote desktop. this is essential if you don't have physical access to the server, and need to connect to it from another place or another computer. so click on local server from the left menu, and click on remote desktop which is currently set to disabled
next step is to configure the remote desktop. this is essential if you don't have physical access to the server, and need to connect to it from another place or another computer. so click on local server from the left menu, and click on remote desktop which is currently set to disabled
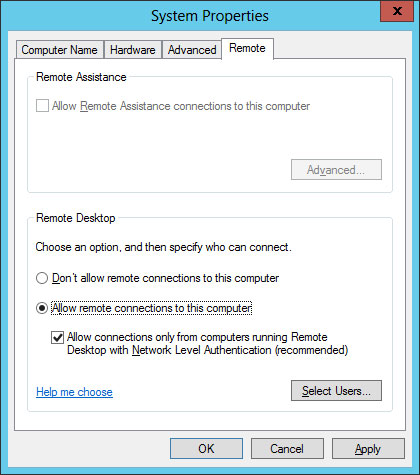
![remote desktop setting]() click on allow remote connections to this computer .
click on allow remote connections to this computer .
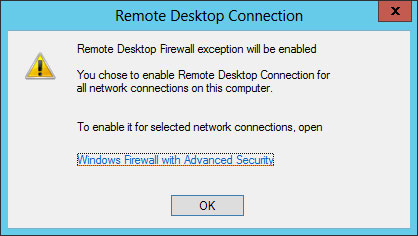
![remote desktop]() you might get a warning about adding the remote desktop exception to the windows firewall
you might get a warning about adding the remote desktop exception to the windows firewall
![remote desktop firewall]() we want also to add the users, so click on select users, in the popup windows, click add to add your current administrator account
we want also to add the users, so click on select users, in the popup windows, click add to add your current administrator account
![add remote desktop user]() click ok to close the remote desktop window.
click ok to close the remote desktop window.
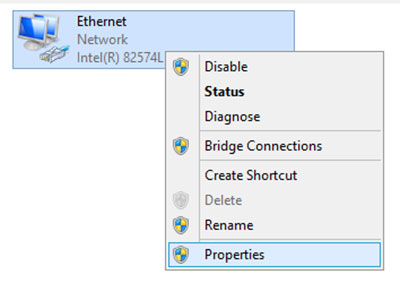
third things to define a static IP to our server, so click on IPv4 address assigned by DHCP, IPv6 enabled to configure the IP settings. the network adapters window appear, so right clock on the network adapter and clock properties
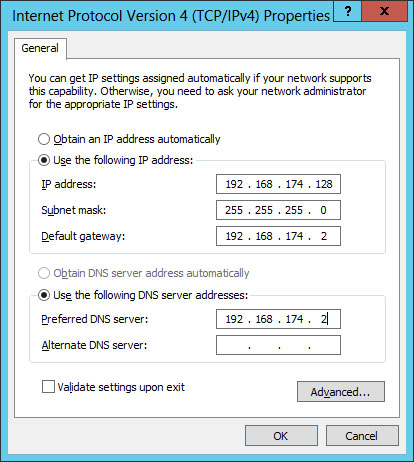
![IP]() double click Internet Protocol version 4 to change its attributes, and input the static IP of your server (i put my settings according to the IP defined by the virtual machine.)
double click Internet Protocol version 4 to change its attributes, and input the static IP of your server (i put my settings according to the IP defined by the virtual machine.)
![static ip settings]()
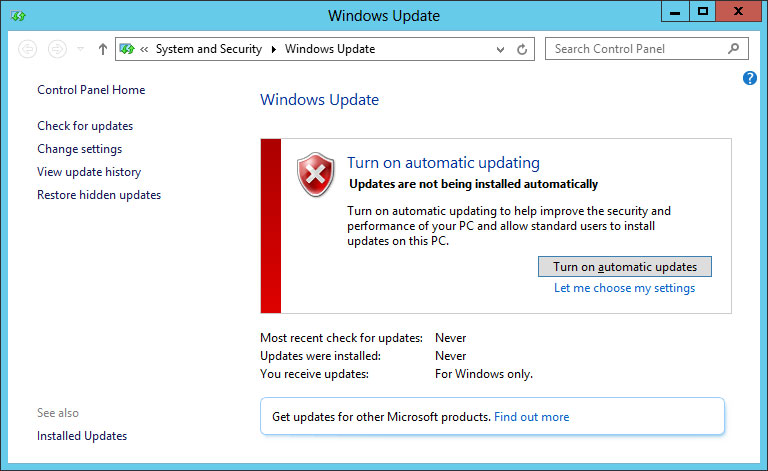
our last thing to do is enable automatic updated and download them. click on (not configured ) beside windows update, and enable the automatic updates
![configure automatic updates]() then check for any updates available.
then check for any updates available.
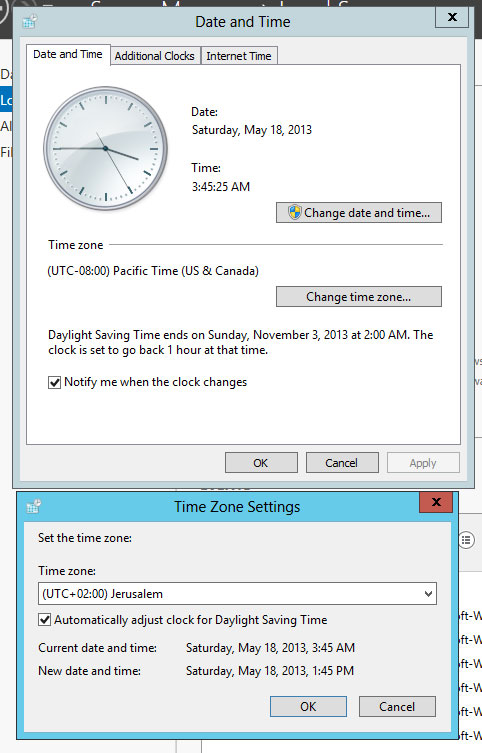
you might also change the time zone if you not living in the US, so click on time zone and change it to your desired country time zone.![time zone]()
And that's it folks, once you updated your server and done these settings, your server is ready for action.
VOTE YES if you find this article great and worth recommending
Lesson 1 - Installing Windows Server 2012
Lesson 2 - Configuring Server 2012 (this article)
Lesson 3 - Active Directory
As described before (lesson 1), we have installed Windows Server 2012, and set up the administrator password. Now we are going to make some system configurations before installing any roles or features to our server.
so, when you log in with your administrator account, first thing you'll notice is the modified SERVER MANAGER dashboard.
 HINT: in you want to see the metro interface, click windows icon from your keyboard
as you see in the figure, you can add roles and features connect to other servers or create groups. for now, we are going to configure and customize or server, so click on LOCAL SERVER on the left side. you'll see this screen:
 inside this screen you'll find our server initial configuration and general information, which we will customize now.
first, we will change our server name, so click on the computer name . from the windows that appeared (system properties ) click on change . type your desired server name (in my case i named it server12) and hit OK. you will need to restart the system to apply settings.
 next step is to configure the remote desktop. this is essential if you don't have physical access to the server, and need to connect to it from another place or another computer. so click on local server from the left menu, and click on remote desktop which is currently set to disabled
 click on allow remote connections to this computer .
 you might get a warning about adding the remote desktop exception to the windows firewall
 we want also to add the users, so click on select users, in the popup windows, click add to add your current administrator account
 click ok to close the remote desktop window.
third things to define a static IP to our server, so click on IPv4 address assigned by DHCP, IPv6 enabled to configure the IP settings. the network adapters window appear, so right clock on the network adapter and clock properties
 double click Internet Protocol version 4 to change its attributes, and input the static IP of your server (i put my settings according to the IP defined by the virtual machine.)
our last thing to do is enable automatic updated and download them. click on (not configured ) beside windows update, and enable the automatic updates
 then check for any updates available.
you might also change the time zone if you not living in the US, so click on time zone and change it to your desired country time zone.
And that's it folks, once you updated your server and done these settings, your server is ready for action.
VOTE YES if you find this article great and worth recommending

Sharing is Caring :)
Have a question about something in this article? You can receive help directly from the article author. Sign up for a free trial to get started.
Comments (4)
Commented:
Congratulations, your article has been published!
LHerrou
EE Page Editor
p.s. You may want to link your "Installing" article to this one as well, so when readers finish that one, the link is there to move on to this one.
Author
Commented:Thanks for the publishing, i will keep the table of contents updated on all the articles i will post on this subject.
Author
Commented:Author
Commented: