Installing and Configuring BlackBerry Enterprise Service 10
I have over 30 years in the IT industry. During this time I have worked with a variety of products in a variety of industries.
Published:
Browse All Articles > Installing and Configuring BlackBerry Enterprise Service 10
After going through the deployment of BlackBerry Device Service 10, and seeing a number of questions posted about it, this article addresses some of the issues and particulars of the installation. There have been a number of other questions posted, which hopefully this article will address for future installations. All of the information below is primarily from temporary systems created for this article and evaluation keys and SRP's.
BlackBerry Enterprise Service 10 is the replacement for BlackBerry Enterprise Server. Released in January 2013, it incorporates three previous products, (BlackBerry Devices Service, Mobile Fusion, and Universal Device Management) into one installation package.
First, you can install this without touching your current environment. However, to fully integrate an existing environment, you need to at least be on BES 5.0 SP3. This will allow the web management to not only administer the new BlackBerry 10 devices, but the older Java based devices as well. Also, you need at least two servers (one preferably in the DMZ). Finally, in order to perform over-the-air activations of Blackberry Playbooks, these devices must be running at least version 2.0 of the OS.
Unlike previous versions, the router service cannot be installed on the same server as the BlackBerry Enterprise Service. It is really designed to be installed on a server in the DMZ for added protection of corporate networks. Also, unless you are planning on using the self-installed SQL 2008 Express version, you will need to have Microsoft SQL 2008 installed and configured per KB03112.
Here is the configuration for this installation; all servers are virtualized on VMware:
In preparing, you need to get a new SRP. This is easily done by registering for a trial version. The nice thing about the trial is that you get a new SRP, license keys, and a 20 user CAL. All of these are permanent (at least at of the time of this writing) except the 20 user CAL. Although, there is a current program to migrate the existing CALs for free.
To register, just to http://us.blackberry.com/business/software/bes-10.html . When the software keys are received, the email will contain a link to download the newest software. It is also best, if there is not already a BlackBerry server in the environment, to create a service account. This should also be the login account all installations are performed under. The directions for this account can be found in KB02276.
BlackBerry no longer uses MAPI services. This has been replaced with ActiveSync, which will require a certificate and advanced configuration of your Exchange server if it has not already been enabled.
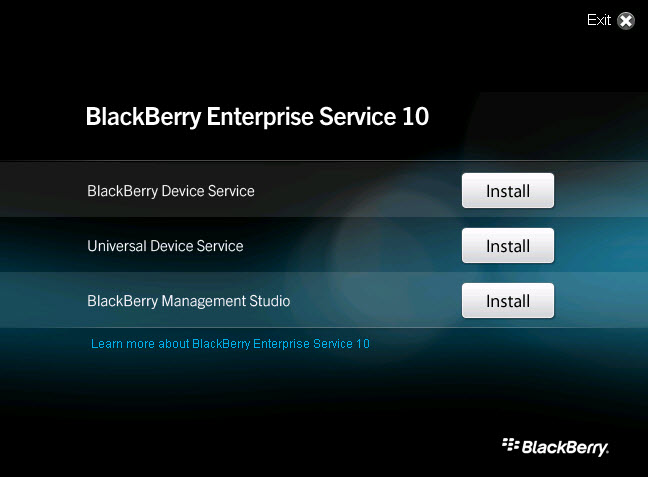
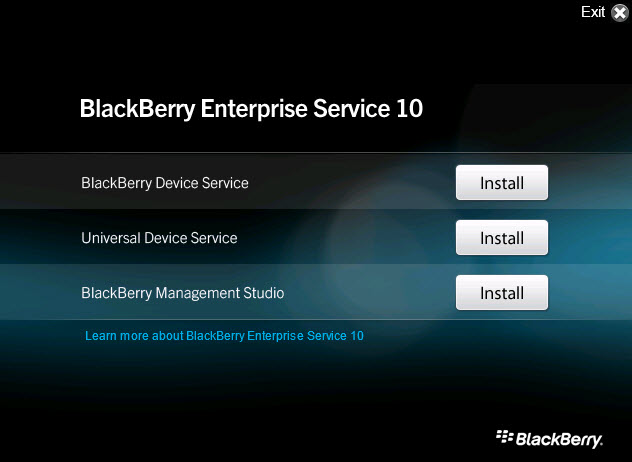
After the downloaded file is extracted, an installation menu is provided with the three different services. The order show, with the BlackBerry Device Service being listed first, is the recommended order of installation. At this point, the installation is similar to the previous versions of BES. As previously mentioned, this installation should be performed while logged into the server as the BlackBerry service account.
![Initial Installation Screen]()
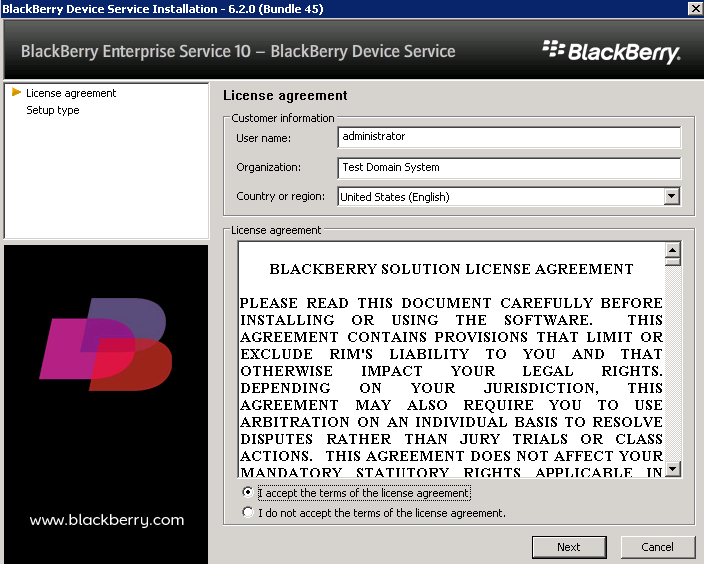
Fill in your name, company name, and country. You will be presented the license agreement for your country. Accept the agreement and click next.
![License Agreement]()
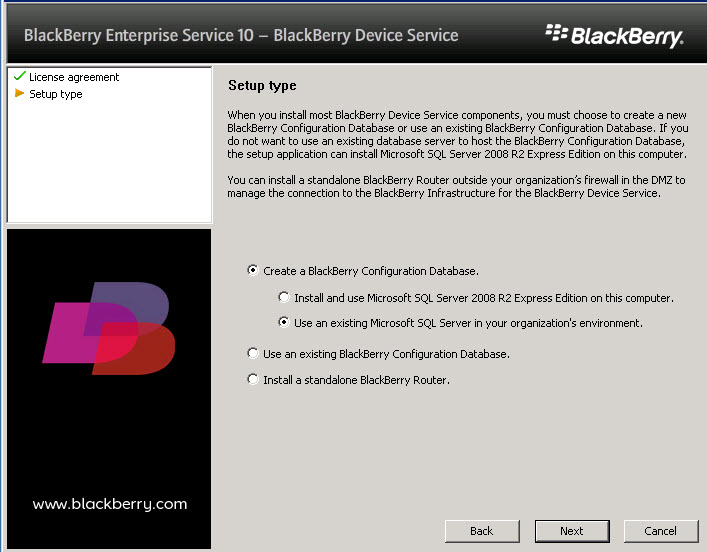
Select the type and location of the BlackBerry database. The installation program can either install an express version of Microsoft SQL, create the database on an existing Microsoft SQL server, or it can attach to a database if it has been pre-created with the included utility.
![Type of database]()
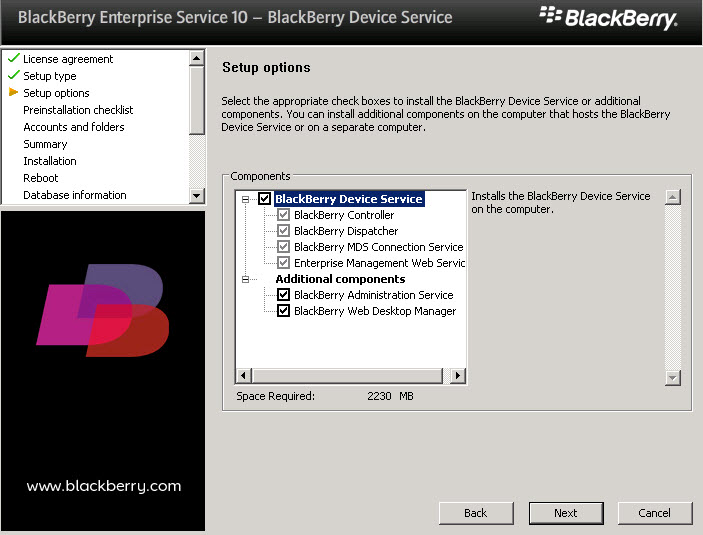
Select they type of installation. If the services are being separated out, then the BlackBerry Administration Service must be installed first. After that, all of the other services can be installed on other servers. In most cases, all services will be installed on a single instance. Please keep in mind that this installation does NOT install the router service. That is a separate installation.
![Services to Install]()
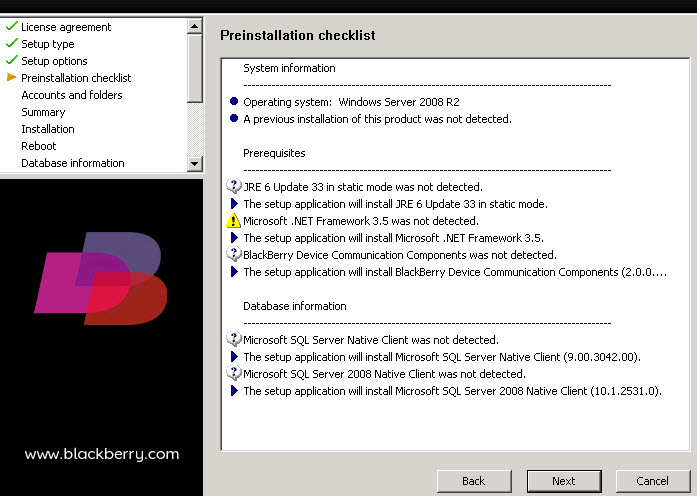
The installation will perform a pre-installation checklist. If there are any issues, the installation will show an error that needs to be corrected. Otherwise, click on next to start the installation process.
![Pre-installation checklist]()
Verify the service account and password. Also, it is recommended not to install the BlackBerry software on the same drive as the operating system. Here is where you will redirect the installation files and folders if that is an option.
![Service Account and path verification]()
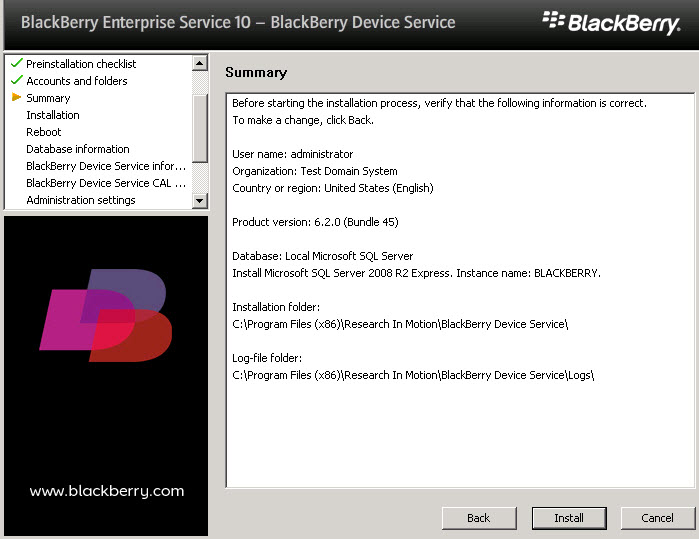
There will be a summary of the installation configuration and file locations. Take a moment to verify that this information is correct. Once verified, click Next to start the installation process.
![Installation Summary]()
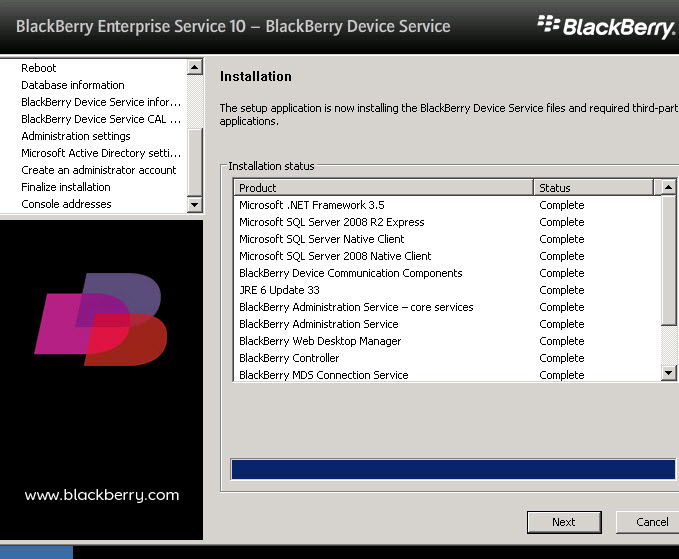
The status is shown as each service installs. Once all of them are complete, click Next.
![Installation Status]()
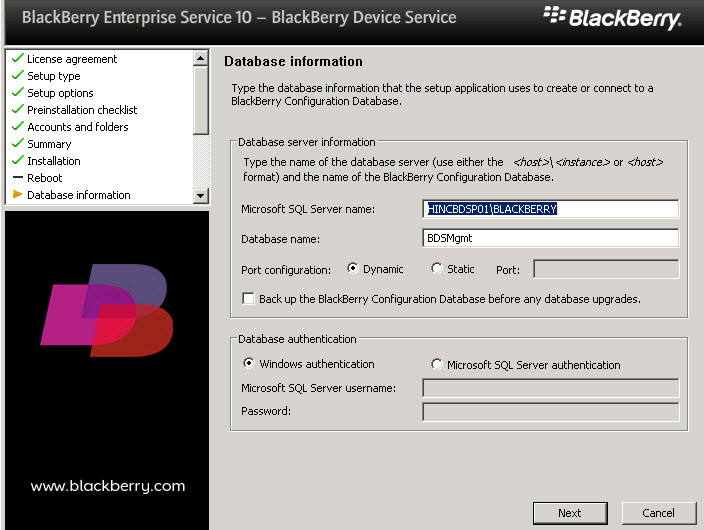
As mentioned before, the database can either be local using Microsoft SQL 2008 Express, which will be installed automatically, or on the database screen enter the SQL server, instance, and the name of the database.
![SQL database location]()
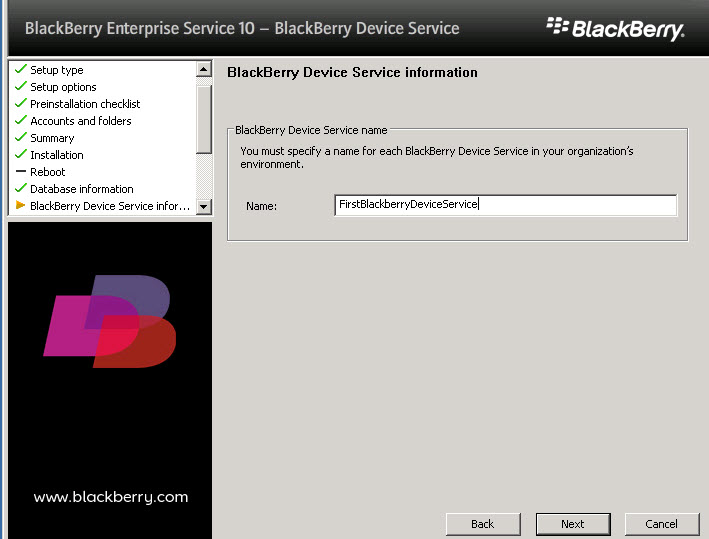
Once the database is installed, a name must be given to this instance of the Blackberry Device Service. This is due to the fact that in larger organizations there may be multiple instances of the service installed. This is due to the face that the preferred way to manage the BlackBerry environment is through the BlackBerry Management Studio, so there must be a way to determine which service is being administrated.
![Naming First Instance]()
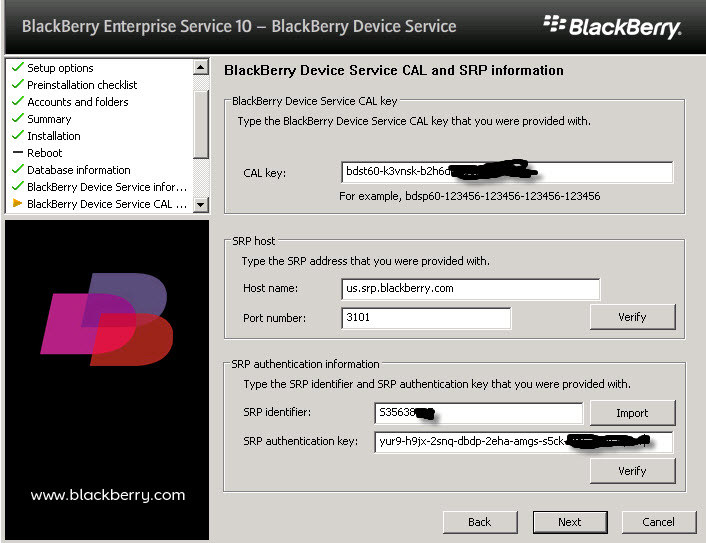
In order to complete the installation the license key, SRP, and client access licenses must be entered. These should have been received via email in advance. The ones below are from a 60 day demo.
![License Keys and CALs]()
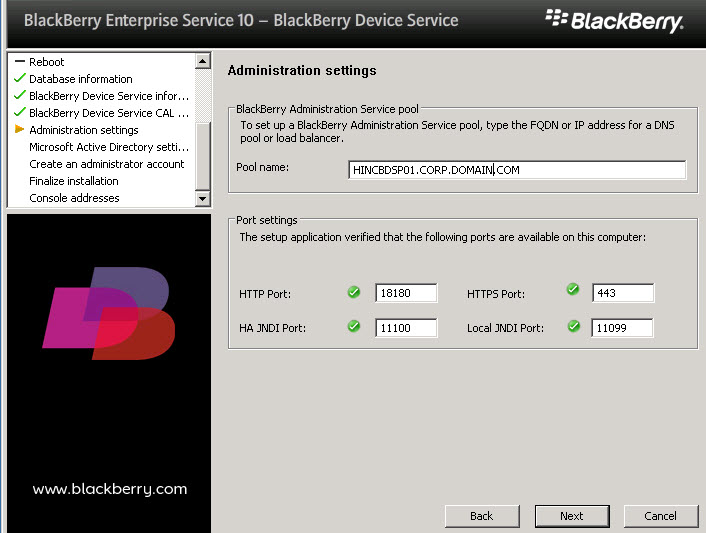
The installation verifies that the needed ports for administration are available. If any of these have a conflict, then it will be indicated here. The conflicts will need to be corrected before the installation is finished. If not, then the link to the administration console will not work.
![Port Verification]()
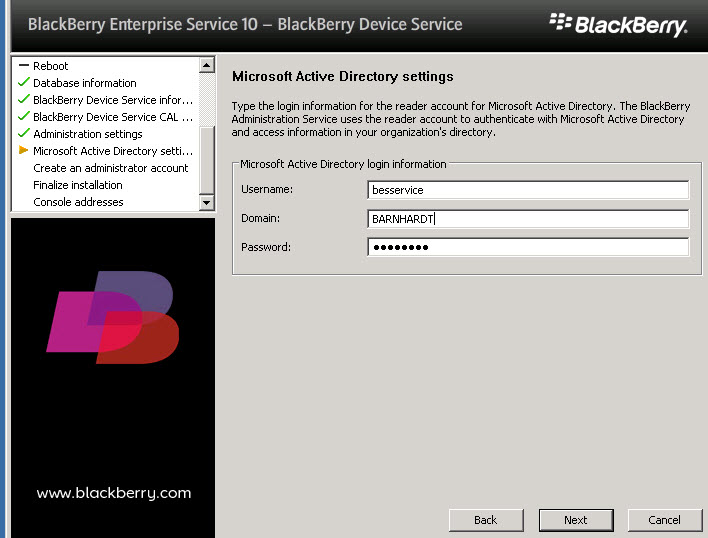
In order to access Active Directory and read the user accounts, the service account must authenticate. Enter the domain password on for the services account.
![Service Account Verification]()
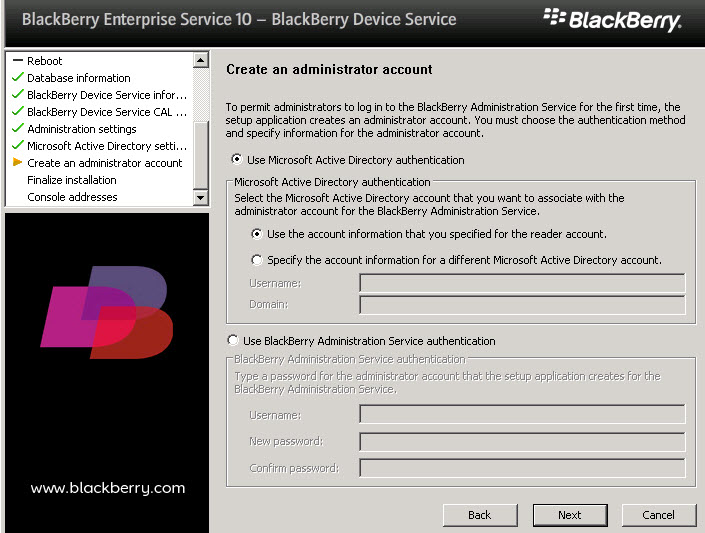
The initial administration account needs to be created. One can be specified, but it is better to have the service account become the first administration account. This is the default configuration.
![Creating administration account]()
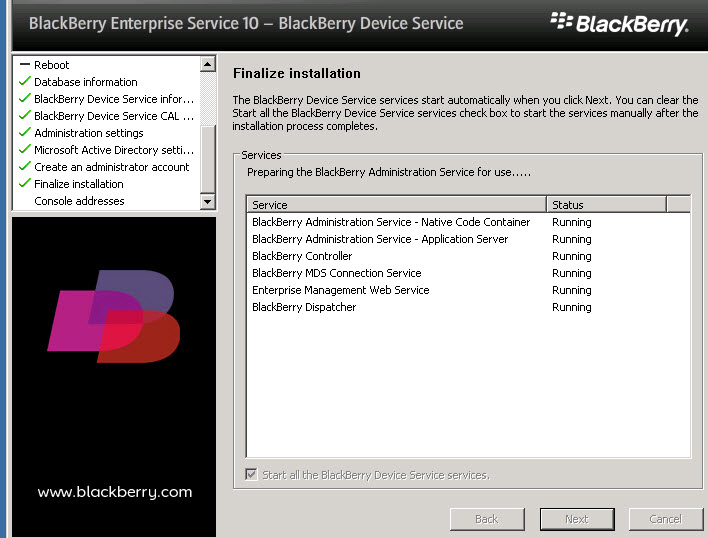
The final task is to start all of the services. If the installation is successful, then all of the services will start successfully when Next is clicked.
![Final tasks-starting all services]()
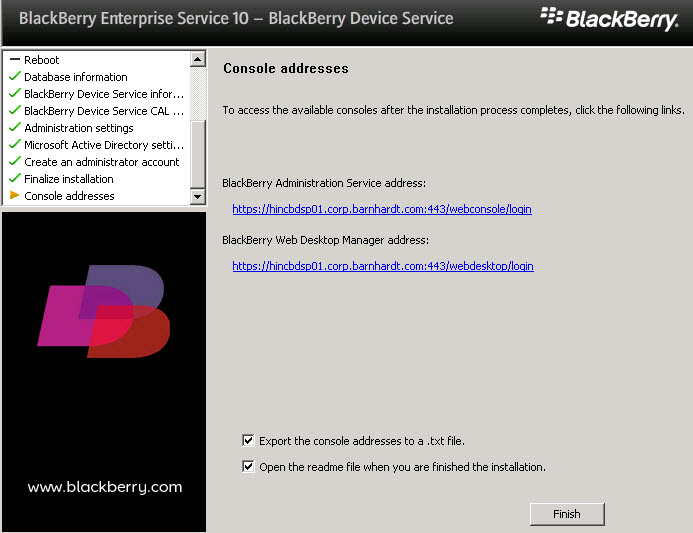
The web addresses for the management console will be displayed. It is a good idea to leave the default checked to allow a text file to be copied to the desktop in order to have a saved value for this address.
![Console Address]()
Router Service
As previously mentioned, the router service is not installed by default and CANNOT be installed on the same server as other Blackberry services.
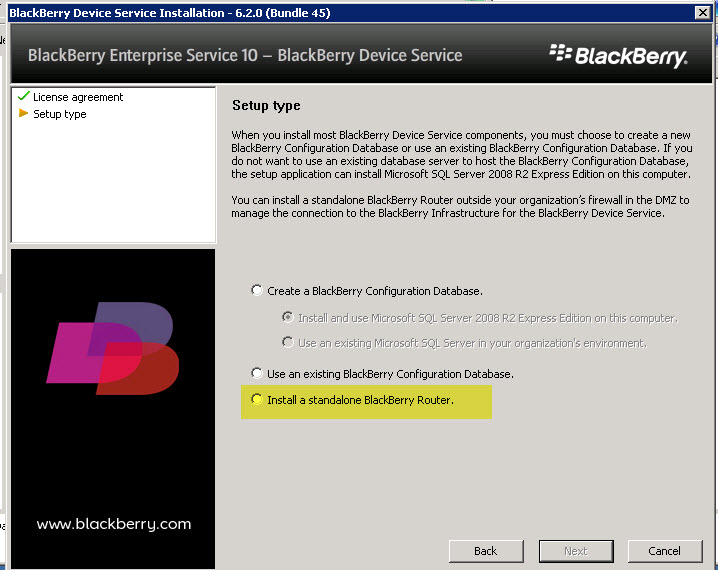
On another Windows 2008 server (preferably in a DMZ), launch the installer again. Once again, you will be presented with the initial installation screen. As before, click “Install” next to the BlackBerry Device Service. Enter the license agreement information and accept the license. This time, when the setup type is displayed, select Install a standalone Blackberry Router and click “Next.”
![Router Installation]()
Once installed, on the Windows desktop go to START>ALL PROGRAMS>BLACKBERRY ENTERPRISE SERVICE 10>BLACKBERRY DEVICE SERVICE>BLACKBERRY DEVICE SERVICE CONFIGURATION. Click on the BlackBerry Router tab and enter the SRP address and port numbers. Click the “Test Network Connection” radio button to verify the settings.
![Router Service Settings]()
In order to allow the BlackBerry Device Service to connect to the router service, the registry must be edited after the service is installed. Launch the registry editor and go to the following key: HKEY_LOCAL_MACHINE\SOFTWARE\Wow6432Node\Research In Motion\BlackBerryRouter and change the “AllowRemoteServices” key to 1. Click “OK” and exit the registry.
The BlackBerry Device Service must now be connected to the router service. Launch in BlackBerry Administration web interface from the link provided at the end of the installation. On the right side under “Servers and Components”, expand BLACKBERRY SOLUTION TOPOLOGY>BLACKBERRY DOMAIN>BLACKBERRY DEVICE SERVICE and click on the instance name.
![BDS Connection to Router Service]()
In the right panel, toward the bottom, click “Edit Instance.” Enter the FQDN of the server running the router service. If the port number remained as the default during the installation, then there is no need to enter any value into the port number. Save and exit.
![SRP Address]()
Creating an Email Policy
The last step before users can be successfully activated is to create an email policy. Within the web console, go to BLACKBERRY SOLUTION MANAGEMENT>PROFILES>CREATE AN EMAIL PROFILE. These settings are generally company specific, but the important setting is the external address of the corporate mail server for ActiveSync. This policy must be assigned to the users before attempting to activate. Otherwise, the devices will fail.
![Email Policy]()
Users and devices can now be activated assuming that ActiveSync has been properly configured on the Microsoft Exchange server. If there is the desire or need to manage IOS and Android devices through the Blackberry server, then the Universal Device Studio and Blackberry Management Studio must also be installed. However, if you are installing all services on the same host, please refer to KB32547 to address port conflict problems.
![Installation Options]()
Troubleshooting
These are some issues that have typically been seen in activating and working with BlackBerry 10 devices.
1. The device successfully activates, but there is not mail flowing to the device:
this can typically take up to 15 minutes depending on the ActiveSync settings. If, after 15-20 minutes, mail is still not syncing to the device, check to verify that an email profile was assigned to the user.
2. When attempting to activate a device, and error code 403 or other 4xx code:
ensure ActiveSync is turned on for the user. Some Exchange environments keep ActiveSync disabled on each user until needed.
3. Device received “no response from server” when attempting to activate:
If all three services are installed on the same host, check for port conflicts. Refer to KB32547 if necessary.
4. Users sub-folders are not syncing:
by default, only the Inbox syncs messages, sub-folders do not. The user can change this by going to SETTINGS>ACCOUNT SETTINGS>select their mail account>EDIT FOLDER SETTINGS. From here, the user can enable “Sync All Mail Folders” or scroll down and select the sub-folders they wish to sync. However, only new messages placed in the folder will be sync’d. Existing messages will not.
5. The user does not see their Outlook contacts under Contacts:
ensure the user is looking on the “Work” side, not the personal. When the device locks and the user unlocks it, the view defaults to the “personal” view.
BlackBerry Enterprise Service 10 is the replacement for BlackBerry Enterprise Server. Released in January 2013, it incorporates three previous products, (BlackBerry Devices Service, Mobile Fusion, and Universal Device Management) into one installation package.
First, you can install this without touching your current environment. However, to fully integrate an existing environment, you need to at least be on BES 5.0 SP3. This will allow the web management to not only administer the new BlackBerry 10 devices, but the older Java based devices as well. Also, you need at least two servers (one preferably in the DMZ). Finally, in order to perform over-the-air activations of Blackberry Playbooks, these devices must be running at least version 2.0 of the OS.
Unlike previous versions, the router service cannot be installed on the same server as the BlackBerry Enterprise Service. It is really designed to be installed on a server in the DMZ for added protection of corporate networks. Also, unless you are planning on using the self-installed SQL 2008 Express version, you will need to have Microsoft SQL 2008 installed and configured per KB03112.
Here is the configuration for this installation; all servers are virtualized on VMware:
Windows Server 2008 R2 Standard Edition (BDS only installs on x64 OS)
C:\ 60GB for OS, E:\ 60GB for BES installation
6GB memory (since all 3 services will be on one system)
2- 2.8Ghz processors
6GB memory (since all 3 services will be on one system)
2- 2.8Ghz processors
Windows Server 2008 R2 Standard Edition running MS SQL 2008
Windows Server 2008 R2 Standard Edition (in the DMZ)
In preparing, you need to get a new SRP. This is easily done by registering for a trial version. The nice thing about the trial is that you get a new SRP, license keys, and a 20 user CAL. All of these are permanent (at least at of the time of this writing) except the 20 user CAL. Although, there is a current program to migrate the existing CALs for free.
To register, just to http://us.blackberry.com/business/software/bes-10.html . When the software keys are received, the email will contain a link to download the newest software. It is also best, if there is not already a BlackBerry server in the environment, to create a service account. This should also be the login account all installations are performed under. The directions for this account can be found in KB02276.
BlackBerry no longer uses MAPI services. This has been replaced with ActiveSync, which will require a certificate and advanced configuration of your Exchange server if it has not already been enabled.
After the downloaded file is extracted, an installation menu is provided with the three different services. The order show, with the BlackBerry Device Service being listed first, is the recommended order of installation. At this point, the installation is similar to the previous versions of BES. As previously mentioned, this installation should be performed while logged into the server as the BlackBerry service account.
Fill in your name, company name, and country. You will be presented the license agreement for your country. Accept the agreement and click next.
Select the type and location of the BlackBerry database. The installation program can either install an express version of Microsoft SQL, create the database on an existing Microsoft SQL server, or it can attach to a database if it has been pre-created with the included utility.
Select they type of installation. If the services are being separated out, then the BlackBerry Administration Service must be installed first. After that, all of the other services can be installed on other servers. In most cases, all services will be installed on a single instance. Please keep in mind that this installation does NOT install the router service. That is a separate installation.
The installation will perform a pre-installation checklist. If there are any issues, the installation will show an error that needs to be corrected. Otherwise, click on next to start the installation process.
Verify the service account and password. Also, it is recommended not to install the BlackBerry software on the same drive as the operating system. Here is where you will redirect the installation files and folders if that is an option.

There will be a summary of the installation configuration and file locations. Take a moment to verify that this information is correct. Once verified, click Next to start the installation process.
The status is shown as each service installs. Once all of them are complete, click Next.
As mentioned before, the database can either be local using Microsoft SQL 2008 Express, which will be installed automatically, or on the database screen enter the SQL server, instance, and the name of the database.
Once the database is installed, a name must be given to this instance of the Blackberry Device Service. This is due to the fact that in larger organizations there may be multiple instances of the service installed. This is due to the face that the preferred way to manage the BlackBerry environment is through the BlackBerry Management Studio, so there must be a way to determine which service is being administrated.
In order to complete the installation the license key, SRP, and client access licenses must be entered. These should have been received via email in advance. The ones below are from a 60 day demo.
The installation verifies that the needed ports for administration are available. If any of these have a conflict, then it will be indicated here. The conflicts will need to be corrected before the installation is finished. If not, then the link to the administration console will not work.
In order to access Active Directory and read the user accounts, the service account must authenticate. Enter the domain password on for the services account.
The initial administration account needs to be created. One can be specified, but it is better to have the service account become the first administration account. This is the default configuration.
The final task is to start all of the services. If the installation is successful, then all of the services will start successfully when Next is clicked.
The web addresses for the management console will be displayed. It is a good idea to leave the default checked to allow a text file to be copied to the desktop in order to have a saved value for this address.
Router Service
As previously mentioned, the router service is not installed by default and CANNOT be installed on the same server as other Blackberry services.
On another Windows 2008 server (preferably in a DMZ), launch the installer again. Once again, you will be presented with the initial installation screen. As before, click “Install” next to the BlackBerry Device Service. Enter the license agreement information and accept the license. This time, when the setup type is displayed, select Install a standalone Blackberry Router and click “Next.”
Once installed, on the Windows desktop go to START>ALL PROGRAMS>BLACKBERRY ENTERPRISE SERVICE 10>BLACKBERRY DEVICE SERVICE>BLACKBERRY DEVICE SERVICE CONFIGURATION. Click on the BlackBerry Router tab and enter the SRP address and port numbers. Click the “Test Network Connection” radio button to verify the settings.
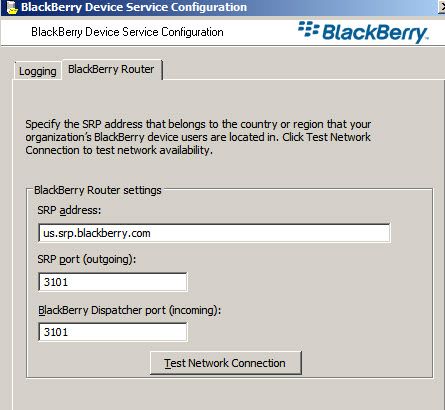
In order to allow the BlackBerry Device Service to connect to the router service, the registry must be edited after the service is installed. Launch the registry editor and go to the following key: HKEY_LOCAL_MACHINE\SOFTWAR
The BlackBerry Device Service must now be connected to the router service. Launch in BlackBerry Administration web interface from the link provided at the end of the installation. On the right side under “Servers and Components”, expand BLACKBERRY SOLUTION TOPOLOGY>BLACKBERRY DOMAIN>BLACKBERRY DEVICE SERVICE and click on the instance name.
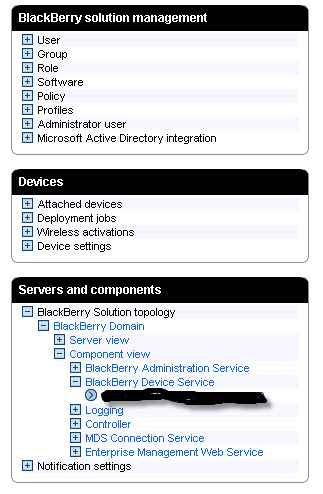
In the right panel, toward the bottom, click “Edit Instance.” Enter the FQDN of the server running the router service. If the port number remained as the default during the installation, then there is no need to enter any value into the port number. Save and exit.

Creating an Email Policy
The last step before users can be successfully activated is to create an email policy. Within the web console, go to BLACKBERRY SOLUTION MANAGEMENT>PROFILES>CREATE

Users and devices can now be activated assuming that ActiveSync has been properly configured on the Microsoft Exchange server. If there is the desire or need to manage IOS and Android devices through the Blackberry server, then the Universal Device Studio and Blackberry Management Studio must also be installed. However, if you are installing all services on the same host, please refer to KB32547 to address port conflict problems.
Troubleshooting
These are some issues that have typically been seen in activating and working with BlackBerry 10 devices.
1. The device successfully activates, but there is not mail flowing to the device:
this can typically take up to 15 minutes depending on the ActiveSync settings. If, after 15-20 minutes, mail is still not syncing to the device, check to verify that an email profile was assigned to the user.
2. When attempting to activate a device, and error code 403 or other 4xx code:
ensure ActiveSync is turned on for the user. Some Exchange environments keep ActiveSync disabled on each user until needed.
3. Device received “no response from server” when attempting to activate:
If all three services are installed on the same host, check for port conflicts. Refer to KB32547 if necessary.
4. Users sub-folders are not syncing:
by default, only the Inbox syncs messages, sub-folders do not. The user can change this by going to SETTINGS>ACCOUNT SETTINGS>select their mail account>EDIT FOLDER SETTINGS. From here, the user can enable “Sync All Mail Folders” or scroll down and select the sub-folders they wish to sync. However, only new messages placed in the folder will be sync’d. Existing messages will not.
5. The user does not see their Outlook contacts under Contacts:
ensure the user is looking on the “Work” side, not the personal. When the device locks and the user unlocks it, the view defaults to the “personal” view.
Have a question about something in this article? You can receive help directly from the article author. Sign up for a free trial to get started.


Comments (4)
Commented:
I find it brillant!
Commented:
Best regards,
RB
Author
Commented:Installing-and-Configuring-BlackBerry-En
Commented: