

Browse All Articles > How to make an 'Archive' button in Outlook
Intro
Whether you like to organize your mail into "Addressed" vs "Un-addressed" items, or have a complicated system of folders to categorize everything, an "Archive" style button, like the one popularized by Gmail is handy.
![Gmail 'archive' button]()
Whether or not you've used Gmail, the need for such a feature may have occurred to you and here you are. Wouldn't you love something like this?
![Wouldn't this be nice?]()
It doesn't just have to be an archive button either. You could create a button that automatically moves any selected messages into whatever folder you want.
Here's how you make yourself an archive feature in Outlook
![Create a new folder]()
![Insert a New Module]()
The code below is designed so that you can make as many different macros as you want where all they do is call the main function with the name of the folder you wish to move selected mail to. The code to copy in is below:
![Copy the code into the new module.]()
![Customize your Toolbar]()
![Locate and Drag the Macro onto the Toolbar]()
![Rename the Button]()
If you want, you can give your button a shortcut by inserting an ampersand (&) in front of the letter you want to be the shortcut. Then when you press Alt+'That Letter', it will trigger the button. Careful, if you chose a letter that is already a shortcut (like A for 'Actions' menu item) then you'll have to press Alt+A+A(again) to cycle through to your button. Here's an example:
![A Shortcut for our Button.]()
![Test it out]()
![Presto! Archived Mail]()
A few extra notes
Remember that you can change the button to work with any folder you want, just make as many copies of the "Archive" code as you want, rename it, and change the name of the folder in the function call. That will be the folder that the mail will be moved to. Also notice the "True" and "False" parameters in the two variations. If "True" it will automatically mark any moved messages as 'Read', if "False" it will leave them as is.
One other thing you might want to consider is changing the icon of your archive button. See the nice icon I used in my first image? I created that in the same place as I renamed the button. After clicking "Modify Selection", click "Modify button icon..." and you will get a window where you can specify your own icon. This is how I designed mine:
![My Archive Icon]()
Enjoy, and if you found this article handy, make sure to let me know and click "Yes" at the top of the page!
--
Alain Bryden
Whether you like to organize your mail into "Addressed" vs "Un-addressed" items, or have a complicated system of folders to categorize everything, an "Archive" style button, like the one popularized by Gmail is handy.

Whether or not you've used Gmail, the need for such a feature may have occurred to you and here you are. Wouldn't you love something like this?
It doesn't just have to be an archive button either. You could create a button that automatically moves any selected messages into whatever folder you want.
Here's how you make yourself an archive feature in Outlook
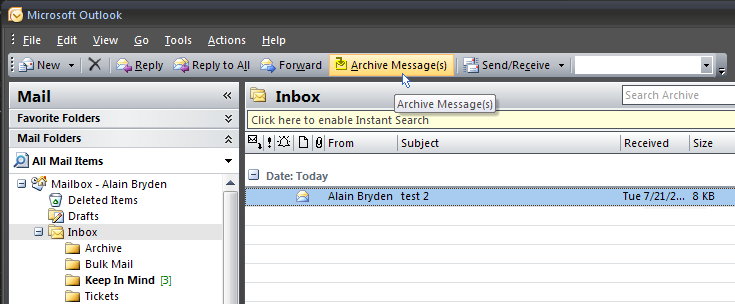
1. Create Your Archive Folder
This is a pretty basic step which you can probably do on your own, but just for the sake of completion, you will want to make a new folder and name it however you like. In this example, I've created a new folder and named it "Archive". If you already have a folder you plan on using, you can skip this.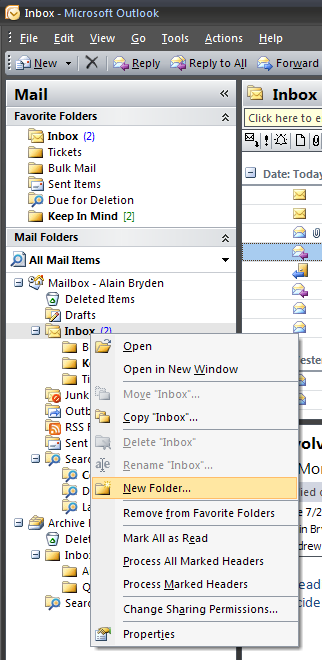
2. Insert a New Module
You're going to be making a simple VBA macro for moving messages to a specified folder. To do this, you need to open up the VBA project for your Outlook (by pressing Alt+F11). When it opens, your window will look similar to the one in the screen shot below. Then, right click your project on the left, and click Insert, Module, as shown: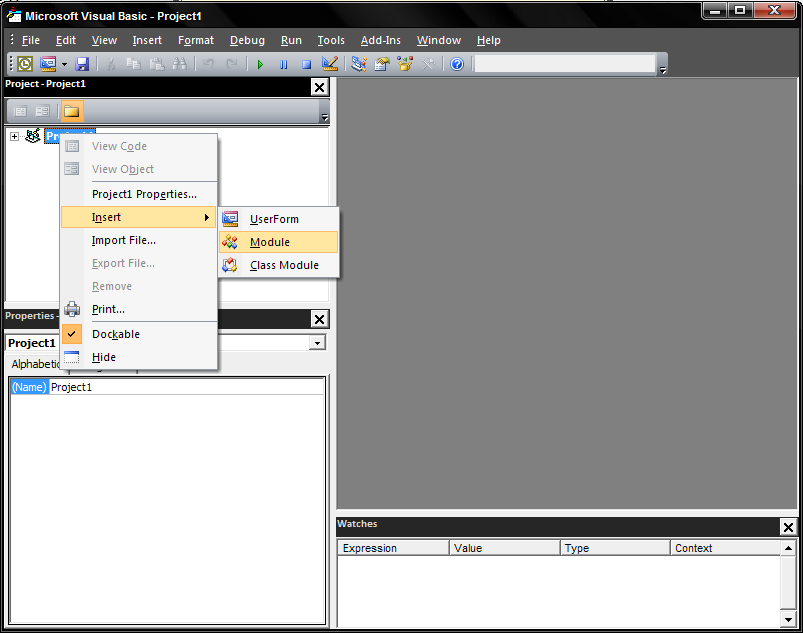
3. Paste in the Macro Code
This is where the hard work has been done for you :)The code below is designed so that you can make as many different macros as you want where all they do is call the main function with the name of the folder you wish to move selected mail to. The code to copy in is below:
Option Explicit
                      Public Sub Archive()
                          MoveSelectedItemsToFolder "Archive", False
                      End Sub
                      Public Sub ArchiveAndMarkAsRead()
                          MoveSelectedItemsToFolder "Archive", True
                      End Sub
                      Private Sub MoveSelectedItemsToFolder(FolderName As String, MarkAsRead As Boolean)
                          On Error GoTo ErrorHandler

                          Dim Namespace As Outlook.Namespace
                          Set Namespace = Application.GetNamespace("MAPI")

                          Dim Inbox As Outlook.MAPIFolder
                          Set Inbox = Namespace.GetDefaultFolder(olFolderInbox)

                          Dim Folder As Outlook.MAPIFolder
                          Set Folder = Inbox.Folders(FolderName)
                          If Folder Is Nothing Then
                              MsgBox "The '" & FolderName & "' folder doesn't exist!", _
                                  vbOKOnly + vbExclamation, "Invalid Folder"
                          End If
                          Dim Message As Object
                          For Each Message In Application.ActiveExplorer.Selection
                              If MarkAsRead Then If Message.UnRead Then Message.UnRead = False
                              Message.Move Folder
                          Next Message

                          Exit Sub
                      ErrorHandler:
                          MsgBox Error(Err)
                      End Sub
4. Add a Button for Your Macro
Now you can close down the Microsoft Visual Basic window. You've done the hard part. Next we want to add the macro to the toolbar so that you can use it conveniently. Right click on a blank area of the toolbar as shown, and click "Customize...". This will bring up the Outlook Customize Toolbars dialogue.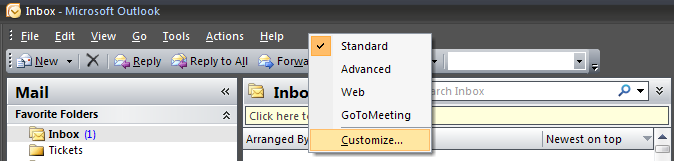
5. Drag your Macro Onto the Toolbar
You have to find your macro and drag it onto the Toolbar now. Switch to the "Commands" tab in the dialogue, and select "Macros" from the list on the left. You should see "Archive" macro there. The other macro will Archive and mark the email as read in one step. If this is what you would like the button to do, you can choose this macro instead. Select it and drag it to wherever you want it on your toolbar: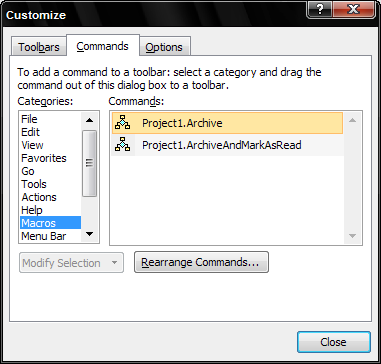
6. Rename the Button
You probably don't like the ugly name Outlook has given your button, so go ahead and rename it. To do this, click the "Rearrange Commands" button at the bottom of the dialogue we have open (I know - pretty unintuitive). A new dialogue will open. Click the "Toolbar" option button (instead of "Menu Bar") and find the new button you just created. When you find it, select it and click the "Modify Selection" button. Here, you can rename it to whatever you want. Here's an illustration: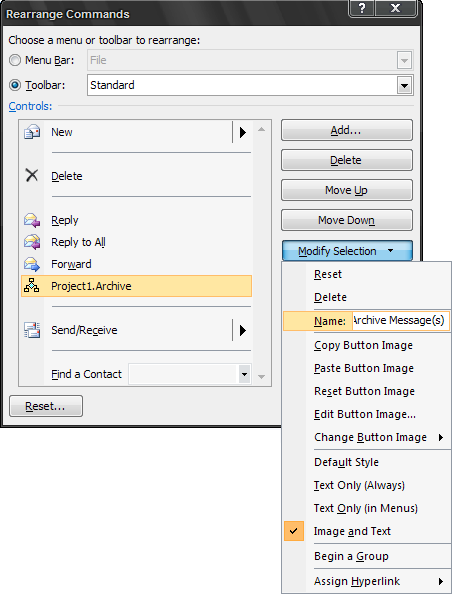
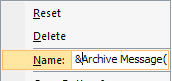
If you want, you can give your button a shortcut by inserting an ampersand (&) in front of the letter you want to be the shortcut. Then when you press Alt+'That Letter', it will trigger the button. Careful, if you chose a letter that is already a shortcut (like A for 'Actions' menu item) then you'll have to press Alt+A+A(again) to cycle through to your button. Here's an example:
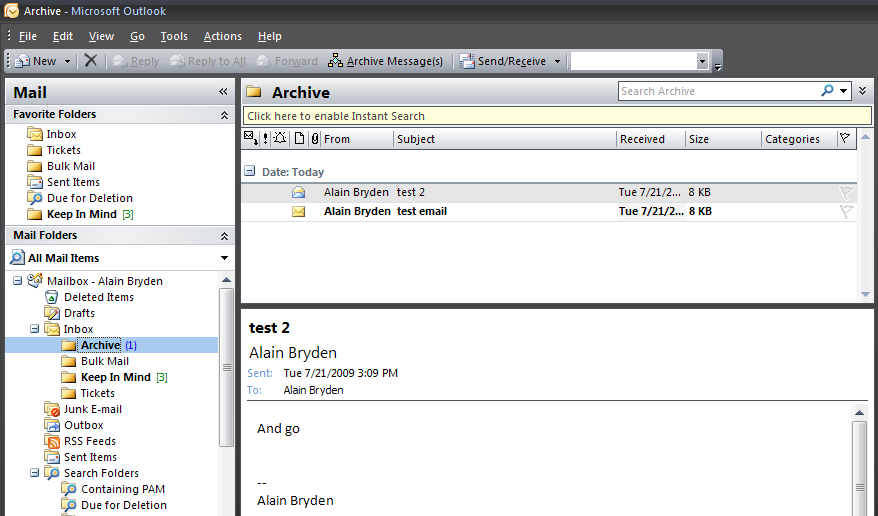
7. Test it out!
Now test it out! Select one or more emails, click the button, and watch them get moved to your archive. Isn't that sharp?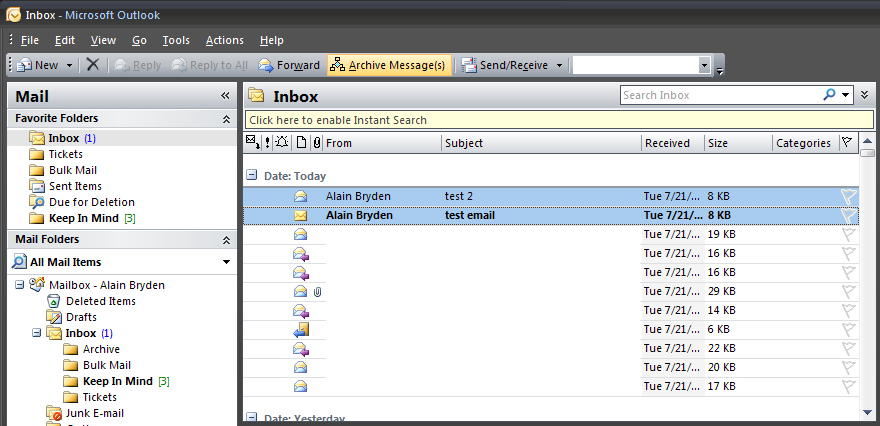
A few extra notes
Remember that you can change the button to work with any folder you want, just make as many copies of the "Archive" code as you want, rename it, and change the name of the folder in the function call. That will be the folder that the mail will be moved to. Also notice the "True" and "False" parameters in the two variations. If "True" it will automatically mark any moved messages as 'Read', if "False" it will leave them as is.
One other thing you might want to consider is changing the icon of your archive button. See the nice icon I used in my first image? I created that in the same place as I renamed the button. After clicking "Modify Selection", click "Modify button icon..." and you will get a window where you can specify your own icon. This is how I designed mine:
Enjoy, and if you found this article handy, make sure to let me know and click "Yes" at the top of the page!
--
Alain Bryden
Have a question about something in this article? You can receive help directly from the article author. Sign up for a free trial to get started.
Comments (3)
Commented:
I thought your article was most helpful. However, I'm running into some problems.
I have installed Google Apps Sync for Outlook on a clients computer, and when trying to use the macro on messages within the inbox, they just disappear. When trying to use the macro on messages in other 'folders', it works as per normal. Any clues as to why this is occuring?
Cheers
Author
Commented:Alain
Commented:
Thanks anyway.