Signature Image with Transparent Background


50+ years in computers
EE FELLOW 2017 — first ever recipient of Fellow award
MVE 2015,2016,2018
CERTIFIED GOLD EXPERT
DISTINGUISHED EXPERT
EE FELLOW 2017 — first ever recipient of Fellow award
MVE 2015,2016,2018
CERTIFIED GOLD EXPERT
DISTINGUISHED EXPERT
Published:
Browse All Articles > Signature Image with Transparent Background
This article is in response to a question here at Experts Exchange. The Original Poster has a scanned signature and wants to make the background transparent so that the signature may be placed on documents without obliterating the surrounding text. Here's an example of the problem, showing how the surrounding document is overlaid when the non-transparent signature is placed on a PDF (in this case, via the Custom Stamp feature in Adobe Acrobat):
![Signing PDF in Acrobat with non-transparent stamp]()
The solution described in this article requires a product called IrfanView, excellent (and free!) imaging software:
http://www.irfanview.com/
At the URL above, click the Download link on the left to download IrfanView and click the PlugIns link on the left to download the PlugIns, which are needed to give you PDF capability. Installing the PlugIns is optional – required only if you want PDF support (and the other features that come with the PlugIns). Install IrfanView first, then install the PlugIns. Although I recommend adding the PlugIns to get PDF support, that's for general, future usage. For this situation, you don't need them, unless your scanned signature is in a PDF file, in which case you do need them.
Here are the steps for making your signature background transparent after installing IrfanView:
(1) Run IrfanView and open the file that has your scanned signature.
(2) I recommend cropping the signature by dragging the mouse from the upper left to the lower right and selecting the Edit menu, then Crop selection. At that point, you'll have something like this:
![John Doe sig not transparent]() (3) Now save the image as a PNG file, which supports transparency. Click the File menu, then Save as. At the bottom of the Save Picture As dialog, tick the Show options dialog box:
(3) Now save the image as a PNG file, which supports transparency. Click the File menu, then Save as. At the bottom of the Save Picture As dialog, tick the Show options dialog box:
![Show options dialog]()
(4) In the Save as type drop-down, select PNG:
![Save as type PNG]()
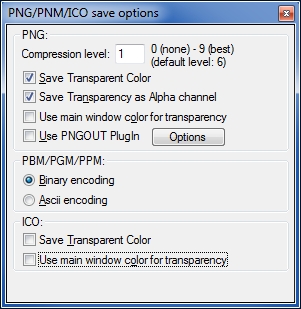
(5) You will see a separate window with the PNG/PNM/ICO save options, like this:
![PNG save options]()
(6) I have experimented with various settings in the PNG section of the save options dialog, and I recommend the settings shown in the screenshot above. In particular, Compression level 1, which makes the file larger (but still a reasonable size) and the quality higher, is a good idea for a signature (Compression level 0, i.e. no compression, results in a very large file). Also, I've had success using the transparent signature in more products when Save Transparency as Alpha channel is ticked.
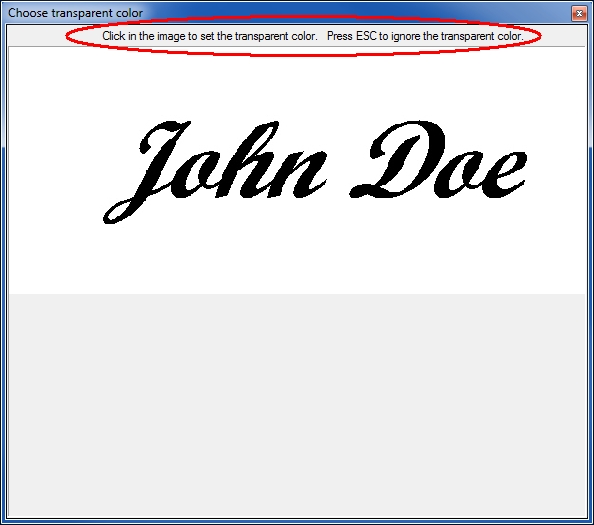
(7) Click Save in the main Save Picture As window. Now the critical step occurs – it will ask you to click in the image to set the transparent color:
![Click to set transparent color]()
So click the mouse on the white background (this assumes, of course, that your scanned signature is dark ink on white paper). After you click the white area, it will be transparent!
(8) Exit IrfanView. The PNG file saved in the step above now has your signature with transparent background.
To show how this works, here is a screenshot of the transparent signature placed on a document, using the same PDF file and the same Custom Stamp feature in Adobe Acrobat that were used with the non-transparent signature at the beginning of this article:
![Signing PDF in Acrobat with transparent stamp]()
If you are wondering how to create a Custom Stamp with your signature in Adobe Acrobat, this EE article explains it:
Create Signature Stamp in Adobe Acrobat
Happy document signing – without having to print it, sign it in ink, and then scan it back in.
If you find this article to be helpful, please click the thumbs-up icon below. This lets me know what is valuable for EE members and provides direction for future articles. Thanks very much! Regards, Joe

The solution described in this article requires a product called IrfanView, excellent (and free!) imaging software:
http://www.irfanview.com/
At the URL above, click the Download link on the left to download IrfanView and click the PlugIns link on the left to download the PlugIns, which are needed to give you PDF capability. Installing the PlugIns is optional – required only if you want PDF support (and the other features that come with the PlugIns). Install IrfanView first, then install the PlugIns. Although I recommend adding the PlugIns to get PDF support, that's for general, future usage. For this situation, you don't need them, unless your scanned signature is in a PDF file, in which case you do need them.
Here are the steps for making your signature background transparent after installing IrfanView:
(1) Run IrfanView and open the file that has your scanned signature.
(2) I recommend cropping the signature by dragging the mouse from the upper left to the lower right and selecting the Edit menu, then Crop selection. At that point, you'll have something like this:
 (3) Now save the image as a PNG file, which supports transparency. Click the File menu, then Save as. At the bottom of the Save Picture As dialog, tick the Show options dialog box:

(4) In the Save as type drop-down, select PNG:

(5) You will see a separate window with the PNG/PNM/ICO save options, like this:
(6) I have experimented with various settings in the PNG section of the save options dialog, and I recommend the settings shown in the screenshot above. In particular, Compression level 1, which makes the file larger (but still a reasonable size) and the quality higher, is a good idea for a signature (Compression level 0, i.e. no compression, results in a very large file). Also, I've had success using the transparent signature in more products when Save Transparency as Alpha channel is ticked.
(7) Click Save in the main Save Picture As window. Now the critical step occurs – it will ask you to click in the image to set the transparent color:
So click the mouse on the white background (this assumes, of course, that your scanned signature is dark ink on white paper). After you click the white area, it will be transparent!
(8) Exit IrfanView. The PNG file saved in the step above now has your signature with transparent background.
To show how this works, here is a screenshot of the transparent signature placed on a document, using the same PDF file and the same Custom Stamp feature in Adobe Acrobat that were used with the non-transparent signature at the beginning of this article:

If you are wondering how to create a Custom Stamp with your signature in Adobe Acrobat, this EE article explains it:
Create Signature Stamp in Adobe Acrobat
Happy document signing – without having to print it, sign it in ink, and then scan it back in.
If you find this article to be helpful, please click the thumbs-up icon below. This lets me know what is valuable for EE members and provides direction for future articles. Thanks very much! Regards, Joe
50+ years in computers
EE FELLOW 2017 — first ever recipient of Fellow award
MVE 2015,2016,2018
CERTIFIED GOLD EXPERT
DISTINGUISHED EXPERT
EE FELLOW 2017 — first ever recipient of Fellow award
MVE 2015,2016,2018
CERTIFIED GOLD EXPERT
DISTINGUISHED EXPERT
Have a question about something in this article? You can receive help directly from the article author. Sign up for a free trial to get started.
Comments (16)
Author
Commented:You're welcome. I'm glad to hear it's working for you. And thanks to you for the update. Regards, Joe
Commented:
It's probably a simpleton approach but to avoid the: "print > fill in & sign by hand > scan" approach you mentioned and because forms & other documents needing info & signatures can be of multiple types (eg pdf, Word, online, etc), I have always done the following:
1) capture a screenshot of the form/doc using the Snipping Tool
2) paste the image directly into PowerPoint (ie without saving it first)
3) enter all required info as text boxes (which are easy to modify or re-position)
4) Insert > Picture > signature
5) Ctrl+A > Right-click > Group (all objects)
then either:
6a) Right-click > Save as Picture…
or:
6b) Snip the completed form and save the resulting screenshot.
Please tell me if I'm mistaken but I've always assumed that doing either #6 option results in an image file which can then be submitted wherever in a form that prevents someone from lifting/altering one of the original single objects (eg the signature).
Author
Commented:> prevents someone from lifting/altering one of the original single objects (eg the signature)
Yes, it means that the signature is not a live object (it has been burned into the image), but that affords you relatively little protection. Someone can easily lift the signature and/or alter the document with imaging software. This was discussed to some extent in a comment above. Regards, Joe
Commented:
1) What site do you use to download software like IrfanView? The link you provided led to a page with about a dozen download links. The first of those (Download.com) resulted in a pop-up notice saying "iview440_setup.exe is malicious, and Chrome has blocked it". I found one of the sites which did not trigger that notice but still wanted me to accept a bunch of extra stuff. I unchecked all those boxes but it makes me wonder what is downloaded and installed without my knowledge. Is there a site where you can count on getting only what you are after and nothing more?
2) After installing and using the IrfanView app, I closed it. But then when I went back to open it again, it was nowhere to be found in my Start > All Programs list of apps and folders. I was only able to find it by Start > Search but that led to the .exe file and I had to go through the install process all over again. Is there something I could be doing wrong or is that just what's required each time you want to use the software?
Author
Commented:Yes, the download page provides many links, but I recommend the TUCOWS link to download IrfanView:
http://www.tucows.com/preview/194967
This will download a single install file called <iviewNNN.exe> or <iviewNNN_setup.exe> with no adware and no junk!
And the TUCOWS link for the PlugIns, which are required for PDF support:
http://www.tucows.com/preview/415586
This will download a single install file called <irfanview_plugins_NNN_set
In both cases, NNN is the version number (currently 440, meaning Version 4.40).
Install IrfanView first, then install the PlugIns.
There's also a new 64-bit version (started with the 4.40 release), available here:
http://www.irfanview.com/64bit.htm
The download links for the 64-bit core product and the 64-bit plugins are at the bottom of the page. I have both the 32-bit and 64-bit versions installed on the same W7/64-bit system (in different folders) — no problem.
> Is there something I could be doing wrong or is that just what's required each time you want to use the software?
Perhaps you're not telling it to create shortcuts. Here's what I select in the installer:
That gives me an IrfanView program group with shortcuts, as well as a shortcut on the desktop. I keep an ultra-clean desktop, so I move the shortcut into a folder of shortcuts where I have my most frequently used programs. Regards, Joe
View More