HOW TO: Migrate a VMware vSphere virtual machine to the Cloud (hosted on Windows Azure)

Andrew Hancock (VMware vExpert PRO / EE Fellow/British Beekeeper)![]() VMware and Virtualization Consultant
VMware and Virtualization Consultant
 VMware and Virtualization Consultant
CERTIFIED EXPERT
EE Fellow, MVE, Expert of the Year 2021,2017-11, Scribe 2016-2012, Author of the Year 2018-6,2013-2012 VMware vExpert Pro, vExpert 2022-2011
Published:
Browse All Articles > HOW TO: Migrate a VMware vSphere virtual machine to the Cloud (hosted on Windows Azure)
HOW TO: Migrate a VMware vSphere virtual machine to the Cloud (hosted on Windows Azure)
In my previous Experts Exchange Articles, most have featured Basic and Intermediate VMware and Virtualisation Topics.
If you would like to read my Basic VMware articles, they are listed here for your convenience.
During this series of articles VMware released VMware vSphere 5.5 and VMware vSphere Hypervisor ESXi 5.5. These articles are also applicable to VMware vSphere Hypervisor ESXi 5.x and 5.5. For consistency, I have used VMware vSphere Hypervisor ESXi 5.1 through this series.
In this article, I’m going to take time out from writing a VMware related article, and concentrate on migrating VMware virtual machines to the Cloud. I touched on this topic in this Experts Exchange article - HOW TO: Convert and Migrate virtual machines and disks to Hyper-V and Windows Azure
In this tutorial we will show you HOW TO: Migrate a VMware vSphere virtual machine to the Cloud (hosted on Windows Azure), at the end of this tutorial, you will also be able to migrate VMware vSphere virtual machines to the Cloud hosted on Windows Azure.
This tutorial is based on a real world scenario, as follows, and we will be doing it again shortly!
We have successfully used this procedure in this tutorial in the real world of IT, when one of our clients regularly has a “Sale Day in the autumn” – unfortunately their current infrastructure does not scale well to handle the thousands of concurrent transactions, and they do not want to spend any more money, on infrastructure, just for the sale day, that happens once a year. Customers would find the website used to crash when they opened the website for business at 10.00am, so we now “push” the website to the cloud, for this day for the “Sale Day in the autumn”!
The customer is not impacted; and does not notice it has been migrated from an on-premise solution to the Cloud! (hosted on Windows Azure), and they are happy to "pay as you go" for their 24 hour hosted solution, whilst the sale is in progress. (and they no longer require our assistance, to do this).
Prerequisites
- Windows Azure Subscription (Free Trials are available).
Please see my Experts Exchange Article HOW TO: Create a Windows Azure Free Trial subscription to create a Windows Azure Subscription.
- Microsoft Virtual Machine Converter 2.0 (MVMC 2.0).
(Download URLs are located in my previous article HOW TO: Convert and Migrate virtual machines and disks to Hyper-V and Windows Azure). Installed and configured on your Administration Windows OS workstation.
- Access to VMware vSphere vCenter Server and VMware vSphere Infrastructure from your Administration Windows Workstation.
- Windows Azure Subscription ID.
- Management Certificate installed and configured on Windows Azure.
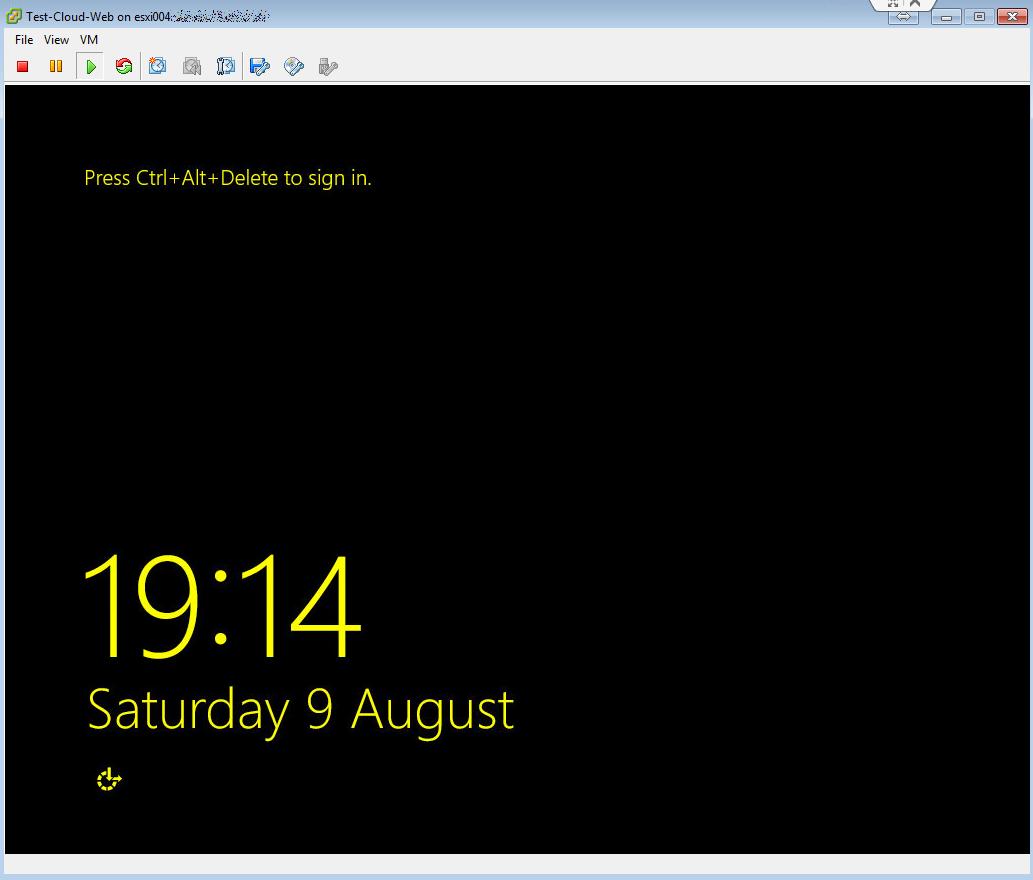
 This is the website running locally on-premise at http://150.xxx.yyy.60, later will show the same website running from the Cloud @ http://test-cloud-web.cloudapp.net !
1. Migrate VMware vSphere Virtual Machine to Windows Azure.
On the workstation that is to be used to convert and migrate the VMware vSphere virtual machine, download and install Microsoft Virtual Machine Converter 2.0 (MVMC 2.0).
 Double-click the icon to start the application. I would recommend starting the application as an Administrator (e.g. Run As Administrator).
The application will start, showing the following dialogue box, click Next to continue.

Select the Migration Destination, in this tutorial, we will be migrating to the Cloud – Windows Azure.
So Select Migrate to Windows Azure
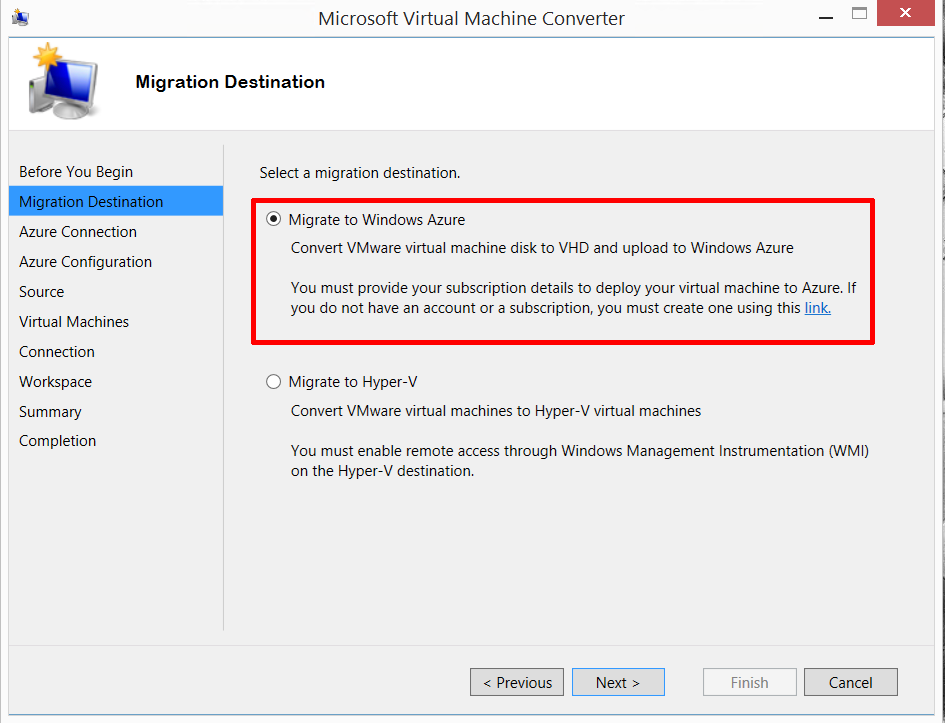
You must provide your Windows Azure Subscription ID and Management Certificate Thumbprint details to deploy your virtual machine to Azure. If you do not have an account or a subscription, you must create on using this Windows Azure Subscription.
Click Next to continue
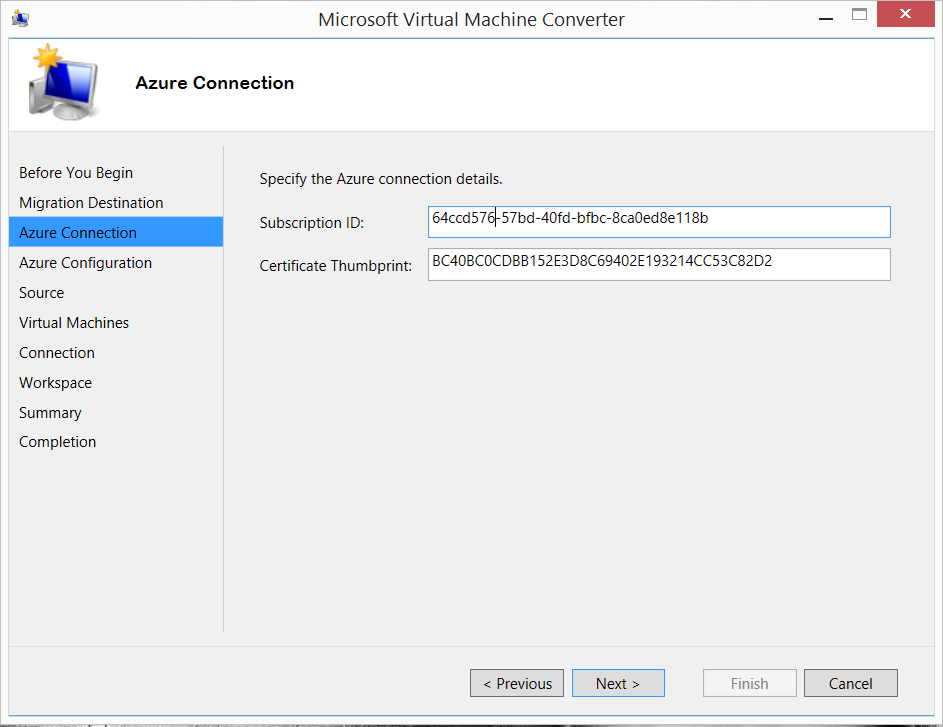
Specify the Windows Azure connections details – enter your Windows Azure Subscription ID and Management Certificate Thumbprint details. These are available from the Windows Azure SETTINGS section.
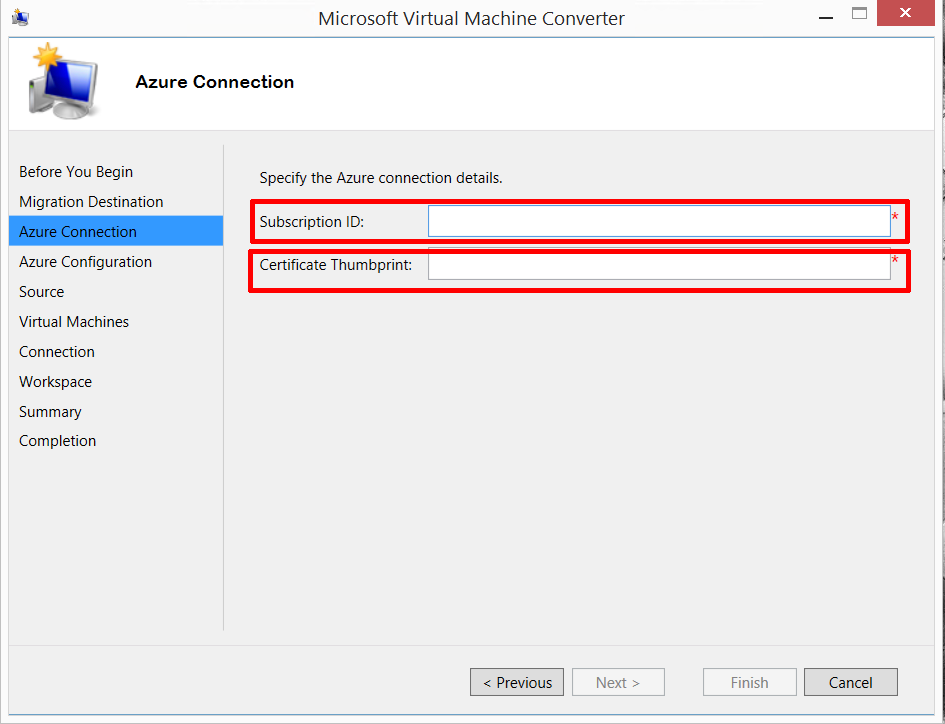
You will need to enter your details; the following details will not work for you! The combination of the Subscription ID and Certificate Thumbprint, will give you secure access to the Windows Azure environment.
Click Next to continue
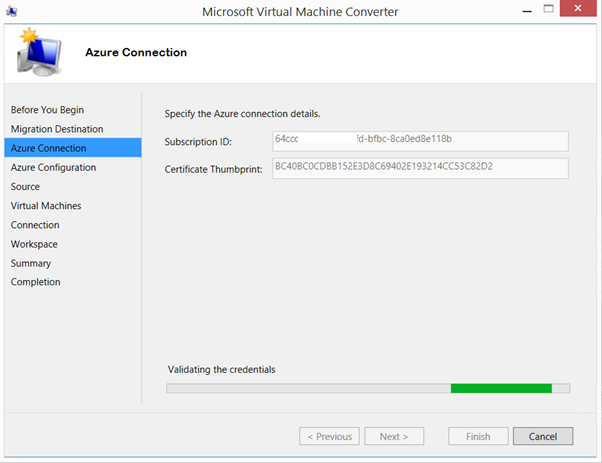
After clicking Next to continue, your credentials will be authenticated against the Windows Azure service.
Select a Windows Azure cloud storage account where you want to store the converted virtual hard disk.
(The conversion and migration proccess, exports the VMware vSphere virtual machine as an OVF, which includes the machine settings, and the VMware vSphere virtual hard disk (VMDK) is converted to a Windows VHD.)
If you have not previously created a storage account, Select the STORAGE view in Windows Azure and create a storage location.
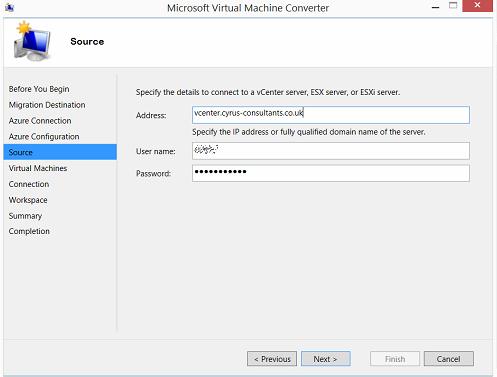
Click Next to continue, and then Specify the details to connect to a VMware vSphere vCenter server, ESX server or ESXi server, followed by Next to continue.
 Once you have been successfully authenticated against the VMware vSphere vCenter Server, a list of VMware vSphere virtual machines will be shown. Select the virtual machine for conversion and migration to the Cloud, followed by Next to continue.
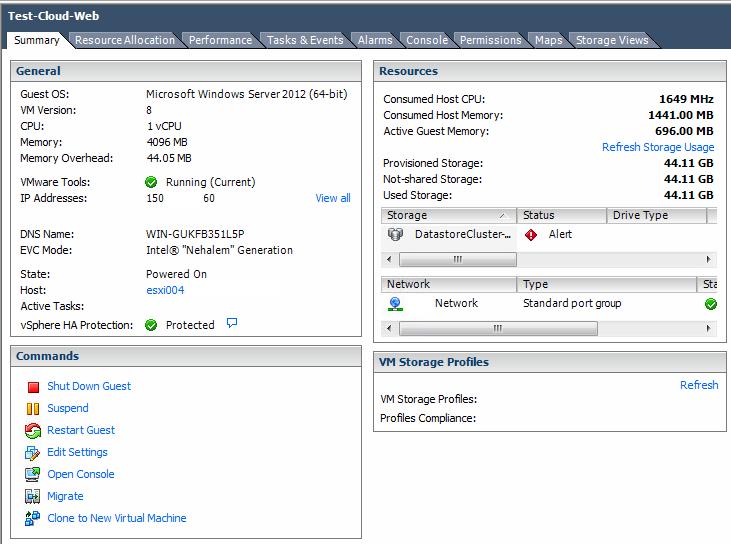
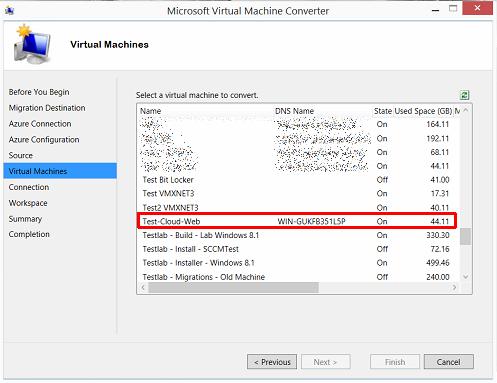 The virtual machine we have selected is a simple On-Premise Web Server which is hosted on a Microsoft Windows Server 2012 R2, with Internet Information Server Role added, using a DHCP IP Address, 1 vCPU and 4GB RAM, with a 40GB virtual hard disk.
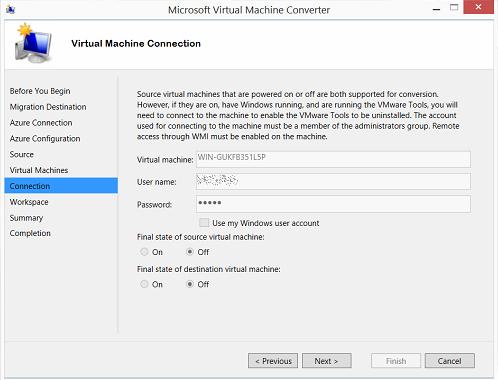 Source virtual machines that are powered on or off, are both supported for conversion. However, please note that if the virtual machine is powered on, and has Microsoft Windows running, and has VMware Tools installed, Virtual Machine Converter must connect to the virtual machine remotely to uninstall VMware Tools.
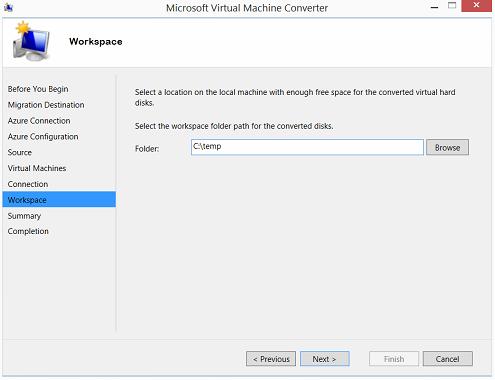
Click Next to continue, select a location on your local computer that has enough disk space for the export and conversion, e.g. 40GB in this tutorial.
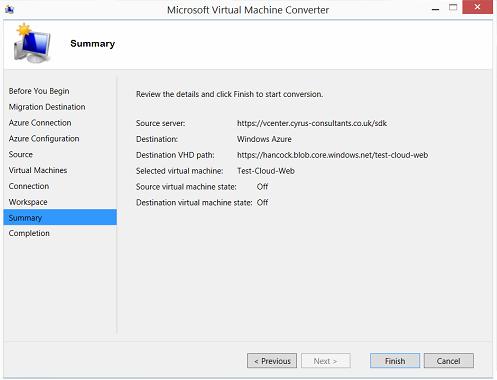
 Review the Summary details and Click Finish to start the conversion and migration.
 The conversion will start, and the Progress will be displayed in the Status Window
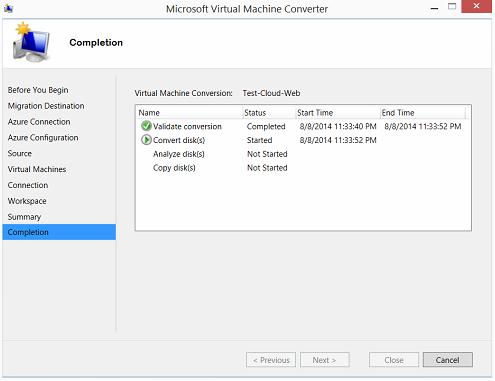
The export of the VMware virtual machine is completed after approximately 40 minutes, a conversion time of approximately 1GB per minute.

The converted virtual machine disk (VHD), is then uploaded to Windows Azure Storage account.
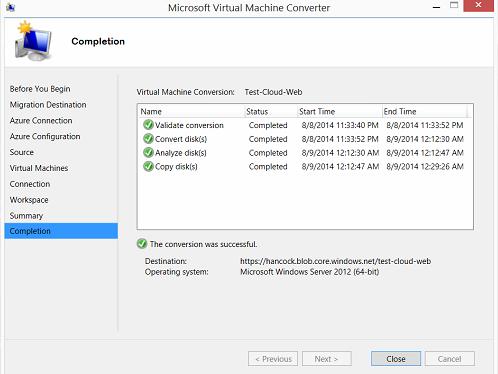 The conversion of the virtual machine has been successful, and the Microsoft Windows Server 2012 R2 (64-bit) has been converted and uploaded to Windows Azure as can be seen from the Destination https://hancock.blob,core.windows.net/test-cloud.web.
It has taken approximately 17 minutes to upload the 40GB virtual disk to Windows Azure.
2. Create the virtual machine in Windows Azure.
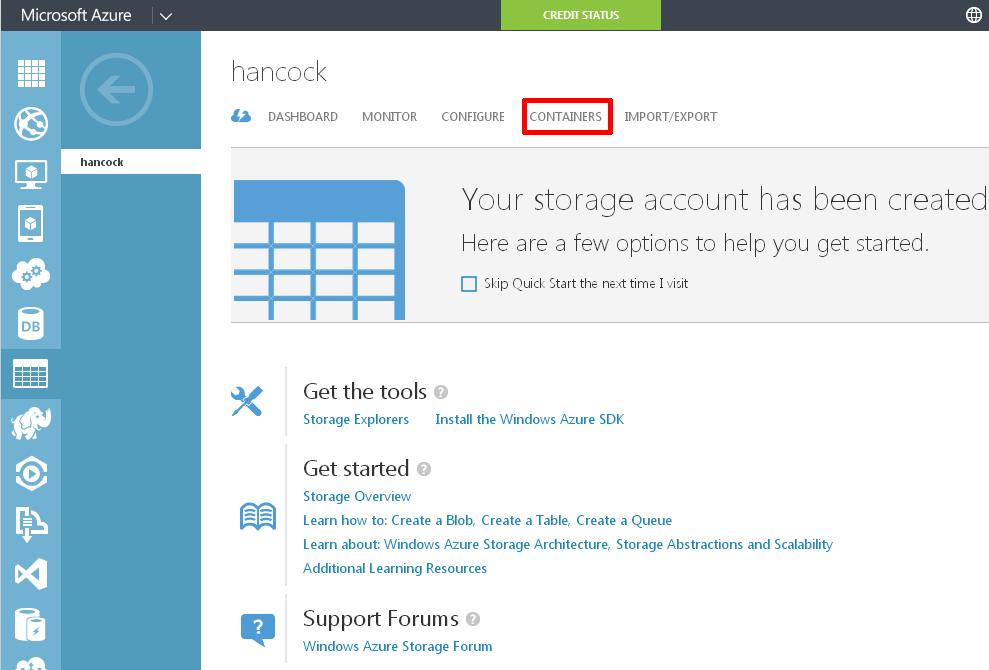
Login to the Management Portal of Windows Azure. If you click your Storage Account followed by Containers
 Select the container name for your virtual machine, in this tutorial the container name is test-cloud-web.
 You should see the virtual machine disk (VHD) which has been uploaded to WIndows Azure.
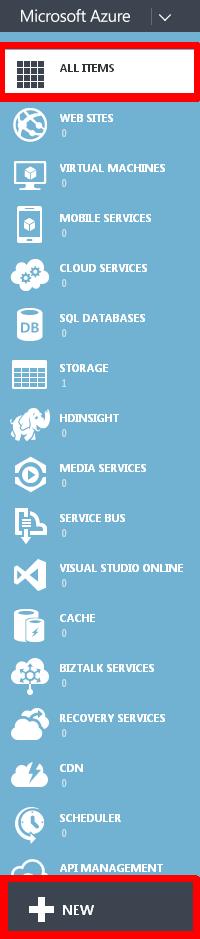
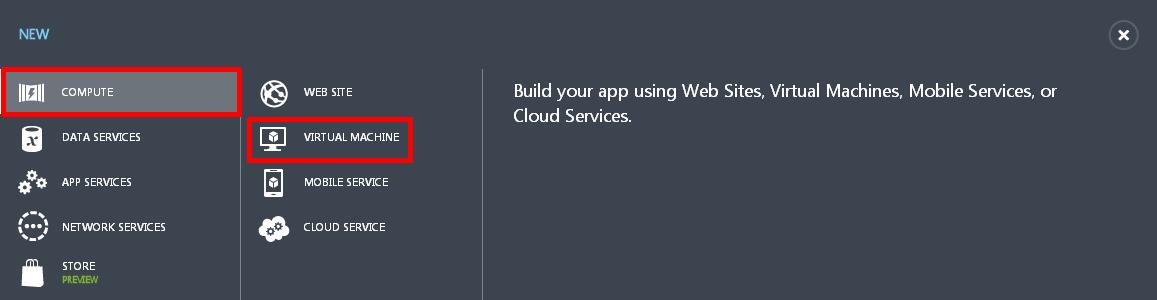
 Select All Items followed by New
 followed by COMPUTER, and VIRTUAL MACHINE
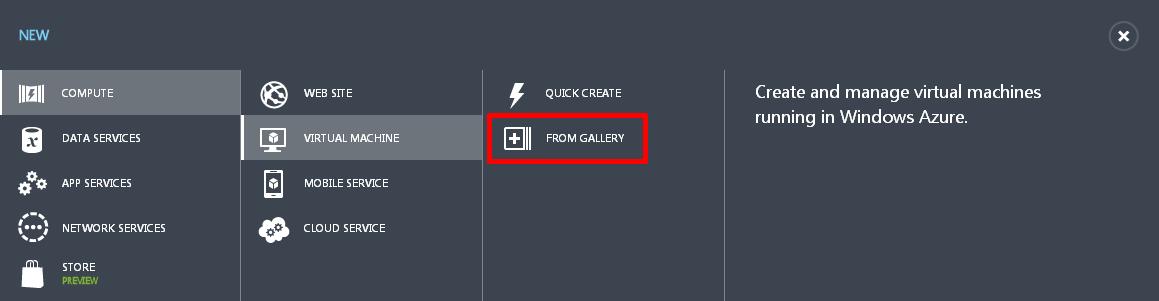
 select FROM GALLERY, this option will allow us to select the virtual disk or MY DISKS we have uploaded to Windows Azure.
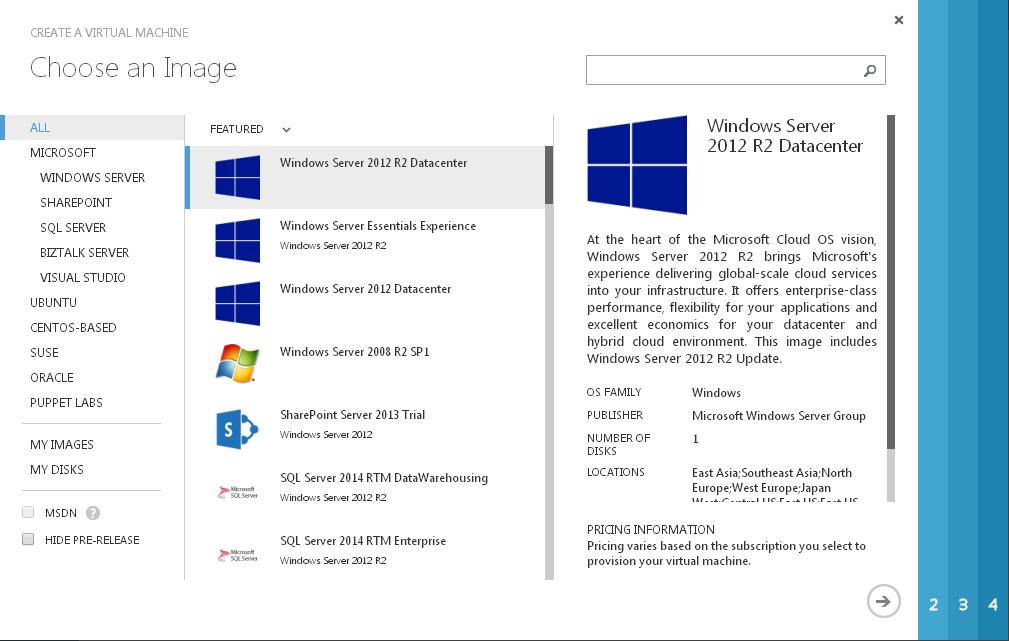
 Select MY DISKS
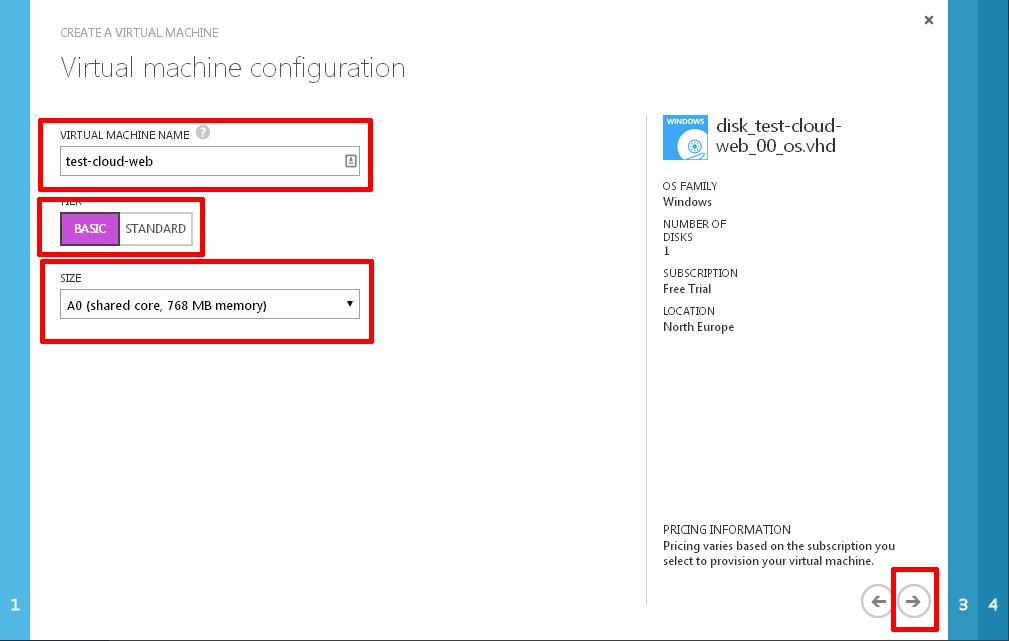
 Select the virtual disk, that has been uploaded to Windows Azure, in this tutorial, MY DISK is called disk_test-cloud-web-00_os.
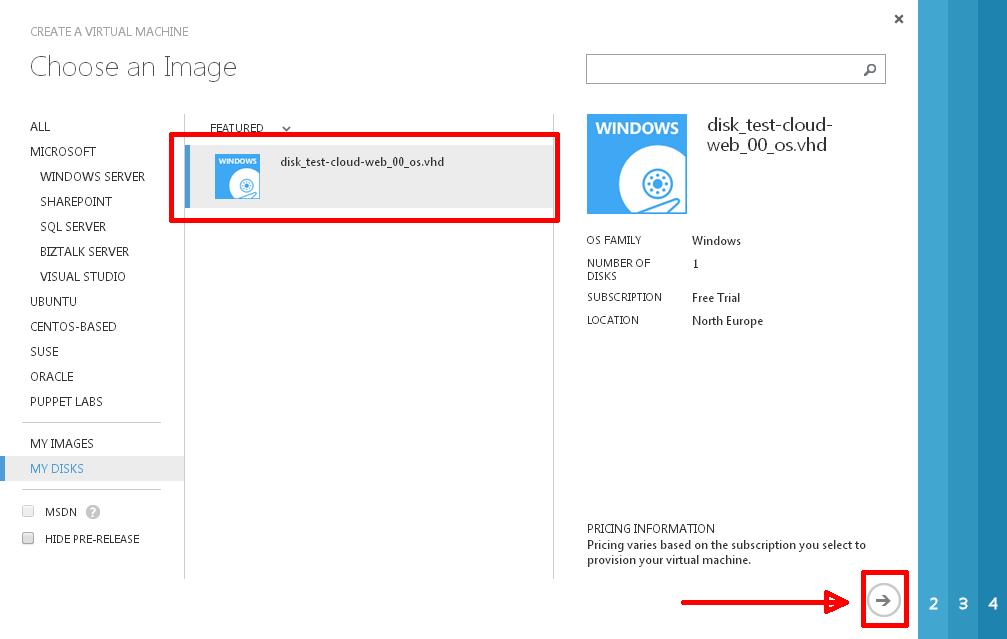 followed by Next (the right arrow button at the bottom right!)
Enter a Virtual Machine Name, select a TIER, and Size of virtual machine. Select a configuration which matches your machine system requirements. This can be changed later, also note pricing for your Instant will vary based on your subscription. (does not apply to the free trial!). Followed by Next to continue.
 On the virtual machine configuration page, you can select the defaults, the CLOUD SERVICE DNS NAME by default will be the same as the virtual machine name, and has to be unique. You can use your own private domains but that is beyond this tutorial.
test-cloud-web.cloudapp.ne
As this is a Web Server in the CLOUD, I've added the ENDPOINT (firewall rule) of
NAME: HTTP
PROTOCOL:TCP
PUBLIC PORT:80
PRIVATE PORT:80
Click Next to continue with the deployment
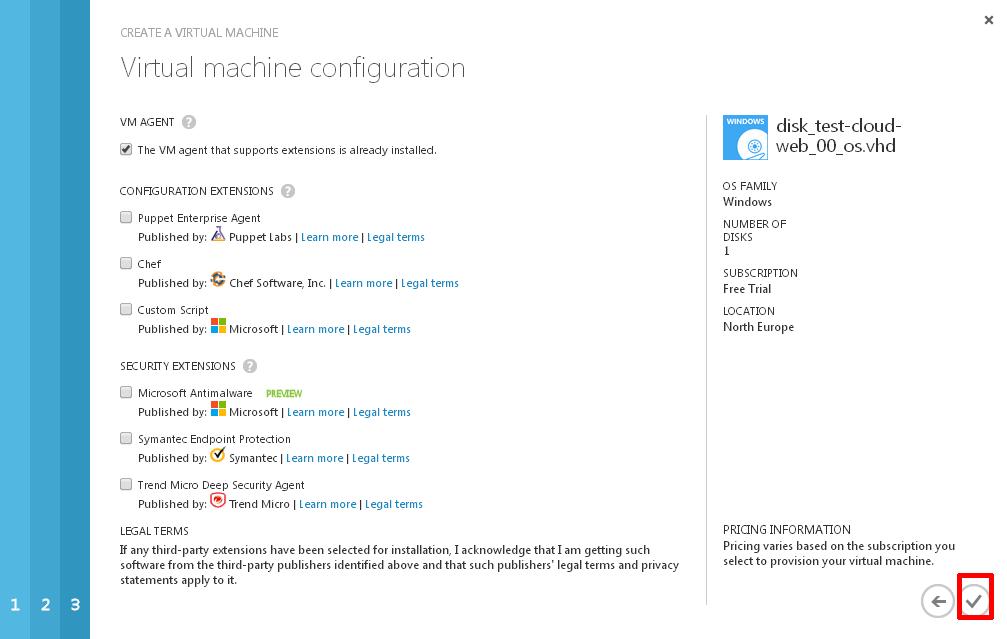
 On the next virtual configuration page, select any additional Configuration Extensions or Security Extensions you require. Click the Tick to start the deployment.
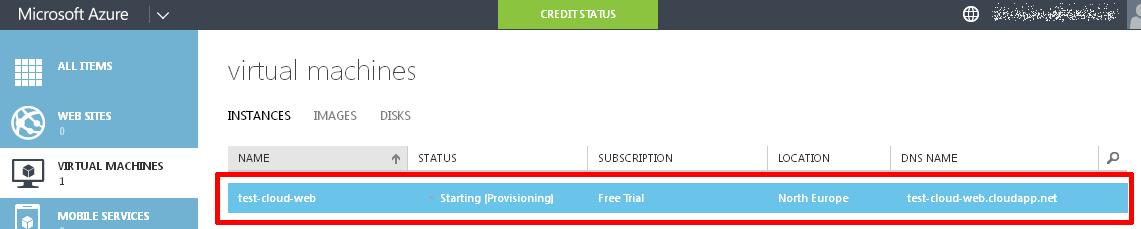
 After clicking the tick, the virtual machine will start to be Provisioned
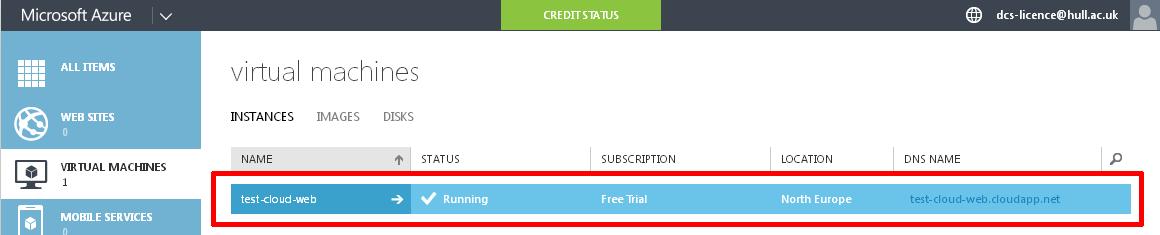
 When the STATUS has changed to Running your virtual machine has been successfully provisioned and started.
Connecting to the test-cloud-web in the Cloud via RDP, using the domain name test-cloud.web.cloudapp.ne
 Website in the Cloud.....
Congratulations, you have successfully migrated a VMware vSphere virtual machine On-premise to the Cloud hosted on Windows Azure.
**************************
Thank you for reading my article, please leave valuable feedback. If you liked my VMware article and would like to see more Articles from me, please click the Yes button near the: Was this article helpful? at the bottom of this article just below and to the right of this information. Thank You. Do not forget if you have a question about this article or another VMware, Virtualisation, Windows Server 2012 question, why not post a Question for me and the other Experts Exchange Experts in the VMware, Virtualisation, Windows 2008, Windows 2012 Zones. I look forward to hearing from you. - Andy :- twitter @einsteinagogo
**************************
EE Fellow, MVE, Expert of the Year 2021,2017-11, Scribe 2016-2012, Author of the Year 2018-6,2013-2012 VMware vExpert Pro, vExpert 2022-2011
Have a question about something in this article? You can receive help directly from the article author. Sign up for a free trial to get started.
Comments (2)
Commented:
If you install a SQL for example in the migrated VM, and you store new data in this SQL ...may be the information is lost due that Azure sees your disk as temporal and not persistent..
Author
Commented: