HOW TO: Quickly Setup a NetApp FAS2520 Filer SAN/NAS Storage System

Andrew Hancock (VMware vExpert PRO / EE Fellow/British Beekeeper)![]() VMware and Virtualization Consultant
VMware and Virtualization Consultant
 VMware and Virtualization Consultant
CERTIFIED EXPERT
EE Fellow, MVE, Expert of the Year 2021,2017-11, Scribe 2016-2012, Author of the Year 2018-6,2013-2012 VMware vExpert Pro, vExpert 2022-2011
Published:
Browse All Articles > HOW TO: Quickly Setup a NetApp FAS2520 Filer SAN/NAS Storage System
HOW TO: Quickly Setup a NetApp FAS2520 Filer SAN/NAS Storage System
In my previous Experts Exchange Articles, most have featured Basic and Intermediate VMware and Virtualisation Topics.
In this article, I’m going to take time out from writing a VMware related article, and show you HOW TO: Quickly Setup a NetApp FAS2520 Filer SAN/NAS Storage System.
NetApp Filers are quite unique, in that they have the ability to offer Fibre Channel (FC), Fibre Channel (FCoE), iSCSI, NFS and SMB/CIFS (Windows Shares) from the same heterogeneous storage system, which makes them suitable for a mix of server and client based solutions. This is subject to purchasing the correct licensing for you NetApp Filer. So technically a NetApp filer can be a SAN and a NAS from the same storage system.
This is not uncommon at present, that a storage box, provides NFS, CIFS and iSCSI from the same storage system, inexpensive storage systems which provide NFS, CIFS and iSCSI, often include processors based on the Intel Atom or ARM design, and a small amount of memory for the storage processor in these designs is not uncommon, 2GB - 4GB. The NetApp FAS2520 contains an Intel Xeon Dual Core processor, and 18GB RAM per storage processor, this processor and memory combination enable the NetApp filer to deliver high storage throughput and performance compared to the Intel Atom and ARM storage systems.
This makes the NetApp FAS2520 setup, a little more complex, some storage devices, you can just connect them to your production LAN with a DHCP server, the storage system will obtain an IP Address, point your browser to the IP Address of the storage system, and configure with your browser. If you connect the NetApp FAS2520 to your LAN, it will do nothing, and requires some low level configuration before it can be configured for use.
When you purchased your NetApp FAS2520, your Account Manager may have included some NetApp Professional Services installation days, where a NetApp qualified Storage Engineer, will visit your site, and setup your NetApp FAS2520. Some organisations on a limited budget will rely on setting up the NetApp FAS2520 on their own. Traditionalists may decide to connect a serial cable to the NetApp FAS2520, and setup via a terminal connection, however this does not setup the NetApp FAS2520 for use. Using the NetApp System Setup Software will configure the NetApp FAS2520 very quickly, and you will be able to start using the FAS2520, for NFS, iSCSI and Windows Shares.
Software Pre-requisites
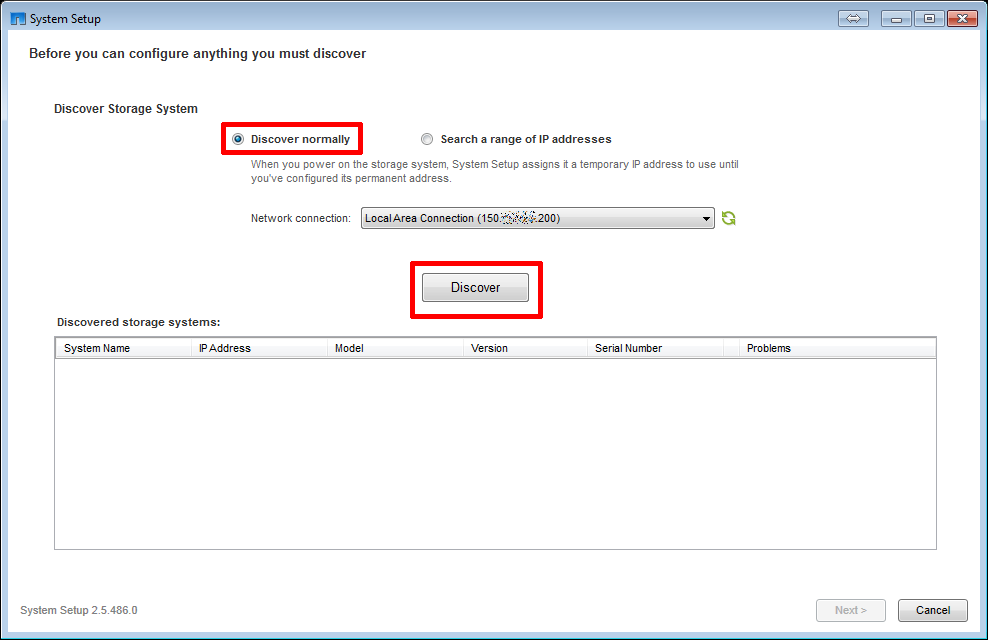
Ensure that the NetApp FAS2520 storage system is cabled as per the Installation and Setup Instructions for FAS2520 .
![net1.png]()
Click the Discover button.
![net2.png]()
![net3.png]()
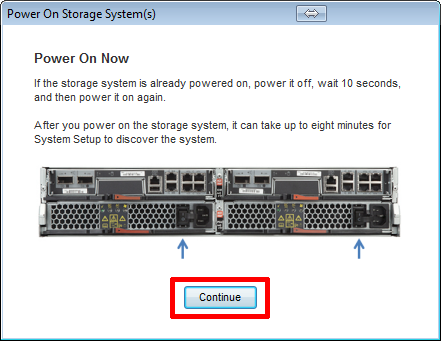
Click Continue after the FAS2520 has been powered up. The FAS2520 will be discovered automatically as below. Select your FAS2520 and Click Next to Continue with the setup.
![net4.png]()
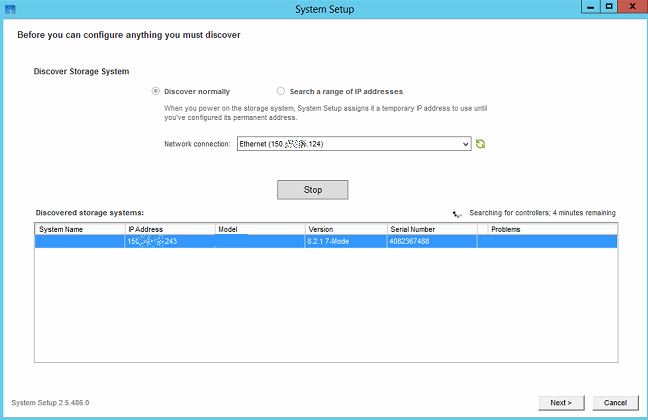
A discovery window will appear quickly as shown below
![net5.png]()
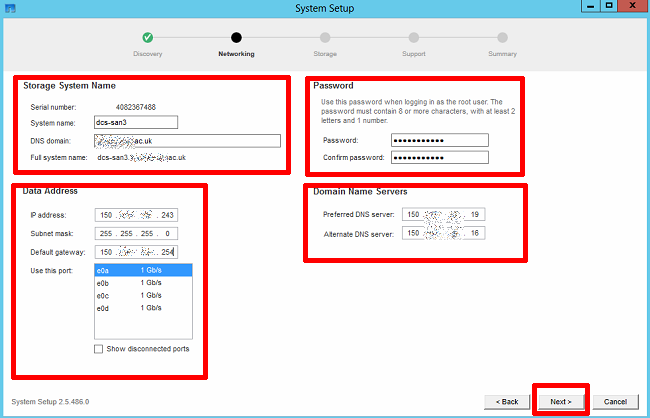
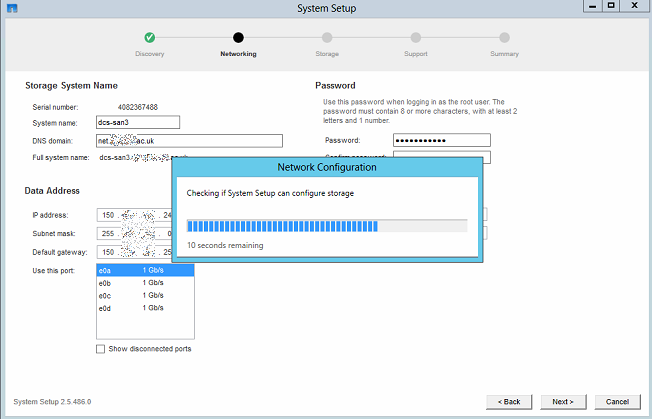
Once discovery has been completed, you will be prompted to enter the Networking configuration
![net6.png]() Click Next to continue, the configuration will be written to the NetApp filer
Click Next to continue, the configuration will be written to the NetApp filer
![net7.png]()
The Storage configuration window will be displayed, for ease select One large Pool,
![net8.png]()
![net9.png]() the storage configuration is written to the NetApp filer. Click Next to Continue.
the storage configuration is written to the NetApp filer. Click Next to Continue.
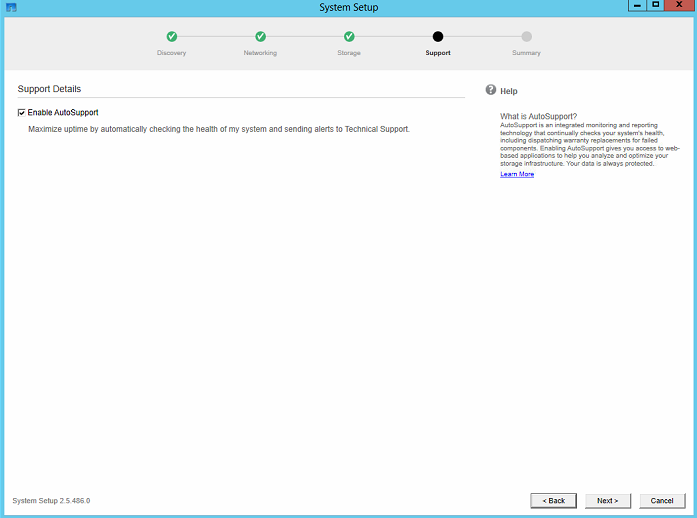
![net10.png]() Finally, after the configuration of storage has been completed. Enable AutoSupport.
Finally, after the configuration of storage has been completed. Enable AutoSupport.
AutoSupport is an integrated monitoring and reporting NetApp technology that continually checks your system’s health, including dispatching warranty replacements for failed components. Enabling AutoSupport gives you access to web-based applications to help you analyse and optimize your storage infrastructure. Your data is always protected securely.
![net11.png]() Click Next to Finish.
Click Next to Finish.
![net12.png]() Click Close
Click Close
Congratulations you have successfully setup your FAS2520 Filer SAN/NAS Storage System.
****************************************************************************
Thank you for reading my article, please leave valuable feedback. If you liked my VMware article and would like to see more Articles from me, please click the Yes button near the: Was this article helpful? at the bottom of this article just below and to the right of this information. Thank You. Do not forget if you have a question about this article or another VMware, Virtualisation, Windows Server 2012 question, why not post a Question for me and the other Experts Exchange Experts in the VMware, Virtualisation, Windows 2008, Windows 2012 Zones. I look forward to hearing from you. - Andy :- twitter @einsteinagogo
****************************************************************************
In my previous Experts Exchange Articles, most have featured Basic and Intermediate VMware and Virtualisation Topics.
In this article, I’m going to take time out from writing a VMware related article, and show you HOW TO: Quickly Setup a NetApp FAS2520 Filer SAN/NAS Storage System.
NetApp Filers are quite unique, in that they have the ability to offer Fibre Channel (FC), Fibre Channel (FCoE), iSCSI, NFS and SMB/CIFS (Windows Shares) from the same heterogeneous storage system, which makes them suitable for a mix of server and client based solutions. This is subject to purchasing the correct licensing for you NetApp Filer. So technically a NetApp filer can be a SAN and a NAS from the same storage system.
This is not uncommon at present, that a storage box, provides NFS, CIFS and iSCSI from the same storage system, inexpensive storage systems which provide NFS, CIFS and iSCSI, often include processors based on the Intel Atom or ARM design, and a small amount of memory for the storage processor in these designs is not uncommon, 2GB - 4GB. The NetApp FAS2520 contains an Intel Xeon Dual Core processor, and 18GB RAM per storage processor, this processor and memory combination enable the NetApp filer to deliver high storage throughput and performance compared to the Intel Atom and ARM storage systems.
This makes the NetApp FAS2520 setup, a little more complex, some storage devices, you can just connect them to your production LAN with a DHCP server, the storage system will obtain an IP Address, point your browser to the IP Address of the storage system, and configure with your browser. If you connect the NetApp FAS2520 to your LAN, it will do nothing, and requires some low level configuration before it can be configured for use.
When you purchased your NetApp FAS2520, your Account Manager may have included some NetApp Professional Services installation days, where a NetApp qualified Storage Engineer, will visit your site, and setup your NetApp FAS2520. Some organisations on a limited budget will rely on setting up the NetApp FAS2520 on their own. Traditionalists may decide to connect a serial cable to the NetApp FAS2520, and setup via a terminal connection, however this does not setup the NetApp FAS2520 for use. Using the NetApp System Setup Software will configure the NetApp FAS2520 very quickly, and you will be able to start using the FAS2520, for NFS, iSCSI and Windows Shares.
Software Pre-requisites
- NetApp System Setup Software:
1. Install System Setup software on the Windows Client
Ensure that the NetApp FAS2520 storage system is cabled as per the Installation and Setup Instructions for FAS2520 .
2. Start the System Setup software
Click the Discover button.
Click Continue after the FAS2520 has been powered up. The FAS2520 will be discovered automatically as below. Select your FAS2520 and Click Next to Continue with the setup.
A discovery window will appear quickly as shown below

Once discovery has been completed, you will be prompted to enter the Networking configuration
- System name:
- DNS domain:
- Root Password:
- Data IP Address:
- Domain Name Servers:
 Click Next to continue, the configuration will be written to the NetApp filer
The Storage configuration window will be displayed, for ease select One large Pool,
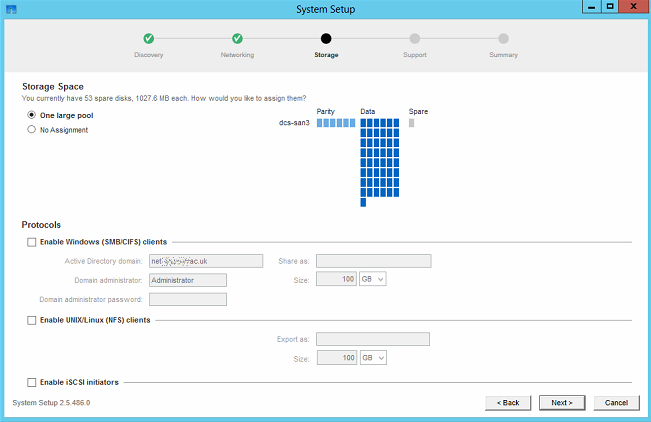
and Tick the boxes
- Enable Windows (SMB/CIFS) clients, use a Domain Administrator to add to an Active Directory domain. Share as windata, 10GB
- Enable Unix/Linux (NFS) clients, export as nfsdata, 10GB
- Enable iSCSI initiators. LUN – iscsidata, 10GB
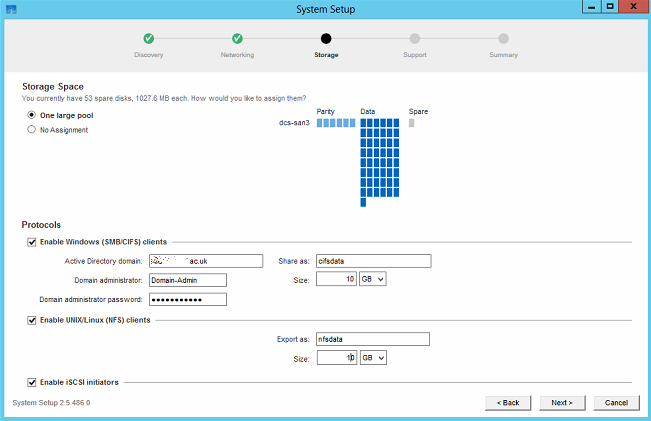 the storage configuration is written to the NetApp filer. Click Next to Continue.
 Finally, after the configuration of storage has been completed. Enable AutoSupport.
AutoSupport is an integrated monitoring and reporting NetApp technology that continually checks your system’s health, including dispatching warranty replacements for failed components. Enabling AutoSupport gives you access to web-based applications to help you analyse and optimize your storage infrastructure. Your data is always protected securely.
 Click Next to Finish.
 Click Close
Congratulations you have successfully setup your FAS2520 Filer SAN/NAS Storage System.
**************************
Thank you for reading my article, please leave valuable feedback. If you liked my VMware article and would like to see more Articles from me, please click the Yes button near the: Was this article helpful? at the bottom of this article just below and to the right of this information. Thank You. Do not forget if you have a question about this article or another VMware, Virtualisation, Windows Server 2012 question, why not post a Question for me and the other Experts Exchange Experts in the VMware, Virtualisation, Windows 2008, Windows 2012 Zones. I look forward to hearing from you. - Andy :- twitter @einsteinagogo
**************************
EE Fellow, MVE, Expert of the Year 2021,2017-11, Scribe 2016-2012, Author of the Year 2018-6,2013-2012 VMware vExpert Pro, vExpert 2022-2011
Have a question about something in this article? You can receive help directly from the article author. Sign up for a free trial to get started.
Comments (0)