

Browse All Articles > How to Accept Drag-and-Drop Files from Windows Explorer
Allow your users to drag from the Explorer rather than navigate a select-a-file or select-a-folder dialog. This article provides C++ source code that will simplify common data-input operations for your users.
For instance, if you want the user to identify a list of files to move or delete or view or process, you can allow him to drag files from an Explorer window and drop them onto your input window. If you need the user to specify a particular folder as a base of operations for output, you can allow him to drop a folder onto your window.
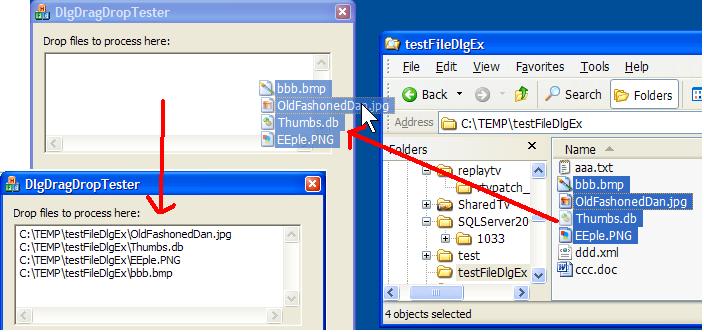
![Drop files onto multiline edit box]() Simplest Scenario
Simplest Scenario
The simplest implementation requires very little programming. In this scenario, you need only set up a single message handler and a few lines of code to convert a file-drop into a list of files.
1) Use the App Wizard to create an MFC dialog-based application.
2) In the Dialog Editor, add a multi-line edit box (IDC_EDIT1).
3) Add a message handler for the dialog: In the Properties of the dialog, select the "Messages" category, click WM_DROPFILES, and select <Add> OnDropFiles. This puts you in the source code editor. Make the handler like so:
4) Edit the OnInitDialog() function and put this at the end:
Allow Drop Only on the Target
The above code might not work exactly as desired. For simplicity, we set up so that the user can drop the file(s) on any part of the parent dialog. A more likely scenario would be to let the user drop only on the edit box. The WM_DROPFILES message goes to the window specified in the DragAcceptFiles(). If we specify the edit box in that call, the parent (dialog) window won't get the messages.
The normal way to handle this to to derive an object from CEdit and do the work in that derived class. As an option, consider this technique: Use SubclassDlgItem() to re-route that one message to the dialog object so that all of the handling can be done there. For instance:
![Drop as an additional input option]() ...where you allow a user to either type in, paste, or browse for a folder... You give him one more option: Drag a folder from any Explorer window.
...where you allow a user to either type in, paste, or browse for a folder... You give him one more option: Drag a folder from any Explorer window.
The More Complicated Scenario
The Simplest Scenario described above is all that's needed to give your program the basic drop-from-Explorer capability. If you read the MSDN documentation, you might wonder why they make it seem so complicated. Well. they have to explain how to be a drop source, which we are omitting here, but also they need to cover the underlying handling that is less often needed.
In the more complicated variation, you must create an IDropTarget object and call RegisterDragDrop(). This technique provides additional flexibility; in particular, you can work with the contents of the dragged object, rather than just the filename.
For instance, using this technique, you can determine in advance if a dropped "file" is actually a directory. And you can handle a drop of all kinds of shell objects, such as printers, computers, and various "shell namespace" objects.
You can control the cursor -- to provide specialized feedback to the user while he drags over various parts of your U/I. And you can know whether the user is pressing SHIFT or ALT or CTRL while he is dragging -- also to provide specialized feedback.
You can also customize the "right-drag" context menu; that is, the menu that appears when the user presses the right-side mouse button when doing the drag. Upon the "right-drop" (releasing the mouse button over your app), you can decide what, if any, special options you want to allow.
This article will NOT go into depth on all of these options; most of them are rarely needed. However, the next example does illustrate how to set up a drop target and how to take action during the drag.
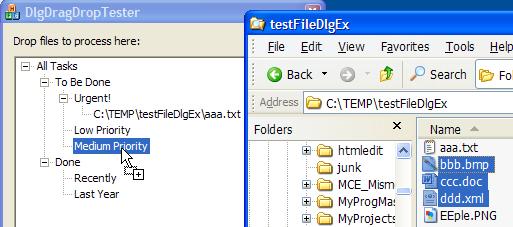
If your application hosts a Tree control, you may want to accept drops of files from the Explorer onto nodes in the tree; that is, dropping onto the tree control is not enough... you need to allow the user to specify a particular node, or branch, of the tree... as he drags.
![Accept file drops onto a Tree Control]() In this example, we assume that you have CTreeCtrl object named m_ctlTree on your dialog and that it is populated with a set of folders... they could be task groups, or holding bins, or whatever. You want to accept files dragged from the Explorer into these buckets. I don't want to complicate the example any more than needed, so I won't show how to set the ImageList for the tree or other (usually essential) coding.
In this example, we assume that you have CTreeCtrl object named m_ctlTree on your dialog and that it is populated with a set of folders... they could be task groups, or holding bins, or whatever. You want to accept files dragged from the Explorer into these buckets. I don't want to complicate the example any more than needed, so I won't show how to set the ImageList for the tree or other (usually essential) coding.
As (nearly) always, the designers of MFC have provided plenty of useful tools to simplify our task. We will derive from from COleDropTarget, which takes care of all of the overhead. All we need to do is provide a handler for OnDragOver() and OnDrop():
In the OnDrop() function, we get the same kind of hDropInfo handle that we used in the Simplest Scenario example, and we use a similar series of steps to process each of the dropped items. For each file, we use InsertItem() to add the item below the drop-target parent node, and we use the SetItemData() function to flag each as a "leaf" node so that it will not be considered as a drop target later on.
Using CMyDropTarget:
To use the COleDropTarget-derived object, just #include the header in the dialog object and declare an instance of it. Then in InitDialog(), call its Register member -- which ends up calling RegisterDragDrop() to set up the tree control for dragging operations. For instance:
How to display a Windows Explorer
Since your user will be dragging from the Windows Explorer, you might want to make his task a little easier by providing a means to pop up an Explorer window for him -- preset, perhaps, to show a particular default directory. Here's how to do that:
References:
Handling Shell Data Transfer Scenarios
http://msdn.microsoft.com/en-gb/library/bb776904(VS.85).aspx
CTreeCtrl Class (MFC)
http://msdn.microsoft.com/en-us/library/8bkz91b4(VS.80).aspx
COleDropTarget Class (MFC)
http://msdn.microsoft.com/en-us/library/4w4z9dwh.aspx
Shell Clipboard Formats
http://msdn.microsoft.com/en-us/library/bb776902(VS.85).aspx
See Also:
How to Accept Drag-and-Drop URLs From a Web Browser
=-=-=-=-=-=-=-=-=-=-=-=-=-=-=-=-=-=-=-=-=-=-=-=-=-=-=-=-=-=-=-=-=-=-=-=-=-=-=-=-=-=
If you liked this article and want to see more from this author, please click the Yes button near the:
Was this article helpful?
label that is just below and to the right of this text. Thanks!
=-=-=-=-=-=-=-=-=-=-=-=-=-=-=-=-=-=-=-=-=-=-=-=-=-=-=-=-=-=-=-=-=-=-=-=-=-=-=-=-=-=
For instance, if you want the user to identify a list of files to move or delete or view or process, you can allow him to drag files from an Explorer window and drop them onto your input window. If you need the user to specify a particular folder as a base of operations for output, you can allow him to drop a folder onto your window.
 Simplest Scenario
The simplest implementation requires very little programming. In this scenario, you need only set up a single message handler and a few lines of code to convert a file-drop into a list of files.
1) Use the App Wizard to create an MFC dialog-based application.
2) In the Dialog Editor, add a multi-line edit box (IDC_EDIT1).
3) Add a message handler for the dialog: In the Properties of the dialog, select the "Messages" category, click WM_DROPFILES, and select <Add> OnDropFiles. This puts you in the source code editor. Make the handler like so:
void CMyDlg::OnDropFiles(HDROP hDropInfo)
                      {
                          CDialog::OnDropFiles( hDropInfo );
                          int nCntFiles= DragQueryFile( hDropInfo, -1, 0,0 );

                          CEdit* pEd= (CEdit*)GetDlgItem( IDC_EDIT1 );
                          for (int j=0; j<nCntFiles; j++ ) {
                              char szBuf[MAX_PATH];
                              ::DragQueryFile( hDropInfo, j, szBuf, sizeof(szBuf) );
                              int iLen= pEd->GetWindowTextLength();
                              pEd->SetSel( iLen, iLen );       // position at end of list
                              pEd->ReplaceSel( szBuf, TRUE );  // append path and filename
                              pEd->ReplaceSel( "\r\n", TRUE ); // ... and line break
                          }
}4) Edit the OnInitDialog() function and put this at the end:
BOOL CMyDlg::OnInitDialog()
                      ...
                          ::DragAcceptFiles( m_hWnd, true );
                          return TRUE;
}Allow Drop Only on the Target
The above code might not work exactly as desired. For simplicity, we set up so that the user can drop the file(s) on any part of the parent dialog. A more likely scenario would be to let the user drop only on the edit box. The WM_DROPFILES message goes to the window specified in the DragAcceptFiles(). If we specify the edit box in that call, the parent (dialog) window won't get the messages.
The normal way to handle this to to derive an object from CEdit and do the work in that derived class. As an option, consider this technique: Use SubclassDlgItem() to re-route that one message to the dialog object so that all of the handling can be done there. For instance:
class CEditDropNotif : public CEdit
                      {
                          virtual BOOL PreTranslateMessage(MSG* pMsg) {
                              if ( pMsg->message == WM_DROPFILES ) {
                                  GetParent()->SendMessage(WM_DROPFILES, pMsg->wParam, pMsg->lParam);
                                  return TRUE; // eat it
                              }
                              return FALSE; // allow default processing
                          }
                      };
                      BOOL CMyDlg::OnInitDialog()
                      {
                       ...
                          static CEditDropNotif cEd;  // must persist (usually a dlg member)
                          cEd.SubclassDlgItem( IDC_EDIT1, this );
                          ::DragAcceptFiles( cEd.m_hWnd, true );  // the editbox, not the dialog
... ...where you allow a user to either type in, paste, or browse for a folder... You give him one more option: Drag a folder from any Explorer window.
The More Complicated Scenario
The Simplest Scenario described above is all that's needed to give your program the basic drop-from-Explorer capability. If you read the MSDN documentation, you might wonder why they make it seem so complicated. Well. they have to explain how to be a drop source, which we are omitting here, but also they need to cover the underlying handling that is less often needed.
In the more complicated variation, you must create an IDropTarget object and call RegisterDragDrop(). This technique provides additional flexibility; in particular, you can work with the contents of the dragged object, rather than just the filename.
For instance, using this technique, you can determine in advance if a dropped "file" is actually a directory. And you can handle a drop of all kinds of shell objects, such as printers, computers, and various "shell namespace" objects.
You can control the cursor -- to provide specialized feedback to the user while he drags over various parts of your U/I. And you can know whether the user is pressing SHIFT or ALT or CTRL while he is dragging -- also to provide specialized feedback.
You can also customize the "right-drag" context menu; that is, the menu that appears when the user presses the right-side mouse button when doing the drag. Upon the "right-drop" (releasing the mouse button over your app), you can decide what, if any, special options you want to allow.
This article will NOT go into depth on all of these options; most of them are rarely needed. However, the next example does illustrate how to set up a drop target and how to take action during the drag.
If your application hosts a Tree control, you may want to accept drops of files from the Explorer onto nodes in the tree; that is, dropping onto the tree control is not enough... you need to allow the user to specify a particular node, or branch, of the tree... as he drags.
 In this example, we assume that you have CTreeCtrl object named m_ctlTree on your dialog and that it is populated with a set of folders... they could be task groups, or holding bins, or whatever. You want to accept files dragged from the Explorer into these buckets. I don't want to complicate the example any more than needed, so I won't show how to set the ImageList for the tree or other (usually essential) coding.
As (nearly) always, the designers of MFC have provided plenty of useful tools to simplify our task. We will derive from from COleDropTarget, which takes care of all of the overhead. All we need to do is provide a handler for OnDragOver() and OnDrop():
// file: MyDropTarget.h
                      //
                      class CMyDropTarget : public COleDropTarget
                      {
                      public:
                          virtual DROPEFFECT OnDragOver(CWnd* pWnd, COleDataObject* pDataObject,
                                      DWORD dwKeyState, CPoint point)
                          {
                              CTreeCtrl* pTree= (CTreeCtrl*)pWnd;
                              UINT nFlags;
                              HTREEITEM hitem= pTree->HitTest( point, &nFlags );
                              if ( hitem != NULL) {
                                  DWORD nItemData= pTree->GetItemData( hitem );
                                  if ( (nItemData & 1) == 0 ) {          // it's a folder item
                                      pTree->SelectDropTarget( hitem );
                                      pTree->Expand(hitem,TVE_EXPAND );
                                      return( DROPEFFECT_LINK );
                                  }
                              }
                           return( DROPEFFECT_NONE ); //else, show the "Don't Drop" pointer
                          };
                          virtual BOOL OnDrop(CWnd* pWnd, COleDataObject* pDataObject,
                                      DROPEFFECT dropEffect, CPoint point) {
                              if ( dropEffect == DROPEFFECT_LINK ) {
                                  CTreeCtrl* pTree= (CTreeCtrl*)pWnd;
                                  STGMEDIUM rSM;
                                  BOOL fRet= pDataObject->GetData( CF_HDROP, &rSM, 0 );

                                  HDROP hDropInfo= (HDROP)rSM.hGlobal;
                                  HTREEITEM hDropItem= pTree->GetDropHilightItem();

                                  int nCntFiles= DragQueryFile( hDropInfo, -1, 0,0 );
                                  for ( int j=0; j<nCntFiles; j++ ) {
                                      char szBuf[MAX_PATH];
                                      ::DragQueryFile( hDropInfo, j, szBuf, sizeof(szBuf) );
                                      HTREEITEM hNew= pTree->InsertItem( szBuf, hDropItem );
                                      pTree->SetItemData( hNew, 1 );   // indicate not a folder
                                  }
                                  pTree->Expand( hDropItem,TVE_EXPAND ); // show the dropped items
                              }
                              return( 1 ); // success
                          };
}; // end of class CMyDropTargetIn the OnDrop() function, we get the same kind of hDropInfo handle that we used in the Simplest Scenario example, and we use a similar series of steps to process each of the dropped items. For each file, we use InsertItem() to add the item below the drop-target parent node, and we use the SetItemData() function to flag each as a "leaf" node so that it will not be considered as a drop target later on.
Using CMyDropTarget:
To use the COleDropTarget-derived object, just #include the header in the dialog object and declare an instance of it. Then in InitDialog(), call its Register member -- which ends up calling RegisterDragDrop() to set up the tree control for dragging operations. For instance:
CMyDropTarget gcMyTreeDropTarget; // declare the object

                      BOOL CMyDlg::OnInitDialog()
                      {
                          CDialog::OnInitDialog();
                      ...
                          HRESULT hr= OleInitialize( 0 );   // <<<---- note: Required!
                          gcMyTreeDropTarget.Register( &m_ctlTree );
...How to display a Windows Explorer
Since your user will be dragging from the Windows Explorer, you might want to make his task a little easier by providing a means to pop up an Explorer window for him -- preset, perhaps, to show a particular default directory. Here's how to do that:
ShellExecute( NULL, "explore",
                          "c:\\My Documents\\WonderProg\\Data\\TaskTemplates", // any folder name
                          NULL,
                          NULL,
                          SW_SHOWNORMAL
);References:
Handling Shell Data Transfer Scenarios
http://msdn.microsoft.com/en-gb/library/bb776904(VS.85).aspx
CTreeCtrl Class (MFC)
http://msdn.microsoft.com/en-us/library/8bkz91b4(VS.80).aspx
COleDropTarget Class (MFC)
http://msdn.microsoft.com/en-us/library/4w4z9dwh.aspx
Shell Clipboard Formats
http://msdn.microsoft.com/en-us/library/bb776902(VS.85).aspx
See Also:
How to Accept Drag-and-Drop URLs From a Web Browser
=-=-=-=-=-=-=-=-=-=-=-=-=-
If you liked this article and want to see more from this author, please click the Yes button near the:
Was this article helpful?
label that is just below and to the right of this text. Thanks!
=-=-=-=-=-=-=-=-=-=-=-=-=-
Have a question about something in this article? You can receive help directly from the article author. Sign up for a free trial to get started.
Comments (0)