How to make a clipping mask using a compound path in Illustrator?


I use my years of visual communication and design thinking to understand the user and their pain points to deliver the best user experience.
Published:
Browse All Articles > How to make a clipping mask using a compound path in Illustrator?
In this article, I’ll explain how I make a clipping mask out of several separate vector objects by using the Compound Path option in Adobe Illustrator. A compound path in Illustrator allows grouping of separate objects into one set of vector paths to manipulate. The Adobe help site has some useful information here on what a compound path is. I will use text to create a clipping mask over some stars in this article.
![Finished.png]()
Step 1. Write Your Text
In this instance I use a big bold font face. Something that will easily show the masked images underneath.
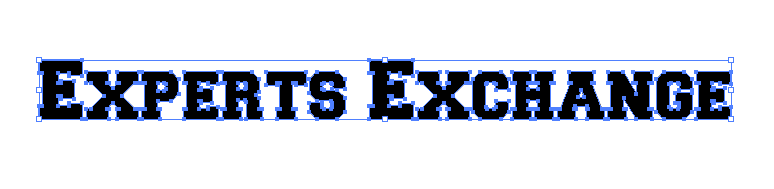
Step 2: Create Outlines of the text
When working with fonts, to make a clipping mask you will need to Create Outlines of the fonts. Select "Type" in the top menu > select "Create Outlines".
Note: I usually will duplicate the font before creating outlines. That way I have a quickly editable font to rework from.
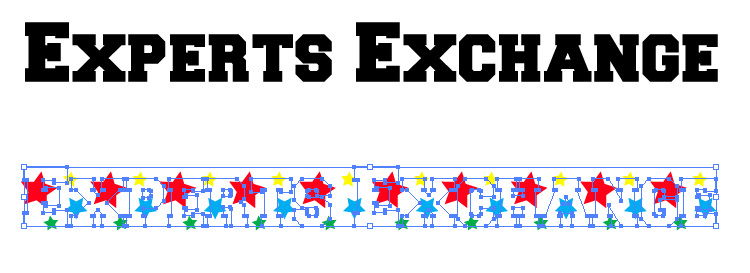
![OutlinedText.png]() Step 3: Create items that will be masked
Step 3: Create items that will be masked
I created stars by using the star generating tool (found by clicking and holding the rectangle tool). Then I grouped them and copied them a few times.
![Stars.png]() Step 4: Overlap items
Step 4: Overlap items
Select the outlined text and drag it over the stars. I look to try and fill as much of the letters with the stars. Next select the outlined text and bring it forward so that it sits on top of the stars. Select “Object” in top menu > Select “Arrange” > Select “Bring to Front”
![Overlapped.png]() Step 5: Duplicate outlined text
Step 5: Duplicate outlined text
When creating a compound path the vector objects lose their background color and strokes. For my sample, the text has color. The only way to create that visual effect is to duplicate the text. I duplicate the layer by copying and pasting. Select “Edit” in top menu > Select “Copy” then Select “Edit” in top menu > Select “Paste”. Move the new text out of your way as you concentrate on making your clipping mask.
![Duplicated.png]() Step 6: Make the Compound Path
Step 6: Make the Compound Path
Select the outlined text above the stars. Select “Object” in top menu > Select “Compound Path” > “Make”. We now have our compound path.
![CompoundPath.png]() Step 7: Make our Mask
Step 7: Make our Mask
Select both the star pattern and compound path. Select “Object” in top menu > Select “Clipping Mask” > “Make”.
![mask.png]() Step 8: Align mask and duplicated text
Step 8: Align mask and duplicated text
Use Illustrator’s align tools (found under the Window tab > Align) select our clipping mask and duplicated outline text to align. Align them centered vertically and horizontally and we are done!
![Finished.png]()

Step 1. Write Your Text
In this instance I use a big bold font face. Something that will easily show the masked images underneath.
Step 2: Create Outlines of the text
When working with fonts, to make a clipping mask you will need to Create Outlines of the fonts. Select "Type" in the top menu > select "Create Outlines".
Note: I usually will duplicate the font before creating outlines. That way I have a quickly editable font to rework from.
 Step 3: Create items that will be masked
I created stars by using the star generating tool (found by clicking and holding the rectangle tool). Then I grouped them and copied them a few times.
 Step 4: Overlap items
Select the outlined text and drag it over the stars. I look to try and fill as much of the letters with the stars. Next select the outlined text and bring it forward so that it sits on top of the stars. Select “Object” in top menu > Select “Arrange” > Select “Bring to Front”
 Step 5: Duplicate outlined text
When creating a compound path the vector objects lose their background color and strokes. For my sample, the text has color. The only way to create that visual effect is to duplicate the text. I duplicate the layer by copying and pasting. Select “Edit” in top menu > Select “Copy” then Select “Edit” in top menu > Select “Paste”. Move the new text out of your way as you concentrate on making your clipping mask.
 Step 6: Make the Compound Path
Select the outlined text above the stars. Select “Object” in top menu > Select “Compound Path” > “Make”. We now have our compound path.
 Step 7: Make our Mask
Select both the star pattern and compound path. Select “Object” in top menu > Select “Clipping Mask” > “Make”.
 Step 8: Align mask and duplicated text
Use Illustrator’s align tools (found under the Window tab > Align) select our clipping mask and duplicated outline text to align. Align them centered vertically and horizontally and we are done!

I use my years of visual communication and design thinking to understand the user and their pain points to deliver the best user experience.
Have a question about something in this article? You can receive help directly from the article author. Sign up for a free trial to get started.
Comments (2)
Commented:
Commented: