Two Tools to Navigate Long Emails in Outlook® 2013


Published:
Browse All Articles > Two Tools to Navigate Long Emails in Outlook® 2013
The best advice for writing email is to keep the message short, but sometimes you have to write, review, or respond to long email messages or discussion threads. Usually this means a lot of tedious scrolling up and down in the message window. There are two tools in Microsoft® Outlook® that can make it easier to deal with long email messages: Split Window and Bookmark/Hyperlink.
Split Window lets you navigate more efficiently in emails you’re reading or writing, while Bookmark/Hyperlink benefits recipients of email you send.
SPLIT WINDOW
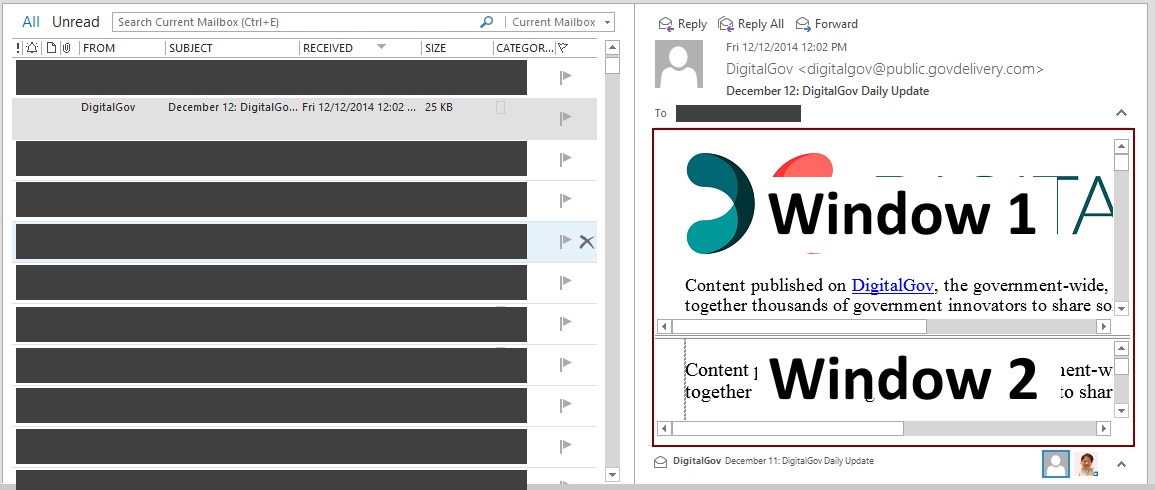
Just as its name indicates, the Split Window feature divides a window into two independently scrollable sections. This allows you to maintain your place in the email in one window while scrolling to other locations in the text in the second window.
Prior to Outlook® 2013
In Microsoft® Word and Excel®, Split Window can be found in the Window group on the View tab. In Outlook®, it’s not so easy to find. In versions prior to Outlook® 2013, Split Window is simply a short horizontal line above the scroll bar in a message window.
![Fig01-Outlook-2010-Split-Window-indicato]() When you hover your cursor on this line, it changes to a scroll icon. Click and hold the left mouse button to drag the line down and reveal the second scrollable window. You can resize the windows by dragging the horizontal separator line up or down. To close Split Window, simply doubleclick the horizontal separator line.
When you hover your cursor on this line, it changes to a scroll icon. Click and hold the left mouse button to drag the line down and reveal the second scrollable window. You can resize the windows by dragging the horizontal separator line up or down. To close Split Window, simply doubleclick the horizontal separator line.
![Fig02-Outlook-2013-Split-Window-scroll.j]()
In Outlook® 2013
One of the interface changes in Outlook® 2013 was removal of the Split Window tool from the message window. In fact, Split Window is not directly accessible anywhere in the interface. It’s only available when added to the Quick Access Toolbar (QAT).
To add the Split Window tool to the QAT:
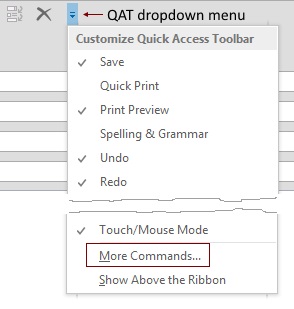
1. On the QAT dropdown menu, select More Commands… and the Customize the Quick Access Toolbar window opens.
![Fig03-Outlook-2013-More-Commands.jpg]() 2. On the Choose commands from: dropdown menu, select Commands Not in the Ribbon.
2. On the Choose commands from: dropdown menu, select Commands Not in the Ribbon.
![Fig04-Outlook-2013-Commands-Not-in-Ribbo]() 3. In the list of commands below the Choose commands from: dropdown menu, scroll down and select the Split command.
3. In the list of commands below the Choose commands from: dropdown menu, scroll down and select the Split command.
![Fig05-Outlook-2013-Split-Command.jpg]() 4. Click the Add>> button to move the Split command to the Customize Quick Access Toolbar list. You can reposition the Split command in this list by selecting the Split command, then using the up and down arrow buttons located to the right of the list.
4. Click the Add>> button to move the Split command to the Customize Quick Access Toolbar list. You can reposition the Split command in this list by selecting the Split command, then using the up and down arrow buttons located to the right of the list.
![Fig06-Outlook-2013-Add-Button.jpg]() 5. When you’re done, click the OK button. The Split Window icon has been added to the QAT.
5. When you’re done, click the OK button. The Split Window icon has been added to the QAT.
![Fig07-Outlook-2013-Split-Window-on-QAT.j]() To use Split Window, click on its icon in the QAT. A splitter that divides the window into two independently scrollable sections will appear. To close Split Window, you can either click on the icon again or doubleclick on the splitter.
To use Split Window, click on its icon in the QAT. A splitter that divides the window into two independently scrollable sections will appear. To close Split Window, you can either click on the icon again or doubleclick on the splitter.
You can add Split Window to three QAT locations:
1. The main Outlook® window – When added to the QAT in the main Outlook® window, you can split the message in the Reading Pane.
![Fig08-Outlook-2013-Split-Read-Pane.jpg]() 2. The read message window – Simply open a message that you have received and update the QAT. You only have to do this once and the change will apply to all read message windows.
2. The read message window – Simply open a message that you have received and update the QAT. You only have to do this once and the change will apply to all read message windows.
![Fig09-Outlook-2013-Split-Read-Reply-Wind]() 3. The new/reply message window – Open a new message or Reply to a message you have received and update the QAT. You only have to do this once and the change will apply to all new, reply, or forward messages.
3. The new/reply message window – Open a new message or Reply to a message you have received and update the QAT. You only have to do this once and the change will apply to all new, reply, or forward messages.
![Fig10-Outlook-2013-Split-New-Reply-Fwd-W]()
BOOKMARK/HYPERLINK
If you need to write a long email or reply/forward comments in a long discussion thread, hyperlinks let your readers jump to specific locations in your email. In Outlook®, there are three methods for navigating with hyperlinks: Heading styles, message text, and links to Top of the Document
To add hyperlinks using Headings:
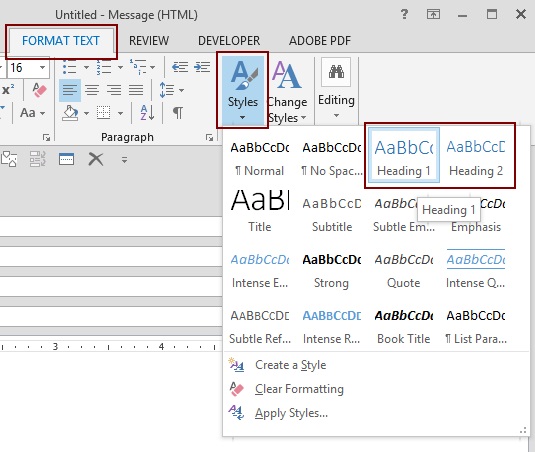
1. You must use the Heading styles in your text. You can use multiple levels of headings. The Heading styles will act as bookmarks.
![Fig11-Outlook-2013-Heading-Styles.jpg]() 2. Create a “Table of Contents” near the top of your email that lists the headings in the email. For example:
2. Create a “Table of Contents” near the top of your email that lists the headings in the email. For example:
![Fig12-Outlook-2013-Heading-Hyperlinks1.j]() 3. Select the entire text of “Heading 1 Title.”
3. Select the entire text of “Heading 1 Title.”
4. On the Insert tab, go to the Links group and select Hyperlink. The Insert Hyperlink window opens.
5. Text to display: shows “Heading 1 Title” because this is the text you selected. You can change the text, if desired.
6. In the Link to: panel, select Place in This Document.
7. In the Select a place in this document: box, there is a Headings group. Select the Heading 1 Title heading.
![Fig13-Outlook-2013-Heading-Hyperlinks2.j]() 8. Click the OK button.
8. Click the OK button.
9. Repeat steps 3.-8. for the remaining headings and subheadings.
To add hyperlinks using bookmarks, you must first create the bookmarks.
To add bookmarks to your email:
1. Position your cursor at the first location in your text or in the discussion thread that you want to bookmark.
2. On the Insert tab, go to the Links group and select Bookmark. The Bookmark window opens.
3. Give your bookmark a name with no spaces.
![Fig14-Outlook-2013-Creating-Bookmarks1.j]() 4. After adding the bookmark name, the Bookmark window will close.
4. After adding the bookmark name, the Bookmark window will close.
5. Repeat steps 1.-4. at every location in the email that you want to let readers jump to.
Tip: If you have a lot of bookmarked locations, in the Bookmark window Sort by: Location. This will sort your bookmarks in the order of their positions in your email.
To add hyperlinks using bookmarks:
1. Create a “Table of Contents” near the top of your email.
2. Select the entire text of “Bookmark 1.”
3. On the Insert tab, go to the Links group and select Hyperlink. The Insert Hyperlink window opens.
4. Text to display: shows “Bookmark 1” because this is the text you selected. You can change the text, if desired.
5. In the Link to: panel, select Place in This Document.
6. In the Select a place in this document: box, select the bookmark you created for “Bookmark 1.”
![Fig15-Outlook-2013-Creating-Bookmark-Hyp]() 7. Click the OK button.
7. Click the OK button.
8. Repeat steps 2.-7. for the remaining items in your “Table of Contents.”
You can make it easier for your readers to navigate in your email by letting them jump quickly back to the top where the “Table of Contents” is located.
To add a “Back to Top” hyperlink,
1. Go to a location in the email where you want readers to be able to jump back to the top of the message and add the text “Top” or “Back to Top.”
2. Select the entire text of “Top” (or “Back to Top”).
3. On the Insert tab, go to the Links group and select Hyperlink. The Insert Hyperlink window opens.
4. Text to display: shows “Top” (or “Back to Top”) because this is the text you selected. You can change the text, if desired.
5. In the Link to: panel, select Place in This Document.
6. In the Select a place in this document: box, select the Top of the Document option.
![Fig16-Outlook-2013-Creating-Bookmark-Hyp]() 7. Click the OK button.
7. Click the OK button.
8. Repeat steps 1.-7. for any locations in your email where you want to let readers jump back to the top of the message.
Using Split Window and Bookmark/Hyperlink will help both you and recipients of your emails get through complex and long narratives more quickly.
Split Window lets you navigate more efficiently in emails you’re reading or writing, while Bookmark/Hyperlink benefits recipients of email you send.
SPLIT WINDOW
Just as its name indicates, the Split Window feature divides a window into two independently scrollable sections. This allows you to maintain your place in the email in one window while scrolling to other locations in the text in the second window.
Prior to Outlook® 2013
In Microsoft® Word and Excel®, Split Window can be found in the Window group on the View tab. In Outlook®, it’s not so easy to find. In versions prior to Outlook® 2013, Split Window is simply a short horizontal line above the scroll bar in a message window.
In Outlook® 2013
One of the interface changes in Outlook® 2013 was removal of the Split Window tool from the message window. In fact, Split Window is not directly accessible anywhere in the interface. It’s only available when added to the Quick Access Toolbar (QAT).
To add the Split Window tool to the QAT:
1. On the QAT dropdown menu, select More Commands… and the Customize the Quick Access Toolbar window opens.
 2. On the Choose commands from: dropdown menu, select Commands Not in the Ribbon.
 4. Click the Add>> button to move the Split command to the Customize Quick Access Toolbar list. You can reposition the Split command in this list by selecting the Split command, then using the up and down arrow buttons located to the right of the list.
 5. When you’re done, click the OK button. The Split Window icon has been added to the QAT.
You can add Split Window to three QAT locations:
1. The main Outlook® window – When added to the QAT in the main Outlook® window, you can split the message in the Reading Pane.
 2. The read message window – Simply open a message that you have received and update the QAT. You only have to do this once and the change will apply to all read message windows.
BOOKMARK/HYPERLINK
If you need to write a long email or reply/forward comments in a long discussion thread, hyperlinks let your readers jump to specific locations in your email. In Outlook®, there are three methods for navigating with hyperlinks: Heading styles, message text, and links to Top of the Document
To add hyperlinks using Headings:
1. You must use the Heading styles in your text. You can use multiple levels of headings. The Heading styles will act as bookmarks.
 2. Create a “Table of Contents” near the top of your email that lists the headings in the email. For example:
4. On the Insert tab, go to the Links group and select Hyperlink. The Insert Hyperlink window opens.
5. Text to display: shows “Heading 1 Title” because this is the text you selected. You can change the text, if desired.
6. In the Link to: panel, select Place in This Document.
7. In the Select a place in this document: box, there is a Headings group. Select the Heading 1 Title heading.
9. Repeat steps 3.-8. for the remaining headings and subheadings.
To add hyperlinks using bookmarks, you must first create the bookmarks.
To add bookmarks to your email:
1. Position your cursor at the first location in your text or in the discussion thread that you want to bookmark.
2. On the Insert tab, go to the Links group and select Bookmark. The Bookmark window opens.
3. Give your bookmark a name with no spaces.
5. Repeat steps 1.-4. at every location in the email that you want to let readers jump to.
Tip: If you have a lot of bookmarked locations, in the Bookmark window Sort by: Location. This will sort your bookmarks in the order of their positions in your email.
To add hyperlinks using bookmarks:
1. Create a “Table of Contents” near the top of your email.
2. Select the entire text of “Bookmark 1.”
3. On the Insert tab, go to the Links group and select Hyperlink. The Insert Hyperlink window opens.
4. Text to display: shows “Bookmark 1” because this is the text you selected. You can change the text, if desired.
5. In the Link to: panel, select Place in This Document.
6. In the Select a place in this document: box, select the bookmark you created for “Bookmark 1.”
8. Repeat steps 2.-7. for the remaining items in your “Table of Contents.”
You can make it easier for your readers to navigate in your email by letting them jump quickly back to the top where the “Table of Contents” is located.
To add a “Back to Top” hyperlink,
1. Go to a location in the email where you want readers to be able to jump back to the top of the message and add the text “Top” or “Back to Top.”
2. Select the entire text of “Top” (or “Back to Top”).
3. On the Insert tab, go to the Links group and select Hyperlink. The Insert Hyperlink window opens.
4. Text to display: shows “Top” (or “Back to Top”) because this is the text you selected. You can change the text, if desired.
5. In the Link to: panel, select Place in This Document.
6. In the Select a place in this document: box, select the Top of the Document option.
8. Repeat steps 1.-7. for any locations in your email where you want to let readers jump back to the top of the message.
Using Split Window and Bookmark/Hyperlink will help both you and recipients of your emails get through complex and long narratives more quickly.
Have a question about something in this article? You can receive help directly from the article author. Sign up for a free trial to get started.
Comments (2)
Author
Commented:Thank you for your generous comments on my article, and particularly for your suggestion that it could have been two articles.
As it happens, I had originally intended to write only about the Split Window tool. While writing the draft, it seemed that 1) an article about Split Window might be a little short, and 2) that the usefulness of the article wasn't about the Split Window tool itself but about being able to quickly navigate long messages. So I added the section about Bookmark/Hyperlink, which turned out to be longer than I had anticipated.
It was not until after I had submitted the article that it occurred to me that it could have been two articles. I do plan to publish this information on my website and had already decided to divide it into a 2-part article there.
Hopefully, members of EE will find it useful to have both Split Window and Bookmark/Hyperlink covered in a single article here. I'm learning the ropes about contributing to EE and hope to contribute more quality content in future.
Regards,
Blaise
Author
Commented:I can definitely add screenshots to this, and future, articles. Thanks for the suggestion regarding saved searches. I do have saved searches but they could probably be refined. I appreciate the referral to Netminder and will definitely contact him.
Cheers!
Blaise