

Browse All Articles > A VBA Progress Bar for Excel and Other Microsoft Apps.
Keeping the user informed is important
If you have written some VBA code for Excel (or Word, or Access), and it takes a long time to execute, it is important to keep the user informed that the code is progressing. Psychologically, it can also have a tremendously positive effect on the perceived responsiveness and speed of your program if the user can see a visual representation of the current progress.
Common methods of keeping the user informed
Currently, a lot of people keep the user informed by allowing the actions of the macro to be seen. (i.e., the flicker of sheets being activated, cells being changed, etc...). This is generally a terrible idea unless the whole routine is finished very quickly. Excel experts should have learned by now that by setting Application.ScreenUpdating = False as the first step to a VBA routine can speed up code execution by orders of magnitude. The only problem with this, is that now the program appears to be frozen until the code sets screen updating back to true. If this takes a long time, the user might think excel is frozen.
Now that Excel's interface is frozen to speed up procedures, it's especially important to inform the user. Many people do this by setting the value of Application.StatusBar. This can hold any text, and updates even when screen updating is disabled. By changing this regularly, the programmer can give a play by play of the current position in the code, or display a percentage completion in a large loop.
![setting the value of Application.StatusBar]()
Something truly impressive
If you want a great tool for keeping the user informed you should create a progress bar form, show the form before beginning code execution, and hide it afterwards. This is something you could do yourself, but to get you started, I've been employing and improving on my own custom progress bar for quite some time now. I think you should find it useful and very customizable:
![Progress Bar]()
Features
Using the progress bar practically
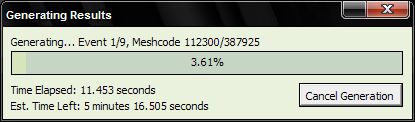
You are responsible for picking an appropriate minimum and maximum value. For instance, if you are looping over R rows (from 1 to R) and C columns (from 1 to C), you should set the minimum to 0 and the maximum to ( R*C ). Furthermore, if you are currently on row i and column j, (and you are looping over all rows within each column), you should be setting the current value to [ i + (j-1)*R ]
If the cancel button is being displayed, you are responsible for periodically checking whether or not the cancel button has been pressed. Do this by checking whether ProgressDialogue.cancelIsPressed is true. If it is true, you should exit the loop and clean up after your routine. Ideally, we could avoid polling using events, but there is no sophisticated event hooking in VBA. An alternative would be to modify the progress dialogue CancelButton_Click method to work very specifically with what you are doing, but regularly checking cancelIsPressed() shouldn't take too much out of your routine's runtime.
The following code block shows the function calls you should remember to include in your loops when using the progress bar dialogue:
This produces the following progress bar:![Using All Features in a Simple Case]()
If you are looping over code where you are making a large number of iterations over code that is very quick to execute, then you might find that updating the dialogue becomes your bottleneck. To prevent this, you can only update the progress bar periodically, using a quick check. For instance, you can say:
If index MOD 1000 = 0 Then ProgressDialogue.SetValue(index)
This way, the dialogue will only get updated every 1000 loops, and it will have much less impact on your code. You will want to play around with how often you update it, to balance the refresh rate with the amount of time spent updating the progress bar. Ideally, in other applications, a progress bar is kept up to date in a thread, but VBA has no support for threading.
Implemented Example and Code
Here, I've attached a workbook containing the 'wasting time' example above. You can use this to experiment with the ProgressDialogue form, and take a look at its implementation.
Progress-Bar-Example.xls
For convenience, I've also included in this article the code within the ProgressDialogue class:
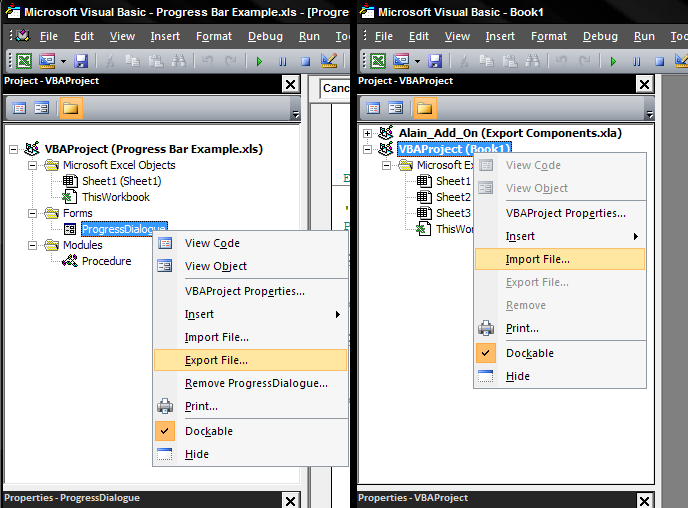
Because .frm and .frx files cannot be attached on experts-exchange, I cannot provide you with those directly, but you can easily add this progress bar to any project by following these steps:
1. Download the example excel file above
2. Open the file, and open the VBA project (Alt+F11)
3. Export the ProgressDialogue form. (Save it somewhere you will remember in 5 seconds).
4. Import the exported file in any other excel project. (You can now delete the exported .frm and .frx files from your system.)
![Step 3 and 4 of adding a progress bar]()
Remember that this same concept can be adapted to other Microsoft Applications, Excel is simply where I've built it here.
Building pleasant user interfaces is crucial to the success and reception of your VBA applications and I think this progress bar dialogue can go a long way to improving that. Feel free to use these ideas and code, and build on them. I wish you success!
--
Alain Bryden
References
Progress bar with a user form in Excel - http://support.microsoft.com/kb/211736
GetTickCount system function in VBA - http://msdn.microsoft.com/en-us/library/aa537191%28office.11%29.aspx
Interfaced-Progress-Bar-Example.xls
If you have written some VBA code for Excel (or Word, or Access), and it takes a long time to execute, it is important to keep the user informed that the code is progressing. Psychologically, it can also have a tremendously positive effect on the perceived responsiveness and speed of your program if the user can see a visual representation of the current progress.
Common methods of keeping the user informed
Currently, a lot of people keep the user informed by allowing the actions of the macro to be seen. (i.e., the flicker of sheets being activated, cells being changed, etc...). This is generally a terrible idea unless the whole routine is finished very quickly. Excel experts should have learned by now that by setting Application.ScreenUpdating
Now that Excel's interface is frozen to speed up procedures, it's especially important to inform the user. Many people do this by setting the value of Application.StatusBar. This can hold any text, and updates even when screen updating is disabled. By changing this regularly, the programmer can give a play by play of the current position in the code, or display a percentage completion in a large loop.

Something truly impressive
If you want a great tool for keeping the user informed you should create a progress bar form, show the form before beginning code execution, and hide it afterwards. This is something you could do yourself, but to get you started, I've been employing and improving on my own custom progress bar for quite some time now. I think you should find it useful and very customizable:
Features
Programmer can configure the progress bar with one function call, then all that is needed to update is to call SetValue.
The progress bar's position and percentage label are automatically computed based on the minimum, maximum, and last set value.
The status (caption above the progress bar) can be set dynamically to indicate additional information, such as the current stage of execution.
An optional cancel button allows the user a mechanism to halt your lengthy process. The cancel button text can also be set, for instance to "Stop" or "Cancel Generation". The default caption is "Cancel". If set to vbNullString, the cancel button is hidden entirely.
An optional label can show the time elapsed since the dialogue box was configured. (It is assumed that you will configure the dialogue directly before showing it). If this option is disabled, the progress bar update routine will not waste time in computing the elapsed time.
An optional label can estimate the time remaining before completion. This is a very accurate estimate if you have appropriately set the min and max values. (You can test this in the example below.) This can be disabled, in which case no time is wasted in computing the remaining time.
Your calling routine can get the current value of the progress bar, as well as the formatted run time. I use this, for instance, for logging, or to display on the status bar the final run time of the routine after it is complete. ![Display the final runtime in the status bar]()

Using the progress bar practically
You are responsible for picking an appropriate minimum and maximum value. For instance, if you are looping over R rows (from 1 to R) and C columns (from 1 to C), you should set the minimum to 0 and the maximum to ( R*C ). Furthermore, if you are currently on row i and column j, (and you are looping over all rows within each column), you should be setting the current value to [ i + (j-1)*R ]
If the cancel button is being displayed, you are responsible for periodically checking whether or not the cancel button has been pressed. Do this by checking whether ProgressDialogue.cancelIsP
The following code block shows the function calls you should remember to include in your loops when using the progress bar dialogue:
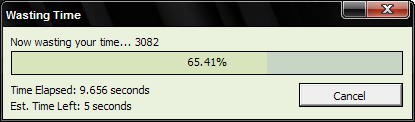
Sub wasteTime()
                          Dim i As Long
                          Dim diag As New ProgressDialogue
                          diag.Configure "Wasting Time", "Now wasting your time...", -10000, 10000
                          diag.Show
                          For i = -10000 To 10000
                              diag.SetValue i
                              diag.SetStatus "Now wasting your time... " & i
                              If diag.cancelIsPressed Then Exit For
                          Next i
                          diag.Hide
End SubThis produces the following progress bar:
If you are looping over code where you are making a large number of iterations over code that is very quick to execute, then you might find that updating the dialogue becomes your bottleneck. To prevent this, you can only update the progress bar periodically, using a quick check. For instance, you can say:
If index MOD 1000 = 0 Then ProgressDialogue.SetValue(
This way, the dialogue will only get updated every 1000 loops, and it will have much less impact on your code. You will want to play around with how often you update it, to balance the refresh rate with the amount of time spent updating the progress bar. Ideally, in other applications, a progress bar is kept up to date in a thread, but VBA has no support for threading.
Implemented Example and Code
Here, I've attached a workbook containing the 'wasting time' example above. You can use this to experiment with the ProgressDialogue form, and take a look at its implementation.
Progress-Bar-Example.xls
For convenience, I've also included in this article the code within the ProgressDialogue class:
Option Explicit
                      Dim Cancelled As Boolean, showTime As Boolean, showTimeLeft As Boolean
                      Dim startTime As Long
                      Dim BarMin As Long, BarMax As Long, BarVal As Long

                      Private Declare Function GetTickCount Lib "Kernel32" () As Long

                      'Title will be the title of the dialogue.
                      'Status will be the label above the progress bar, and can be changed with SetStatus.
                      'Min is the progress bar minimum value, only set by calling configure.
                      'Max is the progress bar maximum value, only set by calling configure.
                      'CancelButtonText is the caption of the cancel button. If set to vbNullString, it is hidden.
                      'optShowTimeElapsed controls whether the progress bar computes and displays the time elapsed.
                      'optShowTimeRemaining controls whether the progress bar estimates and displays the time remaining.
                      'calling Configure sets the current value equal to Min.
                      'calling Configure resets the current run time.
                      Public Sub Configure(ByVal title As String, ByVal status As String, _
                                           ByVal Min As Long, ByVal Max As Long, _
                                           Optional ByVal CancelButtonText As String = "Cancel", _
                                           Optional ByVal optShowTimeElapsed As Boolean = True, _
                                           Optional ByVal optShowTimeRemaining As Boolean = True)
                          Me.Caption = title
                          lblStatus.Caption = status
                          BarMin = Min
                          BarMax = Max
                          BarVal = Min
                          CancelButton.Visible = Not CancelButtonText = vbNullString
                          CancelButton.Caption = CancelButtonText
                          startTime = GetTickCount
                          showTime = optShowTimeElapsed
                          showTimeLeft = optShowTimeRemaining
                          lblRunTime.Caption = ""
                          lblRemainingTime.Caption = ""
                          Cancelled = False
                      End Sub

                      'Set the label text above the status bar
                      Public Sub SetStatus(ByVal status As String)
                          lblStatus.Caption = status
                          DoEvents
                      End Sub

                      'Set the value of the status bar, a long which is snapped to a value between Min and Max
                      Public Sub SetValue(ByVal value As Long)
                          If value < BarMin Then value = BarMin
                          If value > BarMax Then value = BarMax
                          Dim progress As Double, runTime As Long
                          BarVal = value
                          progress = (BarVal - BarMin) / (BarMax - BarMin)
                          ProgressBar.Width = 292 * progress
                          lblPercent = Int(progress * 10000) / 100 & "%"
                          runTime = GetRunTime()
                          If showTime Then lblRunTime.Caption = "Time Elapsed: " & GetRunTimeString(runTime, True)
                          If showTimeLeft And progress > 0 Then _
                              lblRemainingTime.Caption = "Est. Time Left: " & GetRunTimeString(runTime * (1 - progress) / progress, False)
                          DoEvents
                      End Sub

                      'Get the time (in milliseconds) since the progress bar "Configure" routine was last called
                      Public Function GetRunTime() As Long
                          GetRunTime = GetTickCount - startTime
                      End Function

                      'Get the time (in hours, minutes, seconds) since "Configure" was last called
                      Public Function GetFormattedRunTime() As String
                          GetFormattedRunTime = GetRunTimeString(GetTickCount - startTime)
                      End Function

                      'Formats a time in milliseconds as hours, minutes, seconds.milliseconds
                      'Milliseconds are excluded if showMsecs is set to false
                      Private Function GetRunTimeString(ByVal runTime As Long, Optional ByVal showMsecs As Boolean = True) As String
                          Dim msecs&, hrs&, mins&, secs#
                          msecs = runTime
                          hrs = Int(msecs / 3600000)
                          mins = Int(msecs / 60000) - 60 * hrs
                          secs = msecs / 1000 - 60 * (mins + 60 * hrs)
                          GetRunTimeString = IIf(hrs > 0, hrs & " hours ", "") _
                                           & IIf(mins > 0, mins & " minutes ", "") _
                                           & IIf(secs > 0, IIf(showMsecs, secs, Int(secs + 0.5)) & " seconds", "")
                      End Function

                      'Returns the current value of the progress bar
                      Public Function GetValue() As Long
                          GetValue = BarVal
                      End Function

                      'Returns whether or not the cancel button has been pressed.
                      'The ProgressDialogue must be polled regularily to detect whether cancel was pressed.
                      Public Function cancelIsPressed() As Boolean
                          cancelIsPressed = Cancelled
                      End Function

                      'Recalls that cancel was pressed so that they calling routine can be notified next time it asks.
                      Private Sub CancelButton_Click()
                          Cancelled = True
                          lblStatus.Caption = "Cancelled By User. Please Wait."
End SubBecause .frm and .frx files cannot be attached on experts-exchange, I cannot provide you with those directly, but you can easily add this progress bar to any project by following these steps:
1. Download the example excel file above
2. Open the file, and open the VBA project (Alt+F11)
3. Export the ProgressDialogue form. (Save it somewhere you will remember in 5 seconds).
4. Import the exported file in any other excel project. (You can now delete the exported .frm and .frx files from your system.)
Remember that this same concept can be adapted to other Microsoft Applications, Excel is simply where I've built it here.
Building pleasant user interfaces is crucial to the success and reception of your VBA applications and I think this progress bar dialogue can go a long way to improving that. Feel free to use these ideas and code, and build on them. I wish you success!
--
Alain Bryden
References
Progress bar with a user form in Excel - http://support.microsoft.c
GetTickCount system function in VBA - http://msdn.microsoft.com/
Interfaced-Progress-Bar-Example.xls
Have a question about something in this article? You can receive help directly from the article author. Sign up for a free trial to get started.
Comments (10)
Commented:
1st GREAT WORK! I've played with your progress bar within your sample workbook but is there a way you could assist me with the following code below. I'm not an expert with VBA (still have my training wheels on).
I have a code that opens another workbook, copies data from the newly opened workbook and pastes it into the original workbook, then exports the data into Access for storage.
Open in new window
My question is would I update the "progress bar" code to work with the vba shown above.
I downloaded the example workbook, read through your article and for an expert it explains it well but I'm sort of lost because of my inexperience with loops and setting MIN and MAX values for iterations. ((O_O))
Thank you in advance! :)
Author
Commented:Your question is quite specific to your own situation and won't contribute to future readers, so what you should do is post a new question and reference this article and someone will assist you in exchange for points.
Commented:
Commented:
Commented:
1 comment, 1 question.
Comment: instead of exporting and importing modules/forms you can simply drag and drop them from one workbook to the other.
Question on your procedure 'wasteTime'. You declare "Dim diag As New ProgressDialogue" but I get a compile error on this: "user-defined type not defined." Is there a reference I need to add?
View More