Determining an iPhone or iPad's UDID

Published:
Browse All Articles > Determining an iPhone or iPad's UDID
What's a UDID?
If you're involved in developing, testing, or even reviewing an iOS application that's in beta, then at some point you may need to know the UDID for any iOS devices that you'll be testing on. What's the UDID? It stands for Unique Device Identifier, and much like it sounds, is a unique identifier for each and every iOS device. Knowing this number is crucial for granting a specific device permission to run an app that's still in development and not yet released to the public. This way, developers can ensure that their unreleased apps aren't ending up on devices they shouldn't!OK, I've Just Been Asked for Mine
Great! Let's assume you've been invited as a beta tester for some cool new app. (Lucky you!) The developer has asked you for your iPhone or iPad's (or even an iPod Touch's) UDID so that they can set the provisioning profile that'll allow your device to run the beta version of their app. It's easy. Here's what you do:
Step 1: Connect Device to Computer
Connect the device to a computer that's running iTunes. Ideally, you've already got a computer that you synchronize with or backup your iDevice to. Use that one. (If not, then you'll need to get iTunes on a system that you can attach the device to. Just head over to http://www.apple.com/itune
Step 2: Launch iTunes
If iTunes hasn't launched already (in most default scenarios, it'll launch automatically when you attach the device), go ahead and start it.
Step 3: Open the Information Screen for the Device
Near the upper left of the iTunes window, find the icon for your device (it'll look like an iPhone or iPad, depending on what you've connected) and click it. This will switch iTunes to showing the information for the device.

Step 4: Find the Serial Number
In the "Summary" tab for the device, look for the Serial Number field. The screenshot below shows its location.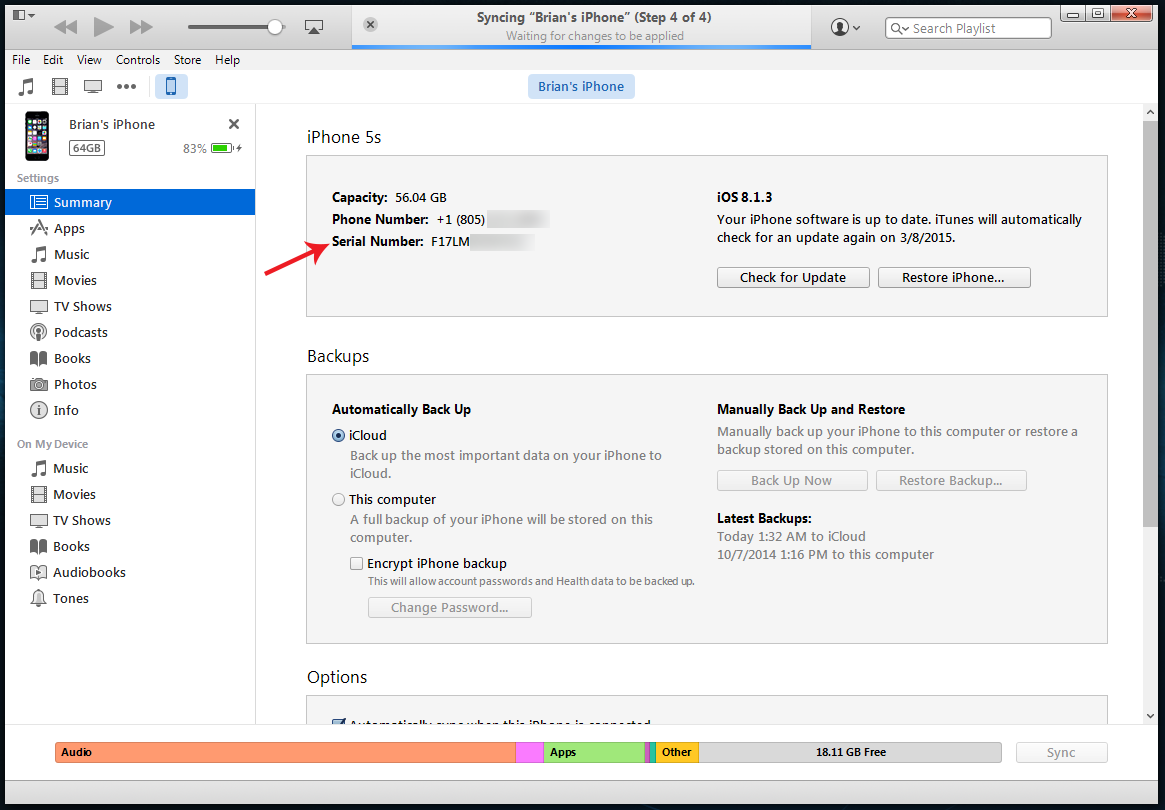
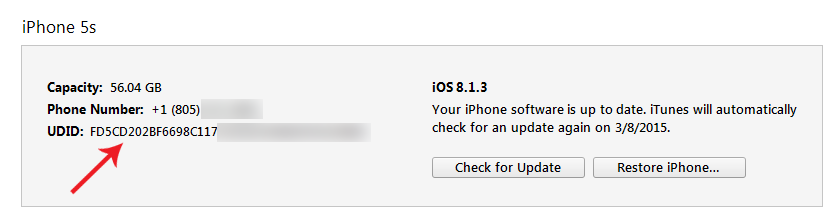
Step 5: Click on Serial Number Until UDID is Displayed
The Serial Number field has many more options that are displayed after you click on the field. In the version of iTunes I'm using, the UDID is displayed immediately after the first click on the Serial Number field. (Additional clicks would cycle to other types of technical data about the device. If you accidentally click past the UDID, just keep clicking until it cycles back to it.)
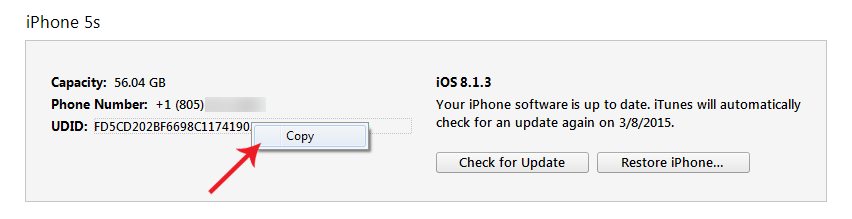
Step 6: Copy the UDID
The UDID is a large string of characters, and you can't click and highlight to select them like you would for most things. However, you can right click and then a copy option will appear. Do that, and you'll now have the entire thing saved to your clipboard.
Step 7: Done!
Now all that's left is to paste the UDID into whatever message or document you need for communicating it to the developer who has requested it. With that UDID value, they'll be able to allow your device to run the app that you're helping to test.
Hope this article helps :-)

Product Manager. Photographer. Runner. Gamer. Mostly human.
Have a question about something in this article? You can receive help directly from the article author. Sign up for a free trial to get started.
Comments (2)
Commented:
Just for info you can also collect the Apple UUID from Windows' registry without iTunes installed - as the iPhone/iPad will identify itself via Plug'n'Play through the USB interface.
There are multiple registry entries but as an example:
[HKLM\SYSTEM\CurrentContro
="USB\VID_05AC&PID_12xx\<y
"USB\VID_05AC&PID_12xx" relates to the Apple DeviceID so for example 129F would mean an iPad 2 (WiFi version) has been connected. (
See below for iPad/iPhone device codes)
The DeviceID and UUID are both used to check devices subscribed to beta projects by programmers.
This might be a useful adjunct to this piece if your readers can't for some reason install iTunes on the Windows device they have available to them.
Open in new window
Author
Commented: