Reduce the file size of many JPG files in many folders via an automated, mass, batch compression method


50+ years in computers
EE FELLOW 2017 — first ever recipient of Fellow award
MVE 2015,2016,2018
CERTIFIED GOLD EXPERT
DISTINGUISHED EXPERT
EE FELLOW 2017 — first ever recipient of Fellow award
MVE 2015,2016,2018
CERTIFIED GOLD EXPERT
DISTINGUISHED EXPERT
Published:
Browse All Articles > Reduce the file size of many JPG files in many folders via an automated, mass, batch compression method
This article was inspired by a question here at Experts Exchange. The requirements stated in that question are (1) reduce the file size of a large number of JPG files in an extremely large number of subfolders; (2) perform that function without user intervention; (3) store the compressed files back into themselves, that is, after compression, each file overwrites itself.
The solution presented in this article meets those requirements. It is based on the excellent software package, GraphicsMagick (a fork of ImageMagick). GraphicsMagick is free (in every sense of the word), distributed under the MIT License.
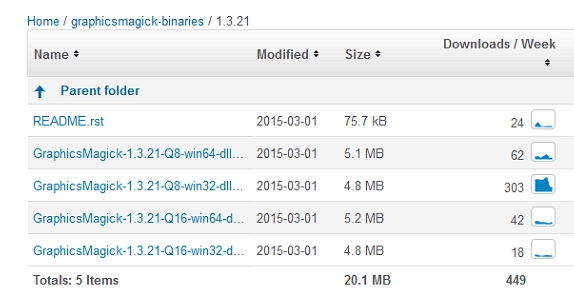
The first step in the solution is to download and install GraphicsMagick from SourceForge (the latest release as of this article's publication is 1.3.21). The download folder looks like this:
![GM-binaries.jpg]() So the choices are:
So the choices are:
GraphicsMagick-1.3.21-Q8-win32-dll.exe
GraphicsMagick-1.3.21-Q16-win32-dll.exe
GraphicsMagick-1.3.21-Q8-win64-dll.exe
GraphicsMagick-1.3.21-Q16-win64-dll.exe
As you can see in the file names above, there are two issues to consider with respect to the correct edition for you. The first is the so-called Quantum Depth. There are two possibilities — Quantum Depth of 8 (Q8) and Quantum Depth of 16 (Q16). The quick summary is that Q8 supports 24/32 bit pixel depth color, requires less in the way of resources (CPU and RAM), and is adequate for typical pictures/photos; Q16 supports 48/64 bit pixel depth color, requires more in the way of resources (CPU and RAM), and may prove to be the right choice for film, medical/scientific images, and images with minimal contrast.
The second issue is whether you are running 32-bit or 64-bit Windows. The installers shown above with win32 in the file names will run on both 32-bit and 64-bit Windows; the ones with win64 in the file names will run only on 64-bit Windows. The advantage of the 64-bit editions is, in a word, speed! Because they can handle large images in memory (without hard drive read/write activity), performance may be significantly improved, although modern Solid State Drives (SSDs) negate that performance to some extent (but image processing in RAM is still faster than SSD — and much faster than HDD).
The installer says that the user "may" need Admin privilege to install it. I don't know how to interpret "may", but I can say that I installed it on a W7 Pro 64-bit system via an Administrator account (but did not install it elevated) and it worked fine.
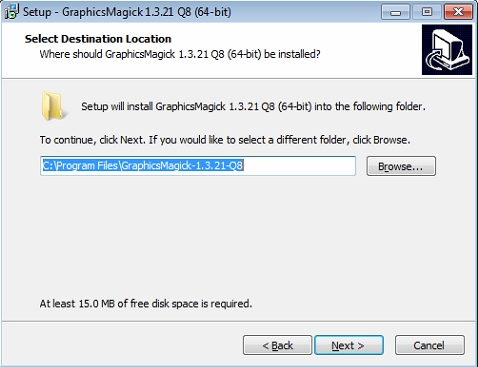
The installer allows you to select the installation folder (with a standard default, shown below):
![GM-install-folder.jpg]()
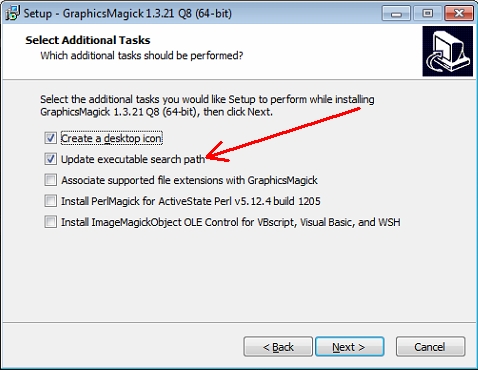
If you want to be able to call the GraphicsMagick command line without fully qualifying the executable (the .EXE file), tick the Update executable search path box in this installer dialog:
![GM-update-PATH.jpg]()
After installing GraphicsMagick into the default folder, you'll have a command line utility called gm.exe in, for example, Program Files\GraphicsMagick-1.3.21-Q8 (depending, of course, on the Quantum Depth version and the current release number). If you allowed the installer to update your PATH variable (shown above), you'll be able to run gm.exe without fully qualifying it (in other words, gm instead of C:\Program Files\GraphicsMagick-1.3.21-Q8\gm ).
The second step in the solution is to copy the following four lines of code into a batch (.BAT) file:
Of course, change the starting folder and quality setting (see below) to whatever you want. If you did not let the installer update your PATH variable, you'll need to fully qualify gm in the batch file. If you're not familiar with the FOR /R statement in a batch file, the quick summary is that it Recurses (loops/traverses) through subfolders executing a command in each one — in this case, the DO command, which, in combination with the PUSHD and POPD commands, will then execute the gm mogrify call in each folder. The (.) parameter means that the FOR /R statement will recurse into all subfolders to an unlimited depth. You may learn more about these batch file techniques here:
FOR /R
DO
PUSHD
POPD
When you're ready to perform the mass compression, simply run the batch file, but before you do, see the caveats below.
Two important caveats:
(1) The mogrify sub-command overwrites the existing file with no warning — be careful! To be safe, you may want to save a copy of the folders/files in a different location before running the script. Beyond just a safety measure, you may want to retain a copy of the original files in their original folder/subfolders hierarchy, in which case copying them to a different root folder with your favorite copy utility is an easy way to do it.
(2) The -quality option value (xxx in the code above) is your ticket to the reduced file size. Possible values are 0 (lowest quality, smallest file size) to 100 (highest quality, largest file size — and in all tests that I've done, larger than the original file). For example, here are the results of a test on a JPG file that was 1521 KB:
I suggest experimenting with several quality settings on a few of your files in order to determine a balance of quality and file size that you're happy with — before turning it loose on a massive set of folders.
One final point about the gm command line call. This article has focused on the mogrify sub-command, because its very definition is to overwrite the original image, which was the requirement in the question that inspired this article. However, gm has another sub-command called convert, which allows specification of an output file so that the original image is not overwritten. The syntax of the gm call with convert is:
gm convert options input-file options output-file
For example:
gm convert -quality 50 ImageIn.jpg ImageOut.jpg
That would apply the quality setting of 50 to ImageIn.jpg, creating ImageOut.jpg, without modifying ImageIn.jpg.
The complete syntax for the GraphicsMagick command line utility is here:
http://www.graphicsmagick.org/GraphicsMagick.html
If you find this article to be helpful, please click the thumbs-up icon below. This lets me know what is valuable for EE members and provides direction for future articles. Thanks very much! Regards, Joe
The solution presented in this article meets those requirements. It is based on the excellent software package, GraphicsMagick (a fork of ImageMagick). GraphicsMagick is free (in every sense of the word), distributed under the MIT License.
The first step in the solution is to download and install GraphicsMagick from SourceForge (the latest release as of this article's publication is 1.3.21). The download folder looks like this:
 So the choices are:
GraphicsMagick-1.3.21-Q8-w
GraphicsMagick-1.3.21-Q16-
GraphicsMagick-1.3.21-Q8-w
GraphicsMagick-1.3.21-Q16-
As you can see in the file names above, there are two issues to consider with respect to the correct edition for you. The first is the so-called Quantum Depth. There are two possibilities — Quantum Depth of 8 (Q8) and Quantum Depth of 16 (Q16). The quick summary is that Q8 supports 24/32 bit pixel depth color, requires less in the way of resources (CPU and RAM), and is adequate for typical pictures/photos; Q16 supports 48/64 bit pixel depth color, requires more in the way of resources (CPU and RAM), and may prove to be the right choice for film, medical/scientific images, and images with minimal contrast.
The second issue is whether you are running 32-bit or 64-bit Windows. The installers shown above with win32 in the file names will run on both 32-bit and 64-bit Windows; the ones with win64 in the file names will run only on 64-bit Windows. The advantage of the 64-bit editions is, in a word, speed! Because they can handle large images in memory (without hard drive read/write activity), performance may be significantly improved, although modern Solid State Drives (SSDs) negate that performance to some extent (but image processing in RAM is still faster than SSD — and much faster than HDD).
The installer says that the user "may" need Admin privilege to install it. I don't know how to interpret "may", but I can say that I installed it on a W7 Pro 64-bit system via an Administrator account (but did not install it elevated) and it worked fine.
The installer allows you to select the installation folder (with a standard default, shown below):
If you want to be able to call the GraphicsMagick command line without fully qualifying the executable (the .EXE file), tick the Update executable search path box in this installer dialog:
After installing GraphicsMagick into the default folder, you'll have a command line utility called gm.exe in, for example, Program Files\GraphicsMagick-1.3.2
The second step in the solution is to copy the following four lines of code into a batch (.BAT) file:
FOR /R "C:\StartingFolder\" %%G in (.) DO (
                        PUSHD %%G
                        gm mogrify -quality xxx *.jpg
POPD )Of course, change the starting folder and quality setting (see below) to whatever you want. If you did not let the installer update your PATH variable, you'll need to fully qualify gm in the batch file. If you're not familiar with the FOR /R statement in a batch file, the quick summary is that it Recurses (loops/traverses) through subfolders executing a command in each one — in this case, the DO command, which, in combination with the PUSHD and POPD commands, will then execute the gm mogrify call in each folder. The (.) parameter means that the FOR /R statement will recurse into all subfolders to an unlimited depth. You may learn more about these batch file techniques here:
FOR /R
DO
PUSHD
POPD
When you're ready to perform the mass compression, simply run the batch file, but before you do, see the caveats below.
Two important caveats:
(1) The mogrify sub-command overwrites the existing file with no warning — be careful! To be safe, you may want to save a copy of the folders/files in a different location before running the script. Beyond just a safety measure, you may want to retain a copy of the original files in their original folder/subfolders hierarchy, in which case copying them to a different root folder with your favorite copy utility is an easy way to do it.
(2) The -quality option value (xxx in the code above) is your ticket to the reduced file size. Possible values are 0 (lowest quality, smallest file size) to 100 (highest quality, largest file size — and in all tests that I've done, larger than the original file). For example, here are the results of a test on a JPG file that was 1521 KB:
-quality 0       51 KB
                      -quality 25     283 KB
                      -quality 50     436 KB
                      -quality 75     627 KB
                      -quality 90    1521 KB
-quality 100 2863 KBI suggest experimenting with several quality settings on a few of your files in order to determine a balance of quality and file size that you're happy with — before turning it loose on a massive set of folders.
One final point about the gm command line call. This article has focused on the mogrify sub-command, because its very definition is to overwrite the original image, which was the requirement in the question that inspired this article. However, gm has another sub-command called convert, which allows specification of an output file so that the original image is not overwritten. The syntax of the gm call with convert is:
gm convert options input-file options output-file
For example:
gm convert -quality 50 ImageIn.jpg ImageOut.jpg
That would apply the quality setting of 50 to ImageIn.jpg, creating ImageOut.jpg, without modifying ImageIn.jpg.
The complete syntax for the GraphicsMagick command line utility is here:
http://www.graphicsmagick.org/GraphicsMagick.html
If you find this article to be helpful, please click the thumbs-up icon below. This lets me know what is valuable for EE members and provides direction for future articles. Thanks very much! Regards, Joe
50+ years in computers
EE FELLOW 2017 — first ever recipient of Fellow award
MVE 2015,2016,2018
CERTIFIED GOLD EXPERT
DISTINGUISHED EXPERT
EE FELLOW 2017 — first ever recipient of Fellow award
MVE 2015,2016,2018
CERTIFIED GOLD EXPERT
DISTINGUISHED EXPERT
Have a question about something in this article? You can receive help directly from the article author. Sign up for a free trial to get started.
Comments (5)
Commented:
Author
Commented:Commented:
Keep Smiling, Shining & Rising always !!!
Stay blessed :-) & spread knowledge all over the globe :-)
Commented:
Author
Commented:https://sourceforge.net/p/graphicsmagick/patches/45/
I haven't tried this and am curious about it, so if you give it a spin, please post your results.
Thanks, Joe