Custom Image from a Screenshot


Microsoft SQL Server database developer, architect, and author specializing in Business Intelligence, ETL, and Data Warehousing.
Published:
Browse All Articles > Custom Image from a Screenshot
Here's a quick and dirty way to create an custom image from a screenshot for use in Experts Exchange questions, articles, or any document using a Windows PC that does not require installing extra software, and creates a compact image of what you wish to display that does not show any unneeded back
Capture the screenshot
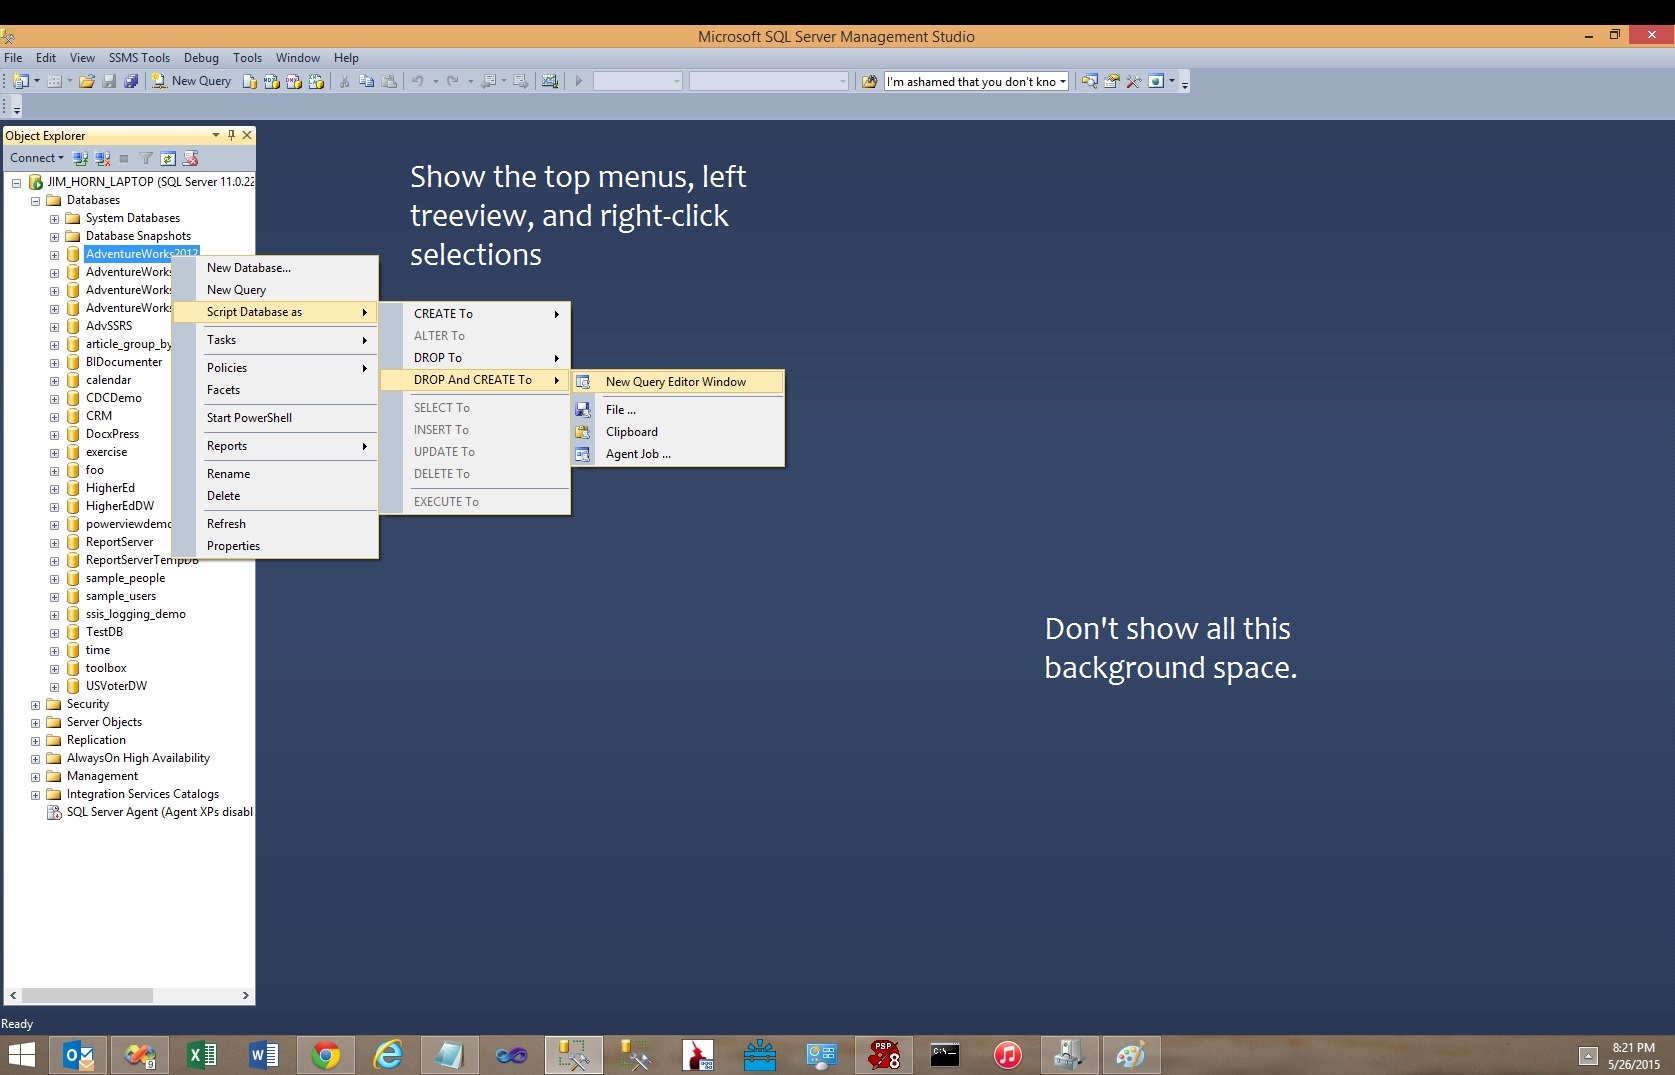
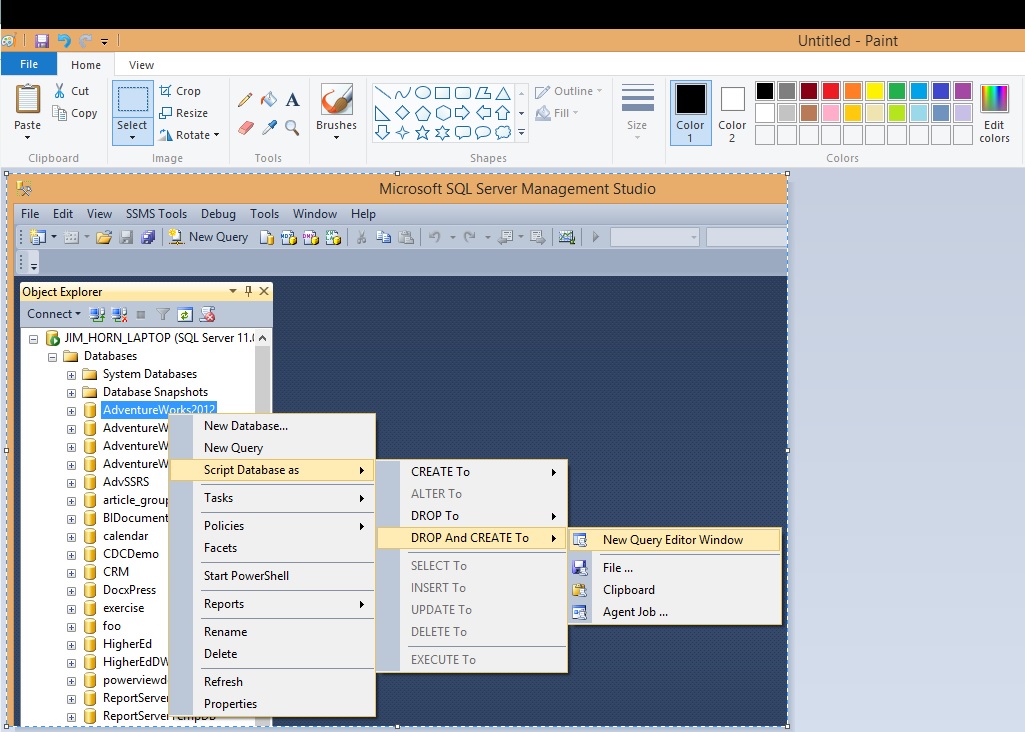
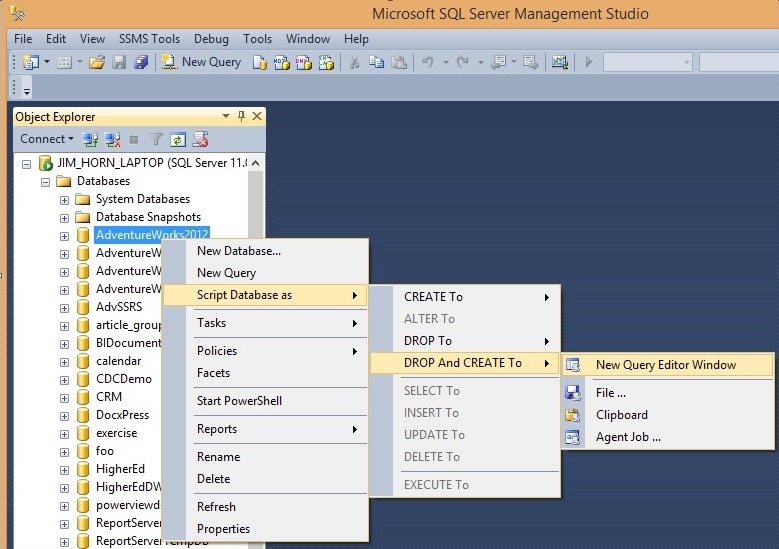
Prep your screen to show as much info related to your question in as small space as possible but still readable. If this involves multiple windows or forms, tile them to show the relevant info of each. Important if you want a browser url and a popup form on the same image, but don't want the browser page to take up the whole screen. If this involves a right-click path, then click the entire path. See below image, a complete path in SQL server of right-click and selections to create a new DROP-CREATE database script, with the remaining background that is of no use to the reader.
![mspaint-image-original-size.jpg]() To copy the screen display into the clipboard hit the Print Screen button maybe be a Ctrl + something based on your keyboard)
To copy the screen display into the clipboard hit the Print Screen button maybe be a Ctrl + something based on your keyboard)
To paste the screen display into Microsoft Paint for future editing, select the Start button > run (or Windows button-X > Run for Windows 8 and above) ...![start-run-windows-8.jpg]() ... and type mspaint.exe and click the Ok button (second image below).
... and type mspaint.exe and click the Ok button (second image below).
![run-mspaint.jpg]() Microsoft Paint will appear with a blank image.
Microsoft Paint will appear with a blank image.
![mspaint-blank.jpg]() Hold the Ctrl button down and hit the V key (Ctrl-V) to paste, which pastes your screenshot into MSPaint (below image). If this doesn't work, go back to your screen display and select Print Screen again. Once you have that screen shot in MSPaint, you may have to use the horizontal scroll bar to navigate to the right if you are running dual or triple monitors, and vertical scroll bars to size.
Hold the Ctrl button down and hit the V key (Ctrl-V) to paste, which pastes your screenshot into MSPaint (below image). If this doesn't work, go back to your screen display and select Print Screen again. Once you have that screen shot in MSPaint, you may have to use the horizontal scroll bar to navigate to the right if you are running dual or triple monitors, and vertical scroll bars to size.
Note that the below images shows the full left nav path, which is very easy to understand.
![mspaint-select.jpg]() Create the image
Create the image
Now to select only the part of the screen display to save as an image, hit the Select button (above image, purple arrow), click and hold on the upper left corner of what will be your image (green arrow), drag to lower right corner (red arrow), let go.
To copy the selected range into the clipboard hold the Ctrl button down and hit the C key (Ctrl-C).
To paste into a new image go to the File ribbon tab > New... > (below image, black arrow).
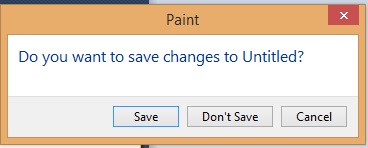
![mspaint-file-new.png]() When asked if you want to save changes, select Don't Save. This will result in another blank image.
When asked if you want to save changes, select Don't Save. This will result in another blank image.
![do-you-want-to-save-changes.jpg]() Ctrl-V to paste. Now you have an image that is only the information needed.
Ctrl-V to paste. Now you have an image that is only the information needed.
![mspaint-image-sized-correctly.jpg]() Arrows, Rectangles, and Text
Arrows, Rectangles, and Text
If you wish, use the shapes to draw on the image to focus on whatever your main point for having the image is Useful when demonstrating an action such as click here, select this, do this first then that second, etc.
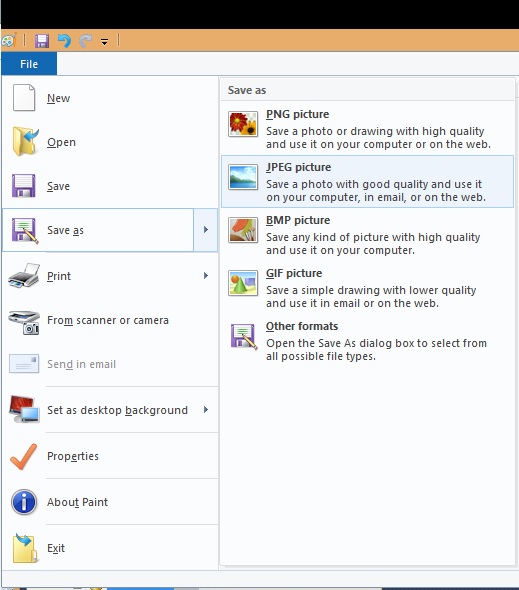
Down-arrow ribbon tab > Save As ... > save it somewhere in jpg or gif format.
![mspaint-save-as.jpg]() And here's the finished image!
And here's the finished image!
![finished-image.jpg]() Use the image
Use the image
Then go back into your EE question and upload using the image button(below image, red arrow). It is important to use the image button and not any file attach funcationality, as file attach forces a user to click on the attachment to view the image, then click back and forth between the question and the image to get a full understanding.
![ask-question-buttons.jpg]()
Thank you for reading my article, please leave valuable feedback. If you liked this article would like to see more, please click the Good Article button at the bottom, and leave me a comment on what you'd like to see next.
I look forward to hearing from you. - Jim - ( LinkedIn ) ( Twitter )
Prep your screen to show as much info related to your question in as small space as possible but still readable. If this involves multiple windows or forms, tile them to show the relevant info of each. Important if you want a browser url and a popup form on the same image, but don't want the browser page to take up the whole screen. If this involves a right-click path, then click the entire path. See below image, a complete path in SQL server of right-click and selections to create a new DROP-CREATE database script, with the remaining background that is of no use to the reader.
 To copy the screen display into the clipboard hit the Print Screen button maybe be a Ctrl + something based on your keyboard)
To paste the screen display into Microsoft Paint for future editing, select the Start button > run (or Windows button-X > Run for Windows 8 and above) ...
 ... and type mspaint.exe and click the Ok button (second image below).
 Microsoft Paint will appear with a blank image.
 Hold the Ctrl button down and hit the V key (Ctrl-V) to paste, which pastes your screenshot into MSPaint (below image). If this doesn't work, go back to your screen display and select Print Screen again. Once you have that screen shot in MSPaint, you may have to use the horizontal scroll bar to navigate to the right if you are running dual or triple monitors, and vertical scroll bars to size.
Note that the below images shows the full left nav path, which is very easy to understand.
 Create the image
Now to select only the part of the screen display to save as an image, hit the Select button (above image, purple arrow), click and hold on the upper left corner of what will be your image (green arrow), drag to lower right corner (red arrow), let go.
To copy the selected range into the clipboard hold the Ctrl button down and hit the C key (Ctrl-C).
To paste into a new image go to the File ribbon tab > New... > (below image, black arrow).
 When asked if you want to save changes, select Don't Save. This will result in another blank image.
 Ctrl-V to paste. Now you have an image that is only the information needed.
 Arrows, Rectangles, and Text
If you wish, use the shapes to draw on the image to focus on whatever your main point for having the image is Useful when demonstrating an action such as click here, select this, do this first then that second, etc.
- Arrows - Add focus to a specific location
- Click on the Arrow button that points in the direction you wish.
- Click on the Color 1 button and change to the color you wish.
- Click on the Color 2 button and change to the same color as Color 1.
- Click on the Fill button and change to Solid Color
- Then click and hold on your image to where you want one corner of the arrow to display, drag to the other corner, and let go of the click button.
- Rectanges without fill - Add focus to a specific location
- Same directions as above but click on the rectangle Shape button instead of an arrow.
- Rectangles with fill - Shade out a specific location, such as connection information or passwords.
- Same directions as above without the Color 2 / Fill steps.
- Text
- Click on the 'A' button in the Tools section, click on the image, and start typing. You can only change the Font and Background before clicking away from the text. Otherwise, to change the text you'll have to Undo with Ctrl-Z and start over.
Down-arrow ribbon tab > Save As ... > save it somewhere in jpg or gif format.
 And here's the finished image!
 Use the image
Then go back into your EE question and upload using the image button(below image, red arrow). It is important to use the image button and not any file attach funcationality, as file attach forces a user to click on the attachment to view the image, then click back and forth between the question and the image to get a full understanding.

Thank you for reading my article, please leave valuable feedback. If you liked this article would like to see more, please click the Good Article button at the bottom, and leave me a comment on what you'd like to see next.
I look forward to hearing from you. - Jim - ( LinkedIn ) ( Twitter )
Microsoft SQL Server database developer, architect, and author specializing in Business Intelligence, ETL, and Data Warehousing.
Have a question about something in this article? You can receive help directly from the article author. Sign up for a free trial to get started.
Comments (1)
Commented: