Slipstreaming Software


Veteran in computer systems, malware removal and ransomware topics. I have been working in the field since 1985.
Published:
Browse All Articles > Slipstreaming Software
I wrote an article some time ago with a reference to nLite slipstreaming software. I recently changed that link to point to NTLite, the updated version of the same software. nLite was an excellent tool but was not really compatible with Windows Vista and above. Recently, when I was updating some machines I decided to revisit the slipstreaming idea, mainly because when I install Windows 7 with Service Pack 1 it still has a couple of hundred updates to do. This makes a new system seem already slow.
Afer doing a little investigation I found that the author of nlite had written NTLite for newer operating systems. Using a combination of Widows Update Downloader, either your current install of windows or a generic installer disk, and NTLite you can slipstream all updates into a single installer device as well as make it unattended (we have a site license), remove or add items during installation, personalize the install, and even run applications after the installation is complete (there is even more included - visit the website to see it all).
The installation was very easy. I found that the most time was spent downloading updates using Windows Update Downloader. Although the NTLite app is excellent, there is one downside (at least that I have seen so far), you must remember to unload the image once you are finished. If you don't, NTLite leaves a large image directory in the temp directory on your machine (about 10-15gb depending on the updates). The directory, on a windows 7 pro box, is C:\Users\[username]\AppData\Local\Temp\imgMntxx and on one machine was just over 14gb. Deleting the directory before unloading the image in NTLite and completely uninstalling NTLite, resulted in my computer Blue Screening. This is apparently not uncommon. So be very careful deleting anything after installing this software (or "cavendum sit user" - let the user beware). Make a backup before installing the software and after the first run.
How I created a slipstreamed version of Windows 7 Pro:
Starting NTLite and loading the image is done in a succession of steps and should be done carefully.
When you start NTLite it will detect the current windows install as one source of your image - you can use that, although I don't recommend it unless you are using a virtual machine only for this purpose.
![005---initial-screen.PNG]()
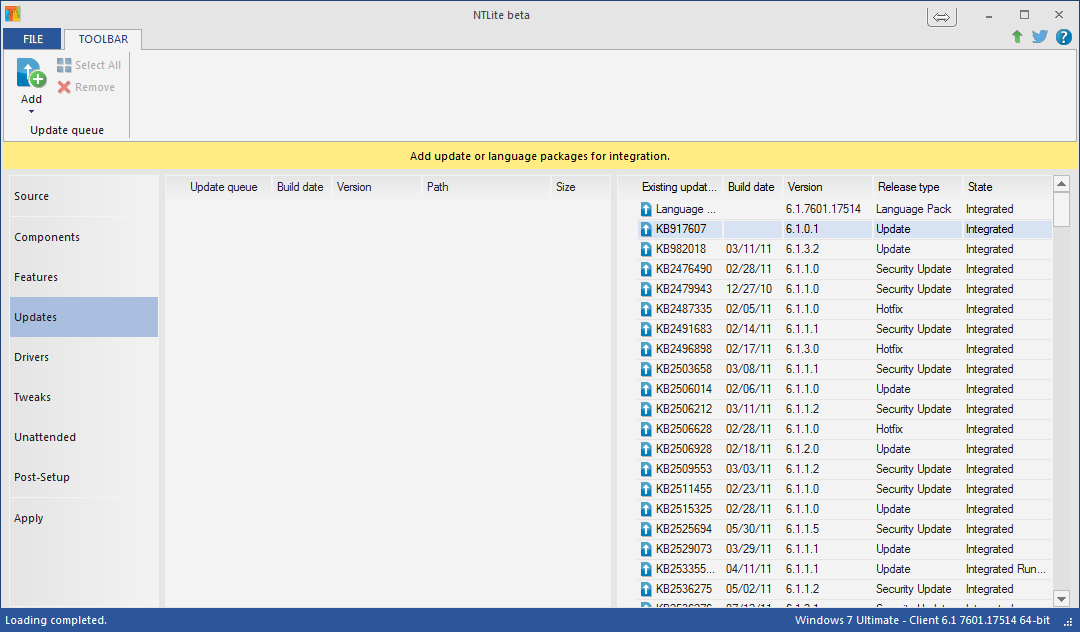
Once you have downloaded the updates you can add them to your slipstreamed image simply by designating the folder where they have been downloaded in the NTLite application.
![035---updatees-loaded.PNG]()
To download the software, the updates and then to slipstream everything with either your generic Windows 7 distribution, or your current Windows install, takes upwards of 4 hours.
I highly recommend that if you wish to do this, download the updates and create the iso on something other than your boot drive. Once you are done, unless you have room to spare on your boot device, unmont the image, and uninstall the NTLite software. You can always reinstall at a later time. If you have the resources and space, do everything in a virtual machine - just in case.
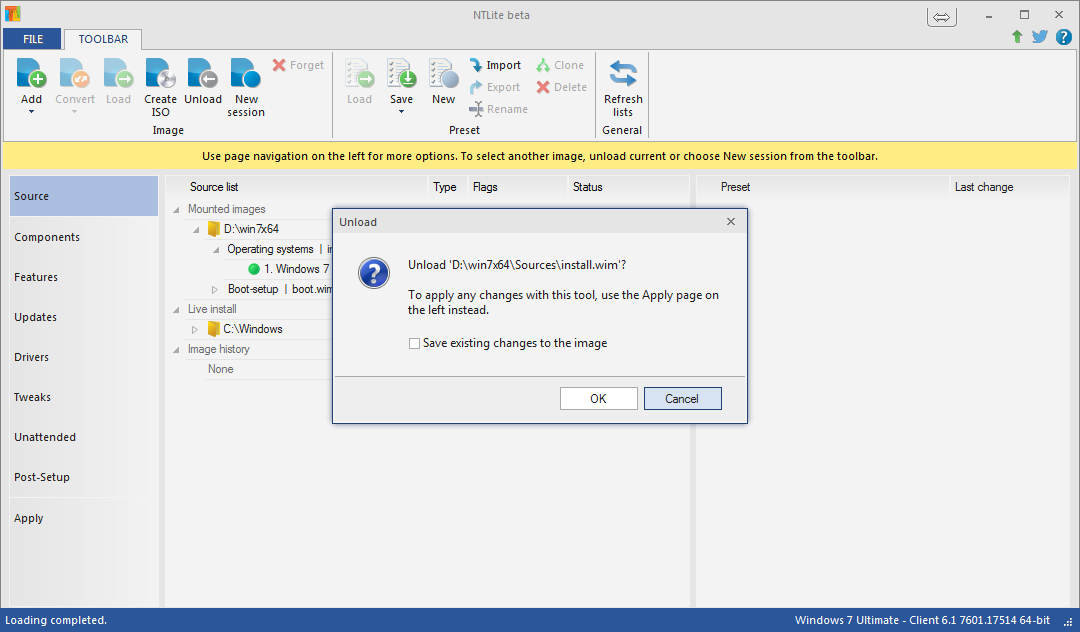
![040---unload-image-dialog.PNG]() On the first machine I tried this on, I didn't know about unloading the image BEFORE closing the program. The machine lost 14gb of RAM in a temp directory (see above), which I eventually deleted causing the machine to generate a BSOD and repeatedly reboot. On the next machine, I carefully unloaded the image once I was done and the temp directory disappeared! I didn't have to uninstall the app at all.
On the first machine I tried this on, I didn't know about unloading the image BEFORE closing the program. The machine lost 14gb of RAM in a temp directory (see above), which I eventually deleted causing the machine to generate a BSOD and repeatedly reboot. On the next machine, I carefully unloaded the image once I was done and the temp directory disappeared! I didn't have to uninstall the app at all.
Although nLite worked flawlessly, NTLite is not as easy a process. it is harder to get good bootable media using this app, so be careful and make lots of backups.
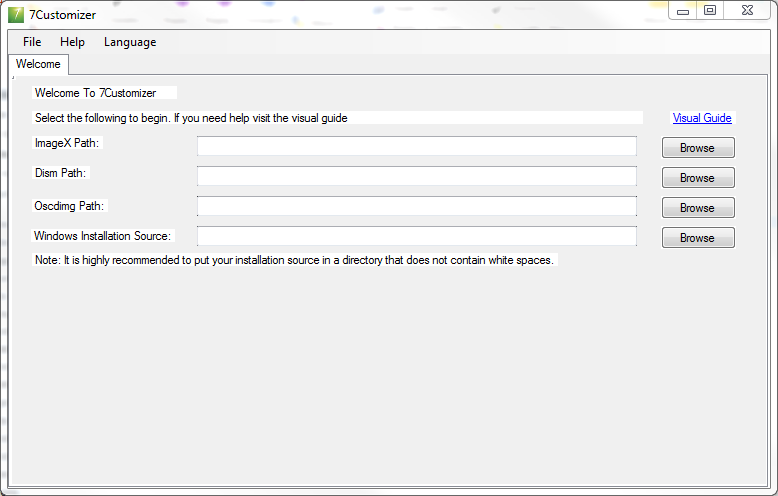
In doing more research I found this article on NTLite. It should be noted that 7Customizer is another tool to create slipstreammed installs for Windows 7, but I do not see that it will work with Windows OSes above 7. I also find it a bit more confusing than NTLite (looking at both of them with an eye towards clarity for the end user).
![050---7customizer-start-screen.PNG]()
Afer doing a little investigation I found that the author of nlite had written NTLite for newer operating systems. Using a combination of Widows Update Downloader, either your current install of windows or a generic installer disk, and NTLite you can slipstream all updates into a single installer device as well as make it unattended (we have a site license), remove or add items during installation, personalize the install, and even run applications after the installation is complete (there is even more included - visit the website to see it all).
The installation was very easy. I found that the most time was spent downloading updates using Windows Update Downloader. Although the NTLite app is excellent, there is one downside (at least that I have seen so far), you must remember to unload the image once you are finished. If you don't, NTLite leaves a large image directory in the temp directory on your machine (about 10-15gb depending on the updates). The directory, on a windows 7 pro box, is C:\Users\[username]\App
How I created a slipstreamed version of Windows 7 Pro:
- First I downloaded NTLite from ntlite.com
- I downloaded Windows Update Downloader program file
- I downloaded the appropriate list of updates from the windows update dowloader site (I downloaded the windows 7 Service Pack 1 x64 list) - It should be noted that the best way to do this is to start WUD first and then click the plus button to add a list. This will take you to the lists page where you can choose the list that best suits your needs. Once it is downloaded simply double click it to install it into WUD.
- I followed the instructions on this page to create first an ISO which I then made into a bootable USB Stick
- This may take some time to complete and you may have to restart several times, but the download will precede from where it left off.
Starting NTLite and loading the image is done in a succession of steps and should be done carefully.
When you start NTLite it will detect the current windows install as one source of your image - you can use that, although I don't recommend it unless you are using a virtual machine only for this purpose.

Once you have downloaded the updates you can add them to your slipstreamed image simply by designating the folder where they have been downloaded in the NTLite application.
To download the software, the updates and then to slipstream everything with either your generic Windows 7 distribution, or your current Windows install, takes upwards of 4 hours.
I highly recommend that if you wish to do this, download the updates and create the iso on something other than your boot drive. Once you are done, unless you have room to spare on your boot device, unmont the image, and uninstall the NTLite software. You can always reinstall at a later time. If you have the resources and space, do everything in a virtual machine - just in case.
 On the first machine I tried this on, I didn't know about unloading the image BEFORE closing the program. The machine lost 14gb of RAM in a temp directory (see above), which I eventually deleted causing the machine to generate a BSOD and repeatedly reboot. On the next machine, I carefully unloaded the image once I was done and the temp directory disappeared! I didn't have to uninstall the app at all.
Although nLite worked flawlessly, NTLite is not as easy a process. it is harder to get good bootable media using this app, so be careful and make lots of backups.
In doing more research I found this article on NTLite. It should be noted that 7Customizer is another tool to create slipstreammed installs for Windows 7, but I do not see that it will work with Windows OSes above 7. I also find it a bit more confusing than NTLite (looking at both of them with an eye towards clarity for the end user).
Veteran in computer systems, malware removal and ransomware topics. I have been working in the field since 1985.
Have a question about something in this article? You can receive help directly from the article author. Sign up for a free trial to get started.
Comments (11)
Commented:
http://catalog.update.micr
you need to use Internet Explorer for the link to work.
Author
Commented:Commented:
Author
Commented:Commented:
View More