

Browse All Articles > Creating Lead Queues in Salesforce.com
Note: You must have administrative privileges in order to configure lead or case queues.
Salesforce.com is a cloud-based customer relationship management (CRM) system. It is widely used around the world by sales and marketing professionals. It is used to track a buyer's journey from prospect to closed business. CRMs are databases that are used to help sales and marketing keep track of potential, current and past customers.
What are queues? Queues are used to manage the distribution of leads, cases or other custom objects. The main function of queues is to create a “pool” of leads or cases for your users to pull from. This is especially helpful when you have multiple users sharing a region and don’t have the ability to round-robin assign. Queues are also helpful if you have a user out sick or on vacation, and don’t want leads/cases routed exclusively to them. Records remain in the queue until they are assigned to an individual user.
Another advantage of a queue is that each user in that queue has initial read/write access to that lead or case. Ordinarily, depending on the sharing/visibility rules you have in place for each user and their role, not all users may have visibility into each other's assigned leads or cases. Queues help circumvent those rules rather than having to reconfigure them.
Here are the steps on how to create and set up lead queues for your users.
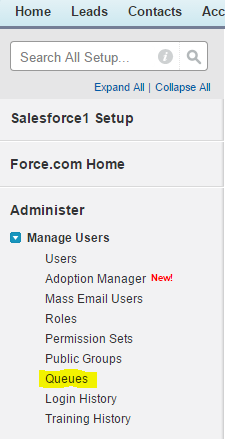
1. Go to Setup > Administer > Manage Users > Queues
![Image-1.png]() When you click on Queues that window will come up with any Queues you currently have set up. To create a new queue, click New in the center of your screen.
When you click on Queues that window will come up with any Queues you currently have set up. To create a new queue, click New in the center of your screen.
![Image-2.png]()
2. Name the Queue and also give it a unique name (the unique name will auto-populate once you fill out the Label field. Feel free to customize the Unique Queue Name, as I have done below.
The next section shows supported objects. Select the object that you want to create a queue for – In this case, I will pick Lead (for assignment rules).
![Image-3.png]()
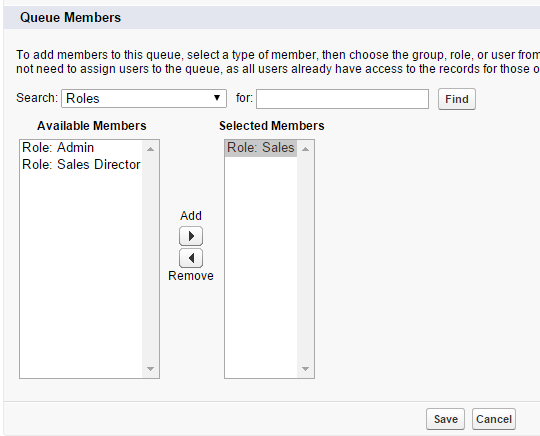
3. Select members of that queue. You can pick by individual user or roles or both. Add all you want and click save. Here, I only want the Sales Role to be able to pick from this queue. If you select by role, hierarchy rules will follow, so even though below I didn’t select Sales Director and Admin, they will still have read/write access to those members of the queue because they have visibility over the Sales Role due to their spot in the hierarchy.
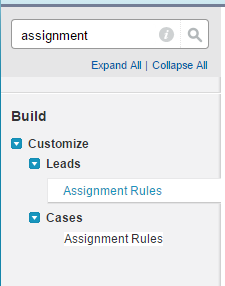
![Image-4.png]() 4. Go back to your side navigation, Select Build > Customize > Leads > Assignment Rules. You can also type in assignment on the search bar (below) for quicker navigation of the side panel.
4. Go back to your side navigation, Select Build > Customize > Leads > Assignment Rules. You can also type in assignment on the search bar (below) for quicker navigation of the side panel.
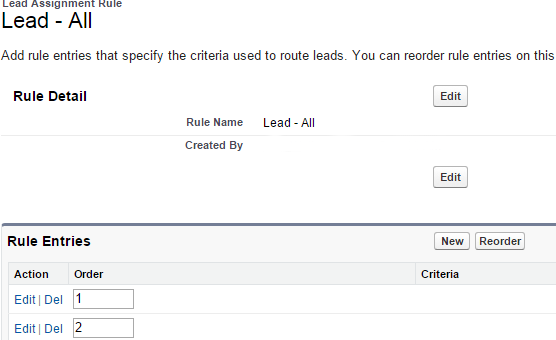
![Image-5.png]() 5. Navigate to your assignment rules. Here, you can create a new rule or edit an existing one. Assignment rules are rules that govern how each lead is assigned to each specific user or queue. This acts like a waterfall. If the lead/case does not meet the criteria for Rule #1, it will next see if it meets rule #2, and it will continue down the line. Criteria can be based on just about any field on the lead object, such as State, Country, Area Code, etc.
5. Navigate to your assignment rules. Here, you can create a new rule or edit an existing one. Assignment rules are rules that govern how each lead is assigned to each specific user or queue. This acts like a waterfall. If the lead/case does not meet the criteria for Rule #1, it will next see if it meets rule #2, and it will continue down the line. Criteria can be based on just about any field on the lead object, such as State, Country, Area Code, etc.
![Image-6.png]() 6. Click new to add a rule entry, or edit one that is already existing.
6. Click new to add a rule entry, or edit one that is already existing.
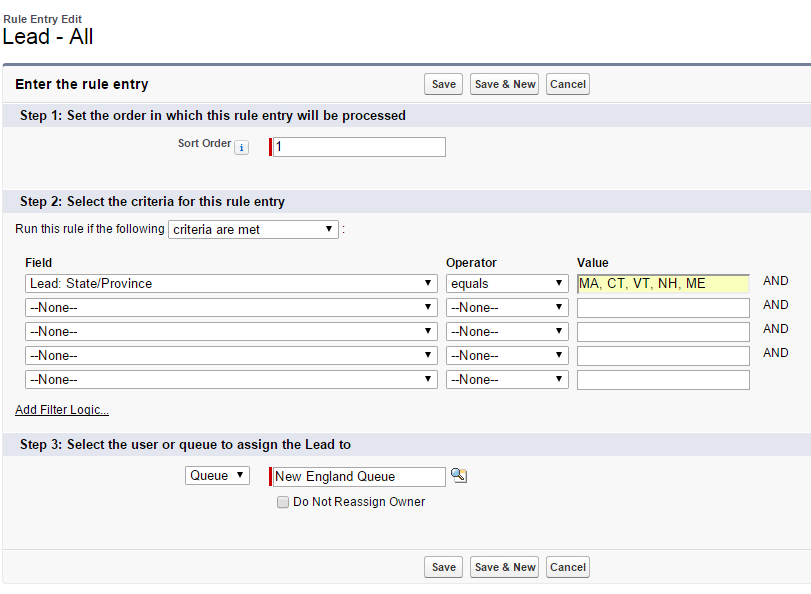
![Image-7.png]() Assign the sort order for your new rule,
Assign the sort order for your new rule,
7. Use the field filters to create the criteria for that lead to be assigned into that queue. Step 3, select the queue to assign to. Finally, click save. (See example below for a New England territory).
![Image-8.png]()
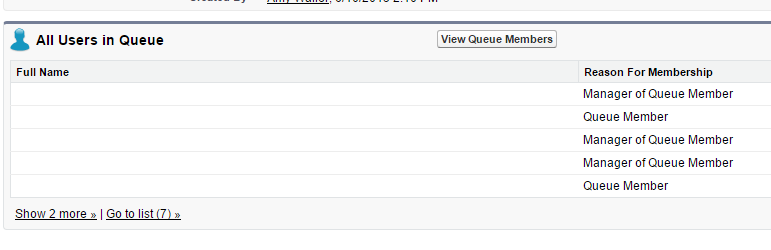
8. Go back into the Lead Assignment Queue (under manage users on your left hand navigation).
You can View All Users to double check that the right people can see the leads in the queue. It will show who can view the queue, and also why. In this example, the sales managers are included because due to their rank in the hierarchy, they can also view the queue.
![Image-9.png]() You have finished setting up your queue! But, your work isn’t over yet.
You have finished setting up your queue! But, your work isn’t over yet.
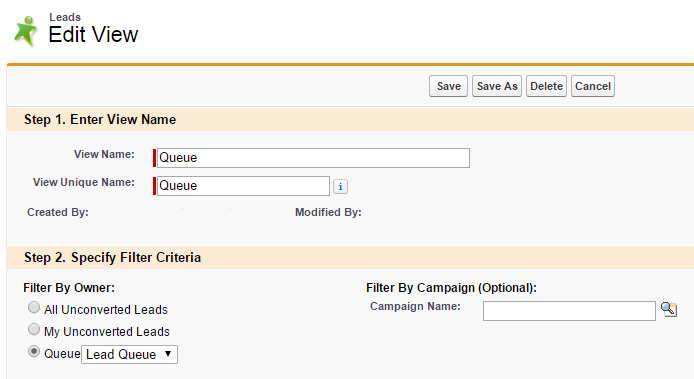
9. Have your individual users each set up their Lead View to view all leads in the queue. They can access this through the Leads tab and by clicking Create New View. Name the view, and then select your filter criteria by filtering By Owner > Queue > “your new queue”. Then, click save to see all leads in that queue.
![Image-13.png]() Each user is now ready to pull from a pool of leads. The leads will be assigned to the Queue and not the individual user. As users claim and assign leads to themselves, or the manager assigns leads, the leads will leave the view.
Each user is now ready to pull from a pool of leads. The leads will be assigned to the Queue and not the individual user. As users claim and assign leads to themselves, or the manager assigns leads, the leads will leave the view.
Now that you have set up queues, make sure you train your users to utilize them. Create as many queues as you want to help cover and share workloads of leads more effectively, and across multiple users.
If you are looking to create queues with Cases, follow the same steps above, but instead of working off of the Lead Object, work with the Case Object and Case Assignments.
Thank you for reading my article, please feel free to leave feedback regarding this content or to recommend future work. Visit my profile to read additional Salesforce.com content.
If you liked this article, please click the "Good Article?" button.
Salesforce.com is a cloud-based customer relationship management (CRM) system. It is widely used around the world by sales and marketing professionals. It is used to track a buyer's journey from prospect to closed business. CRMs are databases that are used to help sales and marketing keep track of potential, current and past customers.
What are queues? Queues are used to manage the distribution of leads, cases or other custom objects. The main function of queues is to create a “pool” of leads or cases for your users to pull from. This is especially helpful when you have multiple users sharing a region and don’t have the ability to round-robin assign. Queues are also helpful if you have a user out sick or on vacation, and don’t want leads/cases routed exclusively to them. Records remain in the queue until they are assigned to an individual user.
Another advantage of a queue is that each user in that queue has initial read/write access to that lead or case. Ordinarily, depending on the sharing/visibility rules you have in place for each user and their role, not all users may have visibility into each other's assigned leads or cases. Queues help circumvent those rules rather than having to reconfigure them.
Here are the steps on how to create and set up lead queues for your users.
1. Go to Setup > Administer > Manage Users > Queues
 When you click on Queues that window will come up with any Queues you currently have set up. To create a new queue, click New in the center of your screen.

2. Name the Queue and also give it a unique name (the unique name will auto-populate once you fill out the Label field. Feel free to customize the Unique Queue Name, as I have done below.
The next section shows supported objects. Select the object that you want to create a queue for – In this case, I will pick Lead (for assignment rules).

3. Select members of that queue. You can pick by individual user or roles or both. Add all you want and click save. Here, I only want the Sales Role to be able to pick from this queue. If you select by role, hierarchy rules will follow, so even though below I didn’t select Sales Director and Admin, they will still have read/write access to those members of the queue because they have visibility over the Sales Role due to their spot in the hierarchy.
 4. Go back to your side navigation, Select Build > Customize > Leads > Assignment Rules. You can also type in assignment on the search bar (below) for quicker navigation of the side panel.
 5. Navigate to your assignment rules. Here, you can create a new rule or edit an existing one. Assignment rules are rules that govern how each lead is assigned to each specific user or queue. This acts like a waterfall. If the lead/case does not meet the criteria for Rule #1, it will next see if it meets rule #2, and it will continue down the line. Criteria can be based on just about any field on the lead object, such as State, Country, Area Code, etc.
 6. Click new to add a rule entry, or edit one that is already existing.
 Assign the sort order for your new rule,
7. Use the field filters to create the criteria for that lead to be assigned into that queue. Step 3, select the queue to assign to. Finally, click save. (See example below for a New England territory).
8. Go back into the Lead Assignment Queue (under manage users on your left hand navigation).
You can View All Users to double check that the right people can see the leads in the queue. It will show who can view the queue, and also why. In this example, the sales managers are included because due to their rank in the hierarchy, they can also view the queue.
 You have finished setting up your queue! But, your work isn’t over yet.
9. Have your individual users each set up their Lead View to view all leads in the queue. They can access this through the Leads tab and by clicking Create New View. Name the view, and then select your filter criteria by filtering By Owner > Queue > “your new queue”. Then, click save to see all leads in that queue.
 Each user is now ready to pull from a pool of leads. The leads will be assigned to the Queue and not the individual user. As users claim and assign leads to themselves, or the manager assigns leads, the leads will leave the view.
Now that you have set up queues, make sure you train your users to utilize them. Create as many queues as you want to help cover and share workloads of leads more effectively, and across multiple users.
If you are looking to create queues with Cases, follow the same steps above, but instead of working off of the Lead Object, work with the Case Object and Case Assignments.
Thank you for reading my article, please feel free to leave feedback regarding this content or to recommend future work. Visit my profile to read additional Salesforce.com content.
If you liked this article, please click the "Good Article?" button.
Have a question about something in this article? You can receive help directly from the article author. Sign up for a free trial to get started.
Comments (0)