How to Configure S/MIME in Office 365 - Explained

Published:
Browse All Articles > How to Configure S/MIME in Office 365 - Explained
S/MIME stands for Secure/Multipurpose Internet Mail Extensions and is used as a standard for digital signing of MIME data as well as for public key encryption. It is mainly based on PKCS standards, comes from RSA security and it uses MIME format for the message structuring and hence the name S/MIME. It is advanced form of MIME. S/MIME provides security such as; authentication, privacy, data security, message integrity, etc. It ensures that the emails are digitally signed and the content is unaltered. As said above that, S/MIME helps in encryption; it also enables the user to compose, encrypt, digitally sign, etc. between two organizations.
Configuring the S/MIME with Office 365 helps the user to secure their emails and thus, gives support to Outlook, Exchange server, OWA, etc. S/MIME provides many services for the email encryption such as; signed receipts, security labels, secure mailing list, signing certificates etc.
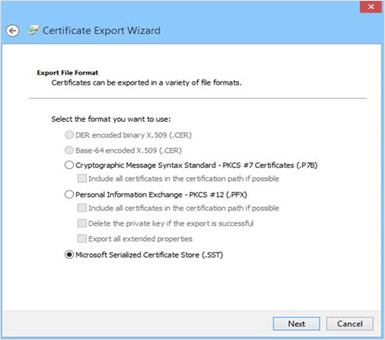
![img1.png]() Step 2: After exporting; choose Microsoft Serialized Certificate Store from Certificate Export Wizard. Press ‘Next’ button and then, on ‘Save’ for saving SST file.
Step 2: After exporting; choose Microsoft Serialized Certificate Store from Certificate Export Wizard. Press ‘Next’ button and then, on ‘Save’ for saving SST file.
![img2.png]()
Step 3: Uploading .SST file to 365 server
Use the remote PowerShell commands for updating;
Step 4: Issuing Certificate
Give the user’s certificate to Exchange Online Global Address List through Outlook 2013. If not, user cannot exchange encrypted message.
For Issuing:
![img3.png]()
![img4.png]() Step 5: Confirm certificate issued in AAD.
Step 5: Confirm certificate issued in AAD.
Verdict: Office 365 is deployed by Microsoft for the users to provide the services outside the network. It supports many applications and all are of latest versions. Enabling S/MIME with Office 365 will enable security to the mails of Outlook and Exchange server in Office 365. Many other applications such as; Lotus Notes, Netscape, etc. has already implemented the S/MIME support. S/MIME provides standard for encryption to emails.
Configuring the S/MIME with Office 365 helps the user to secure their emails and thus, gives support to Outlook, Exchange server, OWA, etc. S/MIME provides many services for the email encryption such as; signed receipts, security labels, secure mailing list, signing certificates etc.
Let us see the procedure for Enabling of S/MIME in Exchange Online of Office 365
For the configuration of S/MIME in Office 365, support of .SST files and End User’s Certificate is essential.- .SST file: It is a file which contains certificates, used for S/MIME validation in Office 365 and also used for validating website identities. SST is obtained from Certificate Authority.
- End User’s Certificate: It is obtained from Certificate Authority for encrypting messages as well as for signing.
The following are the routes for the configuration
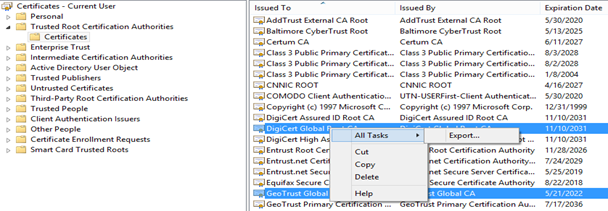
Step 1: Need to create .SST file. For exporting .SST file, you can use Certificate MMC.- Open certmgr.msc and explore through Trusted Root Certificate Authorities folder.
- Select ‘certificate’ folder within it.
- Choose CA Certificate for S/MIME.
- Export certificate by right clicking and selecting All Tasks-Export.
 Step 2: After exporting; choose Microsoft Serialized Certificate Store from Certificate Export Wizard. Press ‘Next’ button and then, on ‘Save’ for saving SST file.
Step 3: Uploading .SST file to 365 server
Use the remote PowerShell commands for updating;
$sst = Get-Content<sst file copied>.sst-Encoding Byte
Set-SmimeConfig – SMIMECertificateIssuingCA $sstStep 4: Issuing Certificate
Give the user’s certificate to Exchange Online Global Address List through Outlook 2013. If not, user cannot exchange encrypted message.
For Issuing:
- Select ‘Options’ from ‘File’ menu in Outlook 2013.
- In ‘Option’ choose Trust Center-Trust Center Settings-Email Security.
- From Trust Center window, select Settings and go for the certificate.
- Type Security Setting name and select Signing and Encryption Certificate from Change Security Setting window.
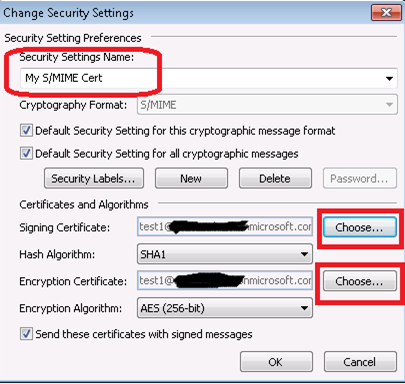
- Choose the default Algorithm and press ‘Ok’.
- Click on ‘Public to GAL’ button
- Press ‘Ok’.
 Step 5: Confirm certificate issued in AAD.
- Open Exchange Online using the PowerShell.
- Run commands and make sure UserSMimeCertificate impute is lived. If not, go to Step 4.
Verdict: Office 365 is deployed by Microsoft for the users to provide the services outside the network. It supports many applications and all are of latest versions. Enabling S/MIME with Office 365 will enable security to the mails of Outlook and Exchange server in Office 365. Many other applications such as; Lotus Notes, Netscape, etc. has already implemented the S/MIME support. S/MIME provides standard for encryption to emails.
Have a question about something in this article? You can receive help directly from the article author. Sign up for a free trial to get started.
Comments (1)
Commented:
Thanks,
Chris